- 7shared
- 0Facebook
- 3Twitter
- 0VKontakte
- 4Odnoklassniki
Reducing Windows startup time is one of the main goals of Microsoft developers, however, many computer owners who do not use the Fast Startup feature continue to face the problem of slow startup. As a rule, a newly installed system starts up quite quickly, but some time passes and it becomes obvious that the computer is taking a long time to boot. Most often this is due to completely natural reasons, although the presence of software and hardware problems cannot be ruled out.
In any case, if Windows 7/10 takes a very long time to load when turned on, it is advisable to find the reasons for this delay and eliminate it. Slow start of the system can be caused by autostart overloaded with applications, lack of disk space, severe fragmentation of the file system, contamination of the system unit, hardware malfunctions, the action of malware and other, less common reasons, which will be discussed below. But first things first.
Autoload analysis and cleaning
There are a lot of useful and necessary programs that are automatically added to startup during installation. Launching together with the Windows shell, they slow down the loading of the desktop, which is why the computer itself takes a long time to load when turned on. The solution is to clear the startup and remove all non-essential applications from it. This can be done in different ways.
The simplest one is to disable unnecessary programs in the Startup tab of the Task Manager. Having opened the Manager in any way convenient for you, switch to the specified tab and carefully examine its contents. Remove unnecessary applications from autostart by clicking on the corresponding entry and selecting “Disable” in the context menu.
If Windows 7/10 takes a long time to load due to resource-hungry programs in startup, this should solve the problem.
At the same time, we recommend checking the startup directory and removing shortcuts to unnecessary programs from there, if any. It is located at %USERPROFILE%/AppData/Roaming/Microsoft/Windows/Start Menu/Programs/Startup (you can get to it by running the short command shell:startup ). To clear startup for all computer users, go to the C:/ProgramData/Microsoft/Windows/Start Menu/Programs/StartUp directory.
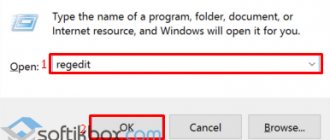
You can also remove programs from startup through the registry. the regedit command , open the registry editor, expand the HKEY_CURRENT_USER/Software/Microsoft/Windows/CurrentVersion/Run branch and delete unnecessary application entries in the right column.
A similar key is responsible for the startup contents for all users, but in the HKEY_LOCAL_MACHINE section.
Experienced users can recommend AutoRuns , a utility for managing startup. This small, but very powerful and effective tool allows you to monitor the operation of not only user programs, but also drivers, system services and modules.
Software problems
Let's take as a basis one axiom, which says: “the most powerful PC, if used incorrectly and carelessly, will slow down more than a guy on a first date.” Considering that many people buy a computer solely because of the coolness of the case, color and manufacturer (alas, this is true), the system quickly loses its advantage, turning into a storehouse of viruses, garbage and unnecessary system files.
In this section, we will talk about software reasons that directly affect the startup speed of your computer. Let's consider the following cases:
- startup;
- service processes;
- incorrectly installed OS;
- OS is too new or old;
- incorrect system configuration;
- old outdated drivers;
- ubiquitous Internet trash;
- disk fragmentation;
- viruses;
- third party controllers;
- abuse of “improvement programs”.
Did you think that dust and slow Internet were to blame for everything?
Startup and unnecessary services
How much this parameter irritates inexperienced users and attracts software creators of varying degrees of lousiness. For some reason, every manufacturer considers it their duty to organize the process of launching their application at system startup. Well, the PC owner simply does not read the file description when installing the program, clicking only “next” and “OK”. As a result, autoloading is filled with something like this:
- Yandex.Browser (that's a different story);
- Mail.Ru services (VK, Odnoklassniki, Moi Mir);
- games from Zynga and Gameloft;
- various links to casinos and slots;
- advertising banners and links;
- unnecessary antiviruses, defenders;
- viruses, etc.
In most cases, there are also replacements for familiar browsers, search engines and file opening programs. Well, the load on the processor is colossal at the time the system starts, because in addition to standard files, Windows has to process third-party tasks in huge quantities.
The “treatment” process is as follows:
- press the WIN+R key combination and enter the familiar msconfig command;
- go to the “Startup” tab (in Windows 10, the system will prompt you to go to the task manager);
- Uncheck all applications that are not Microsoft Corporation.
For Windows 10, you need to right-click on the program and select “disable”. Make an exception for antivirus software (Kaspersky, Avast, ESET), important instant messengers (Skype, Viber). Reboot your PC and check how much faster your boot times are.
Consequences of incorrect OS installation
How often have you heard the phrase “reinstall Windows and the problem will go away”? Probably every time something started to break or behave incorrectly. Is your system loading slowly? Surely the long-suffering OS is to blame, but how? Here are just a few reasons:
- during installation, the characteristics of the hardware were not taken into account (too weak, obsolete);
- bit depth was not taken into account (32 or 64 bits);
- two or more copies of Windows are installed on one disk;
- A different OS is installed on the PC, due to which they can sometimes conflict.
So, let's figure it out. Each operating system has its own minimum installation requirements. For Windows 10 they are as follows:
- processor: 1 GHz and higher (supporting SSE2, NX and PAE instructions);
- RAM: 1 GB for 32-bit (better - 2), 2 GB for 64-bit (better 4 and higher) versions;
- HDD: 16 GB (for 32-bit), 20 GB (for 64-bit) free space excluding updates and security patches (total another +10–15 GB);
- graphics accelerator supporting DirectX 9.
But these are only the minimum conditions for the OS to simply start. For full-fledged work, increase the amount of resources at least twice the minimum, while the amount of RAM for 32-bit Windows should be up to 4 GB (the system simply does not recognize more), for 64-bit - from 4, and preferably 8 or more GB . The size of logical drive “C” should be increased to 100–120 GB, if the HDD capacity allows it. The ideal option is a separate 120 GB SSD for the system.
Multiple OS on one PC is a useful idea, but only in some cases:
- you develop software and regularly check its performance for old and new versions of Windows;
- the computer is used for educational purposes;
- The old version runs programs and utilities that are not available on the latest OS.
Ask a knowledgeable person to help you get rid of duplicates if they are not being used. At the same time, free up additional space.
Finally, we note that a pirated version of Windows is a lottery. You can never be sure of its quality, stability and speed of work.
Drivers and controllers
The problem of the relevance of the driver for a particular device today is no longer as acute as it was 5–7 years ago. Most software updates automatically without the user even noticing it. Another thing is the ban on automatic downloading of new versions on the Internet. Either during the Windows installation process someone turned on the ban, or you, out of inexperience, clicked something in the wrong place.
We will deliberately not advertise various “driver packs”, since finding the optimal one today is increasingly difficult. Better to use the good old manual method:
- Click “start” and enter the command “device manager” in the search bar;
- select a specific item (for example, “video adapters”) and expand it by clicking the arrow on the left;
- Right-click on the hardware and select “update driver.”
- Select "Search for updated driver automatically."
Windows is not always able to find the latest version of software on the Internet, but the method is effective in 80% of cases.
The situation is similar with controllers. When the PC starts, the system reads all the necessary (and not so necessary) drivers and controllers of the connected devices. These include peripheral equipment (Wi-Fi and Bluetooth adapters, web cameras, scanners, printers, DVD drives). In Device Manager, you can disable unused hardware by performing the same manipulations as with the driver. Only instead of “update” you need to click “disable”. This should be done carefully and with knowledge of your PC. Otherwise, you may accidentally block the same graphics adapter.
Garbage and programs for visual decoration
Perhaps the most extensive problem of the modern generation, which does not at all monitor the amount of free disk space, regularly downloading films, music, pictures, programs and other content from the Internet with the thought “what if it comes in handy.” Dear users, according to statistics, you need more than 80% of the data from the global network 1-2 times, no more. In addition, today providers provide access to the network at very high speeds, so downloading something again will not be difficult.
To clean your system of debris, use the following utilities (at your own risk):
- Auslogics Boostspeed;
- CCleaner;
- SpeedUpMyPC;
- AVG Tune Up.
They all have a simple interface and allow you to do the following:
- optimize the file system;
- remove excess browser cache (history of Internet pages viewed);
- clean the registry;
- get rid of duplicate files;
- uninstall unused programs;
- optimize your PC settings.
I would also like to say something about software for visually decorating your desktop:
- RocketDock;
- rainmeter;
- Wallpaper Engine;
- XWidget;
- GeekTool.
These programs allow you to display the time, date, disk and memory loading information on the desktop. And in general, they make the PC more beautiful and more informative, just like standard Windows widgets. Their disadvantage is a serious impact on the processor and RAM. Are you ready to put up with speed for the sake of beauty? “Then you can safely leave them and enjoy the “brakes.”
Hard drive fragmentation
To understand the term “fragmentation”, you need to delve into the structure of the HDD. This device has a reading head and a set of magnetic disks that store information. The storage area is divided into tracks, sectors and clusters. Data recording is initially carried out according to the spiral principle.
Defragmentation, in short and in simple terms, is the ordering (redistribution) of parts of individual files and programs scattered across the disk closer to each other so that they can be read faster.
Let's give you a simplified example using several files and programs. Let's assume that the hard drive contains (the number of digits in the examples is the space occupied by files/programs on the disk):
- 0: empty (unoccupied) space;
- 1111: program No. 1;
- 222: program No. 2;
- 33: folder with photos;
- 44444: one season of the series;
- 555: Windows update.
On the graph we have the following picture (everything is written sequentially one after another):
1111 : 222 : 33 : 44444 : 555 : 000000…
To read any data, for example, files of program No. 2, the hard drive does not need to look for its parts in different places. Data reading is linear.
After a while, you decided to delete the folder with photos 33. After deleting, free space appeared in the place of the folder:
1111 : 222 : 00 : 44444 : 555 : 000000…
Then we decided to install the space-heavy game 666666. The picture will look like this:
1111 : 222 : 66 : 44444 : 555 : 6666 : 000000…
It turns out that the game took up part of the space of the former pictures, and the rest of its files were placed after the schematic “update”. This means that the disk now has to look for game files not within the cluster, but throughout the entire disk. This significantly reduces response time and operating speed.
In simple terms, the files of one application are scattered like socks in a teenager's room, rather than concentrated in one place. Defragmentation collects scattered program files into one place for faster reading:
1111 : 222 : 44444 : 555 : 666666 : 000000…
To solve the problem, defragmentation of the hard drive using Windows is provided. It is enough to do the following:
- open “my computer”;
- Right-click on the system drive “C” and select “properties”;
- select the “service” tab and then click the “optimize” button;
- select the disk of interest and click “analyze”;
- wait for the result, then click “optimize”.
The operation is carried out with all optical disks. The only exception is SSDs, for which defragmentation is destructive and negatively affects performance.
PS Defragmentation should be done no more than once a month, provided that the fragmentation level exceeds 25–30%.
Why is that? - Everything is simple and has already been partially explained above. A hard drive has a certain lifespan before failure. The more cycles of writing, deleting or moving files have been carried out (which is essentially at the same time an operation of deleting from one place and writing to another place), the more exhaustion the disk has, the less it has left.
Viruses
These pests are the culprits of literally everything: slow operation, resource consumption, 100% CPU load, regular reboots, crashes, and even damage to components.
The treatment option is always the same - a good antivirus from a trusted developer. On the Internet you will find information about which product is best suited for your PC, because the program should both find spyware and save resources.
Additionally, we recommend installing one of the suggested clients:
- Malwarebytes Anti-Malware;
- VirusTotal;
- ComboFix;
- HitmanPro.
They also remove viruses, but use a different operating algorithm. The main area of activity is the elimination of harmful “phishing” links, blocking pop-up ads, dangerous sites and transitions.
Do a comprehensive cleaning at least once a month and regularly update the anti-virus database for a quick system response.
High level of fragmentation
In Windows 7, 8.1 and 10, disk defragmentation is performed automatically, but it may happen that this function is disabled for some reason. As a result, the file system on drive C will be highly fragmented, which will lead to reduced performance and, naturally, loading speed. Open the properties of drive C, switch to the “Tools” tab and click “Optimize”.
Make sure that scheduled defragmentation is enabled and that the degree of fragmentation of the system partition does not exceed 7-10 percent.
Otherwise, perform defragmentation and enable it in the settings.
The computer takes a long time to boot when turned on: solving the problem
Cleaning Windows 7 from unnecessary files
To clean the OS, you need to remove unnecessary, temporary and outdated files, duplicate files, URL history, cookies, and files stored in the Recycle Bin from your hard drive. You can delete files manually or entrust this work to special software, for example, CCleaner.
- Go to website: https://www.ccleaner.com/.
Reference! Cleaning the operating system of temporary and third-party files frees up hard drive space, significantly increasing Windows performance.
Defragmenting your hard drive
Over time, files on the hard drive become fragmented, their location becomes decompressed, and gaps (fragments) appear between them. OS access to fragmented files is slower due to additional movement of the hard drive heads, which slows down reading information from files and loading the OS.
Step 1. To defragment the boot disk, you need to click on “Computer” at the top left of the Desktop. A window will open with disks and devices connected in Windows 7.
Step 2. Right-click on the boot drive (usually drive “C”) and select “Properties”.
Step 3. In the window that appears, go to the “Tools” tab and select “Defragment now”.
Step 4. In the next window, click on the desired disk and select “Defragment disk”.
The defragmentation process will begin, during which the location of the files on the disk will be compacted.
Reference! It is important to note that the solid state drive (SSD) does not need to be defragmented, because... it has no moving parts (heads).
Changing startup program settings in Windows 7
Programs are usually added to Windows startup that begin their work when the OS boots, load along with it, and work in it constantly. Such programs include various download managers, program auto-update utilities, etc., which are not always needed by the user.
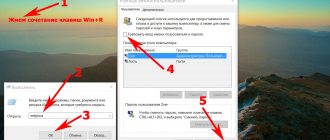
Step 1. To disable programs at startup, press “Win + R” (the “Win” key is located between the left “Alt” and “Ctrl”). The “Run” window will appear, in which you need to type “msconfig” and click “OK”.
Step 2. The “System Configuration” window will appear, in which you need to go to the “Startup” tab and click “Disable all”. This will disable all startup items that are not required to start Windows and reduce the OS boot time. Click “Apply”.
Reference! If there is an assumption that the user may need any of the elements in startup, you can leave it enabled by checking it.
Video - How to disable autorun programs in Windows 7
The system unit is dirty
The reason that a computer with Windows 7/10 boots slowly when turned on may be dust on the system unit. A layer of dust interferes with normal heat transfer, the processor and other hardware components quickly overheat, as a result, performance drops sharply. Severe contamination, as well as insufficient operation of coolers, can lead to sudden computer reboots, and in some cases, to a system crash in BSOD. If dust is detected in the system unit, we clean it, check the operation of the fans, and at the same time you should pay attention to the condition of the thermal paste.
Remove unnecessary programs:
Naturally, the question may arise about which programs can be removed. If you have an annoying program or browser plugin running on your computer that you turn off every time you see it, and the name of the program has nothing to do with regular programs or antivirus software, then you can remove it.
Often, while browsing the Internet or installing different programs on your computer, you install not only the program you need, but also one or more unnecessary programs or browser plugins (plugins, toolbars), without removing them immediately. They take up space in the browser and slow down your computer. Such applications must be removed. If a browser plugin is not in the list of programs that can be removed, you can usually disable it in the browser by right-clicking the plugin or the empty space next to it and unchecking the plugin in the menu that opens.
Read: Difference between 32 and 64 bit Windows
Another reason why your computer may be slow is due to viruses or spyware. Therefore, you need to scan your computer using antivirus and antispyware programs. You can also use the free SUPERAntiSpyware program (available for download here. If you find yourself browsing websites that don't look very reliable (for example, foreign torrent download portals) and then you see that your computer is running slower, it's worth checking your computer Scanning and restarting your computer will usually resolve these issues.
Malware
The vast majority of viruses do not at all seek to disable the system or reduce its efficiency; however, loading into RAM in the early stages, they consume some resources, which is why Windows 7/10 loads more slowly. These are, for example, Trojan cryptocurrency miners that can load the processor by 80-100 percent. Thoroughly check your PC with an additional anti-virus scanner; advanced users can analyze startup components using the same AutoRuns utility.
Causes of the problem and methods for eliminating it
The main reasons why the laptop takes 5 or more minutes to boot when turned on are the following:
- too many entries in startup;
- there is little space left on the HDD;
- malware activity;
- problems with the device hardware.
Let's consider methods by which this problem can be eliminated.
Method 1: Removing unnecessary items from startup
The startup list is a list of applications and services that start when the computer starts. The system itself does not require many components to operate, while many third-party programs (game store clients, resource monitoring tools, third-party task managers, etc.) often include themselves in this list. It goes without saying that thoughtlessly disabling items can lead to system inoperability, so we recommend that you read the instructions on how to properly clean startup from one of our authors.
Method 2: Free up hard drive space
A small amount of free space on your hard drive can also prevent your computer from booting normally. The solution to this problem is obvious - you need to free up space on the drive. This can be done in two ways: deleting unnecessary files and clearing it of garbage.
Method 3: Removing viruses
Another reason why a laptop may take a long time to turn on is the presence of malware. Many representatives of this class of programs (in particular, keyloggers and Trojans) are either registered in startup or start on their own, transferring stolen data to attackers. Usually, fighting such variants of viruses takes a lot of effort and time, but you can still get rid of them, including without reinstalling the system.
Method 4: Troubleshoot hardware problems
The most unpleasant reason for a laptop to turn on for a long time is the failure of one or more hardware components, in particular the hard drive, RAM or one of the circuits on the motherboard. Therefore, it is important to check the functionality of these components and troubleshoot any possible problems.
- The first step is to diagnose the HDD - as user experience shows, it fails more often than other components. Use the guide below to determine the state of the laptop hard drive.
If the check shows problems (especially a large number of bad sectors), the disk definitely needs to be replaced. To eliminate such problems in the future and slightly increase performance, you can install a solid-state drive instead of an HDD.
Read more: Recommendations for choosing an SSD for a laptop Replacing the hard drive in a laptop with an SSD If the target laptop belongs to the budget segment, it most likely has cheap components with a relatively low service life, which is also true for the RAM, which in this case should also be checked .
For users of laptops with removable RAM modules, there is good news - usually only one stick fails, so you can restore the computer's functionality by removing the problematic component. If you choose a replacement, then it is highly recommended to install similar ones or change all modules at once. The most unpleasant problem for the user will be a breakdown of one of the motherboard circuits: the chipset, video card or one of the controllers. If you suspect such a failure, you should conduct a comprehensive diagnosis of the main board of the laptop, which the following instructions will help you with.
If the check shows the presence of problems, there is only one way out - a visit to the service center, since it is very difficult for the average user to independently fix problems in the operation of the laptop’s motherboard.
Conclusion
We looked at possible reasons why a Windows 7 laptop may take a long time to turn on, and presented troubleshooting options. Finally, we would like to note that the vast majority of problems are of a software nature, which is why they can be completely eliminated by the efforts of an ordinary user.
One of the significant factors determining the functionality of the operating system is its loading speed. Over time, the speed of any operating system drops, “extra” files appear, the registry changes, and it becomes infected with malware. As a result, the OS takes more and more time to “react”, including startup.
Physical wear and tear of the hard drive, bad sectors
Another reason that Windows 7/10 takes a long time to boot may well be physical wear on the magnetic surface of the disk, the presence of bad and overwritten sectors on it, or file system errors. If the disk is old, checking it will be highly advisable. For these purposes, it is best to use special utilities - HDD Scan or Victoria HDD . In Windows, to identify and correct file system errors, there is a built-in tool chkdsk , launched either from the disk properties on the “Tools” tab, or from the command line with the /F /R parameters.
Profiling with Windows Performance Toolkit
This toolkit is a set of OS boot optimization utilities included in the Microsoft SDK. Working with this tool allows you to conduct a detailed analysis of Windows boot, identifying its hidden problems.
Step 1. After downloading the software from the link: https://www.microsoft.com/en-us/download/details.aspx?id=8279, you can install Toolkit after unchecking other Microsoft products.
Go to the official Microsoft website using the link and click the “Download” button
Click on the installation file
Uncheck additional software, click “Next” and follow the installer’s instructions
Important! All Toolkit commands must be executed from a command prompt running as an administrator.
Step 2. Open the Start menu, right-click on the Command Prompt utility, then click on “Run as administrator.”
In the "Start" menu, right-click on "Command Prompt" and click "Run as administrator"
Step 3. To start analyzing the OS boot, you need to go to the directory where the utility is installed and run: “xbootmgr -trace boot”. The PC will automatically reboot.
In the command line field, enter the command “xbootmgr -trace boot -prepSystem”, press “Enter”
Step 4. After restarting the PC, a special window will appear with a countdown; you need to close it by clicking “Finish”.
Click “Finish”
Step 5. The file “boot_BASE+CSWITCH_1.etl” will be created in the directory. An OS boot analysis can be carried out by opening it with the “xperf” utility, running: “xperf boot_BASE+CSWITCH_1.etl”.
Enter the command “xperf boot_BASE+CSWITCH_1.etl”, press “Enter”
Problems that arise at the start of the OS are identified during its initialization (“Init”), where a delay occurs:
- PreSMSS (Pre Session);
- SMSSInit(Session);
- Winlogon;
- Explorer;
- Post Boot.
System Load Analysis
Analysis of programs that slow down the system boot
Step 6. It is possible to automatically improve the OS boot by running “xbootmgr -trace boot –prepSystem”, which performs 6 Windows reboots.
In the command line field, enter the command “xbootmgr -trace boot -prepSystem”, press “Enter”
Reboot process 6 times
After the 2nd reboot, “defragmentation” of the boot stages starts.
The process of "defragmenting" the boot stages
When defragmentation is complete, the “xbootmgr” directory will contain 6 files with boot traces, and a file (.etl) with new OS startup data.
Step 7. If, after analyzing the files, you need to disable processes that are slowing down Windows 7, you can use the Autoruns tool. You can also use the “Search online” item to obtain information on these processes on the Internet.
Reference! On average, disabling components that slow down Windows 7-10 can increase loading speed by up to 50%.
General recommendations for optimization
If no obvious reasons for the Windows startup delay have been identified, but the computer still takes a long time to boot when turned on, you can try performing scheduled system optimization. It is done either manually or using third-party optimizer applications. The second method is more suitable for novice users, as it is more secure. Using such programs, you can disable all non-essential and unused Windows services that start at boot.
Advanced users can disable unnecessary features through the Services snap-in and the Add or Remove Programs applet.
So, if you don't use printers, you can turn off the Print and Document service. Work Folder Client, Windows Activation Service, XPS Browser, Hyper-V, SNMP, Telnet Server and Client, Internet Information Services (IIS) Web Engine, CMAK, MSMQ, RIP Listener, TCPIP Simple Services, TIFF IFilter can also be safely disabled . Deactivating these services will free up some memory.
Experiment with the Fast Startup feature, enabled by default in Windows 8.1 and 10. It should speed up boot times, but sometimes it has the opposite effect. Try turning it off in the power options.
You can free up additional resources and speed up desktop loading by deactivating some shell visual effects. To do this, open System Information – Advanced System Settings and click the “Options” button in the “Performance” block.
Disable some effects or even select a mode for the best performance.
Now, right there in the performance settings window, switch to the “Advanced” tab and click the “Change” button in the “Virtual Memory” block.
In some cases, matching the recommended paging file size to the current memory size caused a delay in loading Windows. Try changing the size of the swap file, but remember that it should not be too small, especially on a PC with little RAM.
What should I do if the computer takes a long time to turn on even after following all the recommendations? A radical solution - reinstalling Windows - is not always acceptable, but you can try moving the system to a faster SSD drive, if, of course, such an opportunity exists.
- 7shared
- 0Facebook
- 3Twitter
- 0VKontakte
- 4Odnoklassniki
How to remove unnecessary programs from startup?
”.
To do this, users of any Windows operating system need to press the Win + R
and in the window that appears, enter the
msconfig
- In " and you will see a list of programs that start when you turn on the computer. Uncheck all the unnecessary ones and leave only those that you use regularly.
- If you do not know what programs you need when starting Windows, it is recommended to click on “ Disable everything
”. This action will not disable the loading of important drivers and system services, but will remove all unnecessary software.
- After all the manipulations, click “ Apply
” and “
Ok
”. In order for the changes to take effect, the system will prompt you to restart your computer. Reboot your device and you will immediately see the result.
Using Autoruns for Windows
Autoruns for Windows is one of the best tools for viewing, managing and disabling startup programs. It allows you to fine-tune OS startup, eliminating its bottlenecks.
MSConfig only shows startup and services, but does not check digital signatures. Autoruns doesn't just show the startup programs placed in the startup folder, Run, RunOnce, or other registry keys, but provides a complete list of all programs configured to run when Windows starts, displaying entries from those locations.
Step 1: Download Autoruns for Windows from https://docs.microsoft.com/en-us/sysinternals/downloads/autoruns.
Step 2. After installing and launching the tool, select “Hide Microsoft Entries” in the “Options” section.
Step 3. In “Scan options”, select “Verify Code Signatures” by pressing the “Rescan” button or “F5”.
On a note! Autoruns not only verifies the authenticity of everything you load into Windows using cryptographic signatures, but it also recognizes files that have been tampered with. Hide Microsoft Entries also detects potentially unwanted or dangerous entries, unwanted pre-installed software, and third-party startup images that can be easily disabled using this tool.
Step 4. If you find entries that should not be activated when the OS boots, you can disable or delete them. To disable an entry, you must uncheck it. To delete it, you need to right-click on the entry and select “Delete”.
On a note! The right-mouse menu also allows you to directly jump to an entry's associated location in the Windows Registry or file in Explorer by selecting "Jump to Entry" or "Jump to Image." .
Video - How AutoRuns can speed up system startup
Setting up OS loading at the software and hardware level
This setting is made in the System Configuration utility. To do this you need:
Step 1. Open the Start menu, enter “system configuration” in the search engine and click on the result that appears.
Step 2. In the “System Settings” window, go to the “Boot” tab and set “Timeout” in the window: 3 seconds (seconds). Timeout – the time during which the list of operating systems (if available) is displayed when the PC starts.
Step 3. In the same “Boot” tab, check the box for: “No GUI boot”. This will disable window animation when loading the OS, which will help the computer boot faster.
Step 4. Click “Apply” and “OK”.
Step 5. The system will prompt you to reboot, click “Reboot”.
BIOS setup
BIOS (Basic Input/Output System) is a set of instructions in the computer's startup firmware that controls connected devices: hard drive, keyboard, mouse, etc. You can optimize the BIOS boot by going into it.
Step 1. Press the “DEL” key when the computer starts booting (or another key that the BIOS will display in the startup message).
Reference! After entering the BIOS, you must act in accordance with the specified keys in its prompt.
Step 2. In the “Boot” menu (“Boot Settings Configuration”), turn on the “Quick Boot” option – “Enabled”. This will allow the BIOS to skip POST (power-on self-test), thereby speeding up its boot time.
Step 3. When exiting the BIOS, you must save the results of the changes made by answering “Save Changes and Exit” - “Yes”, or exiting and saving the changes with the “F10” key.
Disabling unused equipment
Every time the operating system starts, it loads a large number of disks and devices that are often not used.
Step 1. To disable them, you need to right-click on “Computer” and select “Properties”.
Step 2. In the left part of the window that opens, click on “Device manager”.
Step 3 : Disable unused devices by right-clicking on them and selecting “Disable”.
Disabling unused devices will help Windows 7 start and shut down faster.
If you want to learn effective methods on how to speed up Windows 7 startup, you can read an article about it on our portal.