Let's start with something simple!
The reasons for the appearance of unnecessary layouts can be different: a crooked Windows 10 update, synchronization through a Microsoft account, manually adding a language.
As for updates, I personally encountered a problem when the system automatically added a new language based on location. After deleting and rebooting, it appeared again. And this continued until Microsoft fixed the defect.
The second caveat is that if you use the same Microsoft account on different PCs, there is a possibility that the language settings may change.
Let's move on to the instructions:
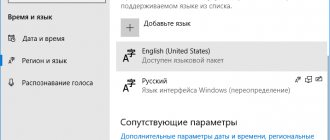
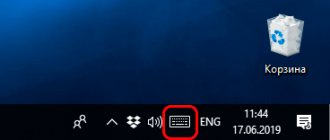
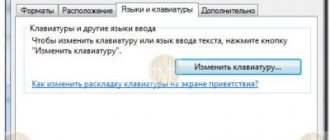
- In the lower right corner, left-click on the icon indicating the selected language and input method. A list will be displayed, and at the bottom there will be a “Settings...” item:
- Now we find an unnecessary element in the list and delete it:
- But how to remove a Windows 10 keyboard layout within one language? For example, it may be English - USA, Indian, Canadian, British. Extra packages can be eliminated by clicking on the “Options” button (see screenshot above), and in the window that opens we get rid of the inappropriate line:
In theory, this all works great. But in practice it’s 50/50. Depends on the version of Windows 10, installed updates and other factors. Next, we will consider more complex but effective solutions.
Removing an extra layout from the language bar
Most often, users are faced with unnecessary installed layouts on the language bar. This happens especially often in neighboring countries in regions with an absolute predominance of the Russian language. For example, you are a resident of Ukraine and Ukrainian is installed in your operating system, since it is the national language of your country. But you plan to use only the Russian language and the Ukrainian layout when working on a computer. In this case, you need to do the following.
- In the lower right corner of the screen, find the language bar icon. It reflects the language of the currently enabled layout. Click on it and then select "Language Settings".
Right-click on the language icon in the taskbar and click on “Language Settings” in the menu.
- Find the language you don’t need, click on it, and then click on the “Delete” button.
Open the “Region and Language” section, left-click on the language and click the “Delete” button
This way, when switching between languages, you will no longer have an extra layout.
How to remove a Windows 10 keyboard layout through the registry
Here it is worth understanding that there are displayed and “hidden” languages. The latter are not displayed in the list on the taskbar, but they are often included in the OS settings. However, their deactivation may be blocked.
- Press Win + R on your keyboard and enter the command in the Run console:
regedit
- In the editing window, we immediately create a backup copy so that if unforeseen consequences occur, you can run the reg file and return everything to its place:
- Now we need to find out the language code. To do this, we use PowerShell - right-click on the “Start” icon (Start) and in the menu that appears, select the appropriate option with administrator rights:
- Select, copy and paste the following command into the console window (Ctrl + V):
Get-WinUserLanguageList
- A list of added languages and input methods (InputMethodTips) is displayed. We remember the code of the unnecessary element. Please note that if 0 419 :00000 419 , this is Russian RU, if 0 409 :00000 409 is English US, and with the ending 4009, 11009 - other English layouts (in my case, Canadian, Indian).
- We return to the registry editor (but do not close the PowerShell window yet) and on the left we see a “folder tree”. You need to open them by moving along the following path:
HKEY_CURRENT_USER | Keyboard Layout | Preload
- On the right we see keys with already familiar values. We remove unnecessary ones, restart the computer and check the result.
Did you manage to remove the language or keyboard layout of Windows 10 using this method?
Suddenly it doesn’t help, then you need help from the console:
- We use the command discussed at the beginning of this chapter again. But now it’s worth paying attention to the “LanguageTag” line. For example, ru-UA:
- Enter the commands one by one:
1) Create a variable and place a list of languages in it:
$LangList = Get-WinUserLanguageList
2) Mark the extra element (instead of the word code, insert your value from the “Language Tag” field:
$MarkedLang = $LangList | where LanguageTag -eq "code"
3) Remove the object from the list (after pressing Enter the value should be True):
$LangList.Remove($MarkedLang)
4) Save and update the list:
Set-WinUserLanguageList $LangList -Force
Ready!
Vadim Sterkin
In the @winsiders chat, member Kato complained about an unusual problem after upgrading to Windows 10 1803. Initially, he had three languages on the system - English (US), Russian and Ukrainian, and after the update two more English were added - United Kingdom and Canada, which did not were removed in the Options (the Remove button is not available). Accordingly, these languages appeared in the list of keyboard layouts, although they were not in the settings.
In general, you can remove any language that is not the default. For example, if the system has only English and Russian languages, then the first can be deleted if the second is designated as the main one. In this case, it does not matter what the source language of the system (distribution) was, which is easily determined in PowerShell with the command:
(Get-CimInstance Win32_OperatingSystem).oslanguage
The command displays the language identifier, where 1033 is English (US), 1049 is Russian, the rest are here in decimal form or from Microsoft in hexadecimal (insert the values into the programmer’s calculator).
On the problematic OS, this command returned 2057, which corresponds to English (United Kingdom). In combination with the picture from the parameters, this was very strange, because the distribution language should not have any language packs, since it is already in the system.
To begin with, we tried to remove the UK and Canada language packs using the commands
lpksetup /u en-gb lpksetup /u en-ca
However, this did not lead to success, which hinted at the actual absence of these language packs, but did not bring us any closer to solving the problem of phantom languages. I had to go in from the back door.
PowerShell has two cmdlets for managing user languages - Get-WinUserLanguageList and Set-WinUserLanguageList . The first one can get a list of languages, and the second one can set it. In PowerShell, the list matched the picture in the parameters.
It is not entirely obvious from the help of the second cmdlet how to remove
unnecessary languages.
But it gives a fairly strong hint that the output of the first cmdlet is an array. This can be used for good. We only need the first three languages from the list. $List = Get-WinUserLanguageList Set-WinUserLanguageList $($list[0], $list[1], $list[2]) -Force Get-WinUserLanguageList The
first command places an array of languages in a variable, and the second sets the current languages the first three elements of the array. At the same time, other languages are deleted! The third command displays a list of languages to check.
It's decided! Once again, PowerShell allows you to elegantly solve a problem without exorbitant effort. If you experiment under a Microsoft account, disable synchronization of language settings to avoid unwanted effects (I caught a few strange things :).
In Windows 10 1803, language settings have almost completely migrated from the classic Control Panel to Settings (with the exception of the classic window with settings for keyboard shortcuts and the language bar). In this regard, I have updated the article about 6 language settings that may confuse you in the context of the changed interface.
Bonus
To ensure that languages and layouts previously added to the system are available when creating a new user and on the welcome screen, you should do the following:
- Go to the “Control Panel”
- Select the “Small Icons” view mode (in the upper right corner), and then open the “Regional Standards” section:
- On the “Advanced” tab, click the “Copy ...” button, then at the very bottom of the new window we activate two options:
What to do if you can’t remove a language from the Windows 10 language bar
Quite often, a malfunction occurs in the Windows 10 system, and then nothing can be deleted. This problem is not that serious, but it can cause trouble for the user. For example, if a person needs only two options for work, all others should be disabled. Below is how to remove the third language in Windows 10.
How to change the language on iPhone 5, 6 and 7 - changing language settings
If two or more input languages match the interface language, you cannot delete them. For example, the interface defaults to Russian, and the input contains “Russian (Russia)”, “Russian (Ukraine)”, “Russian (Belarus)” and “Russian (Kazakhstan)”. Then in the settings the “Delete” line will be inactive. To get rid of the unnecessary option, it is advisable to use the registry editor.
Note! There is another way. You need to open the “Control Panel” and select “Regional and Language Options” there. Inside this tab, open “Languages and keyboards” and click on the “Change keyboard” option.
You can perform this setting through the system tray (notification area in the desktop toolbar). Abbreviations of all active languages are presented there. You need to right-click on the desired option and open the “Options” section. The “Languages and text input services” section will appear in the “General” tab. There you can see which one is on the laptop by default, and if you want, change it. To confirm the actions, click on “Apply”. After these procedures, the “Delete” line will become active.
Problems may arise during deletion
Add a language to Windows 10
1. Left-click on the language icon in the taskbar => select “Language Settings” (or go to the “Start” menu => “Settings” => “Time and Language” => on the left side select “Regions and Language”).
2. On the right side, click on “Add a language”.
3. Select the desired language from the list and wait until it is installed.
Removing and adding a language in Windows 10 through the Control Panel
- Right-click on the Windows logo icon. Find and click on the “Control Panel” item.
Right-click on the Windows logo and open “Control Panel” in the menu.
- In the “View” mode, set “Category”, find and open the “Clock, language and region” parameter.
Select “Category” in “View” mode, find and open the “Clock, language and region” section
- Then click on the “Language” item.
Click on the item “Language”
- Select the language with the left mouse click and click the “Delete” option in the top panel.
Select the language with the left mouse button and click on the “Delete” option
On a note! Next to the language that is installed on the system by default, the “Delete” button will be grayed out, so it cannot be deleted.
The language that is installed on the system by default cannot be deleted
. To add a language:
- In the “Language” window, click the “Add language” button.
Click on the “Add language” button
- In the list of languages, click on the selected one, click the “Add” button.
Click on the “Add language” button
- The added language will appear in the list of available languages.
The language we added will appear in the list of available languages
How to remove the UK keyboard layout if it is installed instead of the US
The user will find two English languages in Windows 10 and earlier versions.
How to fix:
- Through the “Control Panel”, open the “Advanced date and time settings, regional settings” section.
- Open “Language”, and inside it is the “Add a language” section.
- Go to “Change language settings”, and then to “Options”.
- Inside there will be a section “Input method (layout)”. There you need to remove the British layout.
How does the UK layout differ from the US?
There are several differences between British and American keyboard layouts:
- on the American one there are no icons for the pound sterling and euro. However, on the British layout there is a dollar sign;
- the British layout has 62 keys, and the American layout has 61;
- the € icon can be typed via “Alt Gr + 4”;
- the "Alt" key, which is located to the right of the space bar, is the "Alt Gr" key;
- on the British layout there are quotation marks on the “2” key, and on the American layout there is an “@” sign in the same place;
- the slash "\" is located to the left of the letter "Z";
- Some UK keyboards do not have Enter, Tab or Backspace keys;
- the symbols “`” and “¬” are located on the same key;
- on the American layout there is a “~” sign on the top left key, and on the British layout there is a “¬”;
- symbol "|" can be typed using the corresponding key or using the combination “Alt Gr + quote”;
- In the British version, the "#" sign is placed together with the "~" sign. This button is located next to "Enter".
For your information! The American layout is used in most countries of the world.
How to remove US or UK layout
With simple settings you can add or disable different languages. These instructions will be useful to anyone who constantly works on an office or home computer, especially those workers who independently set up their equipment without the help of professionals.