How to enable the virtual keyboard in Windows
Click "Start". Find the Accessibility list and select On-Screen Keyboard. After that it will appear on the display.
In some versions of Windows, the path to the keyboard shortcut may be longer: Start → Programs → Accessories → Accessibility → On-Screen Keyboard.
You can customize the virtual keyboard to suit your needs. To do this, click “Options” directly on it. In the current menu, you can, for example, enable a block of numeric keys or disable sound signals when pressed.
You may need a virtual keyboard when logging into Windows. For example, to enter a password or PIN code. To call it from the lock screen, click on the “Accessibility” icon in the lower right corner and select “On-screen keyboard” from the list.
Method 2
If you don't want to spend a lot of time fiddling with all these drop-down menus and pop-up windows, you can activate the on-screen keyboard using a text command. But please note - this method is only suitable if the main keyboard is not completely broken, and most of the keys continue to work on it.
- Press the Win and R keys at the same time.
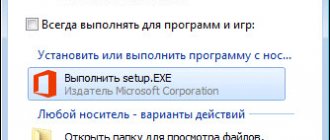
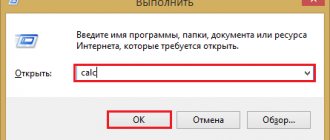
- A window will open for typing text commands. Enter the abbreviation OSK into it and click OK. The job is done - the virtual keyboard has appeared on your screen.
How to enable the virtual keyboard on macOS
Open the Apple menu (apple icon) and click System Preferences → Accessibility. Select "Keyboard" from the list, go to the "Accessibility Keyboard" tab, and check the "Enable Accessibility Keyboard" checkbox. After that it will be displayed on the screen.
In addition to the standard keys, the virtual version has additional ones. For example, to call Launchpad, as well as to control volume, brightness and music.
The gear in the upper right corner opens the on-screen keyboard settings. You can change the scale, theme, transparency, input features and other parameters.
How to enable the keyboard on the monitor depending on the OS
The previous methods, not counting the second, are relatively universal. The following take into account the specifics of each version of the Windows operating system, from XP to 8.
Windows XP
Users of this system must complete the following steps:
- Click the “Start” button in the lower left corner (or the button with the Windows logo, if it works);
- hover the cursor over the line “All programs”;
- find the “Standard” folder;
- in it, select the “Special Features” subdirectory;
- The last step is to click on the On-Screen Keyboard application.
Windows 7
In this system, the path to the required application is completely the same as the XP version. But, in addition to this, it is possible to use the quick search located in the bottom line of the Start menu, into which the corresponding phrase is entered.
REFERENCE. Depending on the functionality of the keys, you can type it yourself or use a voice assistant, if available, as in method 2.
Windows 8
Since this system was also developed for touch devices, the on-screen keyboard is included in the software package by default and is located in the “Accessibility” section of the “All applications” list. In addition, in this OS you can still go to the desired section through the control panel or search bar.
What are the alternatives to the system on-screen keyboard?
If for some reason the built-in virtual keyboard does not suit you, you can download analogues from third-party developers. We were unable to find such programs for macOS, but we will list several options for Windows.
For example, Free Virtual Keyboard is a free virtual keyboard with additional appearance settings. The program allows you to choose the color of the keys, the degree of transparency and the type of layout. There are no other advantages compared to a native application.
You can also try Comfort On‑Screen Keyboard Pro. This keyboard offers even more interface customization, displays helper icons on hotkeys, and supports gestures for touch input. But the program is paid and after a trial month it will ask you for 1,490 rubles.
In addition, there are online virtual keyboards like Virtualkeyboard, allcalc and Virtual-keyboard. They do not need to be installed on your computer, but there is a serious drawback: you can only print text on the current browser page.
How to display
A virtual keyboard is an analogue of the physical version, which is displayed directly on the screen, has equal functionality and responds to a mouse or joystick . It is necessary when the buttons are broken or the user has limited capabilities.
Many users start looking for information on how to display a keyboard on a laptop screen when they are faced with a real need. There are several options, and they are no different for different operating systems - from Windows XP to Windows 10.
- You can enable the on-screen keyboard on your laptop by following the link: Start - Programs - Special Features - On-Screen Keyboard.
- The second option is to enable the numeric keyboard on a laptop or PC - enter the name of the utility or its first letters in the Windows search engine, and then open the found application.
- You can run the utility through the “Run” menu by entering “osk”.
- The last way to launch: “parameters” - “special features”.
VIRTUAL KEYBOARD program
The Virtual Keyboard program allows you to enter characters using the mouse. Yes, it’s not very convenient, but it’s definitely better than writing: “ska4at russkaya klaviatura...”
This program can be useful if you need to type text in a language whose alphabet characters are not on the keyboard buttons or support for the corresponding layout is not installed in the operating system.
Another possible area of application for a virtual keyboard is the secure entry of confidential data (passwords, bank account numbers, credit cards). If you do not rule out that you are being monitored by some program that records your keystrokes on the keyboard, then a virtual keyboard is the solution to this problem!
At the moment (as of September 14, 2013) version 4.0.1 is available for download.
Version 4.0.1
This version has 75 language layouts and supports 53 languages :
Russian , Azerbaijani, Albanian, English, Arabic, Armenian, Belarusian, Bulgarian, Bosnian, Hungarian, Vietnamese, Dutch, Greek, Georgian, Danish, Hebrew, Icelandic, Spanish, Italian, Kazakh, Kyrgyz, Chinese, Korean, Latvian, Lithuanian, Macedonian, Maltese, Maori, Marathi, Mongolian, German, Norwegian, Polish, Portuguese, Romanian, Serbian, Slovak, Slovenian, Thai, Tamil, Tatar, Turkish, Uzbek, Ukrainian, Urdu, Farsi, Finnish, French, Croatian, Czech, Swedish, Estonian, Japanese, has an English interface.
(exe. file 434.0 KByte)
Virtual Keyboard 4 is shareware. It works without registration, but only the basic functions of the program are fully available. To register, follow this link to the developer's website.
IMPORTANT! Virtual Keyboard version 2 requires the .NET Framework version 2.0 or later to be installed on your computer. You can download the current version of the .NET Framework from the Microsoft website: https://www.microsoft.com/downloads/
J Virtual Keyboard
Another version of the program - “J Virtual Keyboard” - is an analogue of the “Virtual Keyboard” program. The difference between them is that “J Virtual Keyboard” is written in the Java programming language, so it works regardless of hardware, settings and operating system language, and is also platform independent. Those. it can run on both Windows and Linux, as well as any other operating systems.
The only condition: to run the program, you must have the Java Virtual Machine (JRE) installed on your computer, which is usually not included in the operating system. Therefore it must be installed separately. The Java Virtual Machine can be downloaded from: https://www.java.com/en/download/manual.jsp
The program is free (Freeware) (zip archive 54.3 KByte)
Developer's website: www.andrej-koch.de
Chrooma Keyboard
A nice keyboard that looks like Gboard, but with an interesting difference. Its theme adapts to the color of the application you use, and Chrooma becomes part of it. It looks quite stylish.
All the necessary functions are present: continuous input, gestures, word prediction and auto-correction. Chrooma supports emoji and gifs. There is an “Incognito” mode designed for entering confidential data.
Basic keyboard features are available for free. The premium version adds customizable key layout, one-handed typing mode, and a built-in translator.
How to set up a virtual keyboard
After displaying the device, you can configure it for comfortable use:
- turn on the sound of the keys being turned on;
- enter additional keys;
- change font settings;
- disable its display on top of other windows;
- Set it to appear automatically after turning on the PC.
Windows XP
Setting up Windows XP
You can configure the equipment after installation in the following way. To switch between layouts, you can use a key combination that is convenient for you:
- to fix them, you need to click the “Languages” tab in “Regional and Regional Standards”, then “Text Languages and Services” and “More details”;
- in the “Languages and text input services” window, activate one by one in the Settings Options – Keyboard Options;
- then in “Advanced options” click “Change keyboard shortcuts”, where you can rearrange the keys at your discretion.
Windows 7
Setting up Windows 7
After the virtual version is displayed on the screen, the user sees an analogue of the physical device. But it lacks a numeric keypad and is small, which can be changed in Settings. To do this you should:
- check the “Sound notification” box;
- O;
- Continue with “Pointer over keys.”
If the sound is annoying when you press keys, you should uncheck the corresponding box.
To switch the language, you must first use Alt, then Shift, then Shift again.
To use hotkeys, you need to press Ctrl and then Z.
Windows 8
Setting up Windows 8
To change the key layout, you need to press Alt, and then Shift and the first key again, after which the changes will occur.
You can make additional adjustments using the “Options” button at the bottom of the version. You can know exactly what actions should be performed thanks to “Help”.
Windows 10
Setting up Windows 10
In the Device Settings for Windows 10 you can configure:
- sound accompaniment;
- making it easier to move around the screen;
- use the number pad;
- pressing buttons and hovering the cursor over them;
- key scanning;
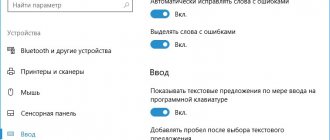
- Use text prediction - Please note that this feature is only available in English, French, Spanish, German and Italian.
The on-screen keyboard launches itself
It may happen that the virtual keyboard starts turning on itself without your request. This means that one of the users of your PC has configured the special settings incorrectly. capabilities of Windows 10. To disable the independent launch of the utility, do the following:
- Let’s go to the “Control Panel” using the method described above;
- Further, in the “Special Center” Opportunities";
- In this window we look for the command “Use a computer without...”;
- Follow the link and remove the checkbox from the “Use on-screen keyboard” command.
Having completed the above steps, the virtual keyboard will no longer launch randomly.
Conclusion: - you now know how to enable the on-screen keyboard on Windows. Use any of the five methods that you like best. At the same time, if your keyboard has completely stopped functioning, you are better off using one of the last 3 methods. Good luck!
Sincerely, Andrey Zimin 09/19/2019
GO Keyboard
The brainchild of the developers of the notorious GO Launcher. The keyboard is reminiscent of ai.type: the same abundance of features, skins and settings. The application has more than 300 fonts, emojis, gifs and other decorations. Continuous input, clipboard management and auto-correction are also present.
GO Keyboard looks good and is quite convenient, but it irritates you with requests to purchase the premium version, which has additional themes, animations, cartoon avatars created using the front camera, and no ads.
Multiling O Keyboard
Another light and fast keyboard. It weighs almost less than the Simple Keyboard, but it has much more capabilities.
Multiling O Keyboard supports continuous and two-handed typing, gestures, layout settings, and a bunch more. There is a calculator, emoji, cursor control, translator. They just didn’t bring GIFs and stickers, but many people get by just fine without them.
The parameters, sizes and behavior of the keyboard are customizable in detail. If necessary, you can download third-party themes, dictionaries and extensions.
The keyboard is free and works lightning fast even on Android 2.1.
How to make quick access
How to enable the on-screen keyboard on a laptop is generally clear, but how to do it so that you don’t have to search for it for a long time? There are also several solutions for this.
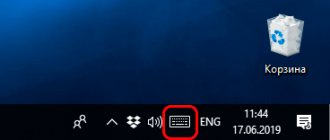
- In Windows 10, having gone from “start” to “on-screen keyboard”, you do not need to launch it, but right-click and select “pin to start screen”. Now, by clicking “start”, the user will see a utility with virtual keys on the right side of the selected programs.
- In Windows 8 and earlier versions, you have the option to pin an application to the taskbar. To do this, again through “Start” you should find the utility and, calling up its context menu, select “pin to taskbar” or “pin to start menu”.
- Another option to provide quick access is to place the application shortcut on the desktop. To do this, you again need to find the program in “special features” and select “send to desktop” in the context menu. This is a way to make a keyboard on your laptop screen without unnecessary complications, just click on its icon.
- In the Windows 7 operating system, users can configure hotkeys to access an application. To do this, use RMB to open the properties and in the “shortcut” tab, enter the keys for quick access. By default, the system sets the combination “ctrl+alt”, the user only has to select the third key, most often the letter k, which is a reference to the English word “key”.
Simple Keyboard
As the name suggests, this keyboard is simple. Even too much. It has a minimalistic Android-style design and only four themes (however, the user can assign a specific color to it).
There are no dictionaries, spell checking, auto-corrections or other bells and whistles - just text input. Ideal for those who don't like it when the keyboard tries to be smarter than its owner.
Simple Keyboard is open source. This means it can be used to enter passwords and credit card details if you don't trust proprietary keyboards.
In addition, the application takes up very little space and will work even on old and low-power smartphones.
If the utility does not work
It happens that the on-screen keyboard does not work on the device. Failure may be caused by viruses or incorrect user actions. The easiest way to correct the situation is to download any similar utility . To do this, simply enter the corresponding query in any search engine and select the most suitable option.
The second option is to copy the utility on another gadget. Due to the simplicity of the application, it takes up very little space. Regardless of the OS version, the application is stored in the System32 folder on the local disk with Windows installed. All that remains is to find the osk.exe utility in this folder and copy it to a similar folder on the gadget in which it has stopped working.
Important! Both devices must run on the same Windows, that is, transferring from XP to 10 cannot guarantee the correct operation of the application.