A portable operating system is a system that is compatible with multiple hardware platforms and can be easily transferred to a physical disk. Most portable OSs are lightweight and come with a CD or USB drive. Running an OS from a CD/USB drive is called a live CD/USB. Although portable OSes are lightweight, performance cannot be underestimated and most are open source with active community support. There's nothing wrong with keeping one OS as part of your first aid.
We will list the best portable Linux distributions that can carry a USB drive and boot on any desktop or laptop.
Puppy Linux
Puppy Linux is a very small Linux OS with a user-friendly interface. Despite its small size, it has easily accessible partitioning and file recovery tools packed with this portable Linux. This distribution is suitable for basic computing and web browsing.
Puppy Linux can save session data in separate files. This distribution includes its own package manager, which makes it easy to install additional applications. Configuration tools allow the user to configure system parameters. After all the settings and installations of additional applications, the user is offered a truly high-quality product.
Main characteristics:
- Size - 100 MB
- RAM - 256 MB
A detailed review of Puppy Linux is written in this article
Instructions for installing Puppy Linux are described in this article
Slax
Slax is a user-friendly Linux distribution. The standard version of Slax is 210 MB in size. This distribution is modular. The advantage of the distribution's modular concept is that the user can add or subtract modules before loading the OS. If you don't need office software, you can remove it before downloading or add a multimedia tool.
This Linux distribution is packaged in a single directory /Slax/. The distribution is available in both 32-bit and 64-bit versions. For older computers, the 32-bit version is recommended, while the 64-bit version is best for modern computer models.
Main characteristics:
- Size – 210 MB
- RAM - 256 MB
Lesson #8. Features of booting from a flash drive
So, we have a bootable USB flash drive with Linux and let's see how we can boot from it. Every computer has some initial software that tests the computer before it boots, and also determines some of the computer's parameters, including which device the boot will continue from. Now two similar programs are used on computers - BIOS and UEFI, which replaced it.
Previously, to select a boot device, you had to go into the BIOS and change the boot order from devices in a special boot partition (in a special boot partition).
But this need has long since disappeared, since when the computer boots, you can call up the so-called boot-menu (boot menu). This menu is a list of devices available for booting the computer, for example, a hard drive, DVD drive and USB drive.
This is the method I recommend, as it is the simplest and most straightforward. There is only one problem - calling the boot menu on different computers and laptops is carried out differently. Usually one of the function keys, for example F12, is responsible for this. But on my old netbook, the boot menu is called up by pressing the Esc key. You will have to figure out which key is responsible for loading the boot menu on your computer or laptop yourself. For a desktop computer, it's worth checking the motherboard's manual. Well, in the case of a laptop, accordingly, the manual from the laptop.
Quite often this key is indicated on the initial boot screen:
but it is not always indicated, so the most reliable way is to still refer to the instructions...
If there are no instructions, you can try using the keys indicated in this table:
Here are the manufacturers of motherboards and laptops and the keys they most often use to open the boot menu. This is not a dogma and in your case there may be a different key, but it’s still worth a try. You can also simply go through all the top row keys one by one from Esc to F12 and then you will definitely find the one and only one :)
Well, the boot menu is called up immediately after turning on the computer or laptop. That is, you turn on the computer and almost immediately press this key. Typically, the boot menu can be called up a little later than immediately after turning on the computer, so the easiest option is to turn on the computer and press the boot menu key until it appears. That is, not just press it and hold it, but press it repeatedly.
So, after the key is found and the bootable flash drive is ready, you can proceed to boot Linux.
We connect the flash drive to the USB connector, turn on the computer and call the boot menu by pressing the corresponding key. From the menu, using the cursor keys, select our bootable USB flash drive and press the Enter key.
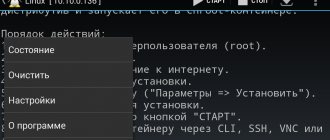
The boot from the flash drive starts and the following menu appears:
There are various options for loading Linux here, but, as a rule, we will be interested in the very first item, by selecting which we will load Linux from a flash drive.
If your laptop or computer freezes while loading the operating system, then in this case you can select the “Start in compatibility mode” menu item, which allows you to boot Linux in compatibility mode. In this case, only the most necessary drivers will be loaded. For example, in this mode my netbook boots with standard video drivers, which sets the wrong screen resolution, but we still get a working operating system and can use it to solve some problems.
So, what does such a download from a flash drive give us?
Firstly , we can see what the operating system looks like and experiment with some of its settings.
Secondly , we can evaluate how the operating system will work on our computer. If it slows down significantly, then you should pay attention to another distribution aimed at weak computers.
Thirdly , if there is something wrong with your computer, then you can transfer information from the computer’s hard drive to other media using Linux. After all, you have full access to the hard drive and you can, for example, transfer the necessary files from drive C to another logical drive before reinstalling the same Windows.
Fourthly , we have access to standard Linux administration utilities and, for example, using the GParted program, we can repartition the computer’s hard drive or check it.
In essence, we get a fully functional operating system on a flash drive, and we can run it on any computer that meets the system requirements, and this is almost any modern computer.
And one more pleasant bonus - if necessary, we can go online and download the necessary additional programs or simply search for information on solving the problem that has arisen. Linux already has the Mozilla Firefox browser and all you need is to set up an Internet connection, for example, select a wireless network (Wi-Fi) and enter a password.
Imagine that Windows has stopped loading for you, and there is no one to ask for help. You can boot Linux from a flash drive and search the Internet for a solution to the problem yourself.
Well, after evaluating Linux Mint, you can start installing it. To do this, there is a special shortcut on the desktop, launching which will allow you to proceed to the process of installing Linux on your computer. Moreover, the installation is carried out in a separate window, which means that while Linux is being installed, you can calmly surf the Internet, and not sit just looking at the screen :) But I’ll tell you about installing Linux next time.
BackTrack (Kali Linux)
Kali Linux is neither light nor the heaviest OS. For a portable OS, it's a bit heavy at 2GB in size. But the 300+ apps available are enough to justify this extra size. This Linux distribution is considered a hacker's favorite and is intended for security testing. Kali OS can be used to hack wireless networks, exploit a server, evaluate web applications, and so on. Although BackTrack Linux contains several graphical tools, this Linux distribution is good for command line experts.
Official Kali Linux website.
BackTrack takes anonymity seriously. Users do not need to register any names, bank accounts or user accounts as part of obtaining the ISO image. No spyware reports to any vendor. Ncrack is a tool in this particular distribution that helps the user identify user accounts with weak passwords without having to log into each host. It should be noted that all tools offered by the Kali Linux distribution must be used only legally. The BackTrack project continues as Kali Linux.
Main characteristics:
- Size – 2 GB
- RAM - 512 MB
A detailed review of Kali Linux is written in this article
Instructions for installing Kali Linux are described in this article
USB Programming in Linux
The general principles of organizing work with USB can be found in the works of Pavel Agurov, but here only one simple diagram will be considered, commenting on the principle of working with any USB device. In its simplest form, a USB device can be represented as a kind of tree structure, including “Configurations”, “Interfaces” (interfaces) and “Endpoints”.
The “endpoint” of a device is a software entity that has its own unique identifier and can have a buffer with a certain number of bytes for receiving and transmitting information. But to get there, the application (under host control) needs to programmatically go through the Device, Configuration and Interface layers. Each of them is described by a standard software structure, and it is possible to choose which interfaces should be used to get to the desired endpoint.
An important feature of USB is the presence of only one Master (master), which is usually a computer. The USB device itself always responds to various requests from the computer, no matter what it is about and no matter in which direction the information is transferred.
A developer can write a full-fledged driver to work with his USB device using the linux/usb.h header file already available in the system.
The fact is that most low-level problems in Linux have already been solved, and any written program will be of an applied nature, although formally it will be called a driver. It's also fair to say that with each new version of the Linux kernel, working with USB becomes easier.
A driver written to support a USB device is designed to solve the following problems:
- driver registration and removal;
- device registration and deletion;
- exchange data with the device.
But we can definitely name one important and natural drawback that the driver-level software module carries with it - platform intolerance.
But what if you don’t have time to write a driver, but you urgently need to create a program that works with a USB device, which will itself decide how, when and which of these devices it will work with? Moreover, I would like it to be easily transferred to other platforms (Windows, Mac OS, etc.) with at least minimal changes in the text or without them at all.
Moreover, it needs to be written in Pascal or even C#. Is it possible? Quite. But this requires the libusb library (https://www.libusb.org/). If the Linux distribution does not have such a “beast” (nothing is displayed in response to the locate libusb.so command), then there are several ways:
- install this package using a standard installer, for example, for Fedora write in the console: yum install libusb;
- download the RPM package yourself (https://sourceforge.net/projects/libusb/) and try to install it;
- download the source package (https://sourceforge.net/projects/libusb/files/) and build the library on your machine.
Important note. There are two branches of the project posted on the libusb.org website - versions 1.0 and 0.1. The article describes working with the old stable version, so be careful: when using version 1.0, there are discrepancies in the API.
To understand whether the system has devices that correspond to the USB interface, you can, for example, use the usbview utility (https://usbview.sourceforge.net) or its advanced analogue - usbview2 (https://usbview2.sourceforge.net/) , although any modern Linux has built-in console commands for such purposes.
In this article we will limit ourselves to the basics and try to understand the algorithm for creating a similar program for viewing USB devices, only it will work in the console.
And as a basis we will take a simple program from here - https://www.linuxquestions.org/linux/answers/Programming/Developing_Linux_Device_Drivers_using_Libusb_API. Let's add Russian comments to it and compile it in C++ program mode. At the same time, in the compiler settings we will indicate the use of the libusb.so () library.
As you can see, this example fully corresponds to the logical diagram described earlier - we start work with a general enumeration of devices and end with specific logical points. In this example, there is a simple enumeration of everything contained in the system that is related to USB. But you don't have to do that. To work with a specific device, we may be interested in a specific product manufacturer code (idVendor) and product code (idProduct). If in this example the already specified header usb.h is replaced with , then this will be a completely different library, which is used to create full-fledged (not portable to other types of systems) drivers in the Linux environment.
A similar example is not difficult to find on the Web for the Free Pascal language, which means it is not difficult to write your own graphical utility, similar to usbview, in the Lazarus environment (https://www.lazarus.freepascal.org/).
To do this, you will need to download the libusb.pp file (for example, here https://www.sciencetronics.com/download/fpc_libusb.tgz).
A fragment of a program written in Lazarus to read a list of USB devices () is presented on page 58.
So, we found out that we have the languages C, C++ and Pascal at our disposal. But this is not the limit; consider a simple example in C# ().
This example (which runs successfully on Linux using the Mono platform) uses a special .NET wrapper called #USBlib to access the libusb.so library. The developers claim that it is equally suitable for both libusb.so and its brother running under Windows (https://libusb-win32.sourceforge.net/). By the way, it is important to note that the feature sets of libusb-win32 and libusb are the same, and specific platform differences are indicated in the documentation. This is the main advantage of the libusb library - brilliant platform portability of the source code.
In conclusion, it is worth recalling that the specific task we worked on using different languages and tools - listing USB devices - is solved in Linux using built-in commands
The developers claim that #USBlib is equally suitable for both libusb.so and its brother running under Windows (https://libusb-win32.sourceforge.net/). By the way, it is important to note that the feature sets of libusb-win32 and libusb are the same, and specific platform differences are indicated in the documentation.
Damn Small Linux
As the name suggests, Damn Small Linux is very small. It's only 50 MB. Small size doesn't mean it's not strong enough. The distribution runs surprisingly fast even on low-power hardware. Damn Small Linux contains many applications:
- Firefox
- VNC Viewer
- file manager
- messenger
- web server
Thus, DSL is capable of:
- browse the web
- write documents
- manage files
- play music
- manage images
- and everything else that a regular computer does.
This portable Linux distribution can function as a server (SSH/FTP/HTTPD) directly on a CD/USB drive. DSL is based on another Linux distribution called Knoppix. Therefore, applications from this distribution can also be run in the DSL.
Main characteristics:
- Size - 50 MB
- RAM - 256 MB
Installation instructions for Damn Small Linux are described in this article
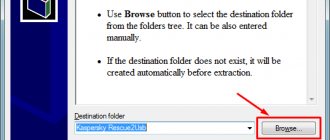
Preparing to install Ubuntu
Before starting the installation, you must prepare the distribution kit - write it to a disk or USB drive (flash drive). You can install Ubuntu from a bootable USB flash drive (if the BIOS supports booting from a USB drive) or from a CD/DVD disk. All preparatory processes are described in the following articles:
- Download Ubuntu
- Burning an iso image to disk - for installation from a CD/DVD. Writing an iso image to a USB drive (creating a bootable flash drive) - for installing Ubuntu from a flash drive.
- Preparing a disk in Windows before installing Ubuntu - this item only needs to be done if you already have Windows installed and want to install Ubuntu next to it.
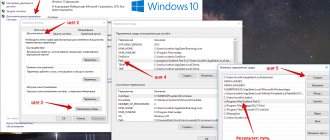
- Setting up the BIOS to boot from disk or USB drive
- Running Ubuntu without installing it on your computer (LiveCD)
This guide walks you through the installation process of Ubuntu 12.04. Other versions of Ubuntu are installed in exactly the same way. Updated: Ubuntu 18.04 installs similarly. Feel free to use this guide.
First of all, you download the Ubuntu distribution kit, then burn it to the desired media (flash drive or disk). If you want to install Ubuntu next to Windows, then you pre-allocate free disk space. Then you restart your computer, configure the BIOS, and boot from the disk (or flash drive). You can boot either into a LiveCD system (a system that works without installation on the computer directly from the disk) or you can start the installation process without loading the LiveCD system. Let's look at the entire installation process step by step.
If you are installing Ubuntu for the first time and do not have sufficient experience, then it is highly advisable to backup your important data (copy it to another medium). Naturally, this is true if you are not installing Ubuntu on a clean computer.
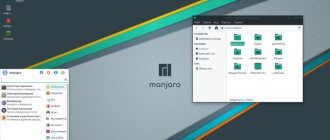
Porteus Linux
This Linux distribution is less than 300 MB in size. Porteus is available in both 32-bit and 64-bit versions. Like Slax, Porteus is also modular. Precompiled modules can be activated or deactivated before booting this Linux distribution. The user can select the default software and select applications like browser, office, etc. Even Skype can be set as the default application. The user has the opportunity to select suitable drivers. Finally, the user can configure the system password and OS boot mode.
Main characteristics:
- Size - 300 MB
- RAM - 256 MB
Installing Linux on a flash drive: preparing tools
To install Ubuntu we need neither more nor less:
- Flash keychain. Volume, of course, matters. The more, the better, but it is advisable to start with 2 GB (this is the bare minimum) or more. The dependence of the price of a flash drive on the volume today is no longer so high, especially if you remember the prices two years ago... Theoretically, it is possible to install ubuntu with flash
and 1 GB, but with a capacity of 4 GB, at least you can use a flash keychain for other purposes , rather than storing the distribution. In addition, you must understand that the operating system tends to grow. In the future, it can and will need to be updated and software installed. - Ubuntu distribution. We take into account the latest release - version 8.10. You can get it in a variety of ways, we offer the following:
- download ISO image (size - about 700 MB). True, you will have to wait two or more weeks for the parcel;
- order a free distribution kit with free delivery;
- borrow from friends/acquaintances;
- buy.
Tiny Core Linux
At 10 MB, this Linux distribution is the smallest portable OS available. It is also the smallest operating system that requires RAM. One of the downsides of being so small is that it doesn't come with any apps, file manager or anything like that. They can subsequently be installed by users. Since Tiny Core Linux has nothing extra, it runs very quickly.
Main characteristics:
- Size - 106 MB
- RAM - 48 MB
Installation instructions for Tiny Core are described in this article
Programs for installing Linux from a flash drive
There is a huge list of software for burning operating system distributions onto USB drives. But the most versatile and proven is Unetbootin, as it works on both Windows and Linux.
How to burn an image using Unetbootin:
- Download the program from the link
- Run it, specifying that the target will be a disk image.
- By clicking the button with three dots, specify the distribution image.
- Select the type “USB Device”.
- Specify the carrier letter. If the media is connected in a single copy, the program detects it automatically.
- Click "Ok". The data on the media will be lost.
Everything is ready to start installing Linux from a flash drive to a laptop. You can close the program.
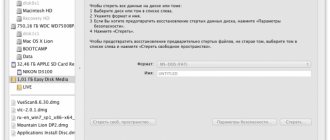
FatDog64
FatDog64 is a 64-bit multi-user Linux distribution and a derivative of Puppy Linux. Many applications are included out of the box. Since it contains more applications than Puppy Linux, it is heavier.
FatDog is packed with applications such as Libre Office and GIMP. There are other lightweight apps for editing images, taking notes, and various other tasks. FatDog64 has room for entertainment as it contains several games. It has a persistent file save feature that prompts the user to save any changes. This feature ensures that system changes made by the user remain unchanged during future use.
Main characteristics:
- Size - 350 MB
- RAM - 256 MB
Knoppix
Knoppix is a well-established and stable Linux distribution. This portable Knoppix OS was one of the first live CD distributions to gain popularity. It includes more than 1000 software packages. Browsers such as Chromium, Firefox/Ice Weasel are available. Office Libre is available for the office suite. Data recovery and system recovery tools are part of this distribution. There are many distributions derived from Knoppix. Adriane Knoppix, Damn Small Linux and Kali Linux are some of them.
Main characteristics:
- Size – 700 MB
- RAM - 128 MB
Instructions for installing Knoppix are described in this article