In the era of digital photographs, tools for processing them were required. The place of the best image editor is rightfully taken by Photoshop. Its possibilities, if not limitless, are certainly very significant. But most users completely misuse some Photoshop settings or are not even aware of their existence. To use the full power of the program, you need to configure it correctly.
What are the options?
Many people, when opening the program for the first time, find themselves faced with dozens of buttons, sliders and parameters. A completely logical question immediately arises: “Where are the settings in Photoshop?” Editor options can be divided into several categories:
- Hardware settings of the program itself.
- Colors.
- Brushes and interface options.
- Separate parameters for each tool.
Setting up Photoshop correctly and conveniently for the first time is almost impossible. It takes time to get used to the program. This may take several hours, a week, a month - it all depends on the frequency of work.
Differences between Photoshop CC and CS
The debate about which version of the popular editor is better has been going on for several years.
Photoshop CC has built-in advanced capabilities for teamwork on a project, improved capabilities and performance of 3D design and 3D printing, and an expanded standard set of brushes and some tools. In addition, the program runs on a new engine, which means it has become a little more productive.
The differences between the CC version and the CS version will be subtle or completely invisible to a novice user. Setting up Photoshop SS is almost identical to setting up any other Photoshop, therefore, following the general recommendations in this article, you can adjust this editor as you please.
How to set up Photoshop cs6 for an artist CURSORS
Paint brushes
The brush tip is full-size; place the crosshairs on the brush tips purely for convenience.
How to set up Photoshop cs6 to work
Leave it as it is, I personally didn’t change anything. Just use CAPS LOCK to display the cursor.
Transparency and color gamut transparency in Photoshop
I didn’t touch anything here, I left everything as default.
Units of Measurement and Rulers
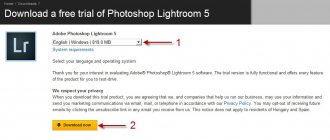
If you use the Photoshop cs6 setting for web development or simply for some of your needs, then I recommend leaving the ruler in pixels. You can choose the format of your choice from the list and see the screenshot of how to set up Photoshop cs6.
Column
By default, everything will work perfectly, leave it without changes.
Main settings
You can go to the main parameters window using the Ctrl+K key combination. There are quite a lot of parameters here, and if you describe each of them separately, you will get a whole documentation for Photoshop, so we will dwell in detail only on the important points.
- So, the first tab is General (basic settings). Here you can select the dynamic palette display, color system and image interpolation method. Below is a list of useful items. By default, they are quite acceptable; if you are not sure of the correctness of the actions, there is no need to touch them.
- Next is the Interface tab. Here you can select the background color and the window itself, the program language and font size. Everything you need to set up Photoshop for yourself.
- File Handling menu. Menu for saving and opening documents. Here you can also leave everything as default.
- Performance tab. Described in more detail below.
- Next are various interface settings. You can select the display mode of rulers or their values, cursors in different situations, guides and grids, plug-in settings window and typography.
How to customize Photoshop cs6 for yourself - Settings - General
Here is a list with parameters; I suggest disabling some functions so that they do not take up the resources of your machine. Disable the clipboard function. It takes up considerable resources.
How to set up Photoshop cs6 to work in Russian INTERFACE
Here everything can be left as default, although you can play around and see. You can change the color scheme of the interface, but in my opinion the dark one is the most convenient for work.
You may think differently. You can check the channels in color box so that you can see how the RGB channels work. And the main thing is to change the interface language. In Russian, I think the program will be more understandable. Although the first time Photoshop is intimidating with its power and many buttons.
Performance Settings
In the Performance tab, you can select Photoshop CS6 settings that will make it more comfortable to work even on weak machines. The first section is memory. Using the slider you can set any value. The system automatically calculates the available number of bytes of memory and the most favorable range of values, in case it is difficult for you to decide for yourself.
Cache and history. History is needed to save actions and possibly cancel them. The number of steps to record is up to you. 20-30 points is a completely acceptable value. The cache is needed to store the current image at different scales in memory. Thus, it is easier for the program to reproduce a saved image than to scale it every time.
File processing how to set up photoshop cs6 for work
I immediately recommend unchecking the “Display a warning before saving files in Tif format.” This function informs that the number of layers will increase the size of the output file. You can also disable the function of maximizing PSD and PSB files by setting NEVER.
PERFORMANCE
The main part of such a powerful unit. Quite a few important Photoshop settings are hidden here. The first is Memory Usage.
You must understand that everything here depends on the power of your hardware (RAM). How to set up Photoshop cs6 to work and close all other running processes, then you can separate say 70-80% as you can see in the screenshot, I set it to 83%. There will be enough work, since the laptop is quite powerful. Photoshop does a great job.
HISTORY AND CACHING
Let's change the action history item at this stage, since it is responsible for the number of steps in the history and this parameter is important.
Working disks.
I think you yourself know how important this parameter is. Everything is simple here - drive C. Your system is located on this drive; I recommend saving and storing everything on drive D or E. Sometimes 20-30 GB is enough for these purposes.
Setting up the GPU.
Check the box next to OpenCL. No matter how this function is not required, if you have a powerful processor, it will not be superfluous.
Graphics and disks
In the disk settings section, you can select a local partition that will be used to store temporary files, and also, if necessary, act as a swap partition. By default this is the system partition, but you can use a disk with more free space. Ideally, you should reserve a separate section for Photoshop, and indicate exactly that in this window. This will speed up the program a little.
The last window is GPU usage. It's definitely worth checking the box if you have an additional video card. To render large images, Photoshop needs as much processing power as possible. In the additional menu of this item you can select the GPU usage mode.
Interface
Now let's look at a few options that control the Photoshop interface. Click on the Interface category.
Color theme
The first option we'll look at is Color Theme. This setting controls the overall color of Photoshop's interface. In this case, "color" only means shades of gray. Adobe gives us four different color themes to choose from. Each topic is represented by a sample. By default, the color theme is the second swatch from the left.
Adobe started using this dark theme in Photoshop CS6. In the CC version, this theme is also used by default. Before CS6, earlier versions had a much lighter interface.
To choose a different color theme, click on its swatch. The arsenal includes one darker theme than the standard one, and two light themes. As an example, I will choose the lightest of all four themes. Note that the theme also controls the color of Photoshop's dialog boxes.
In the image below we can see that Photoshop's interface has become much lighter. Adobe's idea with dark mode was that it would be less intrusive, allowing us to more easily focus our attention on the images. Personally, I agree, so I'm sticking with the default theme. But some users prefer a lighter interface. Choose a theme of your choice that you like best. You can change the Photoshop color theme in the settings at any time.
Highlight color (Photoshop CC)
In Photoshop CC, Adobe has added a new Highlight Color option to the interface settings. This option is not available in CS6. This refers to the color that Photoshop uses to highlight the currently selected layer in the Layers panel.
By default, the highlight color is a shade of gray that matches the overall color theme. In the screenshot below we see Photoshop's Layers panel with the active Background layer highlighted in the default shade of gray. We will study what types of layers there are in the “Layers in Photoshop” section.
Another highlight color we can choose is blue.
Now we see that the active background layer is highlighted in blue. I prefer the default gray color as it is also less intrusive. As a color theme, you can change the highlight color at any time along with any other Photoshop settings.
Menu font size
The next parameter worth considering in the interface settings is Ul Font Size. It is available in both CC and CS6. Menu Font Size controls the size of text in the program's interface (Ul stands for User Interface). Adobe's default font size is set to Small.
If you have trouble reading small print, you can increase the size. To make the text larger, select one of the two options: Medium or Large. There is another option Tiny (Tiny), this is for those who want to create discomfort for the eyes. I use a large font size to minimize eye strain from long periods of time at the computer.
You will have to close and restart Photoshop for all your changes to take effect. For comparison, take a look at the two layers panels below. On the left is the default text size, which is Small. The panel on the right looks like this after changing the text size to Large. Don't forget to restart Photoshop.
Color Setting
Photoshop supports many working color profiles. You can go to the Photoshop color settings menu using the key combination Shift+Ctrl+K. There are few items here, but many options within each drop-down list.
- The first section Settings is a list of settings. Offers several preset macros to choose from. In most cases, you can use one of them.
- Next comes the settings for the working color profile. Classic Adobe RGB (1998) is suitable for most professional camera shots and other images. Having the largest color gamut, it allows you to display and adjust colors in Photoshop on a monitor or print.
- The last point is the choice of action policy. For each color space there are three identical options for working with the color profile. Off – disables color management for images whose profile differs from the working one. Preserve Embedded Profiles (save original profiles) is the best option. Allows you to save the built-in profile and restore it in case of incorrect conversion to a working one. Convert to Working – Simply converts the original profile to a working profile.
In order to fully control the color parameters of incoming images, check all three bottom boxes in the Color Management Policies section. In this case, the program will offer several actions to choose from each time if the color profile of the incoming file does not match the built-in working profile.
Tools (Photoshop CC)
If you're using Photoshop CC, go to the Tools category on the left to open the settings associated with the Photoshop tool. The Tools section is new to Photoshop CC. CS6 users should remain in the Interface category.
Option "Show hints"
The first option in the “Tools” section settings is Show Tool Tips (in CS6 this option is in the “Interface” category). This is a helpful message that appears when you hover your mouse over a tool or option in Photoshop. Tooltips mean a brief description of a particular tool or parameter.
For example, hover over the “Show tooltips” option. The tooltip will appear in black font on a yellow background, explaining that this setting determines whether to show tooltips for controls and tools.
In the screenshot below, you can see that when you hover over a tool icon in Photoshop's Toolbar, a tooltip will let you know which tool you've selected.
The "Show tooltips" option is enabled by default. If you're a beginner in Photoshop, this is a great way to get started with the program. Once you become proficient in Photoshop, these tips can start to get in the way. If you think that you no longer need them, simply uncheck this option in the settings.
Change tool with Shift key
The next option in the Tools category in Photoshop CC is Use Shift Key for Tool Switch. In CS6 you will find it in the main settings. This option affects the selection of Photoshop tools using a keyboard shortcut. By default this option is active.
All of Photoshop's tools are located in the Tools panel to the left of your work area. Adobe has grouped related tools together to optimize your workspace. For example, left-click on the Lasso Tool (L) and a drop-down list will appear with similar tools such as the Polygonal Lasso Tool and the Magnetic Lasso Tool. Note that all three of these tools use the same "L" key on the keyboard.
With the Shift Tool Change option enabled, pressing the L key will select the Lasso tool. No matter how many times you press the L key, only the first Lasso tool in the list will be selected. To move to the rectilinear or magnetic lasso, hold Shift together with the L key. This works for all tools in the toolbar that use the same key combination. To save time and if you don't need this option, you can disable it by unchecking the box next to the "Shift Tool Change" option. If this option is disabled, you can switch between instruments that have the same set of keys by simply pressing the corresponding letter on the keyboard.
Interface personalization
Photoshop offers a fairly wide range of interface settings. It is possible to change the position of almost all tools, tabs, add or remove any of them by simply dragging and dropping.
There are also factory saved workspace macros for various tasks. You can select them in the “Main workspace” tab in the upper right corner, immediately above the entire work area. In the drop-down list, you can select ready-made samples, reset settings, or delete a workspace macro.
By the way, choosing the type of workspace is a purely individual matter. For artists it will be useful to constantly display a navigator or palette, for photographers a histogram, for designers coordinates.
In the Photoshop settings you can control the main menu parameters. By default, the window opens using the combination Shift+Alt+Ctrl+M and contains only two tabs and one list of current settings. It makes sense to disable rarely used tools in order to save screen space, but only if it is really necessary, because you never know what pitfalls the processed photo hides.
In the same window you can configure keyboard shortcuts based on your needs. You can connect any combinations for any items. The menu is intuitive, there are no complex settings in it, which means we won’t dwell on this in more detail.
Interface
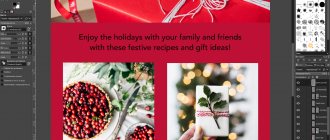
File processing
First of all, uncheck the box against “Display a warning before saving files in TIFF format”, it displays a warning that the number of layers increases the size of the output file. You can also cancel maximizing the compatibility of PSD and PSB files by changing the option to “Never”.
Performance
This is one of the important Photoshop settings that decides a lot)
- Memory usage
It all directly depends on your RAM. On average, if you don’t use other programs when working in Photoshop, you should separate 70-80%, as you can see, I separated a little more than 80%, and Photoshop can handle it completely.
- History and caching
At this stage, I strongly advise you to change the action history item. This parameter is very important for everyone; it is responsible for the number of steps in the story. That is, how many times can you press undo actions Ctrl + Z. For full-fledged work, I think 500 is completely enough, but don’t take into account the maximum you can only do is 1000. The longer the history of actions, the more RAM is required.
- Working disks
I won’t talk about how this parameter works and how important it is, for too long. Let me just say that this affects the speed of work. For these purposes, preferably indicate a separate disk where there is no OS. +20gb is enough to complete most tasks.
- GPU Settings
You must definitely check the box next to “OpenCL”. This feature is not required for full functionality; it makes navigation and editing of files (such as visualization, effects) smoother. Unfortunately, my video card does not allow me to use this feature, which I really regret.
Cursors
- Paint brushes
Set the brush tip to full size. I advise you to check the box next to show the crosshair on the tip of the brush purely for convenience.
- Other cursors
Leave it as “Standard”. To accurately display the cursor, use Caps lock.
Tool Settings
In addition to customizing the ease of use of the program, it is possible to fine-tune brushes and other tools. Each has a “flash menu” that opens directly above the work area when activated. For example, for brushes you can select the type, size, blending mode, pressure and several settings for tablets. There is also a button to go to a full menu for setting up and managing brushes.
Brushes in Photoshop have quite a lot of functions, but they are all useful. The menu with brush presets opens by right-clicking in any part of the workspace, but the global settings menu is opened by LMB-clicking on the icon with brushes in the side menu on the right or on the icon in the flash menu. Here you can choose any contour effects, add texture, blur, rotate, refine and stylize just the contour or the entire print. More flexible brush settings in Photoshop can be done with a graphics tablet. The effect of pressure and the quality of the texture of a particular brush at the edges of the line will be immediately noticeable. This is more relevant for brushes of complex shapes.
Tool Settings Manager
From the same menu you can go to another settings block by clicking on the icon in the lower right corner. In this window you can add or remove brushes, create your own, sort and create tool sets. You can load not only brushes, but also any other elements from the drop-down list. You can download them ready-made or make them yourself.
Unfortunately, it is impossible to recommend any general settings for this menu. It all depends on your preferences and type of activity. Try just moving the sliders and see what happens. You will definitely find a brush of the right shape and texture.
Seal
Photoshop can be used not only for drawing or processing photographs, but also for high-quality photo printing.
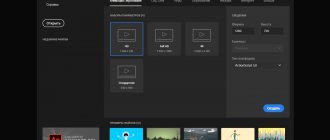
All printing settings in Photoshop are located at File/Print (File/Print) or Ctrl+P. There are several printing methods depending on what kind of images you want to get on paper:
- Printing low resolution, vector drawings, text, monotonous abstractions and low resolution photos.
- Printing photographs and images of high resolution and geometry with complex patterns.
In the first case, you can simply go to the print menu by pressing Ctrl+P. All that needs to be set in this window is the Printer Manages Colors item (the color is managed by the printer). If desired, in the upper section of Printer Setup, you can select the sheet orientation or make adjustments to the advanced settings of the printer itself.
As in the first case, go to the print section Ctrl+P. In the color management menu, you must select Photoshop Manages Colors (color is controlled by “Photoshop”). Next, select a color profile. It usually comes with the printer drivers, but can also be downloaded manually from the printer manufacturer's website. The color profile should describe the printer's operation as accurately as possible. Optionally, you can set the rendering method and black point compensation and other parameters. This method will allow you to convey colors as accurately as possible during printing.
There is no need to change the standard RGB color scheme. All modern printers perform automatic profile conversion.
What to do if you have configured too many things?
After visiting all the settings sections, dragging various sliders and hiding a couple of important windows, you may find that the program has become noticeably worse. There's nothing wrong with that; you don't have to reinstall the program. In a few steps, you can return the standard Photoshop settings and get the product out of the box.
- To do this, at the moment the program starts, hold down the combination Shift+Ctrl+Alt. A confirmation window will appear. After agreement, the program will restart with factory settings.
- But you can also click on the “Photoshop” button and restart the program.