In this tutorial you'll learn how to turn a series of images into a looping animation using Photoshop.
To create an animation you will need:
- Program
- with images
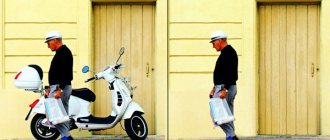
This method works well for creating stop-motion animation using a series of shots taken with a DSLR, compact camera, or mobile device. In this example, we'll use a series of photos taken in Burst mode from an iPhone. Download and unzip the series of images (see link at the beginning of the lesson). You can also use your own series of photographs.
Tip: This method can also be used to create GIF animation from a short video. Let's get started!
Importing a series of photos
Open Photoshop and go to File > Scripts > Load Files into Stack.
Click the Browse button and find the photos you'll be working with. Hold down the Shift key, select all files and click Open.
Click OK to import the selected photos into one multi-layered file.
Pay attention to the layers panel on the right side of the workspace, several new layers have been created here. We will turn these individual layers into frame-by-frame animation.
How to import videos (optional)
If you're starting with a short video, you should first convert the video frames into separate layers. To do this, go to the File > Import > Video Frames to Layers tab.
Find and select the video file you want to use and click Open.
Click OK to convert the video clips into one multi-layer file.
Note: Photoshop may not be able to import a video that is too long. Use the option in the import window to limit the number of frames imported. You can import the entire video or some part. In addition, you can limit the number of imported frames at a specified interval, for example, every 2 frames.
Inbetweeners
In Photoshop, an element can be animated in several ways:
- Draw several frames, manually changing the position and properties of the elements. If the animation is long enough, then drawing each frame takes a lot of time.
- Insert intermediate frames. You only need to manually set the layout states: at the beginning and end of the animation. Photoshop itself will add the necessary frames between these states. This method is suitable for making an object fade in and out or to show its movement.
First I animate the image of the balalaika. To make the image appear smoothly, I use the “Insert Intermediate Frames” tool. For Photoshop to animate an element itself, you must set two states for the element—a start state on the first frame and an end state on the next.
So I'll add another frame to the Timeline using the "Make a copy of frames" button.
After adding a new frame, I switch to the first one and remove the visibility of the balalaika layer. You can also set the layer opacity to 0%.
In the next frame I check whether the layer with the balalaika is visible.
After working with the balalaika image, I adjust the appearance of the text line. In the first frame, I select the "Soul sings" text and move it to the right outside the layout. I do the same with the text “3 strings” - move it to the left until it disappears.
In the second frame I return the text back.
Great. Now let's insert intermediate frames between the key frames.
To do this, click the “Create intermediate frames” button on the “Timeline”.
In the dialog box that appears, I indicate how many frames need to be added.
The more frames, the longer the animation and the smoother the element moves. If there are too few frames, the elements will move jerkily.
The first part of the animation is ready. Now you can play it back and see what happened.
I click on the play button on the Timeline.
Inserting intermediate frames helped quickly create animation with smooth appearance and movement of elements.
Appearing, disappearing and moving can be combined with each other to achieve even more interesting effects.
Convert layers to frames
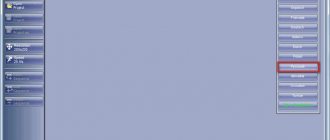
In the upper right corner of the Timeline panel, click the menu icon. From the drop-down list, select Make Frames From Layers. As a result, all layers are converted into separate frames for animation.
Click the Play button at the bottom of the Timeline panel or press the Spacebar on your keyboard to view the animation.
Note: If your animation is playing in reverse order, click the menu icon in the Timeline panel again and select Reverse Frames.
Time scale
Before creating an animation, you need to prepare the necessary tools - turn on the display of the “Timeline”, which helps manage frames in the animation.
To do this, I open the “Window” tab and check the box next to the “Timeline” line.
A wide line should appear at the bottom of the Photoshop window, with which you can control the frames in the animation.
To create the first frame, click the “Create frame animation” icon on the “Timeline”.
Once the first frame has appeared, you can begin to create movement.
Setting up the animation loop
At the bottom of the Timeline panel there is a repeat menu, click on the small arrow to expand the list and select Forever. This will create a looping animation.
Click the Play button at the bottom of the Timeline panel or the Spacebar on your keyboard to preview the animation.
Creating animation
Step 1
Now we are all ready to create the animation. Go to Window
- Timeline
and click on the
Create Video Timeline
.
Step 2
Turn on the visibility of the first and second frames, then select the second frame in the layers panel.
Step 3
Reduce the opacity of the “Frame 2” layer to 0%.
Step 4
On the timeline, expand the second frame by clicking on the arrow on the timeline, and move the time indicator to the position 0:00:00:05.
Step 5
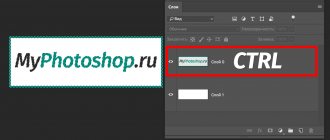
Now we need to create the first keyframe. Close to Opacity
(Opacity) click on the timer icon. As a result, a yellow diamond will appear on the scale - this is our first key frame of the animation.
Step 6
Move the time indicator to 0:00:00:13 and increase the layer opacity to 100%. After changing the opacity, a keyframe will be added automatically.
Step 7
After that, move the indicator to 0:00:00:20 and set the layer opacity to 0%.
Step 8
Select the next layer “Frame 3” and reduce its opacity to 0%. Then we create keyframes with different opacity levels, as we did above: 0:00:00:13, 0:00:00:20 and 0:00:00:26.
Step 9
Select all three keyframes on the timeline, right-click on them and select Copy
(Copy).
Step 10
Move the time indicator to position 0:00:01:00, create a new key frame, right-click on it and select Paste
(Insert).
Step 11
After that, move the indicator to 00:00:02:00 and paste the copied keyframes again. Move the first of the copied keyframes to position 0:00:01:24, and the last one to 0:00:02:20. This will allow us to make the effect more interesting.
Step 12
Now we need to move the indicator to 0:00:03:10 and insert the keyframes again. After this, move the first of the copied frames to 0:00:03:13, and the last one to 0:00:03:21.
Step 13
Now let's animate the next layer. Select the “Frame 4” layer and reduce its opacity to 0%. Then we add three keyframes, alternating opacity as we did above: 0:00:00:13, 0:00:00:18 and 0:00:00:22. Then we copy these frames and paste them side by side so that the central one is at position 0:00:01:03.
Step 14
We add three more new frames: 0:00:03:00, 0:00:03:05 and 0:00:03:20.
Step 15
Copy the three frames created in step 14 and move them to position 0:00:04:00.
Step 16
In the layers panel, select the next layer and reduce its opacity to 0%. After that, add three keyframes at positions 0:00:00:10, 0:00:00:15 and 0:00:00:20. Don't forget to alternate layer opacity.
Then we copy these three frames twice and move each copy so that the central key frame of the first copy is at the position 0:00:01:00, and the second copy is at 0:00:01:15.
Step 17
Add three new keyframes at positions 0:00:02:15, 0:00:02:20 and 0:00:03:20.
Step 18
Now we need to create an animation for the next layer. Reduce the opacity of the “Frame 6” layer to 0% and create three key points at positions 0:00:00:25, 0:00:01:00 and 0:00:01:05.
Then we copy these three frames twice and move each copy so that the central keyframe of the first copy is at the position 0:00:01:15, and the second copy is at 0:00:02:00.
Step 19
Copy all nine key frames and paste so that the first frame of the copy is at position 0:00:03:00.
Step 20
Select the last layer “Frame 7” and reduce its opacity to 0%. After this, we create three frames at positions 0:00:00:15, 0:00:00:18 and 0:00:00:22.
Step 21
Duplicate these three frames twice and place the copies so that the first frame of the first copy is at position 0:00:01:24, and the second copy is at 0:00:02:04.
Step 22
Duplicate all six key frames and paste them so that the first frame of the copy is at position 0:00:03:10.
Step 23
Step 24
Move the indicator to the very end of the timeline and move the layer with the TV texture down 500 pixels while holding down the Shift key.
Exporting animation as GIF
Go to File > Export > Save for Web (Legacy)... (File – Export – Save for Web (Legacy)...).
- For Preset, select GIF 128 Dithered.
- Set Colors to 256.
- If you are using GIF for the web or want to limit the size of the animation file, make changes to the Width and Height fields in the Image Size section.
- Just below in the “Animation” section, set the Looping Options to Forever.
Click the Preview button in the lower left corner of the Export dialog box to preview the animation in a web browser.
Click Save and choose a location for the animated GIF.
Congratulations! You've just created your animated GIF. Post it online to show the world. Please note that you can also use this technique for any layered Photoshop file.
Animation from video
The easiest way is to convert video into animation. You don't need to configure anything. You just need to open the video in Photoshop. The utility accepts avi, mov, mp4, mpg, mpeg, m4v formats. To run them correctly, you need QuickTime installed. The media file added this way cannot be edited or trimmed. Just convert it to graphics.
But there is another method. Here's how to make a gif from a movie in Photoshop:
- Go to File - Import.
- Click Video Stills to Layers.
- A menu will open with some settings. On the right there will be a mini player for preview.
- In the Range box, select one of the options: Start to End or Selected Only. In the second case, the part of the video you selected will be inserted. To cut the desired fragment, move the black markers under the player. The piece that is located between them will be added to the project.
- A maximum of 500 frames can be loaded into Photoshop. If the working material is larger than this value, it will have to be cut or added in parts to different documents.
- Check the “Create frame-by-frame animation” checkbox. This will automatically apply all the necessary settings to the video. Without this, the dynamics will have to be set manually.
- The “Keep every [number]” option will allow you to import not all slides, but, say, every third. The resulting GIF will be choppy.
- Confirm the action and wait until the utility processes the video.
- Go to Window - Workspace and select Motion. This set of settings is best suited for creating animated pictures.
- Below there will be some kind of media player. It indicates the frame rate. There is a “Play” button, rewind, and video track zoom. All pictures are displayed one by one.
- They will also be distributed into layers, the list of which is located at the bottom right of the Photoshop window. Click on one of them to work with a separate slide.
- You can delete some frames or edit them.
- All pictures will be in one area. This is not very convenient. To turn off the visibility of a layer, click on the eye icon next to it. The slide will remain in the document and, if necessary, will appear in GIF animation. To make it appear again, click on the place where the “eye” was.
- If you want to try a different type of visualization (watercolors, pencils, neon lights), click on “Filters” in the menu bar.
- To add Photoshop effects (glow, shadow, gradient, pattern), right-click on the layer and select Blending Options.
- To swap slides, drag them with your cursor.
- To select the display time (or delay) of a frame, click on the small black triangle below it.
Animation from pictures
Here's how to create an animation in Photoshop using pictures:
- Insert the required images. Add each of them to its own layer (delete the layer called “Background”).
- Typically, drawings open in windows or tabs (depending on Photoshop interface settings). To combine them in one workspace, copy them there or move them. They will automatically be sent to new layers.
- Go to Window - Workspaces - Motion. The Animation panel with the player is activated.
- Select the layer that you want to be the first frame in your GIF.
- Make the remaining sheets invisible by clicking on the eye icon next to them.
- On the player panel, click on the “Convert to Animation” button at the bottom right. It looks like a rectangle divided into three parts.
- There will be one frame with the layer you selected. Duplicate it. To do this, click on the small “Create a copy” button.
- Make the number of slides you need.
- The result was a gif animation from one picture. To fix this, click on the second frame and make the second layer visible, removing the “eye” from the first. The desired object will be displayed.
- So, fill out the slides one by one.
If you are creating a large layout, this method will take a lot of time. In this case, you can do the following:
- The Animation tool has a button in the top right corner (in the panel itself, not the Photoshop window) that looks like a list with an arrow. Click on it.
- In the menu that appears, select “Create frames from layers.”
The same actions are available with images as with video slides.
Creating Advanced Animations in Photoshop
While animation in Photoshop is not a new concept, it has certainly come a long way in the last few years, with the Timeline panel overhauled, video layers introduced, and the ability to create keyframe animations. These additions have truly improved Photoshop.
Even if Photoshop is still a long way from producing the high-quality animations of programs like After Effects, it still has enough power to create complex animations—which is especially useful if you don't want to spend the time learning a new application.
In this article, I will share several modern techniques that will help you create complex animations. We'll look at the Timeline panel and the different properties that can be animated. We'll also explore the role of adjustment layers, filters, and smart objects in animation (and how to combine them to achieve amazing effects). Since this article will focus on modern techniques, an intermediate level of Photoshop knowledge is required.
Timeline panel overview
Opening the Timeline panel (“Window” → “Timeline”) allows you to choose between two types of timeline: video and frame. Frame timeline is for frame-by-frame animation, and can be very limiting. It typically converts the layers in the Layers panel into individual frames. I won't go into detail on this timeline; I want to focus on the video timeline.
Selecting a timeline in Photoshop
Video Timeline
Video Timeline allows keyframe animation, an animation process in which you define the key points of an animation in the timeline, and Photoshop interprets the frames in between to create the animation. Let's create a very simple animation to see how this works.
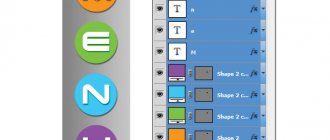
The video timeline panel shows layer (1) with layer properties (2). The Timeline shows the current time indicator (3) and existing key points (4).
As you may have noticed in the image above, the video timeline shows the layers in the Layers panel. Each layer in the timeline has a drop-down panel that represents the layer's properties (these are the properties that can be animated). To animate a layer property, simply click on the stopwatch icon. Note that the keyframe is automatically placed in the current time indicator.
The stopwatch icon is selected for the “Position” property. Keyframe is automatically added to the timeline.
Move the current time indicator to another point in the timeline and move the layer. Again, another keyframe will be automatically added to the timeline.
Moving the layer automatically adds a keyframe to the location where the current time indicator is located in the timeline.
Playing an animation shows how an object on the canvas moves from one position to another.
Photoshop automatically creates animation between keyframes.
Layer Types
Now that we know how the animation process works in Photoshop, let's take a closer look at the common types of layers that can be animated. Because different types of layers have different properties, pay attention to which layers are used.
A standard (pixel) layer is a layer that contains information about pixels. This is the most common (and most basic) layer in Photoshop. Layer properties include:
- position,
- opacity,
- styles.
p1-06-layer-standard-opt Standard layer in the timeline with layer properties.
Adding a layer mask or vector mask to any layer will introduce additional properties specific to that mask. Layer properties that are added to existing layer properties include:
- vector mask layer or position
- layer or vector mask
p1-07-layer-mask-opt Layer with a layer mask in the timeline.
p1-08-layer_vector-mask-opt Layer with a vector mask in the timeline.
The Shape layer contains a shape (one of the shape tools or the Pen tool) or a segment. Because shapes and segments are created with vector mask information, these mask properties will appear in addition to other layer properties. Layer properties include:
- position,
- opacity,
- styles,
- vector mask position,
- vector mask.
Shape layer in timeline with layer properties.
Text layer contains editable text. If the text has been rasterized, the layer will no longer be a text layer, but will be a standard layer with pixel information. Layer properties include:
- transformation,
- opacity,
- styles,
- text deformation.
Text layer in timeline with layer properties.
A smart object can contain any one or combination of the above layer types. The smart object acts as a wrapper for any layer, preserving the original layer when using a new set of properties. These properties include:
- transformation,
- opacity,
- styles.
Text layer in timeline with layer properties.
A small warning about using smart objects. Because a smart object retains the original quality of the layer or set of layers it contains, it can be scaled without losing quality. However, it cannot be enlarged larger than the size of the original layer it contains. This will cause the smart object to lose quality.
Now I want to mention two other types of layers - video layer and 3D layer. Both of these layers are very different from the other layer types mentioned. The video layer is actually a group of layers that contains its own set of properties, while the 3D layer, in addition to containing a unique set of properties, is exposed in an environment completely separate from the other layers. I won't go into detail about these unique layers at this time. You can see how both layers are represented in the timeline below:
Video layer group in timeline with layer properties.
3D layer in timeline with layer properties.
I encourage you to explore these two types of layers. For the rest of this article, I'll only focus on traditional layer views, excluding video and 3D.
Layer properties
Now that we have an understanding of the different types of layers, let's look at the different properties we can animate. Knowing how each property works is important to understanding their limitations and how to work around them. Let's look at the general properties of animation.
The Position property allows you to move along the X and Y axes. Change the position of the object using the Move Tool.
The Position property of the object has been cropped to move the ball back and forth along the x-axis.
Opacity allows you to crop the opacity of a layer. Opacity can be found in the Layers panel.
The object's Opacity is cropped at 100% and 0% to create a fading animation.
The Style property allows you to crop layer styles. Access layer styles by double-clicking a layer in the Layers panel.
Object layer styles (bevel and emboss, color mapping and shadow) are cropped to create a pulsating animation.
A layer mask or vector position crops the x and y position of each mask. This works best when the mask is not associated with the layer.
The mask position is cropped, removing one layer, revealing the background layer.
You can also turn a layer or vector mask on or off. To enable or disable a layer mask, go to “Layer” → “Layer Mask” and choose “Enable” or “Disable”. For vector masks, go to “Layer” → “Vector Mask”. Or “Shift + Click” in the Layers panel.
The mask is cropped, turned on and off for a short period of time, resulting in the effect of an animation appearing.
Common to text layers, the Text Warp property allows you to crop a text warp applied to a text layer. You can access a list of warp text effects by going to “Type” → “Text Warp.”
A flag warp was applied to the text and cropped to create the warp animation.
The Transform property allows you to crop the transformation to a layer. Various transformations (such as rotation and scale) can be achieved by going to “Edit” → “Transform”, or pressing Ctrl + T to enter Free Transform mode.
The scale and rotation of the object are cropped to create a rotating star that grows in and out.
High conversions!
18-03-2016
Saving GIF animation
It is also important to figure out how to save animation in Photoshop. If you format it as a psd file or a “static” image with a jpg, bmp, png extension, there will be no sense. Instead of movement, transformation or flickering, you get one frozen frame. To make a set of changing pictures, you need to convert the document to GIF format.
- When you're done working in Photoshop, don't rush to close it and turn it into a PSD project.
- Go to File - Save As. Or press Shift+Ctrl+S.
- Give your creation a name and specify the folder where you want to place it.
- From the Type drop-down list, select CompuServe GIF.
- Confirm the action.
It’s enough just to understand the Photoshop application and how to make animation. Even if you are not a professional web designer, you can create an image like this. You will have a unique piece of art, assembled with your own hands.
GIFs are everywhere. The once humble animated images are now the unofficial language of the internet. GIF animation is the fastest way to express emotions on Twitter, and we can also spend hours watching it while scrolling through the news feed on VK, Facebook or Odnoklassniki.
There are quite a large number of sites where you can find ready-made GIFs on a variety of topics. But nothing beats GIF animation that you made yourself. Think this is a difficult process? You're wrong, it's quite simple. You can quickly create a GIF animation in the Photoshop graphics editor, converting an existing video, or using a series of static images. Let's take a closer look at how this is done.
Note:
In all of the examples in this article, I'm using Photoshop CC 2017.