Advantages of local mail over browser mail
Before we begin, as promised, I will first talk about what I see as the advantages of local, so to speak, software mail from the one that lives in the browser.
Firstly, this is support for several mailboxes at once and in different services. I don’t know how it is for anyone, but I have more than a dozen emails that live on a bunch of different domains: @gmail, @mail, @yandex, @sonikelf.ru, etc. Naturally, running from box to box in the browser, even if I have direct bookmarks made on them, will still be torturous: while you log in, while you check everything new, while you reply... It’s long and tedious.
You can, of course, attach a plugin for Firefox that checks mail everywhere and allows you to jump between mailboxes with a mouse click, but.. It’s still not the same. There is no clarity, integrity, convenience or comfort in such a solution. The interfaces are different everywhere, the functionality is different and there are problems. It’s a different matter when you use the same Thunderbird: all mail is in one place, downloads automatically, the design is pre-selected and configured by you, mail is divided into folders and in general everything is clear and convenient.
Secondly, this is visibility. Yes, I'm talking about folders and filters. What I always lacked in browser-based solutions was the ability to normally and unlimitedly sort mail into folders that I created. Yes, Gmail has so-called shortcuts (which in some ways are a powerful and interesting solution), but it’s still a little different from manually created folders for work, people, and any specific type of email.
Again, in the mail client you can create normal message filters, which, guided by the given rules, will, when downloading, put all this mail into folders so that you can immediately clearly see where you have important mail, where are all sorts of notifications from social networks, where are letters from friends , where is spam, where is something for work, etc. So you don’t have to sort out the general mess (I don’t know how anyone does it, but I receive at least several dozen letters per mailbox) dumped into one “Inbox” list. There must be order. Preferably in everything 
Thirdly, of course, the availability of mail offline. Despite the age of high technology, unlimited and seemingly eternal Internet, there are still failures and troubles of various kinds (for example, my @mail box today, when I tried to log into it through a browser, gave me a notification that I would go into the forest with your wishes to read the mail).
Naturally, as luck would have it, during something like this, you urgently need some kind of letter containing important information, which, as you understand, if the Internet or a mailbox that is called “sour” (or you forgot the password for it), it’s natural to get will not work. If you use an email client, and not a browser-based solution, all your mail lives not somewhere on a server, but here, on your hard drive, and you can always access your once-downloaded mail (I have emails saved in Thunderbird even after 2004  ).
).
Next, of course, is functionality. Whatever one may say, the mail that lives “on the other side” will always be far from the locally installed program. The fact is that Thunderbird, like Firefox, contains a bunch of plugins without which, personally, I can’t imagine working with mail at all. There is mail markup, quick replies (with one click on the keyboard) using pre-prepared templates, normal linking to a calendar organizer, a full-fledged address book with the ability to independently fill it in with various information and notes (as well as clear export), and amazing (in terms of quality, clarity and convenience) search for messages, and clear RSS support, and all sorts of external amenities such as design styles, fonts, buttons, etc., etc.
In general, there is a lot of stuff that mail sent to the server side (i.e., to the browser) still needs to grow and grow. By the way, a complete selection, from me, of powerful plugins for Thunderbird will be available, but later, and will be published either as a separate article or in several (ala the way they are released for Firefox).
And of course, safety. There are a number of nuances that, if you use an email client rather than a browser-based solution, significantly reduce the chances that your email account or mail from it will fall into the hands of someone. And if it does, then you always have a local copy (by the way, backups of both mail and the client program are very convenient to make and can be stored on a flash drive, working with mail on any computer). Of course, nothing can save you from the lack of a clear password, but still...
Is that enough or are more arguments needed? Then let's go.
Synchronizing your account with the server
To do this, right-click and open “Options”.
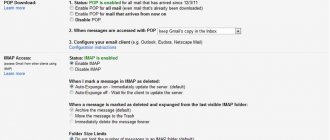
In the “Server Settings” section, in the “When a message is deleted” item, select “Trash”.
In the “Copies and Folders” section, enter the mailbox value for all folders. Click “Ok” and restart the program. This is necessary to apply the changes.
So we learned how to configure Thunderbird. This is very easy to do. This setting is necessary to send and receive emails.
Add the Lumpics.ru website to your bookmarks and we will be useful to you. Thank the author and share the article on social networks.
Did this article help you?
More articles on this topic:
How to properly import address book and calendar from Microsoft Outlook to Thunderbird?
After installation, the mail client worked fine for quite a long time with all mailboxes. After changing the password on Yandex, mail naturally stopped flowing from this mailbox. An attempt to change the password for the account did not lead to anything good, nor did the setting according to your article. I deleted the account and tried (again according to the article) to create a new one. Both during setup and when creating after deletion, everything goes smoothly, all pictures match the article, are checked and tested. But when you click on the “Done” button, it displays a message about the incorrect username or password. Moreover, through the browser with this data, it enters the mail normally. I tried both IMAP and POP3, but it was no use. Moreover, the problem is only with the Yandex mailbox
Hello! I have the same problem as Boris, only when I initially create an account on Yandex, it says: “Invalid username or password.” Why is this a problem only with Yandex mail. It was on Rambler, but after closing the mailbox in the browser, an account was created, but only the “Inbox” and “Deleted Items” folders were displayed and the rest were not. Maybe tell me what to do. I was about to delete it.
Thunderbird email client - download and installation
You can download this joy of the soul from this page.
There is both a Portab (portable, i.e., version that does not require installation and is system independent) and a regular version. The choice is of course yours, but I prefer the full version, that is, one that requires installation (less fuss with plugins, etc.).
Naturally, the program is completely free (unlike the hated The Bat!) and supports the Russian language. After all, the developer is Mozilla.
The installation is extremely simple and I won’t dwell on it.
I’ll go straight to the settings that appear after starting the program
Installing Thunderbird
You can download Thunderbird from the official website by following the above link and clicking “Download”. Open the downloaded file and follow the installation instructions.
After the program is completely installed, open it.
Thunderbird - setting up accounts and more
Account settings look something like this:
As already mentioned, immediately after the first launch, the program will display an account setup wizard. In principle, it is decisively and irrevocably smart and you can still use it, but I prefer to configure everything myself, and therefore feel free to press the “Cancel” button (at the same time you will practice ).
After this, Thunderbird will display a window that will help you set up integration with the system. In principle, there is no need to change anything here, except that I would recommend unchecking the “Always perform this check when starting Thunderbird” box, because, firstly, there is no need for it, and secondly, it will speed up the loading of the program. Having done this, click “OK”.
And so, in fact, in order to start receiving mail, you still need to tell the mail client where to get it, that is, add your accounts. To do this, we boldly go to the button with the menu, and there: “Settings - Account Settings”, where we see a settings window in front of us that allows us to configure everything we need.
But before we get started, I want to give you a little useful theory that will give you an understanding of what’s what and how all these emails work.
conclusions
Mozilla Thunderird is both a simple and functional email client that even a novice user can easily handle. The program automatically adjusts the settings of the most popular email services and can cope with its tasks from the very start. If the standard features do not seem enough to you, you can always expand the functionality using special extensions that are located in the built-in add-on center. Now you know not only how to set up Thunderbird mail, but also how simple seemingly complex programs can be.
Finally, here's a video on how to make Thunderbird minimize on startup:
Related posts:
- Installing Telegram Ubuntu 18.04
November 15, 2016
- How to use Viber
November 23, 2017
- How to use Slack
January 22, 2018
- Installing WhatsApp on Ubuntu
March 28, 2018
Mail protocols - what they are, why and why
The fact is that almost any email works using two main protocols (a protocol, for those who don’t know, is a set of rules governing the process of receiving/transmitting data): SMTP and POP3 (and also IMAP):
- SMTP is used to send mail from users to servers and between servers for further forwarding to the recipient, i.e. exclusively for outgoing messages.
- POP3 is used by the email client to receive email messages from the server, i.e. exclusively for incoming mail.
Thus, the mail is, as it were, divided into two streams “incoming and outgoing”, and accordingly, it is processed by two types of servers (after all, just a protocol is not enough - there must be a device that interacts with it, and also stores and transmits mail through it, which device is the server).
Therefore, in order to set up an email client, you need to know (and indicate) the addresses of these very servers, because different companies (@mail, @gmail, @yandex, etc.) have different ones. Fortunately, there is no secret here and, to make it easier for you and me to set up our email clients, all these Yandex, Google and Mail have long ago told the world the addresses of their servers, and you can find them on the pages of these companies. So that you don’t search on your own, I will give the addresses of the most popular of them:
For @gmail Incoming mail server: pop.gmail.com Outgoing mail server: smtp.gmail.com
For @yandex Incoming mail server: pop.yandex.ru Outgoing mail server: smtp.yandex.ru
For @mail Incoming mail server: pop3.mail.ru Outgoing mail server: smtp.mail.ru
As you probably understood, everyone’s addresses, plus or minus, are the same and correspond to the name of the protocol, and therefore, I think that you can easily create addresses for all other mail services by analogy... or you can find them on the Internet
How to configure Thunderbird using IMAP protocol
First, you need to configure Thunderbird using the IMAP protocol. Launch the program and click create an account - “Email”.
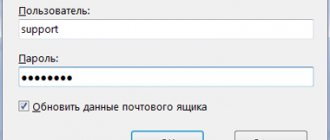
A window opens and we indicate the name, for example, Ivan Ivanov. Next, enter your current email address and password. Click “Continue”.
Select “Configure manually” and enter the following parameters:
For incoming mail:
Protocol - IMAP; Server name - imap.yandex.ru; Port - 993; SSL - SSL/TLS; Authentication - Normal.
For outgoing mail:
Server name - smtp.yandex.ru; Port - 465; SSL - SSL/TLS; Authentication - Normal.
Here it is important to indicate the part before the “@” sign since the setting occurs from the sample box “”. If you use Yandex. Mail for domain", then the full email address is indicated in this field.
And click “Retest” - “Done”.
Setting up an outgoing (SMTP) server for Mozilla Thunderbird
Let's return to our Thunderbird and continue setting up.
First, let's add the SMTP server address, that is, set up sending messages. To do this, click the “Add” button and fill in the required fields in the pop-up window.
Depending on where your mailbox lives (at @yandex, @gmail, @mail, etc.), enter the appropriate SMTP server address (in my case it is smtp.gmail.com) and any description that you like . Next we need to select connection security and specify the port.
Currently, most well-known email services use SSL encryption for security purposes, but some also use STARTTLS. How to find out? The same as in the case of the server address: you need to find this information on the website of the mail company that provides you with access to the mail service (search for “smtp settings for yandex/google/mail mail clients” (substitute what you need)).
So that, again, you don’t have to look, I will provide a list for the three most popular settings:
@mail Connection security: STARTTLS Port (for SMTP): 587 Authentication method: Normal password
@gmail and @yandex Connection security: SSL/TLS Port (for SMTP): 465 Authentication method: Normal password
Filled out? Now enter the login with which you usually accessed your mail through a browser. As a rule, this is what you had before the “@” symbol, but sometimes, in some services, the full email address is entered here (I say this in case of problems when you are sure that everything seems to be entered correctly, and the email the client assures you otherwise and does not let you into the mail). We'll figure out the password later.
When finished, click the “OK” button.
It just so happened historically that all mail can be sent via one SMTP, and therefore we don’t have to add access data here to all the mailboxes of all the services that you have, and therefore let’s move on to setting up POP3, that is, we’ll specify the passwords and server logins incoming mail in order to actually receive this mail.
To do this, everything is in the same wizard, we click the “Account Actions” button - “Add a mail account...”.
Synchronizing emails
Initially, Thunderbird downloads all letters and folders that are on your mail server, but later the user can independently choose which folders need to be synchronized. To do this, click on the account name on the left side of the window and open its settings.
Go to the Sync & Storage category and then select the settings that suit you best. In the "Advanced" menu, you can mark specific folders for your account, messages from which will be sent to your computer.
When finished, click the “Ok” button, and to ensure that all subfolders are displayed correctly, restart the client. The Thunderbird mail setup can be considered complete at this stage.
Setting up an incoming (POP) mail server for Mozilla Thunderbird
After this, a window will appear in front of us, which represents the wizard for adding mail that we had once expelled. Unfortunately, you can’t do without dancing with a tambourine, and therefore feel free to enter your data in the appropriate fields.
And of course, click the “Continue” button. After this, the wizard will try to find the mail configuration in its database and automatically configure all the necessary parameters.
Before you happily press the “Create an account” button, I recommend checking the “Remember password” checkbox, as well as clicking on “Manual setup” and making some changes, namely, if the configurator suddenly set you to connect via IMAP instead of POP , as in my case:
I recommend burning it at the stake and setting POP here manually, simultaneously specifying the appropriate server address, encryption type and port from the list below:
@mail Connection security: STARTTLS Port (for POP): 110 Authentication method: Normal password
@gmail and @yandex Connection security: SSL/TLS Port (for POP): 995 Authentication method: Normal password
When finished, you can click the “Retest” button.
..and “Create an account” (after testing is completed). The wizard will check the password and, if everything is correct, create an account, after which we will see something like this:
Now let's configure where our mail will be stored on the disk.
First launch and setup
Installing Mozilla Thunderbird is nothing special. When you turn it on for the first time (immediately after installation), the account setup wizard starts and offers a choice of:
- Create a new mail account.
- Connect an existing one.
- Put it aside for later.
Let's look at how it works using the example of connecting an existing account, because you probably already have at least one.
- In the " Welcome to Thunderbird " window, Fr.
- Enter your mailbox address and password. Click " Continue ".
- Once entered, click " Done ".
- If desired, change the mailbox settings: click “ Manual settings ” and specify the required servers, ports, protocols, authentication methods and the rest that is shown below. If you do not know the purpose of these parameters, leave everything as is.
This will complete the wizard’s work, and you will find yourself in the main program window. By the way, it is very reminiscent of the Firefox browser window. On the left is the folder panel. In the frame below is a context menu opened by clicking on this panel. At the very top is a tab bar (like in a browser). Below it are functional buttons, the purpose of most of which, I think, is clear. In the main part of the window there is a menu for quick access to the main functions.
Two icons surrounded by a frame on the right open the calendar and task scheduler:
Behind the button in the form of three stripes is the main menu of Mozilla Thunderbird. I think the bulk of the tools collected here are easy to understand without explanation. Among other things, it contains a button to go to the add-on installation section. We should get to know him better.
This is interesting: My first experience with Sony Vegas or how to transfer all the tracks to another project?
Those who have at least once installed plugins and extensions in the browser will not have to explain for a long time how to install them in Thunderbird: this is done in exactly the same way as in Mozilla Firefox. By default, the program has one single extension – Lightning (Calendar). If you want to install anything else, click " Get Add ", select what you like, and click " Add to Thunderbird ".
And below I showed how the “ Quick Filter ” function works. As soon as I started typing the word “coupon”, 3 messages were immediately found where this word was mentioned in the topic title.
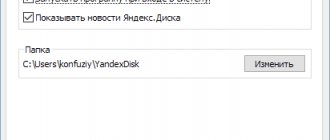
Mail file storage location
It is better not to leave the initially proposed path, because it is buried somewhere in the depths of the system and, in case of problems with it, it will not always be possible to find and restore the folder later, and therefore it would be good to designate your own, which is what we will do now.
On the “Local Folders” tab, click on the “Browse” button and set the folder we created, say, with the name _mail somewhere on the disk. Having done this, click “OK”.
About the same thing needs to be done for the box we recently created. To do this, go to the “Server Settings” tab and, having previously unchecked the “No more than 14 days” checkbox, click on “Browse”, where we indicate either our _mail folder or a subfolder in it with the name of our mailbox (to separate the contents of the mailboxes when there are many of them, in folders).
After this, it is useful to restart Thunderbird and after that, just in case, check whether the paths and settings are saved.
I also recommend that on the “Composition and Addressing” tab, select the items “Place the cursor before the quoted text” and “Place a signature: after my answer (before the quoted text).” This will simplify a number of correspondences
You can set the remaining settings on this page to your taste and color. Fortunately, everything is in Russian, but there is nothing complicated about it.
Of course, you can add an unlimited number of boxes from different services here, following the instructions by which we added the first account above.
Basic setup of the Thunderbird email client
Let's take a quick look at the settings of the program itself, namely sorting mail, setting up filters and the interface.
Initially, the list of messages looks like this:
However, it is possible to make the display much more attractive and visual. To do this, being in the selected folder (for example, “Inbox”), click in the Thunderbird window the items “Menu - View - Sorting - Group by sorting method”.
After which the mail in this folder begins to look noticeably clearer, namely, it is divided into tabs based on the specified sorting rule:
Of course, you can set up various rules for this sorting (the default is “by date”, but there are also a variety of options, for example: “by sender”, “by topic”, etc., which, I think, you have already seen on screenshot before last).
Program interface
Externally, Thunderbird looks like most similar programs. By default, the left side of the window contains all your mail folders, and on the right are message previews, links to RSS feeds, news groups, and much more. The menu bar contains links to the most popular user actions, such as receiving mail, filter, address book, chat and tag filter.
All these elements can be edited and changed based on your own preferences. Just right-click and select “Configure” from the context menu.
Message filters in Thunderbird
We've sorted out the visual sorting. Let's look at filters and try to create some of them.
Let’s say that we receive a huge number of mails with a mention in the subject line of a certain site “Sys.Admin Notes” and we want all these letters to be placed in the folder @from_site that we created in advance (the folder is created by right-clicking on, say, item "Inbox"). To do this, go to “Menu - Message Filters”.
Here we select from the drop-down list the box for which filters will be applied, and then click on the “Create” button.
In the window that appears, fill in the appropriate fields, namely:
- Filter Name: Enter something that will let you know what the filter is
- Subject contains: In this example I enter “Sys.Admin Notes”
- In the Move message to: field, select the folder we created from the drop-down list. In my case it's @from_site
Done, click the “OK” button. You can immediately check the operation of the filter by selecting in the “Run selected filters in folder” field the folder where we want to apply the created filter (in this case it is “Inbox”) and click on the “Run” button.
If everything was done correctly, then all mail will be sorted in accordance with the rule you specified. Naturally, as in the case of sorting, you can create filters of a wide variety of directions and variations, and you can configure filtering according to several rules at once, for which you use the “+” button in the list and set a new rule.
Over time, when you set up all the filters you need, you will be terribly pleased with how significantly your comfort when working with mail has increased.
Possible problems. Their decision.
- Problems usually arise if the user installs all sorts of themes and add-ons for the email client. It may slow down very much or not start at all. Then you should “throw away” the recently downloaded updates and try to find a more stable alternative to them.
- Another common problem is an error when starting the program. In this case, reinstalling or rebooting does not help - all efforts seem to be in vain. There is a way out, and it’s quite simple. Find the profiles.ini file in the root of the installed client, right-click on it, run it through some text editor, for example Notepad, then press Ctrl+f, find the line “Default=1” and delete it. Save the file and close. The letters and profile will remain in place, and the program will start again. If it doesn’t help, delete the file, but then you’ll have to create a new account.
- It happens that after an update the program stops working correctly - in this case a simple reinstallation will help.