The built-in Mail app for Windows 10 has all the necessary features and is the default email client, allowing you to connect and manage all your email accounts from a single interface.
With the advent of the new client, the need to use browsers to check email is no longer relevant. Although the feature set is not as extensive as Microsoft Outlook, the application does a great job of handling the influx of messages. All popular services are supported, such as Outlook, Exchange, Yahoo, Gmail, iCloud and others that use custom POP and IMAP settings.
In this guide, we will take a detailed look at how to add email accounts, as well as optimally configure the application.
Adding a new mail account
To get started, you first need to connect at least one email account by following these steps:
1. Click on the icon pinned to the taskbar; if it is missing, go to the Start menu and click on the live tile.
2. Click on the gear icon located on the left, it will open the options where you will need to click “Account Management.” records."
3. Next, click “Add account.” entry” and select the desired supplier from the list; if there is none, indicate yours.
4. Let's look at adding an account using a Gmail account as an example. Click on the appropriate provider, enter the name and password for your email account, and confirm your consent to give access to your account.
1
2
3
4
5. Specify on whose behalf messages will be sent and click “Login”. After these steps, you can start using email through the application.
If you want to add multiple accounts, repeat steps 1 to 5 above.
Adding an account using advanced setup
There are two ways to access advanced setup options for your email account:
Click the Advanced
, if automatic mail setup fails (see step 3 above).
In the Select Account
in step 2 Click
Advanced Settings
.
Advanced Setup
option is the last option on the list and you may need to scroll down to view it.
Exchange ActiveSync account type
or
Mail on the Internet
.
If your administrator hasn't mandated that you use Exchange ActiveSync, select Online Mail
.
Enter the following information in the Advanced Setup
:
E-mail address
This name will appear in the left pane of the Mail app.
Username
This is your full email address.
Protected
Enter your account password.
account name
This name will appear in the left pane of Mail for Windows 10, as well as in the Account Management panel. You can select the name you want.
Send messages using this name
Enter the name that will be displayed to recipients when they receive your message.
Incoming mail server
You can obtain this information from your Internet service provider or administrator. Typically, the incoming mail server address is in the format mail.contoso.com or imap.google.com. For many email accounts, this information can be found in the POP and IMAP server name reference.
Account type
Select POP3 or IMAP4 protocol. Most email accounts use IMAP4. If you are not sure which one you want to select, please contact your ISP.
Outgoing mail server (SMTP)
You can obtain this information from your Internet service provider or administrator. Typically, the outgoing email server address is in the format mail.contoso.com or smtp.contoso.com.
By default, all four checkboxes at the bottom of the window are selected. Most accounts do not need to change these settings.
Your email service provider will be able to provide you with the parameters you need to enter for advanced setup. But keep in mind that the required settings for popular email service providers are provided in our article Links to POP or IMAP server names.
When all the required information has been entered, click the Login
>
Ready
.
Note:
If you need to add an account other than Gmail, see Special instructions for other accounts.
Checking and responding to incoming emails
Checking inboxes and responding to emails in the application is no different from using mail through Internet browsers or other clients.
- In the menu on the left, select the desired account and the “Inbox” folder;
- In the message feed, select the letter you want to read, it will open in the reading area on the right.
When you need more space for browsing or composing emails, you can collapse the left panel using the hamburger menu button in the top left corner.
If the desired folder is not in the list, select the “Advanced” option, in the additional menu that appears, select the folder you want to view, or right-click on the desired directory, then select “Add to Favorites” in the context menu, after these actions the desired directory will appear in the main list.
While in the message reading area, use the toolbar, here you can quickly reply, forward, archive, delete or move the message to another directory.
Description and interface
The developers introduced the Yandex.Mail client for mobile devices on Android several years ago. Initially, it was a “crude” project that worked so-so and had an inconvenient design.
However, as time went on, new versions of it were updated with bug fixes, added functions, and support for gesture control. Therefore, there is no point in writing about the initial developers and we will talk about the latest update.
Interface changes
After installation and authorization with your account, Yandex.Mail will offer you to familiarize yourself with a couple of training slides while downloading incoming messages. The user will be shown only the latest letters, and earlier received ones are loaded while flipping through the correspondence.
The client interface has been completely redesigned and is a mixture of programs for iOS and Android. In practice it looks beautiful and it has become more convenient to work with. The developers have made working with letters more comfortable by allowing you to mark several incoming messages at the same time, move them to read or send them to a selected directory. There is nothing left of the outdated appearance and this evokes only positive emotions.
When opening a list of letters, avatars of the senders are now displayed if Yandex is able to find them on social networks. Otherwise, the first letter of the username will be shown. Quite convenient, since finding the required letter has become several times easier. On the left side of the program there is a standard menu. It contains custom folders (with hidden names to protect privacy), shortcuts, and labels. At the bottom there is a list of other applications to install from the search giant.
- Mail.yandex.ru - mail service Yandex.Mail - reviews
Improved functionality
Searching in Yandex.Mail for PC has also become several times easier. To do this, you need to type a key query or username or use a filter. So, if you click “Tickets”, inboxes with electronic tickets will remain in the list. Unfortunately, it is not possible to create your own filters.
The answer button is a little misleading. It is depicted as an arrow and is located next to the delete button. Initially it seems like it's a transition to your inbox, although you can get used to it quickly. While writing answers, you have the opportunity to specify additional recipients, attach a photo, or upload a file directly from Yandex.Disk. Another plus was support for the client to work offline. So you can use it even without a network connection. When connected to the Internet, data is synchronized and updated.
In terms of settings, everything turned out to be not so rosy. Here you can only change some properties of the mailbox, as well as activate the “Do Not Disturb” function, with which the mailer turns off notifications about the receipt of incoming letters. On the other hand, the email client does not require many additional options and this allows you to avoid the lengthy initial setup typical of universal email clients.
Finally, the mobile app does not contain micropayments. This is not surprising, since everyone knows that Yandex monetizes its services with contextual advertising and other sources. However, there was not a single advertisement inside the mailer, and this is only encouraging.
Creating an outgoing letter
Creating and sending a message consists of simple steps described below:
1. Click "Create message".
2. In the To field, enter the recipient's email address.
3. In the Subject field, enter a title for the email.
4. In the body of the message, the text to be sent is written.
5. The Format tab provides tools for formatting text, creating lists and headings, as well as options for canceling and reverting email content.
6. To send a file, you need to use the “Insert” tab and click the “File” button. Also, on this tab you can send images, links, and even create tables in the body of the letter.
7. The Drawing tab contains tools somewhat similar to those found in the Paint image editor. To get started, click the Canvas button, select a pen or marker, and start writing.
8. On the “Options” tab, you can set the message to high or low priority, check the text for spelling errors, and also zoom in/out of the text, find the desired word or sentence in the body of the message.
Once the message is ready to send, click the Send button in the top right corner or the Cancel button if you want to delete the message.
How to delete a profile
Getting rid of an unnecessary account is easy.
1. Call the application's "Options".
2. Go to the account management section.
3. Below under the account name, click on the inscription responsible for deleting the account from this device.
4. Confirm the operation and save the new program settings.
The standard Windows 10 email client is a refined evolutionary continuation of the Mail in the Metro interface of its predecessor system, Windows 8.1. The mail application included in Windows 10 received a little more settings than its counterpart in Windows 8.1. In particular, this is the ability to select the color design of the interface and background image in the “Personalization” .
At the same time, the regular Mail has not gone beyond the specifics of Metro applications: it is a mini-mailer that provides only basic capabilities for the needs of the average user, and the emphasis in the application is on a modern usable interface and ease of use with the touch screen.
Below we will take a closer look at how to configure the standard Windows 10 email client.
Quickly set up a mail account
When you first enter the Mail application, you will see the “Get Started” , after clicking which the wizard for adding a mail account will follow.
The Mail application included in Windows 10 allows you to work with several mail accounts; each of them must be added to the mailer in a separate step. Click “Add account” .
The account adding form offers at the top of the list a quick addition of email from individual email services such as: Outlook.com Microsoft Exchange corporate email service , Gmail from Google , Yahoo Mail , and iCloud . For these mail services, you do not need to enter mail server connection details, you just need to log in. Let's look at quickly connecting an email account using Gmail .
After selecting Gmail, we will see a standard window for connecting to a service from Google. Enter your login – Gmail email address – and click “Next” .
Next, enter the password and click “Login” .
In the next window, click the “Allow” , which allows access to Gmail account data from the Windows 10 Mail application.
Done: the account is connected, emails are synchronized.
Advanced mail account setup
To add another mail account, go to the mailer settings section. This is where the mail account connection form is located. Click the settings button at the bottom of the left panel of the application, and in the list of the “Settings” , select “Accounts” .
Then click “Add account” .
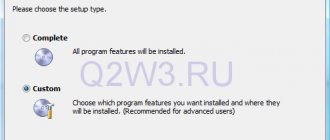
We will see the same form for adding mail accounts. For mail services that are not included in the list of quick settings, the Mail also optionally provides the ability to quickly set up without the need to enter detailed server data, but only by entering the login and password for the mailbox. This is the item “Other POP, IMAP account” . However, for most email services such a quick setup will not work, and emails will not be synchronized with the mail server. For email services not listed in the quick setup list, advanced setup is required. This, accordingly, is “Advanced setup” - the last item in the form for adding mail accounts.
Settings
The email client was designed to manage email accounts, but you can also manage various aspects of the application, some of which include customization of appearance, notifications, signatures, and more. Let's look at how to set up mail.
Account Management
Depending on the email service you use, you can set up an account by following these steps:
1. Open the built-in email client.
2. Click the Options button at the bottom of the left panel.
3. Next, click “Manage Accounts...” in the very top line of the menu.
4. Select the account whose settings you want to change.
5. In the window that opens, you can change the account name, mailbox synchronization settings, or delete the account.
Personalization
To set a background image or switch between dark and light mode, follow these steps:
1. Launch the program, click “Options → Personalization”.
2. Using the “Spacing between folders and messages” parameter, you can adjust the density of display of messages in the feed and between folders.
3. In the “Background” section, you can choose wallpaper from the default ones, or upload your own. The wallpaper will be displayed in the background if there is no email open in the feed to read. You can also turn off the background image.
View of an email client with a background installed.
Switching the program color from light to dark is done here; you need to scroll the list of menu settings to the beginning and select “Dark colors”. The client is designed in dark mode, combined with the activated dark theme of Windows 10.
Automatic answer
A useful function that acts as an autoresponder allows you to automatically send a return message to everyone who sends you a letter. The option is only available for Outlook.com accounts.
Go to Settings → Automatic Replies.
1. Select from the drop-down menu the Outlook email address you want to set up.
2. Turn on the toggle switch for sending automatic replies.
3. In the Within My Organization section, create a message that senders will receive while you are away.
4. Check the “Send replies to users outside of your organization” checkbox if you want to send out-of-office notifications to everyone who sent you a message and is not part of your organization.
5. If you want to limit the number of replies to a specific group of people, select the "Send replies to only my contacts" checkbox.
6. In the second window, create a message that your contacts will receive while you are away.
Sorting
If the feature is enabled, the message feed is automatically divided into two tabs: “Sorted” and “Other”; it only works for Outlook and Hotmail accounts. To enable or disable, follow these steps:
1. Go to the “Options” tab “Mail sorting”.
2. If there are several mail accounts, select the one you need from the drop-down list.
3. Enable or disable sorting by clicking on the switch.
List
On the Message List tab, under Swipe Actions, you can enable or disable swipe actions. In addition, you can configure other functions:
- Organization - allows you to group emails, you can arrange each message in chronological order as they arrive;
- Text preview - shows a summary of the message;
- Sender Avatars—Displays the sender's profile picture. If the image is not available, the standard icon will appear;
- Image preview - you can preview the image attached to the message.
Reading area
This tab has many functions, let’s take a closer look:
- Automatic opening - if this option is enabled, when you delete a message from the feed, the next message is automatically opened in the viewing area;
- Mark item as read - allows you to decide when a message will be marked as read after it is opened;
- Key navigation - use keys to view messages;
- External Content - If this option is disabled, external elements (images and style) will be blocked. Typically, this setting affects email campaigns and promotional offers created using web technologies.
Signature
If you use the same signature at the end of the letter, and do it manually, the application has an option that allows you to create it for all messages, and automatically attach it to each letter.
1. Go to the “Signature” section
2. Select the account to which the signature will be applied, or set it for all accounts by checking the checkbox next to the line “Apply to all accounts.”
3. Turn on the “Use email signature” switch.
4. Create the signature you want to use.
5. Save your changes.
Notifications
Here you can choose how to receive notifications about new emails from 3 options presented.
1. Go to the Notifications tab
2. Select the desired email account, or all accounts; in the second case, you need to check the checkbox next to the line “Apply to all...”.
3. Switch the toggle switch to the “On” position.
4. Select the notification formats you want to use:
- show banner;
- sound a beep;
- Show notifications for folders pinned to the Start screen.
Features of setting up Yandex.Mail
Those who are fans of Yandex mail should keep in mind that you can use it not only using the familiar web interface, but also by setting up your mail program. Today there are quite a few of them - the most popular ones will be discussed in detail below. Currently, special protocols are used for the functioning of mail programs, in which some data must be recorded. We'll tell you how to configure the IMAP and POP3 protocols for email clients.
Via IMAP protocol
Using the IMAP protocol is very convenient because it allows you to maintain the structure of the user email folders through synchronization with the server. The advantage is that all your letters sent through the email client will be saved both on the server and on your laptop or PC. That is, you can access them at any time using different devices.
Here are step-by-step instructions for activating the IMAP protocol:
- Go to your mailbox in Yandex.Mail and click on the gear icon in the upper right corner.
- Select All Settings .
- In the lower right corner, find "Email programs" .
- Check the box to allow mail clients to retrieve mail from the server using the IMAP protocol.
- Save your changes.
This is how the protocol is selected in Yandex mail. But you can’t stop there - you should also configure your email client by specifying a number of data.
In “ Incoming messages” you need:
- enter the mail server address - imap.yandex.ru;
- set connection security - SSL;
- register the port - 993.
In " Outgoing messages" you need to:
- indicate the mail server address - smtp.yandex.ru;
- connect a secure connection - SSL;
- designate the port as 465.
Important: if you plan to send and receive letters using an email program, then when setting it up for authentication you should specify your login and password that allow you to access Yandex mail, and as a login you need to enter the full address of the mailbox, for example
Via POP3 protocol
The use of the POP3 protocol allows the mail client to download letters from those folders that the user selects in “Mail Settings” . All messages will end up in the Inbox , that is, the Yandex mail structure will not be respected. Of course, if necessary, you can set up filters that sort letters into the appropriate folders in the mail program itself.
The algorithm for setting up an email client using the POP3 protocol is almost the same as above - open your Yandex mailbox, find the gear-shaped icon in the upper right corner; Next, select “All settings” , and then go to “Email programs” . At this stage, you need to activate the option “ From the pop.yandex.ru server using the POP3 protocol” , and then save the changes.
To ensure that your email program works using the POP3 protocol, you must provide key information when setting it up.
In "Inbox" enter:
- mail server address - pop.yandex.ru;
- secure connection - SSL;
- port - 995.
In “Outgoing messages” write:
- mail server address - smtp.yandex.ru;
- secure connection - SSL;
- port - 465.
Important: letters that you will send via an email client using the POP3 protocol will only be available on your PC. Incoming correspondence received by the client usually continues to be stored on the server, but some programs delete messages from it by default. If you are not happy with this turn of events, then it is best to think in advance about how to save the letters. Usually programs have a corresponding option in the settings.
Deleting accounts
If you no longer use the email account of a particular service, you can remove your account from the program by following these steps:
1. Go to “Settings” → “Manage Accounts...”.
2. Select the account you want to delete.
3. In the window that opens, click on “Delete account...”, then “Delete” again.
Setting up a mailbox in Windows 10
To set up mail in Windows 10, open the Start menu and select the Mail program. You can find it by the envelope icon or by entering “mail” in the search bar.
The Mail program window will open.
Click the gear icon in the lower left corner. In the settings menu that opens, select Accounts.
Then click on Add account. In the window that opens, select “Advanced settings”.
In the window that opens, select “Internet mail”.
Enter mail settings and enter the following parameters:
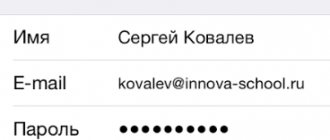
- Account name - your mailbox, for example [email protected]
- Your name is the name that the recipient will see, for example Ivan Ivanov
- Incoming mail server - imap.mesto.biz
- Account type - IMAP4
- Username - your mailbox, for example [email protected]
- Password - password for your email
- Outgoing mail server - smtp.mesto.biz
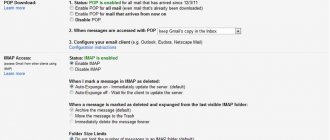
Also check all the boxes next to the items, as shown in the image below.
In the window that opens, click “Done”.
Ready! Now your mailbox is in the list, click on it and to receive mail from the server, click on the update icon on the panel (marked with a red frame in the image).
The setup is complete and the mailbox is ready to use.
Message sent!
We will contact you within 1 hour to confirm your application.
Resetting the mail client
If you're having issues with email syncing or other issues, you can resolve them by restarting the app.
1. Open “System Settings” in the Start menu, or in another convenient way.
2. Go to the “Applications and Features” section, find “Mail and Calendar”, click on it with LMB, and click “Advanced options”.
3. Scroll the window using the slider down, find the “Reset” button and click on it, after which the system will inform you that after clicking, the settings and registration data of the application will be deleted. If you agree, click reset again.
After completing all the steps, the application will return to factory settings, which usually fixes most problems. Due to the app being reset, you will need to configure it from scratch by following the steps above.
Problem opening Microsoft Outlook
Still, I defeated him. Although he gave it all for two nights: torment, torment and headache. But first things first.
The activation of native Windows 7 on the client machine failed. I don’t know why it failed, but the system began writing in the corner of the desktop “Your copy of Windows 7 is not genuine.” Since I couldn’t come to the office, I decided to fix everything remotely and deleted this inscription with pens. After which, when loading, the system began to throw out a warning window, so in order not to irritate the employee, I had to activate Windows not by phone.
After which Microsoft Office 2007, installed on top of 2003, stopped opening normally. MS Word tried to deliver something, and Outlook started, but did not want to connect to the postman.
An attempt to rearrange Microsoft Office 2007 or restore it was unsuccessful, so I tore everything down and installed Office virtually from scratch. After which everything seemed to work fine, but emails stopped being sent from the Explorer context menu (right-click -> Send -> Addressee ), from the Word & Excel menu ( File -> Send -> E-mail ), and also when opening Microsoft Outlook. I get the error “ There is no email program associated with the requested action .”
Troubleshooting
If you're having trouble setting up your account, try the following:
If you upgraded to Windows 10, you'll need to re-add your accounts to the Windows 10 Mail app.
Check your email address and password. Passwords must be entered case sensitive.
If you see recent messages but not old ones, you probably need to change your email sync period.
If you see a message that your account is out of date, you may need to update your password, incoming or outgoing server, or SSL settings. For more information, see Fix a dead account.
Adding an account
Initially, the “ten” has a built-in “Mail” program, which contains many settings and allows you to display information about new letters in the notification area. But in November 2015, an agreement was signed between Yandex and Microsoft corporations, according to which a special version of Windows was developed for residents of the CIS countries - with built-in Yandex search. In addition, the standard email client has been transformed into Yandex mail.
This application is simple in settings (as you will see when reading this article) and is perfectly suited for touch screens.
Immediately after launching the application, a welcome window will appear in front of you, which entices you with the phrase: “This will make your work easier.” All you need to do at this stage is click the “Start” button:
Let me note right away that if you use several mailboxes, then there is no need to visit different sites to check incoming messages. It is enough to add several accounts to this application:
The choice of services may not seem that big. Available: Outlook.com, Yahoo, Exchange, Gmail.
But where is the promised Yandex? - you ask.
It is worth paying attention to the very bottom item in the list – “Other account”:
By selecting this item, you will only need to indicate your e-mail and password. The system will independently determine the settings of the service provider and create a box. But, as always, there is one small “but”. Automatic tuning does not always work normally. As a result, the application may not synchronize with the server.
Therefore, I advise you to select “Advanced settings”:
A window will open with two choices. We are interested in the second one – “Internet mail”. Click on it and proceed to entering parameters:
But first you need to go to the settings of your existing Yandex mail account and indicate there that you allow third-party clients to access the “box”. Here's an example:
Now we return to the application and enter our data:
- The account name can be anything (at your discretion, it does not affect performance).
- The username will be displayed when sending messages.
- We indicate the server address as in the screenshot (for Yandex mail).
- Select the IMAP4 protocol.
The rest of the form is completed as follows:
- Specify the e-mail and password for it;
- Outgoing server (as in the screenshot below);
- We leave the checkboxes unchanged (this is an important point, be careful!)
When all the data has been entered, all you have to do is click on “Login” to establish the connection.
Everything turned out to be extremely simple, wouldn’t you agree? If you have any questions, you can leave a comment on this article, and I will definitely answer.
Now let’s look at the opposite situation of adding an account. For example, you stopped using this or that “box” and want to remove it from the application. How to do it? Now you'll find out.
If for some reason it didn’t work, Elena suggested this option in the comments. Let's try it. In the settings you need to specify in full: incoming - imap.yandex.ru:993; outgoing - smtp.yandex.ru:465.