While working in Windows 10, a situation may arise when Russian characters in the system are no longer displayed correctly. Instead, we see something unintelligible, some hieroglyphs or gibberish that do not have any practical meaning. This usually happens when the locale is selected incorrectly in the regional settings.
This often happens when you work with Russian-language characters in an operating system with English localization, since for a Russian-language program by default there are no means of processing Cyrillic, or any other language with non-Latin characters, be it Greek, Chinese or Japanese. design. In this article I will tell you how to remove krakozyabry in Windows 10 , and instead work with correctly displayed Russian characters.
Usually krakozyabry are not displayed everywhere. For example, Cyrillic characters in the names of programs on the desktop are written absolutely correctly, without errors, but if you run one of the distribution kits with support for the Russian language for installation, then everything immediately starts to go at random, the text becomes unreadable, and you literally cannot know what to do.
Below I will tell you how to get rid of this problem, solving it in your favor once and for all.
It is worth understanding that the whole problem is that your operating system initially does not support the Cyrillic alphabet. Most likely, you installed the distribution in English, and installed an advanced package on top of it to Russify the system, but this does not solve all the problems. The text is still unreadable, but the problem described remains and does not disappear.
The first thing that might come to mind in this situation is to rearrange the OS from scratch to the Russian version, which initially already has support for Cyrillic characters. But let’s assume that this option is not suitable for you, since you want to work in an English-language environment, where all Cyrillic characters are displayed correctly and without bugs. This is precisely the situation that will be discussed in my instructions, which in this case will come in handy more than ever.
Ways to remove services in Windows
The essence of the problem
As a rule, we cannot observe these gimmicks in every program. For example, characters depicted in Cyrillic in program names are displayed correctly. But if we run the installation program for distributions that support the Russian language, we get a “Chinese letter” unknown to us.
And, perhaps, the main problem lies in the fact that the existing OS, by default, does not support Cyrillic characters. In practice, this may mean that you installed an English distribution with an extended Russification package installed on top of it. However, the latter could not solve the problem correctly.
The first thing users try to do in such a situation is to reinstall the operating system from scratch. However, not everyone will agree to this, because someone may deliberately want to work with an English-speaking environment. And in this environment, Cyrillic characters, in theory, can and should be displayed correctly.
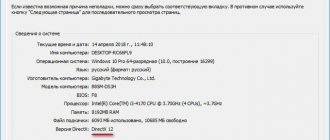
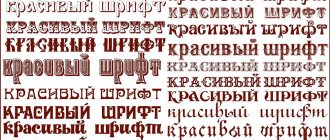
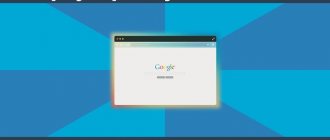
The picture is an example of a problem with the text
Yours may be similar, exactly the same, or completely different. Be that as it may, if you see that instead of what was supposed to be on the page, you have other data, then you can safely use these instructions.
As a rule, the problem does not occur in all applications, but only in special cases. The most common “places” where problems happen:
- Desktop;
- New programs;
- Inside Word;
These are just the most popular reasons, there are others. For example, even in all of Windows 10, the encoding can fail, so don’t worry, if your specific case is not described in the examples, the solution will most likely be described below.
Using system settings to solve the problem
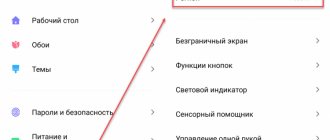
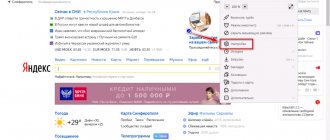
First of all, let's try to fix the error through the control panel. To enter it, right-click on the “Start” menu button and select the appropriate item from the drop-down list.
In the new window that opens, find the section Clock, language, region.
In the new section, select the category of regional standards.
Here we can configure the date and time option, as well as the numeric separator, the number of fractional values, the format of negative numbers, the system of units of measurement, etc.
Also here we are asked to change the format of monetary units and their designation. Here we can configure local settings for different regions, including text characters displayed in the system. It is these options that interest us. To select them, go to the “Advanced” tab at the top of the window.
Go to the section for selecting a language that does not support Unicode, and then select the option to change the system language.
Select the desired option from the list (in our case, “Russian (Russia)” and click “OK”)
In the notification window that appears, select “Restart now.”
The PC will reboot, after which the problem with crackers should disappear. However, this method does not always work. If it did not help solve the problem, consider another option in which we will have to work with the registry.
Fixing Cyrillic display using Regional Settings in Windows 10
The simplest and most often working way to remove gibberish and return Russian letters in Windows 10 is to correct some incorrect settings in the system settings.
To do this, you will need to complete the following steps (note: I also give the names of the necessary items in English, since sometimes the need to correct the Cyrillic alphabet arises in English versions of the system without the need to change the interface language).
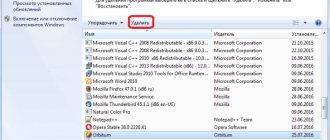
- Open Control Panel (you can do this by typing “Control Panel” or “Control Panel” into the taskbar search.
- Make sure the View by field is set to Icons and select Region.
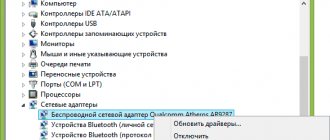
- On the Administrative tab, in the Language for non-Unicode programs section, click the Change system locale button.
- Select Russian language, click “Ok” and confirm to restart the computer.
After the reboot, check whether the problem with displaying Russian letters in the program interface and (or) documents has been resolved - usually, bugs are fixed after these simple steps.
Editing the code page manually
Code pages are responsible for mapping characters to bytes. There are many such tables, and each of them works with different languages. Often, cracks appear when the page is incorrectly selected and compared. To fix this, we have to work with the registry. For this:
- Win + R launch the system service “Run”. regedit in a single line and click OK.
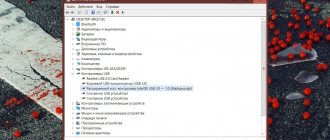
- In the registry window we need to go to the following path: HKEY_LOCAL_MACHINE\SYSTEM\CurrentControlSet\Control\Nls
- Here we select the CodePage and on the right side of the window go down to find the ACP .
- We double-click on ACP, and a window for changing string settings opens in front of us. Here we set the value to 1251. If this value is already set for this item, then you need to do it differently.
While in the same CodePage section, look for item 1252 on the right side of the window. Click on it twice with LMB and in the window that appears, change the current value 1252 to 1251.
After the manipulations have been performed, we reboot the computer so that the applied changes take effect.
Post Views: 2,532
Using the registry if the method above does not help
Let's create a regular file in a text editor, but give it a .reg extension so that later we can apply all the settings stored in it. So, what should the contents of the reg file be?
Fixing errors in the Remote Procedure Call (RPC) service
Let's type into it with pens or copy the following values via the clipboard:
Windows Registry Editor Version 5.00
[HKEY_LOCAL_MACHINE\SOFTWARE\Microsoft\Windows NT\CurrentVersion\FontMapper] "ARIAL"=dword:00000000
[HKEY_LOCAL_MACHINE\SOFTWARE\Microsoft\Windows NT\CurrentVersion\FontSubstitutes] “Arial,0″=”Arial,204” “Comic Sans MS,0″=”Comic Sans MS,204” “Courier,0″=”Courier New, 204" "Courier,204″="Courier New,204" "MS Sans Serif,0″="MS Sans Serif,204" "Tahoma,0″="Tahoma,204" "Times New Roman,0″="Times New Roman,204" "Verdana,0″="Verdana,204"
When all the specified lines are in the reg file, run it, agree to making changes to the system, then reboot the PC and look at the results. The krakozyabrs must disappear.
Important note: before making changes to the registry, it is better to create a backup copy (in other words, a backup) of the registry, so that changes made subsequently do not lead to the crash of the operating system, and it does not have to be reinstalled from scratch. However, if you are sure that these actions are safe for your OS, you can skip this point.
How to fix Windows 10 hieroglyphs by changing code pages
Code pages are tables in which certain bytes are mapped to certain characters, and the display of the Cyrillic alphabet as hieroglyphs in Windows 10 is usually due to the fact that the wrong code page is set by default and this can be corrected in several ways that can be useful when required Do not change the system language in the settings.
Using Registry Editor
The first way is to use Registry Editor. In my opinion, this is the most gentle method for the system, however, I recommend creating a restore point before starting. The advice about restore points applies to all subsequent methods in this guide.
- Press the Win+R keys on your keyboard, type regedit and press Enter, the Registry Editor will open.
- Go to the registry key and on the right side scroll through the values of this key to the end.
- Double-click on the ACP parameter, set the value to 1251 (code page for Cyrillic), click OK and close the registry editor.
- Restart your computer (reboot, not shutdown and start; in Windows 10 this can make a difference).
Usually, this fixes the problem with displaying Russian letters. A variation of the method using the registry editor (but less preferable) is to look at the current value of the ACP parameter (usually 1252 for native English-language systems), then in the same registry section find a parameter named 1252 and change its value from c_1252.nls to c_1251. nls.
By replacing the code page file with c_1251.nls
The second method, not recommended by me, but sometimes chosen by those who believe that editing the registry is too difficult or dangerous: replacing the code page file in C: Windows System32 (assuming that you have the Western European code page set - 1252, usually this is true. You can view the current code page in the ACP parameter in the registry, as described in the previous method).
Fixing the problem with displaying Russian letters in Windows 10
In most cases, problems with displaying the Cyrillic alphabet in the entire Windows 10 operating system or in individual programs appear immediately after installing it on the computer. The problem is related to incorrectly specified parameters or incorrect operation of the code page. Let's start looking at two effective methods to correct the situation.
Fixing the display of Russian letters in Windows 10
There are two ways to solve the problem under consideration. They are associated with editing system settings or certain files. They vary in difficulty and effectiveness, so we'll start with the easy ones. If the first option does not bring any results, go to the second and carefully follow the instructions described there.
Method 1: Change the system language
First of all, I would like to note such a setting as “Regional standards”. Depending on its state, the text is further displayed in many system and third-party programs. You can edit it for Russian as follows:
- Open the Start menu and type “Control Panel” in the search bar. Click on the result displayed to go to that application.
Among the elements present, find “Regional standards” and left-click on this icon.
A new menu with several tabs will appear. In this case, you are interested in “Advanced”, where you need to click on the “Change system language...” button.
The adjustments will take effect only after you restart the PC, which you will be notified about when you exit the settings menu.
Wait until your computer restarts and check if you can fix the problem with Russian letters. If not, move on to the next, more complex solution to this problem.
Method 2: Editing the code page
Code pages perform the function of mapping characters to bytes. There are many varieties of such tables, each of which works with a specific language. Often the reason for the appearance of cracks is precisely the wrong page. Next we will tell you how to edit values in the Registry Editor.
Before performing this method, we strongly recommend that you create a restore point; it will help you return the configuration before you made your changes if something goes wrong after them. You will find a detailed guide on this topic in our other material at the link below.
- By pressing the Win + R key combination, launch the Run application, type regedit in the line and click OK.
- The registry editing window contains many directories and parameters. They are all structured, and the folder you need is located in the following path:
Select "CodePage" and scroll down to the bottom to find the name "ACP". In the “Value” column you will see four numbers; if the value is not 1251, double-click on the line.
Double-clicking with the left mouse button opens a window for changing the string setting, where you need to set the value 1251.
If the value is already 1251, you should perform slightly different actions:
- In the same “CodePage” folder, go up the list and find a string parameter called “1252”. On the right you will see that its value looks like c_1252.nls. It needs to be corrected by replacing the last two with a one. Double click on the line.
An editing window will open in which you can perform the required manipulation.
After finishing working with the Registry Editor, be sure to restart your PC for all changes to take effect.
Code page substitution
Some users do not want to edit the registry for certain reasons, or they find this task too difficult. An alternative option for changing the code page is to change it manually. It is done in just a few steps:
- Open “This PC” and go to the path C:WindowsSystem32, find the C_1252.NLS file in the folder, right-click on it and select “Properties”.
Go to the "Security" tab and find the "Advanced" button.
You need to set the owner's name, to do this, click on the appropriate link at the top.
In the empty field, enter the name of an active user with administrator rights, then click “OK.”
You will again be taken to the “Security” tab, where you need to adjust administrator access settings.
LMB select the “Administrators” line and grant them full access by checking the box next to the appropriate item. When finished, be sure to apply the changes.
Return to the previously opened directory and rename the edited file, changing its extension from NLS, for example, to TXT. Next, hold down CTRL and drag the “C_1251.NLS” element up to create a copy of it.
Right-click on the created copy and rename the object to C_1252.NLS.
This is how code pages are changed in a simple way. All that remains is to restart the PC and make sure that the method was effective.
As you can see, two fairly easy methods help correct the error with displaying Russian text in the Windows 10 operating system. You have been introduced to each one above. We hope the guide we provided helped you resolve this issue.
Thank the author and share the article on social networks.