Microsoft Office Word has fonts for every taste. To customize your text or print a beautiful leaflet, use original calligraphy or a graphic object. But the built-in capabilities of the program pale in comparison with the thousands of different styles that can be downloaded on the Internet. If you don't have enough of what you have in the office, find out how to install a font in Word.
For non-standard text design, use a graphic object
Where to find a new font
There are entire servers on which collections of free calligraphy are posted. There you can immediately see what the letters and numbers will look like. You will select printed signs to suit any need. Even handwriting imitation is available.
Before you add a font to Word, you need to find it on the Internet. Download files only from trusted sources. There are several trusted sites. For example, "Fontspace" or "Xfont". After downloading, the calligraphy can be installed in Word. If you want to view the entire range, do the following:
- Open any search engine.
- Enter the request “Download font for Word.” The most popular services will be on the first pages. You can set specific parameters: “Gothic letters”, “Figured symbols”, “Old Slavonic Cyrillic” and the like. There will always be some new style that no one uses.
- Go to the site you like.
- Do not download executable files with the .EXE extension - they are most likely a virus or other malware. Calligraphy for Word is in .TTF (True Type Font) or .OTF format, and style collections are stored in .ZIP or .RAR archives.
- If you know what font you need, enter its name into the search bar along with the phrase “Download for Word.” This way you will find what you want faster.
The most popular services will be on the first pages of the search engine
It is better to take an archive with styles, rather than download one file at a time. You can add several types of printed characters and see in the program itself what suits you.
Installing new fonts in MS Word
The latest versions of the Microsoft Word text editor have a fairly large set of built-in fonts. Most of them, as expected, consist of letters, but some use various symbols and signs instead of letters, which is also very convenient and necessary in many situations.
Lesson: How to check a box in Word
And yet, no matter how many built-in fonts MS Word has, the standard set will always not be enough for active users of the program, especially if you want something truly unusual. It is not surprising that on the Internet you can find many fonts for this text editor created by third-party developers. That is why in this article we will talk about how to add a font to Word.
Important warning: Download fonts, like any other software, only from trusted sites, as many of them may well contain viruses and other malicious software. Do not forget about your own safety and the safety of your personal data; do not download fonts presented in EXE installation files, since they are actually distributed in archives that contain files in OTF or TTF formats supported by Windows OS.
Here is a list of safe resources from which you can download fonts for MS Word and other compatible programs:
www.dafont.com www.fontsquirrel.com www.fontspace.com www.1001freefonts.com
Note that all of the above sites are extremely conveniently implemented and each of the fonts is presented clearly and understandably there. That is, you look at the preview picture, decide whether you like this font and whether you need it at all, and only after that download it. So let's get started.
Installing a new font on the system
1. Select a suitable font on one of the sites we offer (or on another that you completely trust) and download it.
2. Go to the folder where you downloaded the archive (or just a file) with the font(s). In our case, this is the desktop.
3. Open the archive and extract its contents to any convenient folder. If you have downloaded fonts that are not archived, simply move them to a location where you can easily access them. Do not close this folder.
Note: In addition to the OTF or TTF file, the archive with fonts may also contain files of other formats, for example, an image and a text document, as in our example. It is not necessary to extract these files.
4. Open “Control Panel” . In Windows 8 - 10, you can do this using the Win + X , where in the list that appears you need to select “Control Panel” . Instead of keys, you can also use a right-click on the Start .
In Windows XP - 7, this section is located in the Start - Control Panel .
5. If the “Control Panel” is in the “Categories” , as in our example, switch to the small icons display mode - this way you can quickly find the item you need.
6. Find the “Fonts” (most likely, it will be one of the last ones), and click on it.
7. A folder with fonts installed on Windows will open. Place the font file(s) previously downloaded and extracted from the archive into it.
Tip: You can simply drag it (them) with the mouse from folder to folder or use the commands Ctrl+C (copy) or Ctrl+X (cut), and then Ctrl+V (paste).
8. After a short initialization process, the font will be installed on the system and appear in the folder where you moved it.
Note: Some fonts may consist of multiple files (for example, regular, italic, and bold). In this case, you need to place all these files in the fonts folder.
At this stage, we have added a new font to the system, but now we need to add it directly to Word. Read below for information on how to do this.
Installing a new font in Word
1. Launch Word and find a new font in the list of standard ones built into the program.
2. Often, finding a new font in the list is not as easy as it might seem: firstly, there are already quite a lot of them there, and secondly, its name, although written in its own font, is quite small.
To quickly find a new font in MS Word and start using it in typing, open the “Font” group dialog box by clicking on the small arrow located in the lower right corner of this group.
3. In the “Font” , find the name of the new font you installed (in our case it’s Altamonte Personal Use ) and select it.
Tip: In the Sample you can see what the font looks like. This will help you find it faster if you don’t remember the name of the font, but remember it visually.
4. Once you click OK Font dialog box , you will be switched to the new font and can start using it.
Embedding a font into a document
Once you install the new font on your computer, you will only be able to use it on your own. That is, if you send a text document written in a new font to another person who does not have this font installed in the system, and therefore is not integrated into Word, then it will not be displayed for him.
If you want the new font to be available not only on your PC (well, on the printer, or rather, on a printed sheet of paper), but also on other computers, other users, it must be embedded in a text document. Read below for information on how to do this.
Note: Embedding a font into a document will increase the size of the MS Word document.
1. In a Word document, go to the “Options” , which can be opened through the “File” (Word 2010 - 2016) or the “MS Word” (2003 - 2007).
2. In the “Options” dialog box that opens in front of you, go to the “Save” .
3. Check the box next to “Embed fonts in file” .
4. Select whether you want to embed only the characters that are used in the current document (this will reduce the file size), or whether you want to exclude the embedding of system fonts (in fact, it is not necessary).
5. Save the text document. Now you can share it with other users, because the new font you added will be displayed on their computer.
Actually, we can end here, because now you know how to install fonts in Word, having previously installed them in Windows. We wish you success in mastering the new functions and limitless possibilities of Microsoft Word.
We are glad that we were able to help you solve the problem. Add the Lumpics.ru website to your bookmarks and we will be useful to you. Thank the author and share the article on social networks.
Describe what didn't work for you. Our specialists will try to answer as quickly as possible.
Did this article help you?
NO
How to Add a Font to Word
Once you've found calligraphy, you can figure out how to insert the font into Word.
- Unpack the archive with styles if you downloaded them in compressed form. To do this you need to install an archiver. WinZip or WinRar will do. Right-click on the collection file and select “Extract” from the drop-down list. Now you can copy and move data that was stored in the archive. To see what the symbols look like, open one of the calligraphy files. And you don’t need to open Word to do this.
- Go to Start - Control Panel. In the Appearance and Personalization section, click the Fonts icon. It opens the Character Styles folder in Word. You can also log into it via C:\Windows\Fonts. To better navigate the control panel, in the “View” menu (located in the upper right corner) select the appropriate display settings.
- Copy the downloaded calligraphy files to the “Fonts” folder (not the archive itself, but the data extracted from it). A new type of symbols should appear in Office. Some of them may already be in the system. In this case, a dialog box will appear prompting you to replace the existing printed characters. Do not agree so as not to accidentally delete the “native” office styles.
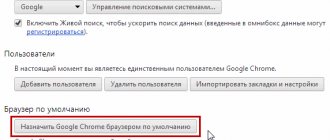
Go to Start - Control Panel
If you can't add them this way, try another method.
- Open the folder with the downloaded calligraphy.
- Right-click on one of the files.
- Click Install.
The styles will then appear accurately in Word.
Download
It’s not difficult to download and install fonts for Word, but it takes a fair amount of time. The first step is to download the necessary set of tools.
Important! You should download the text editor add-on from trusted sites. Otherwise, you can introduce a virus to your computer and lose important data.
You can install fonts only if they are in TTF and OTF format. Files with the EXE extension are dangerous for your PC. It is recommended to download add-ons for Word on Windows from the following sources:
- dafont.com;
- fontsquirrel.com;
- fontspace.com;
- 1001freefonts.com.
All files on these sites are pre-zipped; to unpack them you need to use a special application, for example, win-rar. It is recommended to save the unzipped files on your desktop so you don't have to search for them during the installation process.
On a note!
All fonts available on your computer are stored in the C:\Windows\Fonts folder. You can simply drag and drop the unzipped font files into it and it will be automatically installed in Windows.
If you want to see what a font looks like, open the Fonts folder, right-click the file you want, and select Preview.
How to Add Fonts to a Word File
If you decide to work with text on a computer that does not have the calligraphy you are using, it will not appear. But you can add a style directly to the document.
- Click the blue "File" button. In Office 2007, this menu is called up by clicking on the logo in the upper left part of the window.
- Select “Options”, “Save” section.
- Check the box next to “Embed fonts in file.”
It is better to enable this option if you are using more than just system styles. You won't be able to install your calligraphy on someone else's PC.
Check the box next to “Embed into file”
Installation
To make the installation process easier, you need to open several windows on your desktop, which you will need to add a beautiful font to your text editor. Open the folder with the downloaded files and leave it open.
We also open the control panel. To do this, go to the start menu and select the required section.
Go to the “Fonts” section.
You should place next to the folder with system fonts and those that were previously downloaded for free. Now the new tools should be dragged into the folder where the text styles are located by default.
After the file is transferred, the installation process of the add-on will begin. Installing the downloaded font was not difficult, but now you need to figure out how to find it in the maicrosoft word program.
How to find out the name of a font
Do you like the look of the symbols but don't know the name of the design? And how do you load fonts into Word if you can't find them? There is no need to browse websites hoping to accidentally stumble upon the desired symbols. The name is easy to recognize. There are special programs and even entire websites for this.
- What The Font. Popular and reliable service. Determines the type of calligraphy from the picture. The found style can be immediately downloaded and installed in Word. The resource has its own forum. If searching the database turns up nothing, you can ask other users for advice.
- Extension for Google Chrome browser. Scans the HTML code of the page and displays the title.
- Identifies a font by asking questions about its appearance. If you have a rough idea of what you are looking for, but don’t have specific information, this resource is suitable.
- Bowfin Printworks. Here you can choose your style down to the smallest detail. Asks about the shape of each character.
- A community of people who design calligraphy or simply understand it. You need to create a topic and insert a picture with symbols. Forum users will help you find the right style.
- WhatTheFont for mobile devices. Take a photo of a word and the app will determine what style it is.
What The Font. Popular and reliable service
If you've seen some interesting calligraphy on the Internet or want to expand the capabilities of Office, figure out how to install a new font in Word. Non-standard inscriptions can brighten up boring text. They are used for leaflets, congratulations, postcards, and presentations. There are thousands of them - you are sure to find the right one.
Set uppercase and bold fonts
You can also easily set capital and bold fonts to highlight the necessary places in the text. I'm used to the Times New Roman font when working with regular documents. To “quickly” edit text, select the necessary fragments and use the standard features of the toolbar...
In other cases, we again use the right mouse button on the selected text and, using the font settings already familiar to us, make the entire selected text fragment “uppercase” or “bold”:
You can try playing with other settings - for example, “crossed out” or “hidden”. Try it and see what happens. Good luck to you and see you again!
Author of the publication
offline for 5 days
Web Font Viewer
Web Font Viewer is not a program, but a script that is used to store fonts on the Internet - in a directory that is divided by font type. In addition, through this program you can exchange and sell fonts.
Web Font Viewer is relevant for designers who work from different computers. With such a program, there is no need to always have a media with a database of used fonts with you and constantly keep it up to date on all working machines - Web Font Viewer does this automatically.
Installation procedure
Here we will indicate some of the simplest and most effective ways to install fonts.
In the first method, the user will need to navigate to the downloaded file and right-click on it. Next, click on the line Install , which will be available in the pop-up context menu.
What is Windows Boot Manager - how it works and how to disable it
In the second method, the user will need to get into the fonts folder , several ways to do this were described in the previous section. Next you need to click on the File menu item and select the Install font . In the window that opens, specify the path to the downloaded file.
The third method involves simply dragging the downloaded file into a standard folder.
Additionally
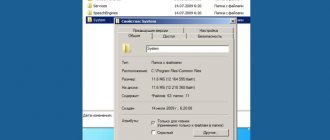
- The Windows/Fonts folder is located in the system partition; you will need Administrator rights to open it.
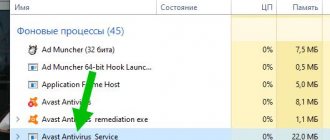
- If you installed a new font, but the application (Word, Photoshop or another) does not “see” it, you should restart the application so that the list is updated and new items are added to it.
- Please note the difference between Cyrillic (Russian characters) and Latin (English) because not all sets have the same style for each character group. Some characters are only available for the Latin alphabet, and in this case the Cyrillic alphabet will display standard characters.
Embedding a font into a document
All sets are stored locally on your computer. Therefore, when transferring a document to another system, a person will not be able to edit a document with the same letter design. To do this, it must be embedded in the file.
Click on the “File” button in the upper left corner. The internal menu of the program will open, select the last line labeled “Options”.
In the window that appears, click on “Save”. At the bottom, select “Embed fonts into file.” We do not remove the remaining checkboxes; this will save space on your computer and reduce the size of the document. Click on “OK”, after which all settings will be saved.
With new fonts, you can unleash your creative potential not only when editing documents in Word, but also when working in a full-fledged graphics editor. And their implementation in the file will save the user from installing hundreds of new styles on each computer when working with new projects.
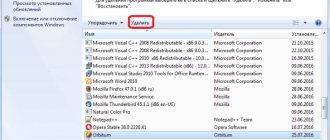
How to remove or hide a font
To delete or hide a font, just go to the folder where they are all stored. After this, you can right-click on the unnecessary file and click “ Delete ”. This will completely erase the file from the system. If the user wants some of them to simply become inaccessible, then you can select the “ Hide ” item, which will save them on the device, but make them inaccessible in editors.
Do not forget that there are several elements without which the system will not be able to work or will fail. Here is a list of files that should not be deleted under any circumstances:
- Courier New (including options: Bold, Italic, Bold Italic);
- Arial (including options: Bold, Italic, Bold Italic);
- Times New Roman (including options: Bold, Italic, Bold Italic);
- Symbol;
- Wingdings;
- MS Serif;
- MS Sans Serif.
What to do if the Mscorsvw.exe service is loading the processor or system
Beautiful Russian fonts for download
For you, we have prepared a set of 250 Russian (Cyrillic) fonts that can be used in Word. You are sure to find the right one. You can download it from the link below (see how to download files from the Internet).
250 fonts:
250 Cyrillic fonts 250CyrillicFonts.rar
10.5 MB 68211 Downloads Details
| Date of: | 11.02.2015 |
There are enough resources on the Internet that offer you all kinds of fonts for every taste. You can search for them yourself. We, in turn, would like to recommend to you the following sites where we selected fonts for downloading.
fonts.by
— convenient preview, large selection. All fonts are divided into categories, making it easy to find the one you need.
fontov.net
— a huge selection, including rare options.
Please note that if you download Russian fonts (Cyrillic), they will only work with the Russian layout (see how to change the keyboard layout). Exactly the same with Latin. Some fonts are universal - you need to look at each one separately.
Installing fonts in Windows 10
All methods for manually installing fonts described in the next section of this manual also work for Windows 10 and are currently preferred.
However, starting with version 1803, the top ten has a new, additional way to download and install fonts from the store, which is where we’ll start.
- Go to Start - Settings - Personalization - Fonts.
- A list of fonts already installed on your computer will open with the ability to preview them or, if necessary, delete them (click on the font, and then in the information about it, the “Delete” button).
- If you click “Get more fonts from the Microsoft Store” at the top of the Fonts window, the Windows 10 store will open with fonts available for free download, as well as a few paid ones (the list is scant at the moment).
- Once you've selected a font, click Get to automatically download and install the font on Windows 10.
After downloading, the font will be installed and available in your programs for use.
How to install a new font on your computer
Initially, the font needs to be downloaded to your computer. This can be done from different sites; just ask the query “Download the font for free” in a search engine. The reliability of a site cannot be checked by eye, so check the downloaded files with anti-virus programs. Also pay attention to the commercial and non-commercial use of the fonts you choose. This is usually indicated in the font description on the site itself.
There are so many options for installing a downloaded font, I will focus on the simplest ones.