Main software
The basis of the entire line of corresponding printing devices is a program called Printer Driver. It was developed for various operating systems: for Windows, MacOS and Linux.
KX Driver
The application allows the user to learn the basic operations that are performed when printing files. This program is quite enough to understand the basics of working with Kyocera equipment. The utility opens up standard features, adding some specific features to them.
For example, for Kyocera technology this is print protection by entering an n-digit password. The program also contains options that control the state of the hard drive inside the printer. The user can create separate profiles that will help speed up the solution of the most common printing tasks. The potential of the utility does not end there, it must be said.
KYOnet for clients
This program was developed by the company's engineers specifically so that the user could at any time view the status of the printing device, as well as the job that was printed. The utility may well become a replacement for the status monitor built into the Windows operating system as a standard device.
KYOnet for Direct Printing
This software will allow you to print a document with a PDF extension even if AcrobatReader is not installed on your computer or laptop. What other opportunities does the program open to its users?
- Combining individual PDF files into one single task;
- Changing the printing sequence of these files;
- Selecting a printing device and a printing profile.
The program interface is extremely simple. To successfully complete a task, the user only needs to specify the files to be printed, and then send them to the appropriate process using a button.
Prescribe Printer Language
This is a real editor, which is based on a programming language called Prescribe (it was developed by the same company Kyocera, which, in principle, is quite logical). The editor allows you not only to perform certain tasks that are somehow related to printing, but also to automate this process. Moreover, some tasks can only be supported by this utility. Among other things, we can note the simplicity of the corresponding programming language. It won't be very difficult to learn it.
Kyocera scanning software
This time we will talk about how you can configure the Kyocera m2035dn kx and m2040dn printers so that you can not only print, but also scan on a local network. It’s not for nothing that the Kyocera scanner is considered an interesting device for office or home use.
A regular cartridge of this brand has not only double-sided printing, but also double-sided scanning. You can use wired (Ethernet) as a network. The M2530dn model also has a fax. A separate image drum and a separate toner cartridge, which allows you to reduce replacement costs, even using original consumables.
Since this is an MFP for the office, the most correct way to use it is to directly connect the device to the local network.
Kyocera ecosys m2035dn kx how to set up a scanner The beginning of setup is connecting the MFP to the local network. Kyocera developers do not eat their bread in vain - right from the factory, the MFP settings are set to automatically receive network settings via the DHCP protocol, so you just need to plug in the network cable and check whether the device is visible on the local network. You can find out the device's IP address by printing a device status report. Or through the printer properties (Ports tab). Or through the router admin panel (list of connected network clients).
Kyocera scanning utility But if you don’t have a router on your network (DHCP server), then you will need to look at what IP address the MFP has and then, on the computer’s network card, set the appropriate one to connect them to each other. You can manually specify the IP address on the MFP itself, but this is inconvenient. Network settings are locked with a login and password that are inconvenient to enter (the default login and password are Admin / Admin). I don’t understand why in the factory settings you need to set a login and password for access through the device panel? Moreover, they are so difficult to type.
But the MFP has a web admin panel, accessible through a browser using the device’s IP address.
Through it it is quite convenient to control the device and configure it. However, in order to use this admin panel, the device must first obtain an IP address. The admin panel opens in limited mode. To access all MFP settings, you need to enter an administrative login and password (by default these are Admin and Admin). Note. When changing the network settings of the device, you need to turn off and then turn on the MFP again. We also carry out: refilling and repair. HP printer does not pick up paper?
What can Kyocera printers do?
Devices manufactured by this company can:
- Scan files to copy them in applications.
- Scan documents and send them to specified email addresses.
- Scan files and save them to a shared folder for multiple devices.
- Scan the FTP server.
- Connect to the database of other servers.
- Work with the Job Box function (in this case, applications receive tasks).
- Save files to external USB drives.
No additional software is needed to implement these functions; any Kyocera printer supports them from the very beginning, simply taken out of the box and connected to the device.
Installing the driver on Windows 10
Below you can read detailed instructions, you can also try another installation option. Every person has used a printer at least once. This device allows you to print text and images. And many people want to buy a device so as not to have to worry about where to print a document. But simply buying equipment and connecting it to a computer is not enough. You need to install the driver on your computer. If you have a Kyocera ECOSYS M2540dn printer model, you will have to tinker a little with the installation. You will need to go into the settings and work with the archive. Our article will help you understand all the intricacies. Go through the whole process with us and you will succeed. First, scroll to the top of this page, there is a link there. To download the Kyocera ECOSYS M2540dn driver, click on it. A window will open, indicating the location where the utility will be saved. Remember it or enter your own.
Find the downloaded archive, right-click on it, select where you want to extract the files. If there are no offers to unpack files in the drop-down list, then you do not have an archiver. It must be downloaded from the Internet and installed.
Now you need to go to “Device Manager”. To get there, click “Start” (menu in the lower left corner of the screen). Once you select Device Manager, you will see all the hardware you have on your computer. Now we connect the printer. Take the wires from the kit for this. Then plug the device into a power outlet. The system recognizes that something is connected to the computer, but it does not yet know what kind of equipment it is. Therefore, a new item “Other devices” will appear in the device manager. Click on it, “Unknown hardware” will appear, right-click on it and select “Update drivers”.
Now you need to choose a way to search for drivers. We saved the files on the computer’s hard drive, so we choose the second method by clicking on “Search for drivers...”.
Click on the button that says “Select a driver from the list of available ones...”.
The next step is to select the “Printers” device and click “Next”.
All that remains is to indicate the downloaded drivers, click on “Install from disk...”.
Select a folder that matches the bit size of your operating system. If you don't know the bit depth, check out this article.
Select the file “Oemsetup.inf” by clicking on it. It will be highlighted, click “Open”.
File Management Utility
This program can be installed by the user for additional ease of use. Having installed it, you can immediately specify certain conditions, under which the scanned files will be placed on a particular network resource. It is logical that this operation can be performed not only for one device, but also for several at once.
However, to use the utility, the printing device must support an option called HyPAS. The program works as follows: the resource in which the scanned files are placed is regularly checked by the device. After this, if the file was placed in a folder, the option moves it to the previously specified address.
Setting up scanning Taskalfa 1800/1801/2200/2201 to a network folder
It’s not very convenient to run to the MFP, insert a document into the scanner, run back to the computer and give a scanning command through the KYOCERA Client Tool program. And so in a circle...
There is another way to scan, the command is set from the scanner itself. To do this, you must first configure it, that is, add the computer to the MFP address book. On this PC, scanned documents will be saved in the specified network folder.
The computer must have a static IP address , but this is a separate topic. To find out your IP, open Control Panel – Network and Internet – Network Connections . Select your active connection and right-click, select Status .
In the window that appears, click the Details button.
Here we need an IPv4 Address , write it down or remember it.
Open KYOCERA Client Tool, select the “ Device ” tab, click “ Scan Destination ”.
Let’s set up “ Address: 01 ”, in the “ Display name ” line, enter any, I recommend Computer Name, so that in the future, if you suddenly need it, it will be easy to identify without calculating the IP address. In the “ original size ” line, select the size of the document to be scanned – A3 or A4. At the bottom of the window you can select the desired format, PDF by default. Nearby you will see the Destination Folder; it is at this address that the scanned documents will be saved. Save yet . Click on the Connection settings... button
Here we need to select the connection method. If you have only one computer, then it makes sense to connect via USB and select the “ Local (USB) ” connection type. You can also use this method if the MFP does not have a LAN connector for network setup. However, if you open network access to the folder (share) in which scanned documents are saved, then users of other computers can also use the scanner. The trick is that virtually all scanned files are stored in a folder on one PC with an MFP connected via a USB cable, but which can be accessed by all computers on the same network.
But if you use several computers, it is better to connect via LAN. With this type of connection, select “ Network ” and enter the IP address of your computer (I recommended writing it down above) so that the scanner can identify the device on the network to which you want to save scans. Click OK.
Now on the main settings page, click Save and Close. The settings are now complete, if you need to add another recipient to the book, then open the Scan Destination again, select “ Addressee: 02 ” and carry out the same manipulations... For the next one – “ Addressee: 03 ” and so on.
Scanning process on Kyocera Taskalfa 1800/1801/2200/2201
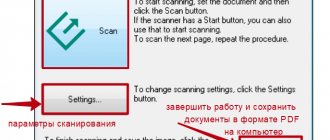
Before starting scanning using the device, you must launch the KYOCERA Client Tool program; without it, network scanning will not work. When scanning via USB, you do not need to open the Client Tool. Place the required document on the scanner.
On the Kyocera Taskalfa 1801 MFP, press the Scan button so that it lights up. You will see " Address: 01 ", in my case its name is OFFICE . If you have created several recipients, you can select anyone by clicking on the Address button.
Select the name of the computer to which you want to send scans using the up/down buttons and click OK.
If the destination is selected, press the green Start button on the MFP. You will see the scanning progress on your computer monitor; after completion, the folder with the scanned document will open.
PS: The Windows account password must not be set on the computer; scanning is not possible with such settings.
The best “Thank you” is your repost
Panel Plus
If you look carefully, the application is, in fact, practically integrated into the “hardware” part of the device. And this is nothing more than a solution for the operating panel of a printing device built on the basis of the HyPAS option. PanelPlus allows you to use a button to run a specific task.
The utility is perfect for cases when you need to perform work regularly, but you’re tired of entering the initial parameters every time. In general, PanelPlus will help save time and nerves.
Panel Plus Designer
This software is installed on a personal computer. It is quite convenient to use. Even a user who is not very well versed in this matter can easily create the task he needs. After the task has been formulated, it will be saved as a file with the appropriate resolution. The file itself can be instantly “uploaded” to the printer (using an external USB drive). Then a button responsible for the task written by the user will appear on the device panel. For the utility to work, Java must be installed on the device, version no less than 6.0.
What's on this list?
The list contains programs that can be used to replace VueScan on Windows, Mac, Linux, iPhone platforms. This list contains 7 apps similar to VueScan.
I don't know about you, but I really love VueScan scanning software. And all because of one property - the presence of scanning profiles. It's no secret that scanner manufacturers simply mock poor users, forcing them to go through a bunch of steps each time before the file with the treasured image appears on the computer. In order to reduce the number of actions to a minimum, you need a program like VueScan. The main thing is that your scanner is on the VueScan compatibility list. Unfortunately, VueScan cannot work with all brands of scanners, especially not expensive ones.
So what is the effectiveness, in my opinion, of this program? For me, it's the ability to create different customized profiles. It’s not very often that a person does something non-standard; most of our activities are routine and monotonous. And in scanning too, constant scanning of the same standard documents, photographs, etc. Of course, from time to time something non-standard comes across, but the frequency of this non-standard is disproportionately small in comparison with the typical flow. Also, customized profiles are very good when the scanner is used by more than one person. The situation is also typical: for example, you have one scanner in your room for several colleagues. Waiting each time until each of them configures a dozen settings before scanning is not good, isn’t it easier to do two steps: select a profile, click the “scan” button? I'm 100% sure it's easier! J
And in terms of the richness of settings, VueScan is at its best. In general, you can start practicing.
Since different versions of VueScan do not contain fundamental differences, I will demonstrate everything using version 9.0.66 as an example.
So, everything in order.
Let's start the installation. It does not raise any questions, except for one question about drivers.
If you are not sure, then select “YES”.
After installation you get this window:
Close the “tip of the day” window and click the “Details” button
A window opens with more detailed information about the settings
To gain full access to the settings, click the “More” button
And here is ATTENTION! If your scanner is supported by VueScan, you will see a “Source:”
in which the brand of the scanner will be written
if your scanner is not supported, then
you will not have “Source:”
There is no point in describing all the wealth of VueScan settings; instead, I will try to demonstrate how to work with profiles using an example.
In my daily activities, I often scan this type of document such as memos.
Since I intend to further recognize service notes and at the same time try to save space, the scanning parameters will be something like this:
;
;
;
;
To get these parameters, with VueScan running, go to the first tab “Input”
(usually it is always active at startup)
configure all parameters as shown in the picture above, i.e.:
- Task: Scan to file;
- Source: (brand of your scanner);
- Mode: Tablet;
- Medium: Text;
- Media size: A4... ;
- Bit per pixel: 1 bit B/W;
- Sensitivity of black and white negative: approximately 120-145 (higher value increases contrast);
- Viewing resolution: Auto;
- Scan Resolution: User Setting;
- Scan resolution (dpi): 400
- Autosave: Scan;
Other parameters on the “Input”
choose to taste J
Now go to the “Crop”
Here, in fact, one parameter is important to us : “Cropping frame size:”
, put it in A4 format.
The next two “Filter”
and
“Color”
are not available in black and white image mode, so we skip them and go to the
“Output”
.
On the “Output”
parameters are configured: where and in what format the scanned image will be saved. For my case with office notes, it will look something like this:
- Default folder: here we set the path where the scanned image will be placed;
- Print size: Scan size;
- Magnification(%): 100;
- Automatic file name: Enabled;
- Create TIFF file: Enabled;
- TIFF file name: @.tif;
- TIFF File Type: 1 bit B/W;
- Compression for TIFF: Auto;
- TIFF Profile: Enabled;
Having set all the parameters, you can click the “View”
and look at the scan results in the preview window.
If everything is fine, then we move on to the most important thing, saving the settings profile. To do this, click the menu item “File”
-
“Save Settings”
and set some meaningful file name, for example “Services 1 bit BW”
click “Save”
.
All. This completes the setup. You can now scan your document by clicking the “Scan”
, and see the results of the work in the folder that was specified on the
“Output”
.
As a result of scanning, a file with approximately the same name “Scan-150427-0001.tif”
. As you can see, the file name consists of the prefix “Scan”, the current date and a counter that will automatically increase with each new scan.
And now, actually, about efficiency. J Subsequent scans of “Office Note” documents will be done in THREE
presses:
Now configure the remaining document types, saving the configuration profiles. My list looks something like this:
Over time, you won't need to go to the File
, you will remember under which function key you have which profile, and you will make its selection by pressing on the keyboard.
And then all you have to do is click the “Scan”
.
What about colleagues? They will be happy too, saving their profiles and saving you time!
Forgive me that in this article I do not go into detail about the settings for each type of document. Unfortunately, this topic is very extensive and requires separate large articles. J Stay tuned for new products!
- VUESCANPRO
License type
:
Quacked
Languages
:
Windows 8, 8 64-bit, 7, 7 64-bit, Vista, Vista 64-bit, XP, XP 64-bit
Downloaded
:
VueScan is one of the inexpensive scanning programs that supports almost all film scanners and some flatbed scanners. It is available in versions for Windows, Mac and Linux.
The advantage of this program is the ability to easily and accurately color correct color negatives. This is very difficult to do, but with VueScan the procedure is greatly simplified. Using the program makes it possible to implement some special functions of the scanner: batch scanning, autofocus, an infrared channel that eliminates dust and scratches, multi-pass scanning that reduces the noise of darkened areas of the slide, and others. With VueScan, multi-pass scanning becomes possible, which interacts directly with the scanner hardware. There is no TWAIN interface in this program. VueScan in many cases outperforms original scanner software in focusing scanning. Which, however, will not prevent you from returning to the latter at any time.
By choosing the type of negative film, you can correct a specific orange tint; VueScan distinguishes between nearly two hundred types of film. In fact, this is quite difficult, since any inaccuracy made in setting the exposure or processing the film can lead to color shifts. VueScan has special tools to solve this problem. Using VueScan is quite simple, many functions are activated automatically for the best color rendering, since this is the default result. The apparent difficulty in using the program can be created by the user himself, who has dug too deeply into it; VueScan is trustworthy in terms of the default settings specified in it. The user really needs to decide on the settings for the scanning mode and, perhaps, the type of film. For the rest, you can trust the program. If necessary, it is possible to increase the preview window and histogram as much as necessary.
You can adjust the brightness, due to the fact that the program in some cases “overdoes” this parameter. However, the main task of the user is to work with color balance, if, of course, this is required by the content of the image.
The “white balance” parameter is involved in adjusting the RGB settings and increases the naturalness of the image. For example, in the Auto Level mode, the maximum values of the histogram are adjusted, which are subsequently displayed in white. Scenes that involve artificial lighting or an orange sunset are best processed in Neutral mode. Images that do not have neutral grays and whites, such as photographs with green grass or flowers in the background, most likely do not need white correction, but other photographs (portraits, landscapes, still lifes) depend heavily on this parameter . Auto Black and White Points values help change the preset overall pixel value and preserve the greatest amount of detail in dark areas, the most natural rendering of shadows and penumbras. It is possible to change these values, that is, increase the contrast by moving the Black slider to the right side (however, no more than half a percent). But practice has proven that it is better not to deviate from the default setting, and leave contrast correction for later and for Photoshop. These half percent changes in typical scenes are simply fantastic. But if you overuse changes to preset values, you can lose the detail in the shaded areas that VueScan saves.
VueScan is not an image editor; Photoshop handles this function successfully. The main task and main advantage of this program is that with its help you can quickly and effectively adjust the color balance. This means quite a lot for working with negatives. You can download VueScan for Windows x64 and Windows here.
VueScan is an advanced universal application for scanners that allows you to get the most out of all the device's capabilities. Both beginners and experienced computer users can use the program. This is possible thanks to a detailed user interface, which is often not the case with other similar software.
As a rule, the software that comes with the scanner has a fairly modest and even primitive set of parameters for setting up the scanning process. In contrast, it takes scanning to a completely new level, which increases the capabilities of the device due to expanded software functionality. For example, with the help of new drivers, users can edit balance, brightness and color depth, perform multi-pass and batch scanning, all in a user-friendly and intuitive user interface.
In addition, the application can partially perform the functions of a photo editor
: the original image or just a picture is saved in a special file, which later allows it to be processed without the participation of a scanner.
Thanks to this, it is enough to pass the original through the scanner only once, at the same time saving the latter’s resource, as well as the user’s time.
The program for the vuescan scanner can be downloaded for free with a key only from the official website, having previously paid for the license, or you can search for the medicine on the Internet. For everyone else, it is distributed free of charge, but with limited functionality (there are watermarks).
It is usually used as
a program for Canon and HP scanners
due to the increased love of users for the equipment of these companies, but this does not mean at all that the software does not work for brands from other manufacturers. The list of supported devices contains simply a huge list of all kinds of devices (working with more than 1850 models is supported).
Separately, it is worth mentioning the possibility of saving previously selected personal settings for each type of scanning. For this purpose, a separate profile is created, which allows you to significantly optimize the work. This is especially true if several users are using the computer at once or a wide variety of documents are being scanned.
Additionally, we note that there is no need to perform various manipulations in order to separately download a program for text recognition from a scanner, since this application copes well with this difficult task. Well, if you need a more professional tool, then the best choice is ABBYY FineReader.
In addition, the scanner program VueScan
will be appreciated by everyone who works with film originals or slides. This software contains information about the color mask of more than 150 types of film, but there is also the ability to manually adjust the parameters. Another “trick” of the VueScan program is that the scanned image can become “qualitatively” better than the original thanks to noise reduction tools, infrared cleaning functions to hide scratches and other defects, and eliminate dust particles and areas of contamination. There is also a tool for suppressing the “grain” effect without significant loss of sharpness, and the ability to qualitatively improve focusing and image calibration is available.
If you use several devices or have just changed your scanner, you can use one driver that comes with this application.
When using this software, even the most demanding user will not remain indifferent to the capabilities of the hardware controlled by this program.
Separately, it is worth noting that you can download vuescan x32 / x64 for free without watermarks only by purchasing a license for the program or thanks to “medicines”. Our site has nothing to do with the latter, due to the high risk of spreading viruses.
This extension for the scanner will not take up much space in the computer’s memory and can be installed “for testing” in order to be safely removed in case you suddenly don’t like it and want to return to the native software that came with the scanner.
The article discusses programs designed for scanning documentation. The software is aimed at users of any level and can be used for office needs and at home.
ABBYY FineReader 10
The program recognizes text and supports editing options. Compatible with all modern editions of the Windows
. The application supports 179 languages, the option of sending by email.
Features of
ABBYY FineReader 10
:
- Automatic image correction, including 3D
. - Saving data in its original form (the quality of the original remains unchanged).
- Interaction with spreadsheet and text editors.
- Processing information obtained when using cameras on mobile devices.
OCR CuneiForm
The program performs conversion using OCR
. This is optical recognition in which the structure of the document remains unchanged, including formatting.
Features
of OCR CuneiForm
:
- The structure of the fonts is completely preserved in its original form.
- Batch processing of documentation.
- Support for any text editors.
- Save to PDF
. - Check vocabulary and grammar using the built-in dictionary.
PaperScan
The program allows you to scan documents, edit and print materials. Compression using the JBIG
2
.
PaperScan
Features :
- Import graphic files and convert to PDF
. - Processing functions including rotation and alignment.
- JBIG 2
is a compression algorithm that does not affect the quality of the file.
Scanitto Pro
The program allows you to recognize scanned copies in TIFF
and
PDF
. The main difference of the software is the ability to quickly select an area for processing.
Features of
Scanitto Pro
:
- Self-adjustment of parameters for the scanning procedure.
- Adding profiles.
- Printing documents.
- Compression of graphic files (independent choice of compression percentage).
Vue Scan
The program supports more than 600 models of scanning devices. The tool is great for recognizing text on old photos.
Features of
Vue Scan
:
- In-depth customization: font size, type, line spacing, paragraph indents and other parameters of the scan result.
- JPEG
and
PDF
format support . - English interface.
