Activate TRIM
How it works? When deleting, the OS tells the device that the disk area is free. Information from it is deleted automatically. In regular HDDs, when a file is deleted, data about it remains. They can be restored.
Disabling TRIM reduces disk performance.
The function supports Windows 7 and above. It is enabled by default. How can I check this? Press “Win+R”, write the command “cmd”.
Further:
If disabled, click “Win+X”, select:
Enter the command.
What operating system settings and services affect the lifespan of an SSD drive.
2.1
Freezes, freezes and blue screens of death (BSOD) after installing a new SSD drive.
If you encounter freezes (second-long computer freezes) or frequent blue screens of death after you started using a new SSD drive, then most likely you need to:
- Install all the latest updates to the Windows operating system.
- Update the SSD firmware.
- Update the motherboard BIOS.
This set of actions in general is the first thing that is best done after switching to an SSD drive, even before working on optimizing the operating system.
The last two points are complex procedures for untrained users, so it is better to seek help from experienced users to carry them out. ↑ Return
2.2
Why is it so important to leave 10 to 30% of the space on your SSD unallocated or unallocated?
It is advisable to always leave at least 20-30% of the space on the SSD free.
This is necessary so that the NAND controller, through which all the logic for working with the disk’s flash memory is implemented, has a large number of free blocks. These free blocks can be actively used in the process of garbage collection, wear leveling, and also for replacing flash memory blocks that have failed. In fact, solid state drives have a special reserve for such purposes. This is called the " spare zone " of the SSD drive. This reserve zone is not accessible to the operating system and can only be accessed by the controller. When most of the free disk space is gone, the controller has to carry out operations to move information to temporary blocks of the reserve area.
You've probably noticed that SSD disk capacities have a strange format: for example, 240GB
instead of
256GB
.
And if you look at the amount of available space, it will be even less, about 222GB
.
In fact, most likely your disk has a capacity of 256GB
, and about
8-13% of the flash memory of the disk is used for the “reserve zone”.
A large volume of the reserve zone is needed for uniform operating speed of the SSD disk (especially noticeable under heavy load), as well as its uniform wear, regardless of how much space you occupy on it - 25%
or
95%
.
But all manufacturers behave differently: some expensive drives from Intel
can have up to
30% of the reserve zone
(in excess of the volume available to the user), while other manufacturers, trying to make the cost of an
SSD
drive as cheap as possible, cut this zone to
6-7%
, or even release firmware that allows users to independently change its size .
Using utilities for testing SSD disk performance, you can independently compare the speed performance of the same disk with a large amount of free space and a small amount when the disk is 95%
. Only very high-quality disks with a sufficient reserve area should not reduce stability in operating speed.
↑ Return
2.3
Which Windows 7 services are useful for an SSD, and which are best disabled?
Defragmentation, temporary files, indexing - all this requires a lot of disk access, which is very undesirable for SSDs due to the presence of a limited number of write cycles, which is definitely not the case in HDDs.
Windows 7 cannot fine-tune services in accordance with the operating characteristics of SSD drives. But you can independently disable some services that definitely do not help the operation of the SSD drive (and sometimes are even harmful, such as disk defragmentation).
You can also decide to disable some services that are not relevant to you. Further in the article you will find a description of such services in Windows 7 and an algorithm for disabling them.
↑ Return
2.4
Disabling SSD disk defragmentation in Windows 7
An absolutely unnecessary (moreover, it wears out the SSD) process, relevant only for a simple hard drive (HDD), transferring fragments of files scattered throughout the drive in different areas to speed up reading from the disk. Fragmentation is the natural splitting of files into parts on a hard drive, which are subsequently recorded in areas physically distant from each other on magnetic information storage. An SSD drive independently distributes data into blocks using a controller and does not need defragmentation.
Let's look at how to disable the defragmentation service in Windows 7:
Step 1.
Open the “
Start ” menu → enter in the search bar: “ defragmentation ” → select “ Hard disk defragmentation” .
Figure 1. Find and launch the Hard Disk Defragmenter application. Step 2.
In the window that appears, click on the “
Configure schedule” → uncheck the “ Run according to schedule” → “ OK ” → close the dialog box.
Figure 2. Window for setting up a disk defragmentation schedule. Ready.
Attention! This action disables defragmentation for all system drives, incl. and HDD. If necessary, start the process manually.
↑ Return
2.5
Disabling the Prefetch Service in Windows 7.
This service has a fairly good effect on the operation of the hard drive, increasing the loading speed of the OS and user software.
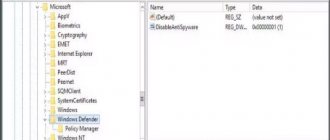
The service accumulates data about which files and programs are opened when the OS boots and the first seconds of its operation in order to optimize methods for accessing such files. But the SSD already works extremely quickly and does not need such optimization. Therefore, “ Prefetch ” can be safely disabled, freeing the drive from unnecessary (albeit small) wear. To do this, use the registry editor (regedit):
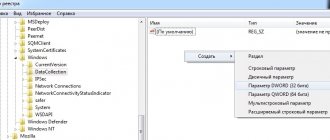
- “ Start ” → enter in the search: “ regedit ” → right-click (hereinafter RMB) on the line with the found program → run as administrator. Next, we look in the hierarchy (on the left in the window) for the following key: “HKEY_LOCAL_MACHINE\SYSTEM\CurrentControlSet\Control\Session Manager\Memory Management\PrefetchParameters”.
- Now on the right side of the window we find the item Enable Prefetcher , right-click on it → “ Change... ”.
- Change the value 3 (or 1) to 0, save, close the registry editor, and restart the PC.
Figure 3. Changing the registry key to disable the Prefetch service. Made! Note : Superfetch and Readyboot services , because
they have virtually no effect on the SSD, sometimes they only write log files of only a few megabytes in size, which help the system work and boot a little better. Now let's move on to controversial functions, disabling which can slightly reduce the performance of the PC, but significantly extend the life of the SSD. ↑ Return
3.
Disable automatic defragmentation
The number of rewrite cycles when moving fragments of files on a solid-state drive is limited. Therefore, defragmentation reduces the lifespan of the disk. If on a mechanical HDD defragmentation reduces the time it takes for the reading head to move, then on an SSD there is no mechanics. The disk reads information equally in whatever memory cells it is located. The latest versions since Windows 7 do not include defragmentation for SSDs, but it is better to check this. Press "Win+R". Further:
Highlight the SSD. In the “On schedule” item, set the value to “Disable”.
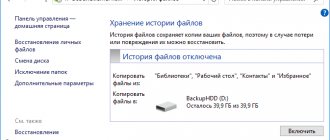
Turning off data indexing
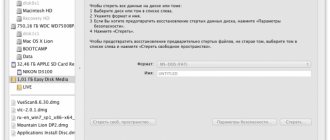
This point has a more practical meaning, which directly affects the speed of your SSD drive and its durability. In the “My Computer” tab, find “System Disk” and go to “Properties”.
Below, by default, the option to allow indexing of files on disk is enabled. This function was developed to optimize the performance of HDD media. This was due to the specific operation of their magnetic plates and heads. There is no such need for SSD drives, so we uncheck this function. This will eliminate unnecessary writes to the SSD disk. If an error suddenly occurs, it will be related to the swap file. You will need to disable it, reboot the system and repeat disabling the above option again.
Setting up an SSD after installing Windows 7 - disabling the page file
Used to record data that is not frequently used. The page file requires multiple operations to write information. This reduces the life of the device. Do the following:
Next: Click the "Options" button.
Select "Edit":
Set the checkbox to the position: “No paging”. Uncheck the "Select automatically" checkbox.
Transferring temporary files
The “Temp” directory is a directory for storing files with intermediate calculations during the operation of Windows 7 or 10. This service folder must be transferred to the hard drive after the installation of Windows 7 or 10 is completed. This action will slightly slow down the computer, which will be beneficial for the user virtually invisible, but will increase the service life of the SSD.
This is done as follows:
- Go to the context menu “My Computer” and call it “Properties”. Or right-click on the “Start” button and select “System” from the drop-down menu.
- In the left frame, click on the “Advanced Settings” tab.
- Go to the “Advanced” tab and click on the “Environment Variables...” button, as in the screenshot.
- Next, new values of environment variables are set.
See also: Task Host slows down Windows 7 computer shutdown
- Select the “Temp” directory and click “Change”.
- In the “Default” line, set the full path to the directory where temporary files will be stored. It is recommended to transfer them to the disk that is first in the list of HDD partitions.
- We do the same for the “Tmp” directory.
From now on, the magnetic disk will store service files of Windows 7 or 10 x64, saving the SSD from unnecessary wear and tear.
Using specialized software
What to do if there is not enough preparation for manual configuration? Download and install the free Mini Tweaker program.
It is possible to configure SSD Windows 7 x64 and x64
Download, install and run the utility. Check all options. Click the "Apply" button.
Settings will occur after a reboot.
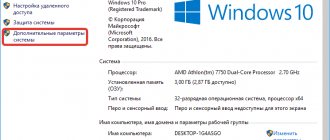
Disabling ClearPageFileAtShutdown and LargeSystemCache (disabled by default)
The ClearPageFileAtShutdown option allows you to clear the page file when the computer boots, and the LargeSystemCache option is the size of the file system cache memory. By default, when installing an operating system on an SSD, these options should be disabled. Windows 7 disables them itself. In order to check this, you need to go into the system registry.
We also go to the system registry editor (see how to do this above). In the branch, go to the following folder: “HKEY_LOCAL_MACHINE/SYSTEM/CurrentControlSet/Control/SessionManager/MemoryManagement”. In the right field we find the file LargeSystemCache. Click on “Change”. If the field is 0, then it is disabled. We immediately find and also check the file ClearPageFileAtShutdown. If the field is 3, then you need to change it to 0, then click OK and restart the computer. You will learn further how to set up an SSD drive for Windows.