Correct connection
To connect the monitor to the system unit, different cords can be used, depending on the model of the video card and the availability of corresponding ports on both devices.
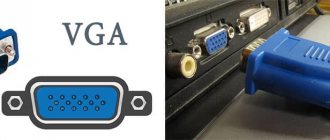
The traditional analog VGA port (blue) is considered obsolete and has some disadvantages compared to digital DVI (white) and the more modern HDMI and DisplayPort.
To ensure the best image contrast, it is recommended to use digital ports. If they differ on the monitor and the system unit, it is acceptable to use adapters.
Note! It is important to disconnect devices from the power supply before connecting them to each other, and only apply power after making sure that the connectors are well secured.
Setting color rendering: related parameters and factors
So, the user was faced with the problem of how to configure the monitor for correct color rendering and check the set parameters. What to do first? First, you need to clearly understand that adjusting just these parameters may not give much improvement.
The fact is that in this case many related factors play a role. For example, before calibrating colors, you need to decide on the place where the monitor itself is constantly located, what the illumination is in this place, whether it changes during the day, whether direct sunlight or electric light falls on the screen, etc. Depending on this, the settings can be completely different.
In addition, it is worth considering that brightness, contrast, color depth and many other factors have a great influence on color rendering settings. In addition to all this, the question of how to configure a monitor for correct color reproduction on a laptop or perform similar actions on a desktop device or television panel to which a computer terminal may be connected may have completely different solutions. More on this later.
Setting the resolution
You'll have to figure out how to manually adjust the screen resolution if the drivers are installed, but the size of windows and elements is still not what you need.
Instructions for the "seven":
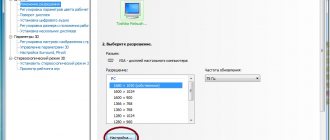
- Right-click on an empty space on your desktop and select Screen Resolution.
- In the window that opens, opposite the word “Resolution,” move the slider to the very top.
- Click the "Apply" button and agree to the changes.
For the “ten”, the settings are performed in a similar way, only the menu item is called “Screen Settings”.
Brightness setting
To adjust the screen brightness, the easiest way is to use the hardware buttons on the monitor, if available. On a laptop, this is done by the Fn function key and pressing another key (for example, the up and down arrows to increase and decrease the backlight). Read the instructions for your laptop or monitor model.
In addition to hardware, there are software. Open "Control Panel" - "Hardware and Sound" - "Display" - "Brightness Adjustment"
Next - “Setting the power plan” (which is used, as evidenced by its highlighting) and move the slider to the optimal result.
In Windows 10, you will find such a slider in the notification center in the lower right corner of the screen.
What is color rendering and in what cases is it needed to be adjusted?
Color rendering is the influence of the color spectrum on visual perception. Correct screen calibration is necessary not only for domestic purposes, for eye comfort, it is also a professional necessity for designers, video editors, photographers, printing workers and many others. Not only the quality of the intended print depends on this, but also the work on customer edits.
IMPORTANT! When adjusting the settings, keep in mind that they may depend on lighting, as well as the type of matrix and video card.
Settings can be carried out in three ways: with your own parameters setting tools (buttons directly on the monitor), standard operating system programs, as well as additionally installed applications.
The simplest method is the first, but it is also the most primitive, since we can’t talk about fine-tuning. For domestic use, the second method is sufficient, but for professional use the third is required, and in some cases the programs are purchased or rented.
Basic recommendations for screen calibration are as follows:
- It is necessary to start no earlier than twenty minutes after switching on, since it takes time to warm up.
- Reset all factory settings before you begin. Such a function may be included in the program, and if it is not there, you can install the wini2cddc utility. It is convenient because there is a free thirty-day version, however, it will not be needed more than once, so it can be removed immediately after use.
- You should also disable all existing auto settings.
Customized color settings (screen calibration)
If you don't like the color rendering of the display, the question arises - how to adjust the color? In the "seven" and newer Windows operating systems there is fine-tuning of colors:
- Go to “Screen Settings”
- From "Adjust Screen Resolution" follow the "Advanced Settings" link.
- Open the Color Management tab.
- Go to the "Details" tab.
- Click the "Calibrate Screen" button at the bottom.
- In the new window, click “Next” and carefully follow the on-screen instructions.
At the end, you can compare the new setting with the existing one and apply the changes if desired.
How to customize your screen using built-in programs
If you have an external monitor without buttons or a laptop, then you can adjust the image using the built-in tools. Such programs are available on Windows and macOS. They are simple and instruct the user in detail on choosing the optimal settings.
If you've already configured your display using hardware buttons, you can also try calibrating it in the system program. Perhaps it will improve the result.
On Windows
Open the system search, type the word “calibration” in it and launch the found application. A series of tests will appear on the screen to configure the display. Complete them following system prompts.
In Windows 10, you can also use the ClearType Text Adjuster. It helps make the text that appears on the screen easier to read. To launch the setup wizard, search for ClearType.
On macOS
Expand the Apple menu at the top of the screen and go to System Preferences → Displays. Then go to the "Color" tab and click "Calibrate". Follow the assistant's prompts to set up your monitor in the best way.
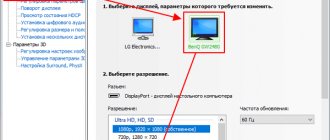
Setting the screen refresh rate (hertz)
The flicker frequency of the monitor screen, measured in Hz, should be set to the maximum available value. As in the previous paragraph, open the "Advanced options" of the display settings, but instead of "Color management" open the "Monitor" tab. Here, select the highest frequency available and apply the changes.
For Windows 10: “Settings” - “System” - “Display” - “Advanced display settings” - “Video adapter properties for display 1” - “Monitor”.
Visual determination of image quality
Finally, before you start directly deciding how to configure the monitor for correct color rendering (use software or limit yourself to system tools), you need to evaluate how feasible this is.
The biggest problem with all screens is the change in color or contrast when viewed from the side. First, you should move a few meters away from the screen and see how the image changes. Along the way, it is worth paying attention to the presence of horizontal stripes changing in the vertical direction. If they are visible too clearly, you will have to adjust the screen refresh rate (this can be done in the adapter properties on the “Monitor” tab). The higher the frequency, the better. As a rule, the default setting is initially set to the optimal setting, but a free-standing computer monitor or laptop screen may support higher settings. Therefore, you need to test each of them by selecting the appropriate frequencies in the drop-down menu.
Configuring font display
Pensioners and people with low vision will be interested in how to adjust the font size to make it large and readable. To do this, return to the “Display” section of the Control Panel and select the appropriate size of the elements in the main window.
At the same time, not only all text labels will increase, but also other interface components. You may need to log out and log back in to apply the changes.
In the “top ten”, similar ones may be presented at “Settings” - “System” - “Display” - “Scale and Layout”.
How to properly set up your monitor
The process is simpler than it seems - all you need is a computer or laptop in front of you and 15 minutes of free time. Further in the material, the setup will be described step by step, which will simplify the process for beginners. Connection
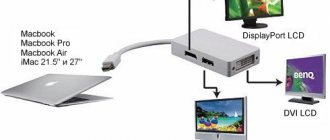
Before setting up your monitor, you should connect the screen to the PC itself. Preferably using modern methods. Then the quality and resolution of the picture will be maximum. Below are the main types of connecting displays to PCs and laptops.
| Cable type | Peculiarities | Image quality |
| DVI | It only transmits a picture, and it is far from being of the best quality. | Mediocre: Color and brightness may be affected. |
| VGA | Transmits picture and sound of mediocre quality. Even HD content cannot be broadcast without distortion | |
| USB | The monitor’s USB connection is possible to almost any device: from a PC to a smartphone and smart watch | Excellent. |
| HDMI | Advanced data transfer method | Maximum. If possible, you should connect the monitor through it - it transmits the signal directly without introducing interference. |
When installing and connecting, you should follow the recommendations:
- Place the monitor in one place and try not to move it.
- The room must be lit. It is worth setting up in the light in which the computer will be used.
- Before starting calibration, the screen should be turned on for a while. For modern TN or IPS displays, 3–5 minutes is enough. Older LCD, LCD and TFT screens need at least half an hour.
Tip : If the monitor is used in artificial and natural light, it is worth creating several calibration profiles with different settings.
Note: TOP 10 best monitors with Full HD resolution - rating of popular models
ClearType technology
In the same section of the computer Control Panel, in the left column there is an item “Setting ClearType Text”. Click on it and a new small window will open. This is a font smoothing technology that makes text on the screen as easy to read as printed on paper.
Typically this settings item is enabled by default. If not (the fonts are angular and reading quickly tires your eyes), then click “Next” in a new window and follow the instructions.
Upon completion, you may not notice how clear and pleasant the fonts in the system have become, but you will feel that your eyes have begun to tire less.
Programs for setting up a monitor
Instead of understanding the intricate settings of Windows itself, you can use third-party programs for these purposes. They are provided by the developer of the installed video card.
There are three such programs:
- Control Center for AMD cards;
- Intel Control Panel for integrated video (especially common in budget laptops);
- Similar software from NVIDIA.
You can find programs on the website of the video card or laptop manufacturer in the driver download section; often they are installed along with them automatically when you select a full installation.
The program interfaces for setting up the monitor are different, but intuitive and include all the necessary tools for adjusting brightness, color, contrast and other parameters.
Dependence on the type of matrix and graphics adapter
Another challenge in deciding how to set up a monitor for correct color reproduction is the variety of modern types of matrices. Setting the same parameters on monitors with CRT, TN or IPS matrices is not the same in terms of the resulting image.
For example, IPS matrices can be easily configured without the use of software methods, since they are made using such technology that when looking at the screen at an angle, the image practically does not change. But other screens may produce glare or change colors.
In the same way, screens can be configured differently depending on what video card is installed. Typically, manufacturers supply special configuration utilities for them in a pre-installed form, so it is better to perform color calibration with their help. In addition, it is precisely these utilities that allow you to change parameters in relation to normal operation or for playing computer games. As a rule, access to color settings and other parameters is carried out from a menu called up by clicking on the adapter icon in the system tray. And, I must say, they can make installations automatically.
Setting up your screensaver
If you need a screen saver on your monitor when you leave the computer, then in Windows 7, open the “Control Panel” and go to the “Personalization” section.
Click on the “Screensaver” item.
Choose the one you like and set the inactivity interval after which the screensaver will automatically start.
In the “top ten” the same options are located at “Settings” - “Personalization” - “Lock screen” - “Screen saver options”.
Changing Theme
To customize the work environment to your liking in Windows 7, open “Personalization” by right-clicking on the desktop. Here in the main window various themes are presented, both using transparency and classic ones.
To install your preferred theme, just click on it once. All changes will be applied automatically.
Note! Changing the theme means changing the sound effects.
Monitor setup: basic parameters
Discomfort when working at a computer for a long time is often associated with incorrect screen settings. This can be easily corrected by making certain adjustments to them. We advise you to familiarize yourself with what screen settings to set so that your eyes are less tired during the day.
The most common parameters that affect a person’s visual system when working on a laptop or PC are: screen resolution, as well as its contrast, brightness and image refresh rate. Those who care about eye health are advised to pay attention to these characteristics.
What screen resolution should I choose?
Experts say that the optimal screen resolution is the “native” one, which is often automatically set by factory settings. In this case, the picture will be clearest, which will reduce the load on the visual organs. Some users increase or, conversely, decrease the standard screen resolution to improve the usability of certain applications. However, this often results in the picture looking blurry.
How to configure:
- You need to right-click on the “Desktop”.
- Select the “Screen Resolution” item in the window that appears (may also be called “Properties” or “Options”, depending on the operating system);
- Select the “Screen Resolution” tab and set the “native” resolution, opposite which there is a “Recommended” comment.
What screen brightness should I set?
As a rule, the brightness of an LCD monitor is selected individually in each specific case. However, it should be remembered that it is tiring for the visual organs to work with too high or, conversely, too low monitor brightness. The choice of this option depends not only on the type of display, but also on the level of natural light in the room.
Adjust the brightness to suit your eyes, taking into account the individual characteristics of the visual system.
To do this, change the setting until you begin to comfortably perceive images and text on the screen.
How to configure:
- You need to go to the “Control Panel” and select the “Power Options” tab.
- Select the optimal brightness settings (experimentally).
You can also change this parameter by simultaneously holding down the Fn button on the keyboard and one of the special keys to increase or decrease brightness. As a rule, they depict a sun with a plus and a minus. However, this feature is present on all devices.
What contrast should I choose?
The contrast of the monitor also directly affects the comfort of working at the computer. Overly saturated images put increased strain on the visual organs. To avoid this, a person needs to select a contrast parameter that matches the individual characteristics of his visual system.
How to configure:
- Go to the Start menu and then Control Panel.
- Find the Monitor Color Calibration section and select the appropriate tab.
- Adjust the contrast by choosing the setting that is optimal for your eyes (experimentally).
What screen refresh rate should I set?
Setting this indicator largely depends on the type of device itself. For example, old-style monitors (CRT) require a frequency of at least 85 Hz, otherwise the eyes will become very tired due to image flickering.
Working with a liquid crystal display is quite comfortable at a frequency of 60 Hz. Changing this setting is quite easy.
How to configure (for Windows XP):
- Right-click on the “Desktop” and select the “Properties” section.
- Go to “Settings” - “Advanced” - “Monitor”.
- Set the desired value in the “Screen refresh rate” line.
Changing the window color scheme
You can also customize the included theme more subtly by clicking on the “Window Color” link below. Provides a variety of colors, the ability to turn transparency on and off, and other options.
If you selected the classic theme at the previous stage, then clicking on “Window Color” will open a window familiar from Windows XP, where you can configure in detail all the elements of the window color scheme.
In the “top ten” you can change the window color in “Personalization” - “Colors”.
Changing your desktop background
The Desktop Background link in the Personalization window allows you to select a background image.
To install an image not from the standard set, opposite “Image location”, click the “Browse” button and specify the desired image. You can choose a location from the drop-down menu or set it to a solid color.
Another simple way to change the background on your desktop is to open the image through the standard viewer application and right-click on it. Select the menu item “Set as desktop background”. This screen settings item works similarly in Windows 10.
Calibrate your monitor or display in Windows 10
You can go straight to the monitor or display calibration interface in Windows 10 by entering a command in the Run . Press Win + R and enter dccw .
If you are not looking for easy ways, then you can find the screen calibration menu using the following path:
- Open Settings – System – Screen . Scroll down a little and find Graphics Adapter Properties .
- In the window that opens, find the Color Management .
- A larger window will open. On it you need the Details . Open it, and then click the Calibrate screen at the bottom of the window.
- This will open the screen color calibration wizard.
- The first step is to adjust the gamma. Before setting it up, Windows will show you examples of incorrect and correct calibration.
- Try to adjust so that the picture complies with the standard, but no one forbids you to set the parameters that suit you.
- If you don't like the setting, use the Reset .
- The next step is to adjust the brightness and contrast. If you don't need to adjust these settings, click Skip brightness and contrast settings .
- At this stage, you will need to use the image controls of the monitor itself. Each manufacturer has menus and control buttons made differently. How to change the brightness and contrast of your monitor should be indicated in the instructions for the screen - contact it for help, or google it. At this step, Windows will only show sample images for precise calibration.
- Click Next and start experimenting.
- Adjusting the contrast will help you set the values to properly display the brightness of the highlights. Again, follow the on-screen prompts and sample images, and then adjust the picture in the menu of the monitor itself.
- Next is adjusting the color balance. Here calibration is already done using the system (although almost every monitor has the ability to change the color balance in the menu - try playing with these parameters too.
- You want to make sure that the large bars on the screen remain as gray as possible. If you notice impurities of other colors, eliminate them with the red, green or blue sliders.
- At the final stage, you can compare the color settings you created with the previous preset. To do this, click on Previous calibration . Current Calibration button will display the parameters you created.
- To save the new settings, click Done . Cancel button will return everything to its previous state.