Features of Puran File Recovery
The Puran File Recovery utility allows the user to select one of the following modes for scanning storage devices:
- Quick (regular) scan. During the data search process, only records in the file system are checked. In most cases, this feature will only detect recently deleted files.
- Deep scanning. In this mode, the application also tries to read information from the entire surface of the disk, checking each byte of information individually. The deep scanning process can take a long time (depending on the write/read speed of the storage device).
- Full scan. In this mode, in addition to scanning the entire disk space, lost partitions are additionally identified, which are then scanned separately. The process also takes a long time.
- Find lost files. Enabling this option allows you to detect not only deleted files, but also their fragments or erroneous disk entries. The latter are usually interpreted by the system as regular files. As a result of the work, the program will display all junk data that can be deleted by the user to free up disk space.
Puran File Recovery also provides the ability to filter search results. The user can use ready-made filters by giving the application a command to detect specific file types - images, music, videos, etc. It is also possible to create advanced custom filters, which allows you to detect files by a specific extension, leading and offset byte values, size and other criteria.
The application also classifies files detected during the scanning process by their status - “Excellent”, “Good” and “Bad”. This allows you to determine in advance whether complete data recovery or just a fragment is possible.
The Puran File Recovery application window has an area to preview the contents of detected files, which makes using the program even more convenient.
Other programs (paid)
The process of finding and recovering lost files is a complex process that programs solve in different ways. This process can be implemented through different software algorithms, each of which can produce different results. That’s why different programs use different algorithms, otherwise there would be no point in creating more than one program for a given purpose. Therefore, if the free programs listed in the article did not help you, try using paid ones - perhaps they will do their job better.
Paid file recovery programs
Here is a list of the most popular paid programs:
- "R-Studio";
- "File Scavenger";
- "Power Data Recovery";
- "R-Undelete";
- "Eassos Recovery";
- "Hetman Recovery";
- "Wondershare Data Recovery";
- "Recover My Files"
Now you have an extensive list of recovery programs. Choose any one according to your taste, based on the advantages and disadvantages. If you need to restore a specific file, then try using the programs one by one until it is found and restored.
Disk Drill
This utility was very popular among Mac OS users, but relatively recently it became available for Windows computers. The operating system must be XP or newer. There is a free version of Disk Drill and a Pro version. The free version allows you to recover only 500 MB of information.
The program itself is versatile, since it supports various storage devices (USB flash drives, hard drives, memory cards). It also understands more than 200 file types and all currently known file systems (FAT, NTFS and others). With its help, you can create an image of the desired device, as well as save the scan result in a separate file and, when necessary, return to it.
- You can download Disk Drill for Windows from the official website at the link: https://www.cleverfiles.com/disk-drill-windows.html. If you are interested in the free version, then use the “Free Download” button.
- There will be no problems during installation. After the first launch, a short instruction will appear. At the last step, be careful and click “Get started” if you want to use the utility for free. Also pay attention to how many free megabytes you have (at the time of writing there are 500).
- Next, a list of all connected devices will appear. Next to the one you need, click on the small arrow, select a partition and you can proceed to data recovery (go to step 6). I would like to draw your attention to the possibility of mounting an image of the media you are interested in. Then in the future it will be possible to restore files from it, which will protect the user from changing information on the device itself. To do this, expand the list of sections and select the one you need. Opposite it, click on the “Extras” button and select “Backup into recoverable disk image” from the list.
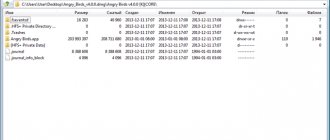
- An Explorer window will appear in which you need to specify the location to save the image. Then wait for the process to complete. As you can see, I created it on the Desktop, and the file itself has the extension *.dmg.
- To attach an image, you need to go to settings (1) and select “Attach image” (2) from the list. After this, the mounted image will appear in the list of devices (in my case, it is a flash drive - 3).
- Now let’s talk about what you need to do to recover data from a flash drive, and it doesn’t matter whether you work with the image or the device itself. Opposite the flash drive (if it is divided into sections, then expand the list and select the desired section), click on the arrow next to “Recover”. In the drop-down list, select the appropriate item: “Run all recovery methods” – run all recovery methods (set by default if you just click the “Recover” button); “Undelete protected data” – canceling the deletion of protected data; “Quick Scan” – quick scanning; “Deep Scan” – deep scanning.
- When the scanning process is completed, the following window will appear. At the very top there is a button for saving scan results - “Save Session”. Just below is a line that shows how many files you have selected – “Selected 11 files”, and how much they will take from the available free 500 MB – “32.23 MB”. Select the folder where to restore the found files (1). View the contents in the found folders (2), using the plus sign, and check the boxes that need to be restored (3). A preview function is available for pictures (4). To recover data from a flash drive, click on the “RECOVER” button (5).
- After this, a report window will appear. It will also tell you how many free megabytes you have already spent.
Although Disk Drill is in English, it is very easy to use. It is highly likely that you will be able to recover data after formatting a flash drive or data that was accidentally deleted from a flash drive. Personally, I had a 100% result. For example, I took another flash drive that was damaged, and it was also possible to recover information from it, but partially.
Wise Data Recovery
This utility has proven itself in recovering files on flash drives, hard drives and other storage devices. Works with any type of file - from music and video to email.
Download link: https://www.wisecleaner.com/wise-data-recovery.html
Advantages:
- quickly copes with the search and recovery of lost files;
- calculates the chances of successful recovery by marking found files with a circle of the corresponding color. The operating principle here is the same as in Recuva.
Flaws:
- When downloading, the program will prompt you to install additional software on your computer. Therefore, be careful where you check the boxes.
RecoverRx
RecoveRx was developed by Transcend, but is also suitable for recovering data from devices from other manufacturers. With its help, you can recover photos, videos, documents, etc., on a USB drive, hard drive, memory card, and even mp3 player.
There is a version of RecoveRx for PC with Mac OS and Windows. If you have a computer with a Windows operating system, then Windows 7 or later must be installed. Also, for the program to work, you will need the Microsoft .Net Framework 4.0 library. The utility itself is in Russian and has a fairly simple interface.
- You can download RecoveRx from the official website using the link: https://ru.transcend-info.com/supports/special.aspx?no=4#. Click on the “Download” button and select the appropriate operating system. There shouldn't be any difficulties during the installation process.
- Launch the utility. Next, find the one you need in the list of connected devices, click on it once and highlight the section. Click on the “Next” button.
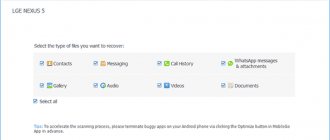
- In the next step, select a folder to save the recovered files (1). Next, select the appropriate sections (2) and check the boxes next to those items that correspond to the extensions of the lost files (3). Click “Next” (4).
- The program will start working. How long the process will take depends on the size of the drive itself and the amount of information being restored. When the result window appears, click on the folder to see what information was saved. The utility window can be closed with the “Exit” button.
In my case, all the photos were restored, but the Word document could not be brought back to life (it was displayed with the wrong encoding).
Pandora Recovery
The Pandora Recovery utility is not particularly popular, and this is not at all fair. After all, if we are talking about recovering deleted files, then it shows very high efficiency. Moreover, it has a very simple and user-friendly interface, which is a big plus for beginners.
Download link: https://pandora-recovery.ru.uptodown.com/windows
Advantages:
- the search for deleted files produces the most complete and objective results thanks to the “surface scanning” function integrated into the program.
Flaws:
- Does not work with all file formats.
R.saver
And the last utility we will look at is R.saver from R.LAB. Suitable for the operating system Windows XP or newer, Russian-language and does not require installation on a computer.
- Download R.saver from the link: https://rlab.ru/tools/rsaver.html.
- Then unpack the archive and run the file that matches the bit size of your operating system.
- In the window that appears after launch, read the information about which file systems the program works with and the recovery algorithm. Check the “I have read” box and click “Let’s get started.”
- Next, select either the desired device or the desired partition (if it is divided into them, for example, like a computer hard drive). Click "Continue".
- After analysis, open the “Lost Files” tab, check the boxes for files to be recovered and click the “Recover Selected” button. The program also offers a preview function for pictures.
- Step 4 will show how many files are selected. Give a name to the folder where they will be saved, and select a partition on your hard drive or flash drive (but not the one from which you are restoring the data). Click on the “Start recovery” button. When finished, a small window will appear. By clicking on the “OK” button, a folder with all recovered files will open.
The R.saver program restored everything without problems. Another big plus is that it is portable and does not require installation. It also helps in cases where the user has formatted a flash drive and now needs to restore the data.
Of course, data recovery on a flash drive is done in a couple of clicks, be it the programs described in the article or some others. But it is important to understand that the more new information has been written to the device, the more times it has been formatted, or serious damage occurs, the less likely it is that everything will work out.
Rate this article:
( 1 ratings, average: 5.00 out of 5)
About the author: Anya Kaminskaya
- Related Posts
- Installing the necessary programs for Windows – InstallPack
- How to Save a Presentation in PowerPoint