If the user is the owner of the Windows 10 OS, then he is definitely familiar with Windows Defender, which is an antivirus built into the system. It stores all malware in the so-called quarantine, placing there also those applications that seem unreliable or suspicious. It needs to be cleaned from time to time; the developers provided automatic removal.
Where is quarantine located in Windows Defender 10
Why do you need a defender?
“Quarantine” is just a separate section of the “defender”; it is important to understand what this program is and whether it is needed at all. As already mentioned, this antivirus protects the user’s computer from malicious files. Moreover, he is able to cope with spyware. It was developed for both Windows XP and Windows 7, but had a different name. It appeared in its usual form with the update to Windows 8, when the developers included it in the standard set.
The note! It took a little time to add the function of time selection, express scanning, etc., so this program will certainly be useful for the user.
Video #61. Windows 10 Defender
So, Windows 10 Defender monitors the status of downloaded files and applications running on your computer in real time. If it finds a virus or potential threat, it immediately reacts to it.
Let's take a look at Windows 10 Defender in action.
First, what will happen if I try to download an infected file.
As we can see, the file that I tried to download was blocked and a notification about this appeared in the Notification Center.
The same thing will happen if you try to run an infected or potentially unsafe file from your computer’s hard drive or from removable media, such as a flash drive.
In both cases, the suspicious file will be deleted and we will be informed of this action by notification.
Now let's look at the settings and features of Windows Defender 10.
Let's go to Settings - Update and Security - Windows Defender.
Here we can enable or disable anti-virus protection, as well as configure settings for sending data from your computer. The fact is that by default, two options are enabled here - sending information about potential threats to Microsoft and sending infected files. On the one hand, it’s good that information about potential and real dangers is accumulated by the developer, since this allows Microsoft to improve their software. But on the other hand, firstly, the sending is carried out automatically without your knowledge, and secondly, at your expense if you use the Internet with limited volume (traffic). Therefore, these two options can be disabled.
Next comes an option that allows you to add some files to exceptions.
And here it should be explained... Many users perceive antivirus as a panacea for all viral ills, but this is far from true, and the presence of such an option in all reputable antivirus programs is proof of this. In the vast majority of cases, antivirus only warns about a POSSIBLE threat. Users usually interpret these warnings unambiguously - the file is infected with a virus, but this may not be the case. There are a lot of criteria by which antivirus programs evaluate the potential danger of files and completely harmless ones can be classified as dubious...
If you have a file that you are sure of, but the antivirus still reacts to it, then you should add this file to the exceptions so that you can work with it. Otherwise, the antivirus will delete it. Thus, the Defender is reinsured. For novice users, this is good, since it is better not to launch something safe than to activate a virus. But sometimes necessary and completely harmless files are blocked in this way, which causes inconvenience, because the information in these files can be really important. I have encountered a similar situation more than once, for example, antiviruses can respond to encrypted e-books with the “.exe” extension, to video courses that have also been converted into an exe container, that is, the course is launched by an exe file, and it happens that an antivirus responds to portable programs, and those that I personally created and therefore am confident in their safety.
By adding such files to exceptions, we tell the antivirus not to respond to them and we can work with them calmly.
Next comes setting up notifications. By default, Defender displays all notifications in the Action Center, but if you disable this setting, you will only see critical notifications.
Well, another very useful feature is Windows Defender Offline.
The fact is that viruses can block an antivirus, that is, they can disguise themselves and prevent themselves from being detected. If you perform an offline scan, the computer will restart and the antivirus will immediately start, which will scan the computer before Windows starts. This will make it more likely to catch all malicious programs. I recommend using this option if the computer behaves in some unusual way, for example, it slows down or freezes, but a regular virus scan did not produce any results.
Well, now let's launch Defender and see how the scan is performed.
You can launch the program either from Settings by clicking on the corresponding button, or from the notification area by clicking on its icon.
We have the opportunity to conduct three types of checks - Quick, Full and Special.
A quick scan scans only the most vulnerable areas of the system. That is, these are the areas most often affected by viruses. A quick check allows you to assess the condition of the system in a short period of time.
A full scan scans all files on the computer's hard drive, as well as all running programs. Such a check takes much longer and its duration depends on many factors, for example, the size of your hard drive, the number of files located on it, the power of the computer, etc.
With a special scan, we can specify the areas in which we want to check. That is, we can specify a specific folder on the hard drive and only files located inside this folder will be scanned.
In order to check your computer for viruses, just select the type of scan and click on the “Scan now” button.
Upon completion of testing, we will receive a verification report.
On the “Update” tab we can manually receive updates to anti-virus databases or changes to the program. All these updates are received by the system automatically, but if for some reason this does not happen, you can go to this section and do it manually.
On the “Log” tab we can get data about the work of the Defender.
Firstly, information about objects in Quarantine. Quarantine is an antivirus-protected area in which a suspicious file is placed. Thus, if the file is infected, the virus will not be able to do anything, at the same time the file is not deleted and is located on your computer, which means that if the alarm is false and you are sure of the file, you can return it from Quarantine to its original location .
Next - Allowed objects. These are exactly the exceptions that we can add. If you mistakenly added a file to exceptions, you can correct the situation right here.
Well, the last point allows us to obtain information about all infected objects that the antivirus detected.
Pay attention to the description. It often talks about the potential danger of a program, that is, the antivirus does not consider this program to be malicious, but only assumes that it may be so and, out of harm’s way, removes it from the computer. If the file is not such, then you can select it and add it to exceptions right in this window.
How to recover a file from the built-in Windows Defender quarantine
Windows Defender works in automatic mode, so all suspicious files and data are automatically quarantined .
The protection system works on the principle of comparing suspicious data with information about virus software that is stored on the Microsoft server. This allows you to detect malware with maximum accuracy, so quarantined files can pose a real threat to the system . We do not recommend restoring files that you are not sure will harm your computer.
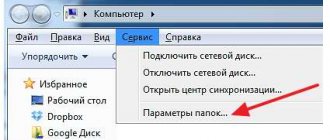
There are two ways to view quarantined files. The first is through Windows Security Center , the second is through Explorer . The first method provides maximum security and gives a full report of why the file was quarantined.
The second method is unsafe , since the user will be able to interact with the executable files of the virus, which will certainly lead to infection.
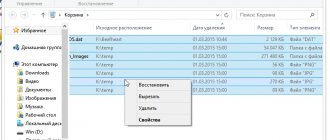
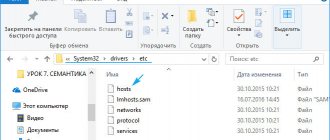
To get into quarantine through Explorer, just follow the Explorer path “C:\ProgramData\Microsoft\Windows Defender\Quarantine” and enable the display of hidden folders and system files .
In order to open quarantine in the Security Center, you must:
Step 1. Go to the “Security Center” in the manner described above, and then select the item with the shield logo “Protection against viruses and threats” .
Step 2. In the window that opens, select the item “Threat Log” .
Step 3. In the window that opens, you can see all the threats that have been placed in the quarantine zone. Suspicious files can be deleted or restored in this window.