Password management and file encryption
Before we talk in detail about file encryption, there is an important note to make regarding passwords. You should use a good password manager and follow good password practices.
What is it for? If you lose or forget the password for accessing encrypted files, they will no longer be accessible to you. This is why a password manager is so important. Popular ones include 1Password , LastPass and some others.
Find ransomware virus
The process of finding an infected file and healing the computer is done from other equipment.
After working on encrypting your files, you receive a message asking you to pay for recovery. Most often, the user loses not only data, but also money if he fulfills this requirement.
The interesting thing is that the user himself allows the installation and activation of the virus on his computer.
This could be opening a file with an .exe extension received via email, or agreeing to update a well-known application (JavaScript or FlashPlayer). There are many camouflage options for covert penetration.
Once you change the file extension to XTBL, you will no longer be able to open them. Attempts to restore by changing the name or extension will lead to nothing.
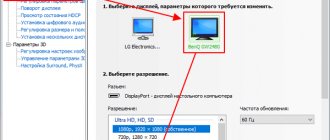
How to encrypt files and folders on Windows 10
Options for encrypting files and folders in Windows 10 depend on its version. Windows 10 Pro and Enterprise have a built-in encryption tool called Encrypting File System (EFS). Any Windows 10 user, including the Home edition, can use third-party applications like 7-zip to encrypt files and folders.
In addition to these options, Microsoft Office applications include simple file encryption functionality, as does Acrobat Reader.
Choosing a hash function and number of iterations
In order to encrypt (well, and decrypt too) any data, the cryptocontainer does not use a password. To encrypt using any algorithm, a binary key of a fixed length is taken, the so-called Data Encryption Key or Media Encryption Key (MEK). How exactly does your password (probably very long and secure) turn into a fixed-length MEK? Frankly speaking, none. The Media Encryption Key for a container once created is unchanged; it is stored in encrypted (more precisely, “wrapped”, wrapped) form directly within the container, and in “unwrapped” form it is used to access data.
The MEK data encryption key is necessarily encrypted (forgive the tautology) with the Key Encryption Key (KEK) encryption key. Without KEK it is impossible to decrypt MEK, and without MEK it is impossible to decrypt data. Why is such a complex scheme needed? At least so that you can change the password for the crypto container without having to decrypt and re-encrypt the entire content. However, the role of the MEK/KEK key pair is not limited to this scenario. So, it will be enough to erase a few tens of bytes in the container header (overwriting the area in which the MEK is stored), and no one will ever be able to decrypt the container, even if the password is known exactly. The ability to instantly and permanently destroy data is an important part of an overall security strategy.
So, we've sorted out the MEK/KEK key pair. How is a KEK key derived from a password? VeraCrypt carries out a cyclic sequence of one-way (this is important) mathematical transformations - hash functions, and the number of cycles is quite large: by default, the transformation is performed 500,000 times. Thus, with the default settings, VeraCrypt will take from one to five to six seconds to calculate a single KEK based on the entered password.
Here comes an important point. Do you remember that a little higher I discussed the speed of encryption algorithms and recommended using AES as the most common and fastest option? So, with the choice of a hash function, everything is exactly the opposite: you need the most non-standard and slowest algorithm.
VeraCrypt has a choice of four hash functions: the default SHA-512 (it is quite slow and quite secure, but default, which is a minus for us), even slower and also well-studied Whirlpool, the old SHA-256, which is still secure, but I don’t see the point in using it, and the “dark horse” “Stribog”, which is the slowest in the benchmark.
However, words from Wikipedia reliably discourage the use of the Stribog hash function: “Developed by the Center for Information Protection and Special Communications of the FSB of Russia with the participation of OJSC InfoTeKS based on the national standard of the Russian Federation GOST R 34.11-2012 and put into effect on June 1 2020 by order of Rosstandart No. 1060-st dated December 4, 2020,” as well as some trivial errors and oddities found by independent researchers in the permutation tables.
How to properly configure the conversion of a password to a KEK encryption key? Here are three main points.
- Don't use the default selection. All software for hacking crypto containers, without exception, is configured for attacks with the “default” settings. The expert will have a choice of settings (default, select a specific combination by parameter or try all combinations). The “default” attack will be the fastest, the “try all combinations” option will be disastrously slow, and trying to manually select the correct combination of encryption parameters is the same as manually guessing a password.
- Choose the slowest hash function (not Stribog). Yes, with a slow hash function, and one that is different from the “default choice”, your crypto container will be mounted in not one, but five to six seconds - but the resistance to attack will increase by the same five to six times (and taking into account “ choice is not by default" - even stronger).
- Change the number of iterations. More on this below.
So, we’ve sorted out the default settings and decided on the choice of hash function. However, there is another important parameter hidden behind the inconspicuous Use PIM checkbox. What kind of PIM is this and why is it needed?
PIM (Personal Iterations Multiplier) directly affects the number of iterations that will be used to convert your password into the KEK encryption key. According to the documentation, VeraCrypt calculates the number of iterations (number of transformations) using the formula 15000 + (PIM · 1000). For the SHA-512 and Whirlpool hash functions, the default PIM value is 485, which gives us exactly 500,000 iterations.
What is this parameter for? The fact is that the computing power, including that of those who will hack your crypto container, is constantly growing. Protection that was effective twenty years ago no longer seems so impenetrable today. However, in the case of VeraCrypt, you can easily and gracefully increase the strength of the protection as much as you like, simply by increasing the number of iterations. Yes, increasing the number of iterations (via a custom PIM value) will slightly reduce usability (when mounting a crypto container, you will have to enter the PIM number in addition to the password), and the mounting speed will slow down somewhat. Believe me, however, that any, even the most insignificant change in PIM means a severe headache for anyone who decides to guess the password.
How much will changing the PIM affect the mount speed of the crypto container? Here's the time with default PIM settings.
But I changed PIM to the value 500 (from the default 485).
And here I used a PIM of 1000.
The numbers are by no means prohibitive: it’s not difficult to wait extra seconds when mounting an encrypted volume, but someone who tries to guess the password for that volume will have a lot of problems. The general algorithm for hackers will look like this.
- First they will try all possible attacks with standard settings. This is time, often significant.
- If it is clear that the PIM value is non-standard, and the number of PIMs is known exactly, the attack will be carried out immediately with the correct settings. However, increasing PIM from 485 to 1000 will approximately double the time required for an attack. So-so increase in security, but better than nothing.
- But if the PIM value is unknown to the attacker, then the attack will have to be carried out for the entire range of PIM values. That is, if you set the PIM value = 1000, then the attacker will have to check EVERY password option with PIM values = 1, 2, 3, ..., 1000 (or 485, 486, 487, ..., 1000, if the attacker is convinced that the PIM value is you did not decrease, but exclusively increased). In other words, the complexity of the attack increases by a factor of (your PIM - 485) if the attacker uses only options greater than the default value, or by (your PIM) times if the attacker decides to iterate over the entire range of PIM values.
A logical question: wouldn't increasing the password length by two or three characters from the extended character set give a similar (and even better) result? If you approach it from a purely computational point of view, it will. The reality is that most attacks are carried out with default settings; The number of programs that can use attacks with a non-standard PIM value can be counted on the fingers of one hand, and the number of programs that can automate attacks with a custom range of PIM values is even smaller.
Let's look at a screenshot of the latest build of Elcomsoft Distributed Password Recovery with VeraCrypt support (by the way, not even officially released yet).
Here we see an attack in a standard configuration: AES encryption algorithm, hash function - SHA-512. No surprises. The attack speed is 170 passwords per second (this is with all processor cores loaded and using the computing resources of the video card; without a video card, we would see a speed of about 0.5 passwords per second).
But if you change the hash function, then an attack like the one shown in the first screenshot will not be able to find the password. Accordingly, a second attack will be used - this time across the entire range of encryption algorithms and hash functions.
What do we see in the second screenshot? Firstly, the search speed dropped sharply to one password per second - this was using a GPU accelerator.
What don’t we see in the second screenshot? We do not see any possibility of attacking the number of PIM iterations. The number of PIM iterations can be specified manually in most password cracking software. Thus, a non-standard number of iterations will make the attack ineffective: even if your password is 123, it will not be possible to find it without specifying the exact number of iterations.
Of course, if there is a problem, there is a solution for it. The latest beta of the well-known hashcat tool contains two interesting parameters: —veracrypt-pim-start and —veracrypt-pim-stop (commit with change). What will happen to the search speed? If the exact encryption parameters are unknown (a combination of an encryption algorithm and a hash function), then the search speed is already quite low: only one password per second on a computer with a GPU hardware accelerator. Now divide this figure by the number of possible PIM options, and you get an extremely slow search. In reality, brute force will be even slower: if with low PIM values checking a password takes a fraction of a second, then a large number of iterations will slow down the brute force by several times compared to the standard value.
How to Encrypt Files and Folders Using Encrypting File System (EFS)
Encrypting File System (EFS) is available in Professional and Enterprise editions. This is considered an advanced Windows feature. Inexperienced users may lose access to files when working with this system.
EFS encrypts files in the background, including automatically generating a File Encryption Key (FEK). Only the account in which the file was encrypted can decrypt it. All this happens automatically.
Apart from the padlock symbol that appears in Explorer next to an encrypted file or folder, it is impossible to tell by eye that it is encrypted using EFS.
Unfortunately, EFS has disadvantages that make it less than ideal.
- EFS only works with NTFS formatted drives
- If you transfer an encrypted EFS file to a disk formatted FAT32 or exFAT, it will be decrypted
- If you transfer an encrypted EFS file over the network or send it by email, it is decrypted
If that doesn't bother you, here's how to encrypt files and folders using EFS:
- Launch Explorer and open the location of the desired file or folder.
- Right-click on them.
- In the context menu, click on the “ Properties ” command.
- On the General tab, click on the buttonOther».
- In the “Additional attributes” window, check the box next to the “Encrypt content to protect data».
After this, the file or folder will appear as encrypted to everyone except this account.
Encrypting a drive using BitLocker
If you need to encrypt disks or removable drives, you should use the built-in BitLocker , which will allow you to encrypt a large amount of data. To get started with BitLocker, you need the Ultimate , Professional , or Enterprise version of Windows .
To access BitLocker, right-click on “Start” button , select “Control Panel” and go to the first section “System and Security” .
In the window that opens, go to the item “Bitlocker disk encryption” .
Now you need to activate the utility next to the system drive or the required volume.
The program will automatically analyze the disk and prompt you to select an unlocking .
If the motherboard has a TPM , you can choose additional unlocking methods. The utility also offers the ability to protect the drive with a password or create a special flash drive with a key that can unlock the drive when connected.
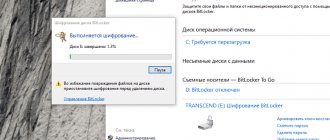
Regardless of the unlock method you choose, BitLocker will provide a special key to unlock the drive . You can use it if you lose your flash drive or password.
This key can be printed, saved as a document on removable media, or saved on a Microsoft server. It is worth noting that this stage is very important, since without an emergency key and if other means of unlocking are lost, the disk will remain locked.
After completing all the steps, the utility will prompt you to select an encryption method, from which you should select the preferred one.
After this, the computer will reboot, and upon a new boot, the encryption process indicator will be present in the system.
How to encrypt files and folders using 7-zip
7-zip is a free file archiving program that can also encrypt files and folders using the AES-256 algorithm. This is the current encryption standard on most systems.
If you plan to use 7-zip to encrypt files or folders, you need to remember that it creates encrypted copies of the file or folder. The originals remain unencrypted.
If you are creating an encrypted object to send to someone or to store in the cloud, this method is suitable. If you are going to protect files or folders on your own device, this method is not ideal.
Installing GPG
Windows
Download and install Gpg4win.
GNU/Linux
Most GNU/Linux distributions already have GPG installed.
If you don't have it installed, install the gnupg package using your package manager or build it from source. Android
For Android there are programs GnuPG for Android and OpenKeychain. The creators of GnuPG for Android recommend using OpenKeychain.
Official website of OpenKeychain OpenKeychain in F-Droid OpenKeychain in Google Play
Official website of GnuPG for Android Sources of GnuPG for Android on GitHub
Thanks to my friend under the nickname sormon for reminding me!
What to do after 7-zip encryption
As a result, you will receive an archive encrypted using the AES-256 algorithm. The next steps depend on what you are going to do with the encrypted file or folder.
If you created an archive to share copies of a file or folder, send the archive to the recipient. If they have 7-zip or similar and you somehow securely gave them the password, they can unzip the archive, then double-click the file to enter the password into the dialog box.
After entering the password, the operating system should open the application corresponding to the file. The recipient will be able to view, save, and edit it. The encrypted version of the file will also remain in the system.
If you created an archive to protect files or folders on your system, the unencrypted originals should be deleted to prevent them from falling into the wrong hands.
Simple encryption
Some readers, of course, have heard of the Caesar cipher, which is also called cyclic. This method was invented more than 2000 years ago, and its principle of operation is based on encryption and decryption using 26 letters of the alphabet.
To encode a message, letters were replaced with others that were shifted in the alphabet from the position being replaced by “x”, for example, by 3. If the letter being encrypted is the last in the alphabet, we return to the beginning. In this case, the encryption key will be the value “x”.
A modern example of such a cipher is ROT13, which was once used, for example, in the Outlook Express email program. This, however, is already a story that perfectly illustrates the mechanism under discussion.
Let's move on to methods that we can use every day. If we don't have encryption applications at hand and we want to protect a file or folder, we can use the ZIP archiver built into Windows. Unfortunately, with the advent of the seventh version of Windows, the ability to protect archives with a password disappeared from the compressor. But nothing is lost, because data compression itself causes the organization of individual bytes to change into an incomprehensible set of characters.
Some users try to replace the lack of a password by changing the file extension from *.ZIP to another, for example, *.DLL. This method is quite appropriate, but there is no point in re-compressing, which supposedly should make the information difficult to read. If you want to protect your archive with a password, you have a free tool at your disposal - 7-ZIP.
How to Encrypt Microsoft Office Files on Windows 10
Some applications allow you to internally encrypt files of the types they work with. You can encrypt files in Microsoft Word, and Adobe Acrobat encrypts PDF files.
- In Word, go to Menu > File > Info.
- In this window, select " Protect Document ".
- In the menu that appears, select "Protect with password».
- A dialog box will appear asking you to enter a password.
Now, when viewing this document, you will always need to enter a password.
Files on the computer are encrypted in xtbl
One of the latest variants of the ransomware virus encrypts files, replacing them with files with the extension .xtbl and a name consisting of a random set of characters.
At the same time, a text file readme.txt is placed on the computer with approximately the following content: “Your files have been encrypted. To decrypt them, you need to send the code to the email address [email protected] , or [email protected] Then you will receive all the necessary instructions. Attempts to decrypt files yourself will lead to irretrievable loss of information” (mail address and text may differ).
Unfortunately, there is no way to decrypt .xtbl at the moment (as soon as it becomes available, the instructions will be updated). Some users who had really important information on their computer report on antivirus forums that they sent the authors of the virus 5,000 rubles or other required amount and received a decryptor, but this is very risky: you may not receive anything.
What to do if the files were encrypted in .xtbl? My recommendations are as follows (but they differ from those on many other thematic sites, where, for example, they recommend immediately turning off the computer from the power supply or not removing the virus. In my opinion, this is unnecessary, and under some circumstances it may even be harmful, but it's up to you to decide.):
- If you know how, interrupt the encryption process by clearing the corresponding tasks in the task manager, disconnecting the computer from the Internet (this may be a necessary condition for encryption)
- Remember or write down the code that the attackers require to be sent to an email address (just not to a text file on the computer, just in case, so that it is not encrypted either).
- Using Malwarebytes Antimalware, a trial version of Kaspersky Internet Security or Dr.Web Cure It, remove the file encrypting virus (all of these tools do a good job of this). I advise you to use the first and second products from the list in turn (however, if you have an antivirus installed, installing the second one “from above” is undesirable, as it can lead to problems with the computer.)
- Wait for a decryptor to appear from some antivirus company. Kaspersky Lab is at the forefront here.
- You can also send an example of an encrypted file and the required code to, if you have a copy of the same file in unencrypted form, send it too. In theory, this could speed up the appearance of the decryptor.
What not to do:
- Rename encrypted files, change the extension and delete them if they are important to you.
This is probably all I can say about encrypted files with the .xtbl extension at the moment.
Deleting unencrypted copies of a file
If you use 7-zip or Microsoft Office to encrypt your files, Windows 10 may keep one or more temporary copies of the unencrypted versions of your files. You need to delete these copies after encryption.
- Click on the “Start” button and type “temporary” in the search. From the menu that appears, select “Delete temporary files.” The settings will open in the “Storage” section.
- Windows 10 will scan your system and display a list of file types that are stored on different drives. Select Temporary Files to view a list of file types available for deletion.
- In this list, check the boxes next to the “Temporary files” and “Trash” commands, click on the “Delete files” button at the top of the list. This will remove unencrypted copies of files from your system.
Let's decipher the ransomware virus
Decryption requires a private key, which they allegedly offer you to buy.
Currently, for some types of ransomware, there are file decryption software.
This requires determining what specific type of encryption the files were subjected to using NoMoreRansom or IDRansomware services.
To do this, you need to copy the following files from a computer subject to a virus attack:
- offers received from the extortionist,
- one of the modified files with the XTBL extension.
In addition to thematic forums, it is worth trying the indicated decryption services.
Decrypting ransomware viruses
Russified service in the active stage of development NoMoreRansom. If the circumstances are favorable, it will completely solve your problems with the ransomware.
To do this, on the service website nomoreransom.org, select “Yes” and on the page that opens, upload the modified file (without confidential data!).
There is a size limit - no more than 1 megabyte. Specify the e-mail address or site url provided to you by hackers or download the file itself received from them. Launch "Check".
You can also download the necessary decryption utility from them (after determining the type).
Installing VeraCrypt
- You will need a USB flash drive to create the VeraCrypt Rescue Disk. Format the flash drive to the FAT or FAT32 file system.
- You need a program to unzip files. You can use 7-zip.
- Go to the VeraCrypt download page and look for installations for Windows.
- Run the VeraCrypt installer and use the default settings.
- A message indicating successful installation should appear.
- Click OK and Finish to complete the installation process. The following dialog box will be displayed.
- If you have not used VeraCrypt before, it is recommended that you read the manual. Click Yes to view the guide.
- Launch the application. In the menu, select the System section > Encrypt system disk partition.
- The VeraCrypt Volume Creation Wizard appears. You will be asked what type of system encryption you want to use: normal or hidden. In the first case, the system partition is encrypted, which is what we need in this case. Select Normal and click Next.
- Next, you will be asked whether you want to encrypt the Windows system partition or the entire disk. If you have several partitions with important data, you can encrypt the entire disk. If you have one partition, you can select Encrypt Windows system partition. Once selected, click Next.
- The Number of Operating Systems window appears. If you have more than one operating system on your computer, select the Multiboot option. Otherwise, you will select the "Single System" option. Click Next.
- The Encryption Options window appears. It is recommended to select AES encryption algorithm and SHA-256 hash algorithm. Click Next.
- The Password window will appear. You need to choose a strong password if you want to keep your data secure. Many password managers include a password generator. VeraCrypt suggests creating a password of at least 20 characters. Click Next.
- The “Random Data Collection” window will appear. You will need to move the mouse in the window. This increases the strength of the encryption keys. When the panel at the bottom of the window is filled, you can click Next.
- The "Generated Keys" window will appear. Click Next.
- You will need to create a VeraCrypt Rescue Disk (VRD). An explanation will appear on the image. If you're willing to take the risk, you can check the "Skip recovery disk confirmation" checkbox to avoid creating a physical recovery disk. Note where VeraCrypt saves the zip image, then click Next.
- If you did not select the "Skip recovery disk verification" option, create a physical disk and let VeraCrypt verify it. You need to insert a blank flash drive into the computer and open the address where the VeraCrypt application stored the recovery disk in the previous step. Use 7-zip or a similar application to extract files from VeraCrypt Rescue Disk.zip to the root of the flash drive. Click Next.
- If everything went correctly, a recovery disk confirmation window will appear. Remove the flash drive from your computer and click Next.
- The Wipe Mode window will appear. Set it to "No" and click "Next".
- The System Encryption Pretest window appears. This is where the encryption process is checked. The image below shows in detail what will happen. Click "Test". The application may issue several more warnings before the test runs.
- If everything went as expected, the following window may appear after restarting the computer and passing the system encryption check.
- VeraCrypt recommends backing up important files before encrypting your system. This will allow them to be restored if something unexpected happens, such as a power outage or a system error during the encryption process. After that, click “Encrypt”. The app will show documentation that you can print. This describes when to use the recovery disk after the encryption process is complete. After this, the encryption itself begins. You can track your progress.
- Once encryption is complete, you must enter your password every time you start your computer.
Usage
Only usage on Linux will be shown here (at the time of writing, the latest version of GPG is 2.2.6)
First, it’s worth clarifying that most Linux distributions have two binary files: gpg and gpg2. As far as I remember, there were two different versions: 1.4.x and 2.0.x, and for ease of use I made an alias so that when gpg was launched, gpg2 would be executed. Now in Debian and Arch Linux /bin/gpg2 is a symbolic link to /bin/gpg and the need for such manipulations has disappeared. You can check this by executing file /bin/gpg2.
So, let's begin!
By entering gpg without arguments, it will create the files it needs (if they have not already been created) and will wait for the information to be encrypted to be entered.
[email protected] :~$ gpg gpg: created directory '/home/user/.gnupg' gpg: created shield with keys '/home/user/.gnupg/pubring.kbx' gpg: Attention: command not issued. I'm trying to guess what was meant... gpg: Write a message...
If we have the key, we can enter text, press the key combination Ctrl + D and get a portion of crap directly into the console. But we don't have the key yet.
Key creation
To generate a key, we need to run GPG with the argument “--full-generate-key” (we can also use “--gen-key”, but in this case we will not have a choice of some important parameters).
UPD: If you run GPG with the —expert argument, then the choice of key type will be much wider. Thanks to comrade nikitasius for the addition!
[email protected] :~$ gpg —full-generate-key gpg (GnuPG) 2.2.6; Copyright (C) 2020 Free Software Foundation, Inc. This is free software: you are free to change and redistribute it. There is NO WARRANTY, to the extent permitted by law. Select the key type: (1) RSA and RSA (default) (2) DSA and Elgamal (3) DSA (signature only) (4) RSA (signature only) Your choice? [email protected] :~$ gpg —full-generate-key —expert gpg (GnuPG) 2.2.6; Copyright (C) 2020 Free Software Foundation, Inc. This is free software: you are free to change and redistribute it. There is NO WARRANTY, to the extent permitted by law. Please select what kind of key you want: (1) RSA and RSA (default) (2) DSA and Elgamal (3) DSA (sign only) (4) RSA (sign only) (7) DSA (set your own capabilities) (8) RSA (set your own capabilities) (9) ECC and ECC (10) ECC (sign only) (11) ECC (set your own capabilities) (13) Existing key Your selection?
You can choose any option, but keep in mind that if you choose the third or fourth option, you will not be able to encrypt messages and files!
… Your choice? 1 RSA key lengths can range from 1024 to 4096. What key size do you need? (2048)
For RSA, a key size of 2048 bits is sufficient, but you can choose a key size up to 4096 bits (it is not safe to use keys smaller than 2048 bits).
... What key size do you need? (2048) 2048 Requested key size - 2048 bits Select the key expiration date. 0 = unlimited = key validity period - n days w = key validity period - n weeks m = key validity period - n months y = key validity period - n years Key validity period? (0)
If you choose a limited key validity period, then after its expiration the key will be invalidated. You can renew the key until it expires.
GPG will ask if we entered the correct deadline, and if so, we will need to provide a name, email address, and a note (all this is optional, but you must provide at least one).
... The key is valid until Thu January 01, 1970 00:00:00 +00 Is that correct? (y/N)y GnuPG must construct a user ID to identify the key. Your full name: Habrahabr User Email address Note: My own key You have selected the following user ID: “Habrahabr User (My own key)” Change (N)Name, (C)Note, (E)Address; (O)Accept/(Q)Exit?
Here you can make edits or continue.
Next, gpg will ask you to specify a password (I recommend refreshing your memory and reading about the rules for choosing a strong password). If you are running an X server, you will see a dialog box where you need to enter a password. If not, then the password is entered directly into the console.
If you don't like windows
Add this line to the ~/.gnupg/gpg-agent.conf file: pinentry-program /usr/bin/pinentry-tty Pynentry are the same dialog boxes.
In addition to the tty version (console), there are several more versions (graphical) that you can try. Then restart gpg-agent. On systems with systemd this is done like this: systemd —user reload gpg-agent ... You need to get a lot of random numbers.
It is advisable that you perform some other actions during the generation process (typing on the keyboard, moving the mouse, accessing disks); this will give the random number generator a better chance of getting enough entropy. Enter a passphrase to protect the new key Passphrase: The entered password is not displayed in the terminal!
There is also a useful tip that will speed up key creation. It is advisable to follow it, but not necessary (and very carefully so as not to bump into unnecessary things).
... Passphrase: Repeat: You need to get a lot of random numbers. It is advisable that you perform some other actions during the generation process (typing on the keyboard, moving the mouse, accessing disks); this will give the random number generator a better chance of getting enough entropy. gpg: /home/user/.gnupg/trustdb.gpg: trust table created gpg: key 5699884482E426AC marked as absolutely trusted gpg: directory '/home/user/.gnupg/openpgp-revocs.d' created gpg: revocation certificate written to '/home/user/.gnupg/openpgp-revocs.d/2BB6803FCF82316969619C155699884482E426AC.rev'. public and private keys are created and signed. pub rsa2048 1970-01-01 [SC] 2BB6803FCF82316969619C155699884482E426AC uid Habrahabr User (My own key) sub rsa2048 1970-01-01 [E]
At this point, a key is generated and added to the keychain. A keychain can contain many keys. Also at this stage, a revocation certificate is created - a file with which the created key can be revoked (invalidated). It is recommended to store it in a safe place because... If attackers gain access to it, they will be able to revoke your key.
So what do all these strange last lines mean?
rsa — RSA encryption algorithm. 2048 — Key length. 1970-01-01 — Key creation date. 2BB680…E426AC — Key fingerprint. It should be checked when importing someone else's public key - it must be the same for both parties. uid — Identifier (User-ID). pub and sub — Key types:
pub — Public key. sub — Public subkey. sec — Secret key. ssb - Secret key.
[SC] and [E] - The purpose of each key. When you create a key, you receive as many as 4 crypto keys: for encryption, decryption, signing and signature verification:
S - Signing. C - Key signature (Certification). This will be discussed a little later. E - Encryption. A - Authorization. Can be used, for example, in SSH.
Why do you need to sign messages? In order to confirm that the message was written by you and has not changed during transmission. If the message is changed, this will be indicated when checking the signature.
Configuration
The configuration file is stored in the file ~/.gnupg/gpg.conf Here, for example, is an example of my configuration file, which I recommend installing:
keyid-format 0xlong throw-keyids no-emit-version no-comments
keyid-format 0xlong — key identifier output format. Each key and subkey has its own identifier. By default it is not displayed; previously a short version of it was displayed. Available formats: none - Do not output (Default). short — Short entry. 0xshort — Short entry with the prefix “0x”. long — Long entry. 0xlong - long entry with the prefix “0x”.
throw-keyids - Do not include key information in the encrypted message. This option can be useful to anonymize the recipient of the message.
no-emit-version — Do not insert the GPG version into the encrypted message.
no-comments - Removes all comments from the encrypted message.
These are all options that can be found in the man page. In the configuration file they are written without the prefix “—“.
Commands and Options
I will describe only the most basic.
--armor -a — Produce ASCII (character) output. When encrypting, GPG produces binary output by default. When this option is used, GPG encodes information using Radix-64 encoding (a variation of Base64). This text output can, for example, be sent via instant messenger or email, or displayed on the screen.
--encrypt -e — Encrypt the message.
--recipient -r — Specify the key to be used for encryption. You can use the information user ID (name, email), key ID, key fingerprint.
--decrypt -d — Decrypt the message.
--sign -s — Sign the message. The signature will be located separately from the message itself.
—clear-sign —clearsign — Sign the message. The signature is saved along with the message.
--local-user -u — Specify the key that will be used for signing. Similar to the --recipient option, but not the same thing.
--verify — Verify the signature.
--list-keys -k — List public keys.
--list-secret-keys -K — List private keys.
—export — export the public key to a file, which can then be sent somewhere.
—import — import a public key.
--edit-key - Edit the key.
—expert — “Expert mode.”
Examples
gpg -a -r 0x12345678 -e decrypted.txt > encrypted.gpg Encrypt the decrypted.txt file into the encrypted.gpg file with the key 0x12345678. In this case, the finished file will be text, not binary.
gpg -r 0x12345678 -d encrypted.gpg > decrypted.txt Decrypt the encrypted.gpg file with the key 0x12345678 and save it to the decrypted.txt file.
gpg -u 0x12345678 -s message.txt > sign.asc Sign the message file with key 0x12345678 and save the signature to the sign.asc file.
gpg -r 0x12345678 —clearsign message.txt > message.gpg Sign the message.txt file with the key 0x12345678 and write the message with the signature to the message.gpg file.
gpg —verify message.asc message.txt Verify the signature of the message.txt file, which is written in the message.asc file.
gpg —import pubkey.gpg Import the public key from the pubkey.gpg file.
Editing a key, signing other people's keys and sending the key to the key server
The key is edited with the gpg --edit-key command. After entering this command you will see this:
[email protected] :~$ gpg —edit-key CCA230DA07929EB7 gpg (GnuPG) 2.2.6; Copyright (C) 2020 Free Software Foundation, Inc. This is free software: you are free to change and redistribute it. There is NO WARRANTY, to the extent permitted by law. The secret key is available. sec rsa2048/CCA230DA07929EB7 created: 2018-05-08 expiration date: never assignment: SC trust: absolute credibility: absolute ssb rsa2048/7859E2A888E31276 created: 2018-05-08 expiration date: never assignment: E [ absolutely ] (1). Habrahabr User (My own key) gpg>
You can find out the available commands by typing help. Here we can add various subkeys, add user IDs, and also sign other people's public keys. Why do you need to sign keys? This way you can confirm that the owner of the key being signed is who he claims to be. In this way you create the so-called “Network of Trust”. Example: Alice signed Bob's public key, and Bob signed Charlie's public key. If Alice gets Charlie's public key, she can trust it because the key is signed by someone Alice trusts, i.e. Bob. In order to get signatures for their key, people even hold special meetings where they exchange their public keys and sign them.
Now about key servers. A key server is a special server that stores public keys. Key servers are used to distribute public keys.
Attention! Keys sent to the key server cannot be deleted! They can only be revoked by importing the revocation certificate onto the server, but the key still remains on the server.
Send public key to server: gpg --keyserver --send-keys
Receive a public key with a key identifier from the server: gpg --keyserver --recv-keys
Receive key updates from the server: gpg --keyserver --refresh-keys
Find the key on the server: gpg --keyserver --search-keys
For convenience, you can enter the address of the key server in gpg.conf so as not to write it in the commands: keyserver
Where you might encounter GPG usage
Git You can use GPG to sign your commits. This way you confirm that you were the one who made the commit. In GitHub, you can import your public key and commits signed with your key will receive a check mark.
UPD: You can read about Git configuration to use GPG in the Git documentation. Here is an example of a Git configuration file from friend nikitasius:
[commit] gpgsign = true [user] signingkey = [gpg] program = /bin/gpg
Downloading distributions and other files Most installation images of distributions are distributed by signed developers. If you download a modified image, when checking the signature you will immediately notice that the image is not original. An example is the popular Tails distribution.
Package Managers All packages are signed by the developers to protect them from changes.
When packages are installed, these signatures are verified. This is all done automatically without user intervention.