Historically, command line utilities in Unix systems are better developed than in Windows, but with the advent of a new solution the situation has changed.
Windows PowerShell allows system administrators to automate most routine tasks. With its help, you can change settings, stop and start services, and also perform maintenance of most installed applications. It would be wrong to perceive the blue window as another command interpreter. This approach does not reflect the essence of the innovations proposed by Microsoft. In fact, the capabilities of Windows PowerShell are much wider: in a short series of articles we will try to figure out how the Microsoft solution differs from the tools we are more familiar with.
Key Features
Of course, Windows PowerShell is primarily a command shell with a scripting language, originally built on the .NET Framework and later on the .NET Core.
Unlike shells that accept and return text data, Windows PowerShell works with .NET classes, which have properties and methods. PowerShell allows you to run common commands and also gives you access to COM, WMI, and ADSI objects. It uses various storages, such as the file system or the Windows registry, for access to which the so-called. suppliers. It is worth noting the possibility of embedding PowerShell executable components into other applications to implement various operations, incl. via graphical interface. The reverse is also true: many Windows applications provide access to their management interfaces through PowerShell. Windows PowerShell allows you to:
- Change operating system settings;
- Manage services and processes;
- Configure server roles and components;
- Install software;
- Manage installed software through special interfaces;
- Embed executable components into third-party programs;
- Create scripts to automate administration tasks;
- Work with the file system, Windows registry, certificate store, etc.
How to run a PowerShell script?
There are several different ways to run the script, the main ones are below:
- Launch the PowerShell shell and run the script in it (enter the path to the file and the file name, for example, like this: C:\Scripts\test.ps1, or go to the script folder with the command cd C:\Scripts and run it with the command .\test.ps1 )The shell can be found and launched in many ways. One way is through the Start menu. For Windows 7 - you need to go to “All Programs” - “Accessories” - “Windows PowerShell” and launch the “Windows PowerShell” shell. For Windows 10 - you need to find the group with the letter “W” and in it you will find “Windows PowerShell”.
- Launch "Windows PowerShell ISE" - this is a program - a development environment that allows you to edit and debug PowerShell scripts, which is also included by default with PowerShell itself. Having launched it, you just need to click the “Open” button or go to the File - Open menu and select the desired script, then press F5 or the “Run Script” button. You can find Windows PowerShell ISE in the same place as the PowerShell shell - in the Start menu .
- Run a standard command line and write in it: powershell -file <script_name> (example: powershell -file myscript.ps1)
If you have not run PowerShell scripts before, you will most likely receive the message: The file <script name> cannot be loaded because script execution is not allowed on this system. Type "get-help about_signing" for more information. This is due to the fact that for security reasons and to prevent accidental execution of malicious code, all scripts must be digitally signed.
Shell and development environment
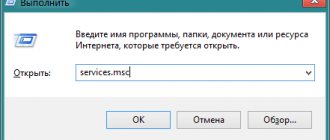
Windows PowerShell exists in two forms: in addition to the console emulator with a command shell, there is an integrated scripting environment (ISE). To access the command line interface, simply select the appropriate shortcut from the Windows menu or run powershell.exe from the Run menu. A blue window will appear on the screen, noticeably different in capabilities from the antediluvian cmd.exe. There is autocompletion and other features familiar to users of command shells for Unix systems.
To work with the shell you need to remember some keyboard shortcuts:
- The up and down arrows scroll through the history to repeat previously typed commands;
- The right arrow at the end of the line retypes the previous command character by character;
- Ctrl+Home deletes the typed text from the cursor position to the beginning of the line;
- Ctrl+End deletes text from the cursor to the end of the line.
F7 shows a window with the entered commands and allows you to select one of them. The console also works by selecting text with the mouse, copy-pasting, cursor positioning, deleting, backspace - everything we love.
Windows PowerShell ISE is a full-fledged development environment with a code editor that supports tabs and syntax highlighting, a command designer, a built-in debugger, and other programming delights. If you write a hyphen after the command name in the development environment editor, you will receive all available parameters in the drop-down list, indicating the type. You can launch PowerShell ISE either through a shortcut from the system menu or using the executable file powershell_ise.exe.
Launching PowerShell via the command line
Yes, for those who like non-standard paths, there is also a way)) Many ways to launch the command line are described here. Here I will describe a method that is suitable for modern operating systems. Right-click on the Start corner or press Win+X, and in the menu that opens, select the appropriate command line. If you need PowerShell with administrator rights, then select Command Prompt with administrator rights.
In the window that opens, enter powershell and press Enter . After this, the command line will work completely like Windows PowerShell.
Launch Windows PowerShell through a Windows Explorer window.
Open Explorer and go to one of the folders:
a) 64bit PowerShell if the system is 64 bit or 32bit PowerShell if the system is 32 bit C:\Windows\System32\WindowsPowerShell\v1.0
b) 32bit PowerShell on 64-bit systems is located in the folder: C:\Windows\syswow64\Windowspowershell\v1.0
You can simply paste the link into the address bar.
If you need PowerShell with normal rights, just run the highlighted file. If you have administrator rights, right-click and select “Run as administrator.”
Cmdlets
In Windows PowerShell, the so-called.
cmdlets. These are specialized .NET classes that provide a variety of functionality. They are named according to the “Action-Object” principle (or “Verb-Noun, if you prefer), and the hyphen-separated connective resembles the predicate and subject in natural language sentences. For example, Get-Help literally means “Get-Help” or in a PowerShell context: “Show-Help”. In fact, this is an analogue of the man command in Unix systems, and manuals in PowerShell need to be requested this way, and not by calling cmdlets with the –help or /? key.. Don’t forget about the online documentation for PowerShell: Microsoft has it quite detailed. In addition to Get, cmdlets also use other verbs to denote actions (and not only verbs, strictly speaking). In the list below we give some examples:
Add - add; Clear - clear; Enable - enable; Disable - turn off; New - create; Remove - remove; Set - set; Start - start; Stop - stop; Export - export; Import - import.
There are system, user and optional cmdlets: as a result of execution, they all return an object or an array of objects. They are not case sensitive, i.e. From the command interpreter's point of view, there is no difference between Get-Help and get-help. The ';' symbol is used for separation, but it is required only if several cmdlets are executed on one line.
Windows PowerShell cmdlets are grouped into modules (NetTCPIP, Hyper-V, etc.), and there is a Get-Command cmdlet for searching by object and action. You can show help on it like this:
Get-Help Get-Command
By default, the command displays quick help, but parameters (arguments) are passed to cmdlets as needed. With their help, you can, for example, get detailed (-Detailed parameter) or complete (-Full) help, as well as display examples (-Examples parameter):
Get-Help Get-Command -Examples Help in Windows PowerShell is updated with the Update-Help cmdlet. If a line of commands turns out to be too long, the cmdlet arguments can be transferred to the next one by writing the service character '`' and pressing Enter - simply finishing writing a command on one line and continuing on another will not work.
Below are some examples of common cmdlets:
Get-Process - show processes running in the system; Get-Service - show services and their status; Get-Content — display the contents of a file.
For frequently used cmdlets and external utilities, Windows PowerShell has short synonyms - aliases. For example, dir is an alias for Get-ChildItem. There are also analogues of commands from Unix systems in the list of synonyms (ls, ps, etc.), and the Get-Help cmdlet is called by the help command. The full list of synonyms can be viewed using the Get-Alias cmdlet:
How to open PowerShell in Windows 7
Users on the Windows 7 operating system can launch PowerShell from the Start button menu. To do this you need to do the following:
- Left-click on the Start menu button.
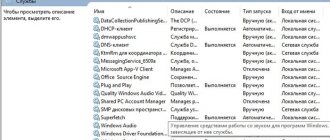
- In the All Programs list, open the Accessories folder.
- Locate the "Windows PowerShell" folder, which contains the icons for launching the application.
To run PowerShell as an administrator, right-click on the application shortcut and select “Run as administrator” in the context menu that opens.
PowerShell Scripts, Functions, Modules, and Language
Windows PowerShell scripts are stored as plain text files with a .ps1 extension.
You cannot run them by double-clicking: you need to right-click to open the context menu and select “Run in PowerShell”. From the console you will either have to specify the full path to the script, or go to the appropriate directory and write the file name. Running scripts is also limited by system policy, and to check the current settings you can use the Get-ExecutionPolicy cmdlet, which will return one of the following values: Restricted - running scripts is prohibited (default); AllSigned - only scripts signed by a trusted developer are allowed to run; RemoteSigned - allowed to run signed and own scripts; Unrestricted—any scripts are allowed to run.
The administrator has two options. The most secure involves signing scripts, but this is quite a serious sorcery - we will deal with it in the following articles. Now let's take the path of least resistance and change the policy:
Set-ExecutionPolicy RemoteSigned
To do this, you will have to run PowerShell as an administrator, although you can use a special parameter to change the policy for the current user.
Scripts are written in an object-oriented programming language, the commands of which are named according to the same principle as the previously discussed cmdlets: “Action-Object” (“Verb-Noun”). Its main purpose is to automate administration tasks, but it is a full-fledged interpreted language that has all the necessary constructs: conditional jump, loops, variables, arrays, objects, error handling, etc. Any text editor is suitable for writing scripts, but it is most convenient to run Windows PowerShell ISE.
You can pass parameters to the script, make them mandatory, and also set default values. Windows PowerShell also allows you to create and call functions in the same way as cmdlets, using the Function construct and curly braces. A script with functions is called a module and has a .psm1 extension. Modules must be stored in directories defined in PowerShell environment variables. You can view them using the following command:
Get-ChildItem Env:\PSModulePath | Format-Table -AutoSize
Writing and running scripts
Scripts are saved as files with the .ps1 extension. Even though PowerShell has long been a native part of the Windows OS, you can't run its scripts with a simple double-click. To do this, right-click on the script and select “Run in PowerShell”.
Intensive “How to choose a programming language and find a job”
October 1–3, Online, Free
tproger.ru
Events and courses on tproger.ru
There are also system policies that restrict script execution. You can check the current policy settings by running the Get-ExecutionPolicy command. The result will be one of the following values:
- Restricted —execution of scripts is prohibited. Standard configuration;
- AllSigned - you can run scripts signed by a trusted developer; Before running the script, PowerShell will ask you for confirmation;
- RemoteSigned - you can run your own scripts or those signed by a trusted developer;
- Unrestricted - you can run any scripts.
To get started, you need to change the startup policy setting to RemoteSigned using the Set-ExecutionPolicy command:
Cmdlets
Cmdlets are commands with a predefined function, similar to conditional statements in programming languages. They have several key features:
- There are system, user and optional cmdlets;
- the result of executing the cmdlet will be an object or an array of objects;
- Cmdlets can process data and pass it to other cmdlets using pipelines;
- cmdlets are case insensitive, so there is no difference between Get-ADUser, get-aduser and gEt-AdUsEr;
- The symbol is used as a delimiter. .
Each cmdlet contains a verb and a noun separated by a hyphen. For example:
- Get-Process - display current processes running on the computer;
- Get-Service - display a list of services and their status;
- Get-Content - Display the contents of the specified file, for example Get-Content C:\Windows\System32\drivers\etc\hosts.
If necessary, you can list all available cmdlets using Get-Help-Category:
You can also create your own cmdlets.
Options
Each cmdlet has several parameters that determine how it works. PowerShell ISE automatically suggests all available parameters and displays their type. For example, Get-Service-NameW* displays a list of services whose name begins with W. If you forget what parameters the cmdlet you entered has, use Get-Member. For example, Get-Process | Get-Member:
If you don't find what you need, or aren't sure how to set the parameters correctly, you can even request examples using the -Examples parameter:
Some cmdlets can also be called using aliases, for example, instead of Get-Help you can simply write Help.
When writing large scripts or team development, you can use comments. Each comment begins with a # character, and the comment block is delimited by combinations of characters at the beginning and at the end, respectively.
Conveyor
PowerShell allows you to communicate between cmdlets using a pipeline. For example:
- GetService | SortObject -property Status - sorting running services by status;
- “Hello World!” | Out-File C:\ps\test.txt - writes text to a file.
Multiple conveyors can be used. For example, the following script lists the names of all services except stopped ones:
Get-Service | WHERE {$_.status -eq “Running”} | SELECT displayname
Conveyors
In the last example, we used a design familiar to users of Unix shells.
In Windows PowerShell, the vertical bar also allows you to pass the output of one command to the input of another, but there is a significant difference in the implementation of the pipeline: we are no longer talking about a set of characters or some text. Built-in cmdlets or user-defined functions return objects or arrays of objects, and can also receive them as input. Like the Bourne shell and its many successors, PowerShell uses a pipeline to simplify complex tasks. The simplest example of a pipeline looks like this:
Get-Service | Sort-Object -property Status
The Get-Service cmdlet is executed first, and then all services it receives are passed to the Sort-Object cmdlet for sorting by the Status property. Which argument the result of the previous section of the pipeline is passed to depends on its type - usually it is InputObject. This issue will be discussed in more detail in an article dedicated to the PowerShell programming language.
If desired, you can continue the chain and pass the result of Sort-Object to another cmdlet (they will be executed from left to right). By the way, Windows users also have access to the design familiar to all Unixoids for page-by-page output:
Get-Service | Sort-Object -property Status | more
Opening Windows PowerShell from the System Folder
There are options to launch PowerShell directly from the “Windows” folder where the operating system is located. This is a universal method that works in different versions of Windows.
Go through the following steps:
- Open Windows Explorer.
- Follow the path:
C:\Windows\System32\WindowsPowerShell\v1.0
- The “v0” folder contains application files that can be run on a PC. Double-click on the "powershell.exe" file with the left mouse button.
How can I run Windows PowerShell with elevated rights in this case? Right-click on the file, and in the context menu, click on “Run as administrator.”
Running tasks in the background
Quite often it is necessary to run a certain command in the background so as not to wait for the result of its execution in the shell session.
Windows PowerShell has several cmdlets for this case: Start-Job - launch a background task; Stop-Job - stop a background task; Get-Job - view the list of background tasks; Receive-Job — viewing the result of a background task; Remove-Job - remove a background task; Wait-Job - transfer a background task back to the console.
To start a background task, we use the Start-Job cmdlet and specify a command or set of commands in curly braces:
Start-Job{Get-Service}
Background tasks in Windows PowerShell can be manipulated by knowing their names. First, let's learn how to display them: Get-Job
Now let's show the result of Job1: Receive-Job Job1 | more
It's quite simple.
How to allow execution of an unsigned PowerShell script?
1. In PowerShell, before running the script, run the command to allow execution of unsigned scripts for the current shell session:
Set-ExecutionPolicy RemoteSigned -Scope Process
2. When running from a standard command line, use the -executionpolicy parameter, i.e. run the script like this:
powershell -executionpolicy RemoteSigned -file <script_name>
Both methods set the policy only for the current session, while the security policy for executing PowerShell scripts written in the registry will not be changed and will remain the same. If you want to change the script execution security policy to “permanent”, then use this method:
3. Allow launch forever: Run PowerShell as “Administrator”, then run the command:
Set-ExecutionPolicy RemoteSigned
However, I would not recommend this method, so as not to expose your computer to possible threats, because... This way you allow everyone to execute scripts at all times.
Note: If the script was downloaded from the Internet, then in order to avoid a request to confirm the launch, you need to use Bypass instead of RemoteSigned - completely disabling any requests and warnings.
Remote command execution
Windows PowerShell allows you to run commands and scripts not only locally, but also on a remote computer and even on an entire group of machines. There are several ways to do this:
- Many cmdlets have a -ComputerName parameter, but this method will not work, for example, to create a pipeline;
- The Enter-PSSession cmdlet allows you to create an interactive session on a remote machine;
- You can use the Invoke-Command cmdlet to run commands or scripts on one or more remote computers.
PowerShell versions
Since its first release in 2006, PowerShell has changed a lot. The tool is available for many systems running on different hardware platforms (x86, x86-64, Itanium, ARM): Windows XP, Windows Server 2003, Windows Vista, Windows Server 2008/2008 R2, Windows 7, Windows 8, Windows 8.1, Windows RT, Windows RT 8.1, Windows Server 2012/2012 R2, Windows 10, Windows Server 2020, GNU/Linux and OS X. The latest release 6.2 was released on January 10, 2020. Scripts written for earlier versions are highly likely to work in later ones, but problems may arise with a reverse transfer, since over the years of development, a large number of new cmdlets have appeared in PowerShell. You can find out the version of the command shell installed on your computer using the PSVersion property of the $PSVersionTable built-in variable: $PSVersionTable.PSVersion
You can also use the cmdlet: Get-Variable -Name PSVersionTable –ValueOnly
The same thing can be done using the Get-Host cmdlet. In fact, there are many options, but to use them you need to learn the PowerShell programming language, which we will do in the next article
.
Results
Microsoft has managed to create a truly powerful command shell with a convenient integrated environment for developing scripts.
What distinguishes it from the tools we are familiar with in the Unix world is its deep integration with operating systems of the Windows family, as well as with software for them and the .NET Core platform. PowerShell can be called an object-oriented shell because cmdlets and user-defined functions return objects or arrays of objects and can receive them as input. We think all Windows server administrators should own this tool: the time has passed when they could do without the command line. An advanced console shell is especially necessary on our low-cost VPS running Windows Server Core, but that's another story. Part 2: Introduction to the Windows PowerShell programming language Part 3: Passing parameters to scripts and functions, creating cmdlets Part 4: Working with objects, custom classes
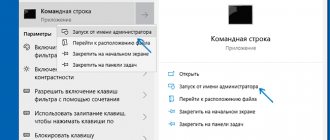
How to open PowerShell Windows 10 - 1 way
In modern versions of Windows 10, PowerShell has replaced the command line in the operating system interface. The command line itself has not disappeared, it’s just that the OS offers to use PowerShell by default.
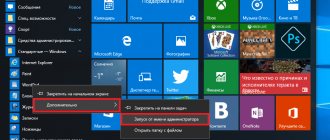
To launch the shell in Windows 10, you can use the Start button context menu:
- Right-click on the Start menu, or press the Win + X keys.
- The “Windows PowerShell” and “Windows PowerShell (Administrator)” items will open in the context menu.
You can run Windows PowerShell as an administrator or normally as the current user on the computer.
If the command line is displayed on your computer instead of PowerShell, this means that changes were previously made to the Windows 10 settings. You can return Windows PowerShell to its place in the following way:
- Launch the Settings app.
- Open Personalization.
- Go to the “Taskbar” section.
- In the option “Replace the Command Prompt with Windows PowerShell in the menu that appears when you right-click the Start button or press the Windows key + X,” move the toggle slider to the “Enabled” position.
After this, instead of the command line in the context menu of the Start button, items for launching PowerShell will be displayed.