Recently, Windows 10 users have received many complaints about the error in installing cumulative updates, which, as you know, are necessary to ensure the security and stability of the system. This is manifested by the fact that after a reboot following the installation of the packages, the system displays a notification “We were unable to configure Windows updates. Changes are being undone."
Most often, the cause of the described error is flaws in the update itself, but this does not make it any easier for the user. The error will be repeated again and again until its causes are eliminated. There are several ways to fix it; if one doesn’t help, another will have to help. Let's look at them in order.
Cleaning out the SoftwareDistribution folder with Windows 10 updates
If the system boots normally, you can first try clearing the Windows 10 update cache by deleting all previously downloaded packages from it. This cache in Windows 10 is the system folder C:/Windows/SoftwareDistribution
, or more precisely, the Download folder nested in it, into which the system saves downloaded update packages.
In most cases, deleting or renaming this folder or the parent SoftwareDistribution
will solve problems with installing updates.
Note:
— renaming is used in cases where the user wants to preserve the original SoftwareDistribution folder.
Since the SoftwareDistribution directory is used by the update service, you cannot immediately delete or rename it. First you need to disable the Windows Update
.
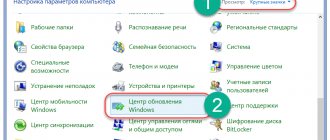
To do this, press Win + R
to open the Run window, run the services.msc command in it, find the
Windows Update service in the snap-in that opens and disable it by clicking the Stop service link
.
Next, without closing the service management window, go to the Windows directory and delete or rename the SoftwareDistribution folder. After this, start the update service again and restart the computer. The folder will be automatically recreated.
If you have a problem accessing the system partition, you can clear the update cache in . Shift key
, restart your computer from the Start menu. When the action screen appears, select Troubleshooting → Advanced options → Boot options and restart your computer using the only button available in the options list window.
After you see a list of boot options on the screen, press the F6 key and the computer will restart in safe mode with the command prompt already running. Now, to delete the SoftwareDistribution folder, run the following command in the console:
rmdir /s /q C:/Windows/SoftwareDistribution
The folder will be deleted along with all its contents, which you can verify by going to the C:/Windows location and running the output folders and files dir
. If you want to limit yourself to just renaming, run the following command:
ren C:/Windows/SoftwareDistribution SoftwareDistribution.old
If things are so bad that the system cannot boot in either normal or safe mode, you should use a bootable USB flash drive or installation disk with the same bitness as the one installed on your computer to clear the Windows 10 update cache. Having set it to the appropriate priority and booted from external media, press Shift + 10 after the first wizard window appears on the screen.
This will launch the command line. First of all, let's determine what letter the system drive has. To do this, run the following commands in the console:
diskpart list volume exit
The first command launches the disk utility Diskpart, the second one displays a list of all partitions on the disk, the third one terminates Diskpart. In our example, the system partition has the letter D, therefore, the SoftwareDistribution removal command will look like this:
rmdir /s /q D:/Windows/SoftwareDistribution
Ready. The update folder has been deleted, you can remove the flash drive or installation disk and boot in normal mode.
Alternatively, you can use the built-in troubleshooting tool to fix the “We were unable to configure Windows updates” error. Open the classic Control Panel, select the Troubleshooting applet, click on the View all categories link on the left, find “Background Intelligent Transfer Service (BITS)” and “Windows Update” in the list that opens, and launch both of these components in sequence. Problems will be checked and corrected automatically.
The described error can also be caused by duplication of registry settings in the user profile. This phenomenon does not occur so often, however, it should be excluded. regedit command
open registry editor and navigate to the following path:
HKEY_LOCAL_MACHINE/SOFTWARE/Microsoft/Windows NT/CurrentVersion/ProfileList
Expanding the ProfileList
, you will see one, two or more nested subsections with long names (those whose names consist of five characters cannot be touched).
Expand them one by one and compare the value of the ProfileImagePath
, which contains the path to your user folder.
If the path to the user profile contains two or more subsections, then one of them is redundant. Namely, the one in which the value of the RefCount
is equal to zero will be superfluous.
Having created a backup copy just in case, delete the subkey with the duplicate ProfileImagePath
and restart your computer. If the error was due to a duplicate profile, there should be no more problems with the next update.
That's all. Thank you for reading the article. I hope it was useful to you.
Windows is constantly updated: new features are added, security is improved, and errors in the system are corrected. However, modernization does not always go smoothly. Some users are faced with the fact that after a reboot, which is required to complete the upgrade, an error message appears with text like “We were unable to configure Windows updates” or “We were unable to complete the updates.”
Failed to configure Windows 7 updates, undoing system changes in progress
Let's take it in order.
When updating Windows services, identification for the license is carried out. In the case of a pirated version, the check does not complete successfully and an error appears. The reason may also be user actions. Have you seen messages on the taskbar about updates or when you turn off your computer? There also appears a message that the update is in progress, for example, 47%. A bit of a lengthy process, and it often requires resources. And when you turn off the computer, the screen does not go dark, and the OS informs you that you should not try to turn off the computer, do not pull the cord from the outlet...
Unfortunately, many users, due to their inattention or stupidity in combination with other character traits, harm the OS, doing everything exactly the opposite. Now let's look at tips for eliminating this violation.
Failures of this type are characterized by 2 main reasons:
When you try to install updates, the OS notifies you that it is impossible to configure these updates and that you are canceling the changes. The PC reboots, again updates unsuccessfully, the process repeats, repeats again, and repeats again, the evil user pulls the cord plug from the socket or presses the button on the system unit to reboot in the hope of changing something, since the computer does not turn off after Windows 7 shuts down There is no point in doing this, because the work is not completed!
You need to wait for the next reboot, or you can do it using Reset. On the laptop, press the power button. When loading BIOS
press
F8
to open the OS boot menu.
Safe Mode
launch option and start the system.
Because Since most services are inactive in safe mode, the update download service will stop working. After loading the OS, click on the checkbox on the taskbar. Now you need to open the My Computer
.
Select the local OS drive on which Windows was installed. If you have several of them, and you have no idea which OS is on them, then go through them ( of course, at a glance! The local disk with the OS is marked with a flag
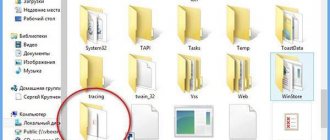
), there should be a folder called Windows:
Next, select a folder called SoftwareDistribution
, and in it we look for
Download
:
A window will open in front of you with long and strange folder names. You will need to look by date and delete the latest ones, see the picture:
If you have difficulty deleting the latest update releases, then select all existing folders and delete them. Now reboot the OS and try to enable updates, but if you own a pirated version, then updates must be disabled to avoid a repeat crash.
Of course, the screenshot with the checkboxes highlighted and updates enabled (with a green picture) shows what to do with the licensed program. Well, where everything is disabled and the checkboxes are unchecked (accordingly, the picture is red) - an option for pirated OS releases.
Reboot your PC again and look at the changes.
If you are not lucky enough to solve the problem, then there is this option, it is also effective and quite affordable.
Also press F8
at startup, but now select the boot option
Safe Mode with command line support
, do not get confused.
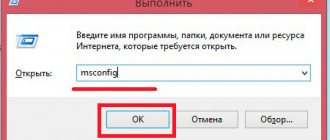
This is what it looks like, type msconfig
and press
Enter
. The command will be executed and the window will open:
Now, a window has appeared on the system configuration, now go to the service and look for the line to restore the system.
After which you should make a choice on the restore point, and then confirm it:
Press it's ready. After the changes have been made, also proceed to updates, and then you can decide whether to do them automatically or refuse altogether. If you forgot something, all this is indicated in the 1st method, do not forget to also check the boxes. Again, reboot your PC.
Please leave your comments via social networks. Tell us which method helped you. What else would you like to see on this site? Feel free to post your thoughts, this will help other visitors and the administration.
What to do when an error message appears
Regardless of the exact text, the notifications make it clear that an error occurred while trying to install updates. Windows cannot complete the upgrade procedure, so it begins to undo the changes, returning to the working configuration.
What should the user do in such a situation?
Wait until the rollback of changes is completed. The computer should be turned off forcibly only as a last resort, as this can lead to system crash.
The rollback may take a long time (up to several hours), but after it Windows will definitely work, and you will not have to restore the system.
Clearing the update cache
Again, boot into safe mode (described above), open the command line and clear the contents of the C:WindowsSoftwareDistributionDownload folder (Windows downloads updates to this folder and starts installing them from here)). You can do this directly from Explorer or with the following command:
Disable automatic start of the Windows Update service:
We check whether Windows 8 boots in normal mode, if so, enable autostart of the update service and start it:
The system must download updates again and install them.
If it doesn't help, move on
How to update the system?
It is not recommended to leave Windows without updates, as this will reduce the level of security and leave the system without new features added by developers. If you can't configure Windows Update, you have several troubleshooting options.
Deleting cache
The first method that should be used is clearing the SoftwareDistribution folder, which contains the update cache. If the computer manages to complete the rollback of changes and boots the system:
Once the system boots into safe mode, launch Command Prompt with administrator rights. Run the command "ren C:\windows\SoftwareDistribution SoftwareDistribution.old" to rename the SoftwareDistribution folder. If the system is not installed on partition C, then insert another volume letter.
Reboot the system normally. Now, when updating, Windows will automatically create the SoftwareDistribution folder, which will be empty.
Using a recovery disk
If the undo of changes does not complete, and the computer constantly restarts, you will have to use another method. It involves using a recovery disk. If you don't have one, you can create the tool on a third-party computer.
- Boot the system from the recovery disk. Go to the "System Restore" section.
- Go to the Troubleshooting section. Launch Command Prompt.
On the command line, run several commands in sequence:
- Diskpart.
- List vol.
- Exit.
- Ren c:\windows\SoftwareDistribution SoftwareDistribution.old.
Before executing the last command, make sure that the system volume is assigned the letter "C". This is why you need the “list vol” command, which displays a list of all connected media.
To disable automatic downloading of updates, enter “sc config wuauserv start=disabled”.
After completing these steps, you can close the Command Prompt and start Windows as normal.
When the system boots, press Win+R on your keyboard and search for “services.msc” to open the list of services. Select "Windows Update" and set the startup type to "Manual" in the properties.
If after completing these steps the update completes without errors, you can delete the SoftwareDistribution.old folder, which contains an unnecessary cache.
Using diagnostic utilities
If the methods described above do not help resolve the problem, try using the built-in diagnostic utilities. If the rollback of changes completes and the system boots:
Once the scan is complete, restart your computer and try updating the system again.
If Windows won't boot:
- Using the recovery drive, open a command prompt.
- Run "bcdedit /set {default} safeboot minimal" to reboot into safe mode.
After booting into safe mode, to launch diagnostic utilities, write the following queries in the command line in turn:
- msdt /id BitsDiagnostic.
- msdt /id WindowsUpdateDiagnostic.
Finally, enter the command to disable safe mode - “bcdedit /deletevalue {default} safeboot”. After rebooting, the update error should no longer appear.
Verifying accounts
Another possible cause of the error may be problems with user profiles in the registry. To eliminate them
In the ProfileList directory you will find several folders with long alphanumeric names. You need to analyze their contents by looking at the parameter values.
- The ProfileImagePath parameter, whose value indicates a link to the profile, must be in only one folder.
- If the second folder also has a ProfileImagePath parameter, it needs to be removed.
- To determine which folder to remove the ProfileImagePath setting from, look at the RefCount value. If RefCount is set to 0, delete the ProfileImagePath parameter, which is located in this folder. Another indication of the need for deletion is the postscript.bak in the section title.
Before editing the registry, make a backup copy of it. If you don't want to check folder names and manually correct them, perform a registry repair.
Some Windows users like to reinstall the operating system when they are unable to cope with the situation and find a solution to the problem on their own. For example, if an attempt to deploy an update fails, the computer goes into a looping reboot mode, followed by the message “We were unable to configure Windows updates. Changes are being rolled back" or "We were unable to complete the updates. Cancel changes. Don't turn off your computer." The legs of both one and the other have been growing since Windows 7 and they still won’t be cut off in the “top ten”. But you can still overcome them, and to do this it is not at all necessary to tear down the system and install it again. Just read these instructions, which describe what needs to be done if the OS is unable to install the Windows 10 update.
Causes of errors when installing windows updates
The next time you turn on a personal computer, a person may be in for an unpleasant “surprise.” On the blue background of the monitor, the following message is displayed: “it was not possible to configure the windows update and all recent changes are being canceled.”
PC owners who have already encountered this problem once know that undoing changes can take several hours. And users have a question: what to do and why did this happen?
There are many reasons for this error to appear, but the main one is incorrect installation of updates. This situation may arise in the following cases:
- forced disconnection of a PC in the process of updating from the power supply;
- power surge;
- Internet connection interruption;
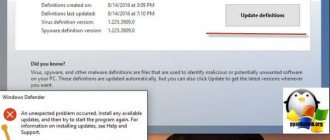
- using a pirated version of Windows (Figure 2);
- activity of viruses, etc.;
Surely, many PC owners, when shutting down Windows, noticed a warning about installing updates and a request not to turn off the computer. However, due to lack of time or patience, users often ignore this warning and forcefully unplug the PC from the outlet without waiting for the installation to complete.
Active users of personal computers sometimes see such warnings so often that they simply stop giving it any real importance. As a result, you get a critical Windows error, which can cause a lot of trouble, including reinstalling the OS. Many people “sin” with this behavior, and therefore both advanced users and beginners may encounter this problem.
Cleaning out the SoftwareDistribution folder with Windows 10 updates
Before installing updates, the system downloads them to a separate directory. In most cases, cleaning it or moving it will help overcome the mentioned errors. This can be done either from under the system (if you have access to it) or using a USB drive with files for installing Windows 10.
Cleaning up the SoftwareDistribution folder in
This method is suitable if you were able to log in.
Using a bootable Windows 10 USB flash drive to clean SoftwareDistribution
If you cannot get into the system, then to clear the folder you will have to use the drive with the files to install the operating system. you can do it in several ways, but one way or another you will need a second computer with a stable operating OS.
After creating the boot drive, do the following:
Failed to configure Windows 7 updates, undoing changes in progress
Windows updates occur automatically when you shut down your computer. The update process is accompanied by a message on the screen that reads “Do not turn off the computer. Update in progress." Perhaps the owner of the equipment is running out of patience, and in an attempt to change the situation, he begins to pull the connecting cords or even try to turn off the computer, despite the ban. Such machinations only lead to the fact that the process is repeated again and again after the next automatic reboot, and the message “Windows updates could not be configured, changes are being canceled” appears on the screen. The cause of the problem and constant rebooting without a final result can also be a pirated version of Windows on the PC.
The master will arrive for free
30% discount on all services
Autumn promotion until
Return to the time of the last update
You must wait until the computer restarts again, or press the “Reset” key. If you are working with a laptop, hold down the power button. When loading the BIOS, press the F8 key. In the system boot data that opens, select the “Safe Mode” line and wait. At this time, the system is loading. When the familiar desktop appears, go to the start menu. Next, select the “Computer” line and the local drive on your device, which in most cases is indicated by the letter “C”. After that, go to the following path: “C:/windows/SoftwareDistribution/Download/”. This will lead to the final step - deleting the downloaded Microsoft Windows update files. If selective deletion of only the latest updates causes difficulties, you can press “Ctrl+A” and then press “Del” to delete all existing files. After that, reboot the system and enable its updates.
Restoring a system backup
The method of troubleshooting by restoring a backup version begins in the same way as the previous one - when restarting the computer, press the F8 key. Further:
- Select the line “Safe mode with command line support” and confirm with the Enter key.
- In the line, type the word “msconfig” and press Enter again.
- The System Configuration window opens.
- At the top right of the window, select “Service”, and in the new window that appears, select “restore the computer system to one of its previous states.”
- In the window that opens called “System Restore”, confirm the actions with the “Next” button.
- Select the line we need “Removed Windows 7...” and click “Next” again.
- We confirm the final completion of the procedure with the “Finish” button.
Fixing Windows Update Could Not Complete Error with Update Center Diagnostics
As you may know, Windows has its own set of diagnostic and troubleshooting tools. You've probably come across it often, but never used it. Now you have a great opportunity to use it to solve the problem.
If you are unable to penetrate the system, then you should try another option.