How difficult is it to completely remove the background from a photo? For the average person, the answer would be “too damn hard.” Using programs like Photoshop or GIMP is out of the question unless you do it professionally. Trying to do this in professional photo editors will be useless for most people and a waste of time.
But there are also online services available to the masses, but most of them are paid. There are only a few free services that even a child can handle. We'll talk about them now!
Features of network services
There are several services on the Internet that allow you to remove the background of a photo online for free. At the same time, they all have fairly simple tools, allowing you to remove the background of photos in almost a few clicks. Below I will list these services with a detailed description of their functionality.
If you, like me, have a desire to create a clip from your photos with music, then I hasten to please you, I tested most of them and compiled a list of the best (follow the link above).
Photo street
This site will allow you to approach image editing from a completely different angle.
Ideal if you need to lighten an image, or overlay it on another picture, or if you want to use the image as a watermark or background on documents.
By going to the web service page, open the photo editor. If necessary, allow Flash Player to launch in a new window. Next, upload the photo or image needed for correction.
This service allows you to upload not only an image from your computer, but also an image from the Internet if you have a link to it.
Note!
- How to make a screen on your phone: step-by-step description of replacement and operating principle (100 photos)
- How to take a screenshot on a Mac - step-by-step description of how to take a screenshot on devices running Mac OS (125 photos + video)
- How to make a shadow in Photoshop - detailed instructions on how to create a shadow with your own hands (125 photos and videos)
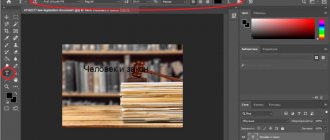
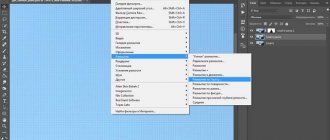
After adding a picture to the photo editor, open “Effects” (the button is located at the bottom left of the panel). There is a “-” icon at the top right that will help you change the transparency of the background.
Minimize the picture once you get the desired result. Save the image to your computer.
This procedure is not similar to how to make a picture transparent in PowerPoint, but you can then use it by inserting it on any page of your presentation.
Online-Photoshop service allows you to remove the background
The first resource that allows you to create a transparent background in a photo is Online-Photoshop. Working with it is quite simple, allowing you to get an object with a transparent background in your photo in a couple of minutes.
- To implement this, go to the resource https://online-fotoshop.ru/ubrat-fon-online/, click on the “Select image” button and upload the desired photo.
- The latter will appear on the left side of the screen, and the cursor will take the form of a yellow circle.
- Using this circle, use a yellow line to mark the outer contours of the object whose background you want to make transparent.
- Then click on the green circle with a plus sign in the toolbar and mark the internal features of the object with green.
- Then click on the red circle with a minus sign and mark the external space beyond the boundaries of the object with red lines.
Now click the arrow on the right and see the result. If everything is fine, click on the “Download” button at the top and save the result to your PC.
Pixlr service sets one background color
Another tool for making transparent backgrounds online is the Photoshop-like online editor Pixlr. It has a significant number of capabilities, but we are primarily interested in creating a transparent background online.
- To accomplish this, log in to www.pixlr.com, and then click on “Upload an image from your computer.”
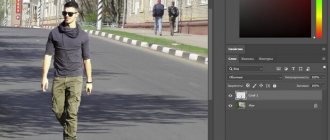
- After loading the image, it will appear in the editing window, but we are interested in the “Layers” window on the right, with the “Back layer” option with a lock located in it.
- Double-click on the padlock and a check mark will appear instead of the padlock.
- Now click on the “Magic Wand” in the toolbar on the left (usually this is the third icon from the top on the left column), click it on the background of the picture (it is marked with the corresponding line), and then press the “Delete” key to delete the background. You may have to do this several times to completely remove the unnecessary background from the photo.
- After you completely get rid of the background, click on the “File” button and select “Save” there.
- Select png as the extension of the saved file, otherwise the transparent background of online pixlr may be lost.
LiveInternetLiveInternet
Quote from Lottaza
Read in full In your quotation book or community!
Remove white background in Photoshop.
Lesson from Lottaza There are many ways to get rid of the background in Photoshop. There are other ways to remove color, of which I most often use a pen. Now I will describe how to remove the white background from an image, i.e. Those methods that I myself use most often are for removing white. I will describe three simple and convenient methods. We will use the channels palette, eraser and magic wand.
1. Using the Channels palette. Open the image in the store from which you want to remove the white background. This method is convenient to use for preliminary preparation of a scanned sketch for coloring in Photoshop. Open the jpeg image and immediately double-click on the background with the lock to turn it into an editable layer.
If the picture is in the gray color mode (Grayscale), before coloring it needs to be converted to RGB (menu Image - Mode - RGB; you need to remember that changing the color mode requires merging the layers, so it is advisable to immediately convert it to the desired mode, so that you don’t feel sorry for it later their works). Next, in the Channels palette (all channels are selected by default), click on the icon on the far left (a circle with a dotted line) - this will select all the white colors in the image.
Press DEL (Delete) to remove the white color and CTRL+D to deselect. The clean line art is ready. For future use, save it in PNG format.
2. Using an eraser to remove a white background, but not an easy eraser, but a magic one. By the way, with this and the following method you can remove any solid color. Often pictures from the Internet, especially gifs and monochrome (black and white) are saved in indexed color mode to reduce file weight. This is exactly what I came across. What do we do in this case? We simply switch to the mode we need - Image - Mode - select the desired one - I use the most functional and acceptable for displaying a color image - RGB. So, we opened the file, set the mode, removed the lock from the background (double click), then select the Magic Eraser on the toolbar and click on the extra areas in the picture.
Such a picture can be saved as a brush: menu Edit - Save Brush, or you can go further and make a vector free-form shape from it. To do this, you need to select the layer with the image (CTRL+click on the layer), go to the paths palette (next to the Layers and Channels palette) and select the Create work path icon at the bottom of the palette (it’s right in the middle of all seven icons). After that, activate the Pen tool on the toolbar and right-click and select Define Free Shape. 3. Magic wand. It works on a similar principle. We opened the picture, selected the Magic Wand tool, clicked on the excess in the Select+ mode, deleted the background, deselected it. I use this thankless method, well, let’s say, in the most extreme cases, the result is painfully unsatisfactory if smooth edges are needed. Do not expect smooth and clear selection boundaries from using this method. However, in some cases it is still irreplaceable. For example, when the background has unclear color segments or you obviously need a blurred selection border.
How to turn the selection into the most convenient PNG clipart? For convenience in subsequent processing, it is advisable to set the background removal parameters using the Refine Edge function. Call up this dialog box: right-click and select Refine Edge. This is where we see all the flaws - torn edges and borders.
Now let's smooth out the edges of the selection a little. I set the Smoothing parameter to 3, click OK and delete (DEL). Create a new layer, drag it below the clipart, fill it with a contrasting color and see that we still need to work on the edges.
The easiest way is to remove the border around it. Menu Layers - Edge Processing - Remove Border... and set the value. I put 2.
A little better, but still a mess. Smooth the edges with the Blur tool
Set the hardness to about 20 percent, the size to 8-10 pixels, the intensity to 10 percent and carefully move along the edges. In addition, it is clear that at the edge of the spoon, along with the background, both a piece of the saucer and the sparkling edge of the spoon have disappeared. Well, here you can already restore it using all sorts of methods known to you. I used the selection of a piece of the saucer and dragged it to the missing area, and completed the edge of the spoon with a pen + stroke with a brush in the shape dynamics mode. It turned out like this
And the final result is PNG
And that's it. There are actually a great many ways, since Photoshop is a fairly powerful graphic editor with many functions and capabilities. I described simpler and more convenient ones.
Now the lesson is definitely over. Good luck with your creative experiments! )
Series of messages “Lessons”:
Part 1 - How to create a seamless texture Part 2 - Photoshop speaks and shows (video book) ... Part 19 - Lesson - Flashlight in Photoshop Part 20 - Lesson in Photoshop: Designer curls using a pen and paths Part 21 — Remove the white background in Photoshop. Lesson from Lottaza
Lottaza LESSONS series of posts:
Part 1 - How to create a seamless texture Part 2 - Lesson - Creating a gem in Photoshop... Part 13 - Lesson - Flashlight in Photoshop Part 14 - Photoshop lesson: Designer swirls using a pen and paths Part 15 - Remove white background in Photoshop. Lesson from Lottaza
The IMGonline service allows you to make a transparent background
This service is an almost completely automated option that allows you to make the background transparent online.
- To work with the service, go to https://www.imgonline.com.ua/replace-white-background-with-transparent.php.
- Click on the “Browse” button.
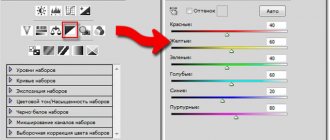
- Make sure that the "Replace solid background with" option is set to "Transparent" and click on the big "OK" button at the bottom.
Select “Transparent background” and click “OK”.
After processing, you will have the opportunity to view the result or download it to your computer using the appropriate links.
I note that due to automation, the quality of the resulting processing is usually worse than in the Online-Photoshop and Pixlr listed above.
Service Watermark.Algid.Net
Another service that allows you to make a transparent background on a photo online for free.
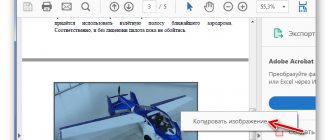
To work with this service, you need to prepare a photo, for which you need to paint over a potentially transparent area with a color that is not in the image itself (for example, blue, as shown in the example below). It is also important that the photo is in png or gif format.
- Then you need to go to the site itself https://watermark.algid.net/ru/create-transparent-png.php.
- Click on the “Browse” button, indicate to the service the path to your file and click on “Next step”.
- Your image will open, you will need to click on the photo color that you want to make transparent (the background to be removed must have the same color after processing).
- Click on the background color, the program will process it and it will become transparent.
- If you are satisfied with the processing, right-click on the photo and select “Save Image As”.
Replacing the background of a photo in Movavi Photo Editor
Even if you have little experience in photo processing, you can easily figure out Movavi Photo Editor.
To replace the background of a photo in our program, follow these steps:
Step 1. Download Movavi Photo Editor
Download the program to your computer and install it according to the instructions.
Step 2. Open the image in the program
Launch the photo editor and click the Open file
to find the desired picture. Or simply drag it from the folder into the program window.
Step 3: Select the background to replace
Open the Background Replacement tab.
To automatically select the area to highlight, click
Auto Select
.
To manually select the background, select the green brush
and apply a few strokes inside the main object (the one you want to save in the photo).
Then a red brush
to select the background that you will change.
You can adjust the selection using the Eraser
.
An alternative option is to use the Lasso tool.
To do this, set the starting point and move the cursor along the border of the object - the line will automatically be magnetized to it.
At this stage, it is not at all necessary to outline everything perfectly: just click the Next button -
you can correct it later.
Step 4: Adjust the Selection
Now swipe with Mask Brushes
along the contours to add the necessary areas or remove unnecessary ones.
Use the Hair Highlight
to select small details.
When finished, click Next
.
Step 5: Replace the background
Your main subject is now on a transparent background. To color it any color, click Replace background with color
and select the desired shade.
To place another photo in the background, click Add Image
.
Find the desired picture in the window that opens and click OK
.
Reset
to cancel your changes .
When you're finished working on the photo, click Apply
.
Step 6: Save the photo
Click Save in the lower right corner of the window. Select your desired image format and click Save again .
Watch this Movavi Vlog video to see the whole process:
LunaPic service removes the background of an image
This service for creating a transparent background is similar in its functionality to the previous one, requiring a background made in one color. It transforms this color into a transparent background, obtaining the image required by the user.
- To work with the service, log in to it https://www8.lunapic.com/editor/?action=transparent.
- Click on “Browse” and upload the required photo (or provide a link to it online in the line below).
- Then select the color in the photo that you would like to make transparent and click on it with the mouse.
- The photo will be processed and you will ideally have a transparent background color.
Compared to the Watermark.Algid.Net service, the LunaPic service is more like a full-fledged photo editor, allowing you to color the background with one color using the tools built into this service.