Photos using Canva
Any talented person with a good imagination in our era can do something unique, unlike anything else. An Instagram profile is one of the available opportunities to show yourself to the world. You share your life experiences, provide and advertise services. Many artists and photographers registered on Instagram develop professionally thanks to the messenger.
To create and develop an account you do not need to invest a lot of money and effort. Author's content and presentation will quickly interest the audience, and your account will gradually begin to grow. With Canva, you can create interesting and colorful photos for your profile. The service already has a variety of filters and tools for working with photographs. All this applies to your photos, making them more varied and lively. You can also add captions and quotes under photos and edit videos.
How to Make a Professional Photo Design Using Canva
Many art pictures for Instagram are made here:
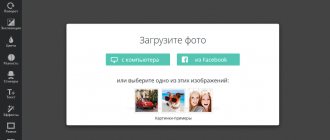
- Launch the Canva app and create a new layout. This could be “Publications” or “Stories” on Instagram.
- Upload a photo you took yourself, or use our free image service. There you can find more than two million images for your purposes.
- Adjust filter settings, brightness, contrast, saturation, etc. add backgrounds, stickers, bringing your photo to life.
- When you are satisfied with the work done, add small inscriptions. They can also be modified by changing fonts.
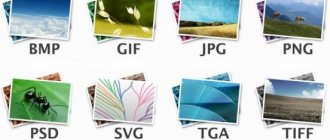
- When the photo is ready, you need to save it in PNG format and then publish it on your personal Instagram page. You can also put it on your avatar.
Photoshop lesson. Illustration in Retro Pop Art style
Today we will learn how to create a retro effect.
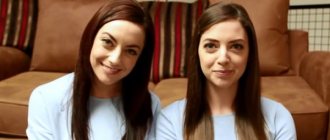
Preparation: We will need a photo of Keli Hasel. All rights to this resource belong to its owner.
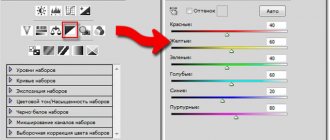
Step 1 . Setting up the Pen Tool: There are two types of lines, with and without Simulated Pressure. Set the Brush size to 1 px and draw a straight line with the Pen. Then, right-click on the path and select Stroke Path . Select Brush, uncheck Simulate Pressure and you will get a line as shown in the image below (Without Simulate Pressure). Select the Brush Tool (B) and open the Brushes Palette. Click on Shape Dynamics and set it as shown below, then close the palette when done. Set the brush size to 3 px and draw a straight line with the Pen Tool . Right-click on the path and select Stroke Path , check the box next to Simulate Pressure . You should get something like the one shown below.
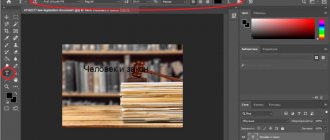
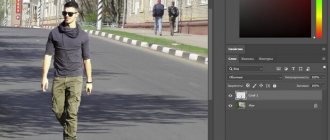
Step 2 . Tracing a shape: Create a new document sized 750x550 pixels. Drag the girl image into a new document, create a new layer on top and name it “ Outline ”. Using the technique from step one, draw an outline using the Pen Tool. Set the Brush to 1 px and draw a new path without Simulating Pressure. Draw outlines for the hair and other parts. Change the Brush size to 3 px and apply a Feign Pressure stroke.
Step 3a. Color Overlay: Create a new layer below the "Outline" layer and name it " Skin ". For the base color, choose #E6B292 . Select a brush of a suitable size, for example 15-20 px, paint the skin as shown below.
Step 3b . Color Overlay: Create a new layer below "Skin" and name it " Hair ". Select color #795229 and color your hair.
photoshop lesson
Step 3c . Color Overlay: Create a new layer again, call it “ Shirt ”, color #9E5D18 , paint the shirt.
photoshop lesson
Step 3d . Color Overlay: Create a new layer on top of "Shirt" and name it " Face ". Use color #000000 (black) to color the eyes, eyebrows, ears and nose. Change the color to #FFFFFF (white) to outline the teeth, and use #EC6060 to outline the lips.
photoshop lesson
Step 4a - Adding a Halftone Effect: Hide all layers except the girl layer. Then desaturate Image – Adjustments – Desaturate (Image – Correction – Desaturate). Next Image – Adjustments – Threshold (Image – Correction – Isohelium), set the parameter to 80 .
Photoshop lessons in Russian
Step 4b . Adding a halftone effect: Apply a filter Filter – Pixelate – Color Halftone (Filter – Design – Color Halftone), maximum radius 6 , set channels 1,2,3 and 4 to 0 . You will get a very interesting black and white halftone effect, as in the picture below.
Photoshop lessons in Russian
Step 4c . Adding a halftone effect: Place the halftone layer at the very top in the layers palette and change the blending mode to Soft Light (Soft light), opacity 50%. Restore visibility to all hidden layers.
Photoshop lessons in Russian
Step 5a . Create the background: Create a new layer below all the main ones and name it “ Background ”. Set the foreground color to #662855 and the background color to #3B022D . Make a gradient across the diagonal of the screen.
photo photoshop lessons
Step 5b . Create a background: Select the Custom Shape Tool (U) and select Registration Target 2 from the list of shapes. Set the color to #4953BD and draw a big explosion as shown below. Reduce transparency to 30% .
photo photoshop lessons
Epilogue: I added one more halftone to the background to complete the design. I hope you enjoyed the lesson!
You can view the image in full size.
photo photoshop lessons
Source: photoshop-master.ru
See also:
Photoshop lesson. Unusual effect using channels
Account corporate identity
Many photo editing and creation apps allow you to create your own branding style. Accounts made in the same theme and with the addition of art photos for Instagram look more successful and attract new audiences.
You'll find several million images in Canva's library. Photo topics are different: food, travel, attractions, etc. They can be changed by adapting the design to the style of your account. Filters will allow you to create harmony in your photos and combine captions and images.
The background of your photos can also be changed to add variety. You can make a stylish frame or insert the photo into a Polaroid photo frame. You will be able to create the effect of an aged photograph. Add some text below the photo. Labels that are too large are difficult to read, so focus on the frame itself. Sizes, font, alignment can be changed in a separate Canvas window.
You can publish the finished photo on your page or add it to your avatar, after saving and downloading it to your computer.
Creating frames yourself
Sometimes people have many plans, the implementation of which will take a lot of time and money. Professional photographers charge a lot for their services, and it’s not always possible to explain all your wishes. Thanks to a ton of frame editing apps, creating original content is easy.
Pictures posted in the public domain become an assistant for novice bloggers. You can combine them, add backgrounds, and create art pictures for Instagram. Choose any designer for Instagram photos, add the desired background, logo, any distinctive elements, stickers. The result will be an original creative image that you can post on your page.
Create variety in your account, because content in the messenger is a big part of personal promotion. It is not necessary to use the services of professionals when ordering photo sessions. Now you don’t have to spend money on designers who would bring the pictures to a single concept. You can take several photos at the same time, distributing them over a long period of time.
Lessons / Effects
54341 13-10-2011
A charming lesson from Designerfreelance, in which you create an art drawing from an ordinary photograph in a very simple way.
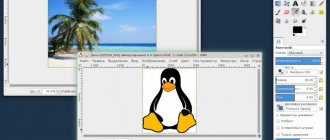
First, we will prepare the necessary Photoshop patterns with different inclinations of decorative lines. Then we will use the Isohelium filter (Treshhold) with different settings for different duplicate layers, which together will create a very beautiful effect. Next, we will need a grunge texture with a characteristic imprint, which we will apply using “Multiply” and then lightly process. In conclusion, we will decorate the work with blots and texts. Step 1. Let's use some suitable photo, for example this one.
Step 2. Make a duplicate layer from the original and apply “Filter” (Filter)> “Blur” (Blur)> “Smart Blur” with values as in the image below. Quality – High, Mode – Edge Only.
Step 3. Press Ctrl+I to invert the image. At this stage, let's turn off this layer for now. We'll need it later. And let's do one more thing. Create a new layer above the original photo layer and fill it with white.
Step 4. In a new document, create a horizontal line. Hold Shift+Ctrl+Alt and press the right arrow to copy the line. Then we combine all the lines and rotate them by 45 degrees.
Step 5. Select a 100x100 pixel square and crop the picture. After that, we define a new pattern “Edit” > “Define pattern”.
Step 6. Similarly, create the second pattern with a slope in the other direction.
Step 7. Return to our main document. After that, make a duplicate of the photo layer and move it above the white layer. Apply “Image” (Image)> “Correction” (Adjustments)> “Isohelium” (Threshold) with settings as in the figure below.
Step 8 Apply a layer style “Pattern Overlay”. Blend mode “Replacement with light” (Lighten). As a pattern, select the first stripe pattern we created (Step 4-5).
Step 9
We got this result. Now let's convert the layer into a new smart object. Right-click on the layer and select “Group into a new smart object” (Convert to smart Object). After that, change the layer blending mode to “Multiply”.
Step 10. Create another duplicate of the original layer and repeat Steps 7-9 with the difference that in Step 7 we use the value 100 instead of 118, and in Step 8 we use the second pattern we created with a different inclination of the stripes.
Step 11. After this you should get the following result.
Step 12. Turn on the top layer of lines, which we turned off in Step 3.
Step 13. Create another duplicate layer from the original photo. Apply to it “Image” (Image)> “Correction” (Adjustments)> “Isohelium” (Threshold). Only now the settings need to be even lower to get the same effect as in the picture below. After that, change the layer blending mode to “Multiply”.
Step 14. In general, after all the manipulations you should get the following result.
Step 15. Let's use some suitable texture, for example this one.
Step 16. Insert the texture into our document, change the blending mode to “Multiply”.
Step 17. Reduce the transparency of the texture layer to 85%. Then select the Eraser Tool and use a small soft brush with 30% opacity to paint over the texture in the area of the forehead, cheeks and chin.
Step 18. Now let's decorate the background with some brushes with blots available.
Step 19. Finally, let's write some text in calligraphy.
PS. Guard. Do you know that Model Adriana Lima is a very beautiful girl who is in great demand in the advertising and fashion business and who inspires many designers with her beauty.
Avatars and why they are needed
Thanks to avatars, other users can identify your account from thousands. Vivid and memorable profile pictures attract attention, force others to go to your personal profile and view publications. However, creating unique avs from personal photos is not always possible. Many users of the social network have already switched to art for Instagram created from personal footage.
All over the world, people want to stand out and attract as much attention as possible. That's why art appeared on Instagram. Even a small icon that your subscribers click on should not go unnoticed. A new global trend is avatars created in editors from your own photographs.
Artwork began to be used by many celebrities and stars as ava and publications. Everyone tries to stand out, adds new effects, enlivening the resulting image. Some draw art on their own, some edit ready-made pictures, and some order the services of professional artists or designers. Even mobile applications are becoming assistants in creating unique content.
Avatars in a circle
By inserting your avatar into the circle, you get a stylish picture that will attract a new audience to your account. Thanks to any online service you can edit your photos. So how to make an art picture for Instagram:
- Open an online photo editor and upload any photo from your computer or smartphone.
- Select a selection area in the shape of a circle and crop the photo.
- Choose a frame for your ava in a suitable style.
- You can add a background for Instagram art, stickers or filters.
- Save the finished image in PDF format.
- Download the finished photo to your device.
Next, publish a new avatar on your profile:
- Go to your profile and click on the “Edit Profile” button.
- A window will appear with various functions. Select "Change Profile Photo".
- In the new window, select “New Profile Photo.”
- In the gallery, click on the finished image in the circle and publish it as a new avatar.
How to make art from a photo: making photo art in Photoshop
The pop art processing style does not lose its popularity. It is used for advertising posters, in magazine design and simply in social networks, as attractive avatars and propaganda banners.
In this article we will show you how to make art in Photoshop. More precisely, we will make an art picture from the photo. And undoubtedly, the best program for creating art from photographs is Photoshop. There are several ways to create art. We will consider the least labor-intensive and fastest.
For work we need a portrait. Open the image in Photoshop. Duplicate the image layer ( Ctrl+J ).
The background in the image needs to be removed. We wrote earlier how to separate an object from the background in the article “How to process the background in Photoshop.”
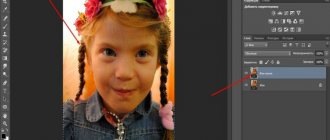
If you have a uniform background in the photo, use the Magic Wand Tool or Quick selection tool . If the background is complex, then you need the Quick mask mode .
In our case, you can separate the girl from the background using the Quick selection tool . We work with a duplicate image.
Select the background without affecting the model. After that, invert the selection ( Ctrl+I ). Now it is not the background that is selected, but the object on the background, in our case the girl.
After this, just press the key combination Ctrl+C , Ctrl+V so that the image of the girl separated from the background is transferred to a transparent layer.
Next, we make our picture black and white by pressing the keys Shift+Ctrl+U . For now, turn off the visibility of the lower layers (click on the “Eye” ).
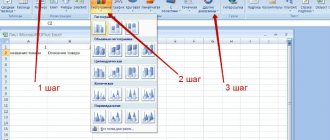
Now we need to select in the “Filter Gallery” the one with which we can outline the contours on our black and white photo and posterize the shadows and highlights. Posterization will break the shades into levels, the transition between which will be very sharp. At this stage of creating art, you should choose your own filter for each photo, or even two, if necessary. The following filters are most likely suitable: “Strokes”/Brush Strokes/“Stroke”/Ink Outlines and “Accented Edges” ; “Sketch” / “ Photocopy” / “Photocopy” ; “Imitation”/Artistic/“Outlined Edges”/Poster Edges . The filter gallery is located in the “Filter” of the main menu of the program. Important! When choosing a filter, the main working colors should be black and white.
“Imitation”/Artistic/“Outlined Edges”/Poster Edges filter was ideal . The filter is customizable. On the left side of the dialog box, you need to move the sliders until you achieve the desired result. “Edge thickness” is set to 1 , “Intensity”/Edge Intensity is set to 0 , “Posterization” to 1 . Notice how the lights and shadows are divided into levels. When you have finished selecting the parameters, click Ok .
All that remains is to color the image. “Gradient Map” will help us with this . You can call it in the list of adjustment layers, at the bottom of the layers palette.
A dialog box will open. Double-click on the gradient to bring up the settings.
In them we have to specify four color points for the gradient. We will move from left to right.
Even more about Photoshop - in the courses "Fotoshkola.net".
There are sliders at the bottom of the gradient. They are control points (stops). The dot on the left is at Position/Location 0%, on the right is at 100%. With one click of the mouse below, under the gradient, you can create a new point. Once you grab it, you can move it left and right. Extra points can be deleted by highlighting and clicking on “Delete”. We have to put points at positions 25%, 50%, 75%. Let's assign a color to each point. The last two dots will be the same color, approximately similar to a person's skin tone.
You can set the color at a control point by double-clicking on it (on the slider). The palette will open. On the gradient of all colors, move the slider to the desired color and select the appropriate tone in the large hue gradient window. We close the window.
And now the points one by one.
With each new point added, the shadow levels will be colored.
Set the point at the 25% position and set the color to red.
The next point will be blue, position 50%.
Penultimate point 75%. We select its color close to the color of the skin. At the bottom there is a window marked # . Copy the color code from this window (select it and press Ctrl+C ).
We already have the very last point. Position 100%. Double-click on it, open the palette, select the inscription in the window marked # and paste our copied code by pressing Ctrl+V . We close the window. We also close the gradient map by clicking Ok .
The gradient map adjustment layer needs to be attached to the girl's layer since we will be painting the background. To lock an adjustment layer, move your mouse between it and the one you applied it to. Hold down Alt and click between the adjustment layer and the image layer. The adjustment layer will have an arrow indicating it will attach to the layer below.
Create a new layer ( Shift+Ctrl+N ) and drag it under the layer with the image of the girl.
Staying on the new layer, take the Rectangular Marquee Tool .
Place the cursor in the upper left corner of the image and, holding down the left mouse button, drag it down; on the right, stick to the middle of the image. An area outlined with a dotted line will appear. Then select the Fill G key ). The color can be selected by double-clicking on the primary color swatches, which is located at the very bottom of the toolbar.
Now move the cursor to the darkest shade of our art and, while holding Alt , make a single click with the left mouse button. On the shade gradient, move the checker to a slightly lighter shade. Close the window.
Paint Fill tool , click inside the rectangular area in the image that we outlined earlier. Get the first part of the background.
We follow the same steps for the second half of the background. Let's take the color red, a darker shade, so that the model does not blend into the background.
Save the image ( Shift+Ctrl+S ) in a familiar format, for example, JPG. And we use it!
You can choose other colors for your art. As you have seen, making art in Photoshop is easy and fun. We wish you a creative mood and excellent results!
Even more about Photoshop - in the courses "Fotoshkola.net".
Creating art for Instagram
One of the famous applications for creating images for Instagram is PicsArt. The algorithm for working in it is as follows:
- Before taking an art photo on Instagram, select a suitable photo from your gallery. Remember that it must be of high quality, people must be positioned in such a way that parts of the body are not cut off by the frame. Only the legs that will not end up on the future avatar can remain cut off.
- Open the application and upload the photo there.
- A toolbar will open on the side, where you need to click on “Effects” and “Art”.
- The first filter available for the image will be Oil. It needs to be applied to the picture. If you click on the filter again, a scale will open for editing its intensity.
- Use an eraser to remove the applied effect from the face. Edit folds, wrinkles and imperfections. If you accidentally deleted something unnecessary, use the “Pencil” and restore everything back.
- Save the resulting processing with a checkmark in the right corner.
- Select "Magic" from "Effects".
- Edit the effects you like until you are happy with the photo. Save the result again.
- You can create a volume effect on a photo by cutting out a person from the frame. This is done manually or by clicking on the little man on the toolbar. When the application accidentally selects something other than a shape, use the eraser to correct the selection.
- Save the selection as a sticker.
- Add an Instagram background for the art by selecting it from open sources Yandex or Google.
- Create a new document, add a background, editing and changing it as desired. Insert an image of a person from the selected stickers.
- Insert a circle where you can move the image of the person. Rotate and resize the circle and sticker to the desired size.
- Remove unnecessary parts with an eraser, place the sticker exactly in the circle area. The image will stand out against the background and create a volume effect. If you unexpectedly deleted a desired object, restore everything using the Pencil.
Subscribe to our Telegram channel, there is a lot of useful information and live discussion - https://t.me/proinstagramer
Stage 1: posterization
See also: “How to make a portrait in pop art style in Photoshop”
- First we need to separate the singer from the white background. To do this, create a copy of the original layer by pressing CTRL+J.
- Then remove the visibility of the first layer by clicking on the eye icon next to the layer thumbnail. After that, move on to the duplicate layer.
- You can remove the white background using the “Magic Eraser” tool, which is located on the side toolbar of the program. Once the eraser is selected, click on all individual areas of the white background in the photo to remove it.
- As a result, instead of white as a background, we should see a chessboard - a sure sign that we did everything right.
- Now you need to desaturate the copied layer. To do this, press the combination Ctrl+Shift+U.
- We get a black and white photograph.
- If necessary (depending on the situation), you can adjust the image levels to make shadows and highlights more expressive. To do this, you need to use the “Levels” tool, which is located in the “Image” tab, “Correction” group. Or you can use the key combination Ctrl+L.
- After the settings are made, save them by pressing the OK button. In our case, minimal adjustments to the initial values were required, although these changes could have been done.
- Open the filter gallery located in the “Filter” tab.
- Expand the “Imitation” group, select “Outlined edges” from the proposed list. We set the values of the “Edge Thickness” and “Intensity” parameters to zero, and for “Posterization” we leave it at 2. When ready, press the OK button.
- The result should look something like this.
- Let's move on to posterization. To do this, in the layers palette, click on the button to create an adjustment layer and select the appropriate item in the list.
- In the posterization properties, set the value to 3 (depending on the source image, this value may vary, but, most often, number 3 is the best option).
- Press the key combination Ctrl+Alt+Shift+E to create a merged copy of all layers.
- Select “Brush” from the side toolbar.
- Now you need to paint over the extra parts in the photo:
- if you want to remove black or gray dots from white areas, hold down the ALT key on the keyboard (the cursor turns into the Eyedropper tool), click on the white color that you want to take as a sample, then release the ALT key and paint over the required areas using a brush.
- Similar actions are performed in relation to the black and gray areas with the selection of appropriate color samples.
- Create a new layer and place it under the layer with the processed portrait.
- Fill the created layer with the same layer as in the portrait. To do this, first use the Eyedropper tool, then the Fill tool.
- At this point we are done with posterizing the photo, and we can move on to coloring it.