Today, almost all modern computers, laptops or mobile devices are equipped with Internet access. However, they are far from willing to bother setting up connections, since this causes some difficulties. Even fewer users understand the question of how, for example, to distribute Wi-Fi from their terminal. To simplify such actions, a unique application called Switch Virtual Router is used (by the way, a Russian development). You will have to delve into the settings in any case, but this will take much less time and effort than doing similar things in the operating system with hardware equipment.
Switch Virtual Router: what is this program?
You can understand what kind of utility this is quite simply by translating its name from English into Russian. In essence, this is a real virtual router that allows you, through built-in tools, to turn your terminal into a distribution device, to which other computer systems or users of mobile gadgets can subsequently connect.
At the moment, you can download the version of Switch Virtual Router in Russian (in this form the program is initially released), and the distribution kit for release 3.3 itself will “weigh” something around 720 KB.
What it is
Switch virtual router, a utility that helps you organize a virtual access point from a Wi-Fi adapter for a PC, and allows you to connect to it from a tablet, smartphone and TV. Its distinctive feature is the consumption of a minimum amount of system resources. You don't need to run any additional services to work. Can turn off the PC or put it into hibernation after disconnecting clients from the network. It's easy to work with. Essentially, this is a virtual router that distributes the Internet.
Important! To work, you need to install the .NET Framework. It will not run on a PC with Windows XP and Vista installed.
Basic operating modes
The application itself does not have many features (by and large, they are not needed here). However, the Switch Virtual Router program offers two main operating modes:
- two user terminals are connected through one access point in point-to-point mode (only information and data exchange is possible);
- the virtual router is configured as a point to which many users connect and provides shared Internet access.
There is another interesting point. One of the “tricks” of the program is that if you disable the application, the created point, as if nothing had happened, will still work in an active state. The same applies to putting the distribution terminal into hibernation mode after disconnecting all previously connected devices. Undoubtedly, it is very convenient.
Please note: the application does not support legacy XP and Vista systems and can only function correctly in versions 7 and higher, regardless of architecture.
How to use Switch Virtual Router: preliminary setup
Installation of the application is carried out using the appropriate “Wizard”, in which you just need to follow the instructions.
At this stage there should be no problems or difficulties. After installation is complete, launch the application. The first thing you should do is go to the settings menu. They are opened by a special button with a picture of a gear in the lower right corner of the program window.
On the general settings tab, you must specify the router name in English (it will be applied to both the name of the access point and the name of the network), a password (preferably at least eight characters) and its confirmation, and then save the changes. Also, if you wish, you can check the box opposite the launch of WiFi (Switch Virtual Router - respectively) when the system starts.
Setting up and launching a virtual access point
Open the Switch Virtual Router program and click on the button that opens the settings (in the lower right corner).
The Settings page appears. We only need to set the name of our Wi-Fi network, which the computer will broadcast, and the password.
In the Router name (SSID) , enter the network name, in English.
And in the field below, you need to specify the password twice that you will use to connect devices. I recommend setting your password to exactly 8 characters. From English letters and numbers.
You can look at other settings, but we have already set the main ones. Click the Apply and OK .
Now click on the big Start .
If everything is fine, then an animation should appear, the inscription on the button will change to Stop, and the inscription “Internet access” will appear below.
This means that your computer is already distributing the Internet via Wi-Fi, you can connect your devices.
On the main window of the program you can view information about connected devices:
To stop the virtual access point, simply click on the Stop . That's all.
Activate device sharing
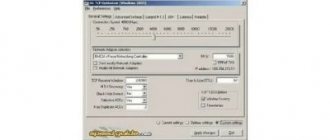
Now you need to enable virtual device sharing. To do this, in the main window you need to click on the line for changing network adapter parameters or go to this section from the Network and Sharing Center in the standard “Control Panel”.
Another wireless connection has appeared in the menu of available connections (until the access point is configured, it will display a cross on a red background). By right-clicking on it, use the properties line in the drop-down menu and go to the access tab. Here we use both present permissions (except for installing a telephone connection, if one is in the list) and select the type of connection to the home network. Then we simply save the changes.
Installing and configuring the program
- Download and install from our website using this link. If the link is broken or the program is installed somehow incorrectly, write about it in the comments and we will update the software on the server.
- If your language is English, change it to Russian. After this, enter the name of the network and specify the password twice that will be used when connecting. By the way, if you use this program constantly, you can check the “Run with Windows” and then it will start when the system starts.
- At the end, click “Apply” “ button .
Now you can connect to this device, according to the data we specified in the program. But it happens that there is no Internet. For example, if you have a laptop to which the Internet cable goes directly. It's okay, it's just that the operating system blocks the use of the Internet for other connections. We'll fix that now.
- Press “ Win+R” at the same time;
- We write the command as in the picture above;
- And so, now our task is to allow access to our created Wi-Fi from the network in which there is Internet. Click on the connection that has internet. In my case it goes along the wire. Right-click and go to properties. Next to the second tab. Check the top box to allow other connections to use the Internet from this network. And below in the list, indicate the connection number that we created. The number will be displayed there, not the name. Select it and click “OK”.
- Restart the Wi-Fi distribution program.
First connection start
Now all that remains to be done in the Switch Virtual Router program is just a little. There is a start button in the main window.
Click it and wait until the connection is established. If everything is normal, a corresponding icon will appear in the tray, and in the network connection settings, the previously used name like “wireless connection number such and such” will be replaced by the one that was assigned to the virtual router at the initial stage.
Download
To download Switch Virtual Router, follow the link below on this page. You will be presented with an archive containing the installation and configuration file. Launch the file with the extension .exe. Installation takes only a few minutes, and the same amount of time will be required to complete basic settings. After which you can easily activate the wireless network and distribute the Internet to other devices.
| Language: | Russian |
| Operating system: | Windows 7, 8, 10 (32 / 64 bit) and others |
| License: | Free |
Possible access problems
As for problems with the virtual device, almost everyone who has used it notes that the Switch Virtual Router program does not always determine IP addresses for connected devices or even the main terminal correctly, although it uses automatic mode for this.
If such a problem occurs, and a notification appears in the system tray requiring you to check and fix the connection, you can try to enter the relevant data manually. The subnet mask remains in the standard form (255.255.255.0), and the combination 192.168.137.1 is used for the IP address.
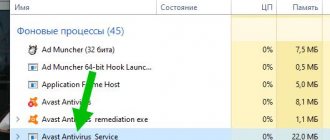
In some cases, the Switch Virtual Router program may be blocked by an antivirus or firewall. To begin with, you should disable the anti-virus scanner for a while and check the application for functionality. In the second case, the program must be added to the firewall exclusion list. If Switch Virtual Router is not displayed in the list of installed programs or it is not possible to add an application to it in the standard way, you must specify the location of the program's executable file manually.
Pros and cons of the program
All that remains is to express all the pros and cons. According to reviews from users and specialists, the program has only one drawback - periodically occurring problems with automatically determining the IP addresses of connected users.
On the other hand, the undoubted advantages of the application include the following:
- free distribution of the utility;
- small size;
- low consumption of system resources;
- no need to run additional services;
- the ability to switch the distributing terminal to hibernation mode after completing a connection session with other devices;
- full control of parameters, monitoring of network connections and information about connected terminals.
Advantages and disadvantages
Let's highlight all the pros and cons of software for creating a wireless network.
Advantages:
- Russian language support;
- easy installation;
- free distribution;
- minimal problems when organizing an access point;
- no connection interruptions.
Flaws:
- You may need to change settings on the Windows side;
- sometimes conflicts with antiviruses.
Instead of a total
As you can see, there is nothing particularly complicated in setting up the program and additional network adapter parameters here. All this will take a maximum of a couple of minutes after the first start of the application. Of course, problems with the created connection may also arise, but this issue can be resolved quite easily.
But here’s the main thing: the user of the same laptop with a built-in Wi-Fi adapter or the owner of a computer with a wired connection or an external USB controller does not need to buy additional equipment, which can sometimes be quite expensive. The program will turn the desired terminal into a virtual router without any problems.
Module check
From experience, I can say that not all built-in Wi-Fi modules on laptops support access point mode. 99% of new models have this function, but older laptops may require driver updates. You need to check similarly if you have an external Wi-Fi transmitter for your computer.
- Launch “Start” and enter “ cmd” in the search bar;
- Run as administrator. Enter the command “ netsh wlan show drivers”.
- If the highlighted item has the value “Yes”, then move on. If “No” , then try updating the drivers for the wireless adapter.