What you will need for transfer
There are quite a lot of methods using different auxiliary programs and services. But a prerequisite is to have a Google and an Apple ID account. In many cases, we will also need access to a PC, since high-quality transfer of contacts is also possible through it.
Tip: do not forget to always turn on contact synchronization, this will protect you from further loss of important numbers and problems with transfer.
Also install general mail on your device, for example, myMail. Named ones do not always allow operations on “competitive” operating systems.
Transfer contacts using Bump
This app offers quick transfer of recordings from iPhone to Android. To transfer using Bump, you will first need to install the application on both devices.
Then launch and give permissions for geolocation (also on both devices).
To transfer numbers you will need to do the following:
- On iPhone you will need to open your contacts list (with Bump running).
- Then select the contacts you need to transfer.
- After which the message “Bump now!” will appear.
- It is easy to hit devices.
- Click “Connect” in the dialog box.
- The data transfer process will begin. Upon completion, all allocated numbers will be in the recipient’s phone.
2 Ways to Move Contacts Through Apps
Do not forget that there are also special programs that allow you to export numbers in a few clicks. Of course, they take up additional space, but if you don’t have problems with not having enough space, you can try it. Let's look at the simplest and most convenient applications.
My Contacts Backup
QR Code
My Contacts Backup
Developer: GLOBILE BILISIM BILGISAYAR HIZMETLERI ILETISIM DANISMANLIK SANAYI TICARET LIMITED SIRKETI
Price: Free+
A very popular utility that has come out ahead of its competitors due to its ease of use, intuitive interface and accessibility. We download the application through the Apple Store, launch it and provide access to our contacts.
Click on the “ Backup ” . The backup begins almost instantly, after which we select a file with vCard resolution. This format is recognized by almost all phones. As soon as we receive the file, we send it, for example, to our email installed on Android.
Importing numbers should happen automatically, or do it manually through the Contacts .
Please note that through the free version of the program you can only transfer up to 500 contacts , but for the extended version, where there are no restrictions, you will have to pay.
Qikshare
QR Code
QikShare - Share Anything
Developer: iVinny
Price: Free+
Another good transfer program. To carry out the manipulations, download the application simultaneously on both the iPhone and the Android smartphone. We launch and enable geolocation detection, so the programs can connect with each other.
Now select the contact transfer icon, select the necessary ones and confirm the transfer. We get the numbers and import them into the “Phone Book”.
Using Applications
If the option of synchronizing via Google or exporting via iCloud does not suit you, then use special applications to transfer contacts.
CardDAV
This app allows you to quickly move contacts directly from iCloud to Android, without using a computer.
- Launch CardDAV on your Android phone. Select CardDAV from the list of accounts.
- Specify the server p02-contacts.icloud.com. Your username and password are your Apple ID information.
- Give the account any name and be sure to o. Click Finish.
As a result of synchronization, contacts from iCloud will be in the memory of the Android smartphone. In addition, you can set up automatic synchronization in the application settings: as soon as you add a new entry to your iPhone and iCloud storage, it will appear in your contacts list on Android.
Bump
The Bump app has versions for iOS and Android, allowing you to quickly transfer contacts wirelessly.
- Launch the app on your iPhone, open your contacts list, and select the entries you want to transfer. Click "Bump now!"
- Launch the application on Android. Lightly push the devices together. A dialog box with the “Connect” button will appear on the smartphone screen; clicking on it will start data transfer.
After the transfer is complete, close the application and make sure that all sent contacts are saved in the phone memory.
My Contacts Backup
The application allows you to pack phone book entries into a VCF file and send it by e-mail.
- Launch My Contacts Backup on iPhone. Click "Backup" to create a copy of all contacts.
- Select sending by e-mail and enter your address.
- Go to your email on your Android smartphone and click on the attached file.
The contacts will be automatically exported to the phone book from the VCF file. This method can be used to transfer phone book entries from iPhone to any platform - another iPhone, Windows Phone.
How to transfer contacts from iPhone to Android - 3 ways
2 (40%) 1 vote.
How to transfer contacts from iPhone to Android if iPhone is not working
Many users often encounter this situation. The iPhone has stopped working, repair is irrelevant, since you purchased an excellent Android device, but now how can you transfer the necessary contacts to it?
Most of the above methods are useless on a non-working phone, but don't worry. There is a way out, and this is iCloud cloud storage. The fact is that when synchronization is turned on, all contacts from the iPhone are already stored in it, and our job is to simply transfer them to Android, as indicated in the subparagraph of the same name.
Note! The official iCloud website can only launch in Safari. Chrome, Opera and similar browsers often prevent the storage from functioning properly.
Transfer contacts via iCloud
Use iCloud cloud storage to transfer data like this:
Step 1. Connect your smartphone to PC with a USB cable.
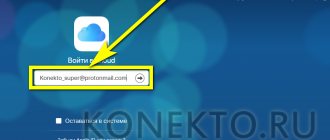
Step 2: Go to www.icloud.com and enter your Apple ID account information. You will see a menu like this:
Step 3. Select “Contacts” and a list of numbers saved on your iPhone will appear. By pressing CTRL+A, select all contacts.
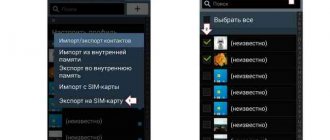
Step 4. Click on the settings icon (“gear” in the lower left corner) and click “Export to vCard”:
The file with contact information will be saved in the computer’s memory (by default in the “Downloads” folder). The file resolution is vcf, it looks like this:
At this point, the Apple gadget can be put aside. Let's get started with an Android smartphone. One of two options is possible:
Option No. 1. Manual transfer. vcf format file is copied to Android memory. Then you need to follow the path “Settings” “Contacts” on your smartphone and specify the path to the file.
Option No. 2. Transfer via mail. This option is much more confusing and is suitable for users who have an email account on Google mail.
- Go to www.gmail.com and log in with the account you intend to use when working with your smartphone.
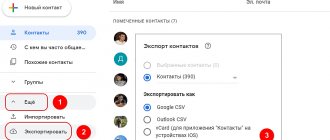
- From the drop-down menu (where it says Gmail ), select Contacts.
A new page will appear that will look like this:
- Click "Import" in the left menu and select the "Import from CSV or vCard file" option.
However, do not think that everything will end so simply: the system will inform you that this version of Google Contacts does not support importing from external files, and will give instructions on what to do next:This problem is probably temporary, but while it exists, it's worth operating through the old version of Contacts. Click on the “Go to previous version of contacts” button.
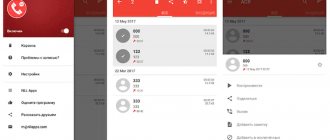
- After downgrading to the previous version, click on “Import contacts” in the menu on the left and select the file vcf:
If everything is entered correctly, you will see that there are checkmarks next to the data (as in the figure). In the next window, make sure that the “Contacts” slider is activated. Then click “Save”, and then make sure that synchronization is enabled in your mail settings.
Enter your mailing address and click “Email.”
The contacts will be transferred to your Gmail account. All that remains is to log in using the same account on the gadget, and all the numbers will appear in the address book.
The main disadvantage of transferring numbers from iPhone to Android via a vcf is that the images that were attached to contacts will be “lost.” However, this drawback is very insignificant: re-installing photos is much easier than manually “entering” all the numbers into a notebook.
Yandex for those who don't trust Apple and Google
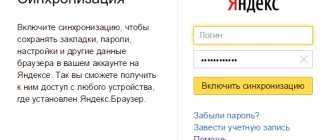
Another simple synchronization method for smartphones running Android is using an account on Yandex Disk. We transfer contact information from an iPhone to an Android device using the following algorithm:
- We install the Yandex Moving application on the phone from which we plan to copy.
- Create an account and proceed further. All information will be automatically uploaded to the cloud.
- The device will receive a code via SMS, save the numbers.
Subsequently, you should download “Yandex Disk” to your smartphone and log into it using the data created for “Moving”. Instructions:
- Go to the menu, click on the “Settings” icon.
- Select the function of moving from one device to another.
- At the moment the information is generated, a code will be sent to the cloud - enter the numbers and click on “Start transfer”.
The procedure takes a few minutes. Please note that Google contacts cannot be transferred to Yandex. To do this, you need to use the Gmail service from an American corporation, or use software for iPhone.
How to transfer via Gmail
A Google account offers no less features and functionality than Apple's native cloud storage. The ideas are at least the same - there is the same synchronization of calendars and mail, and the ability to store and view photos. A plus is quick authorization in various Google services (from YouTube to an account in the Chrome browser), and access to documents, notes and other technological wonders. And, if for some reason your Google account has not yet been registered, it’s time to correct the situation on the official website (an authorization form and, accordingly, registration of a new profile is available in the upper right corner).
If the account is found, but has not yet been added to iOS, then the steps are as follows:
- Go to “Settings”, select “Accounts and Passwords”;
- Click on the “Add account” icon. Select “Google”, fill in all the required fields – Name, E-mail, password. Accept changes and save;
- If authorization is successful, the system will immediately display a list of documents available for synchronization. Mail, searched for “Contacts”, Calendars, Notes. The necessary points are worth noting, and you can safely pick up an Android device;
- There you will have to repeat the procedure - go to “Settings” (of course, the accounts must match), to the “Accounts and Synchronization” section, then check the box next to the “Contacts” item, and then save the changes and wait until the phone book is filled with numbers, names and surnames.
The method is elementary and really convenient - this way synchronization will always work and in any order - both when switching from iPhone to Android and vice versa.