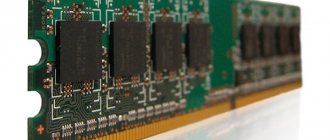
An audio card is an equally important element of any computer, responsible for sound reproduction and its quality.
Over time, it can fail, for example, the most typical problem is lost drivers, sound interference, or complete silence. In this case, it is necessary to carry out a full diagnosis. But before you start identifying the problem, you need to find out what sound card is on the computer, or rather its manufacturer and model. This will allow you to most accurately identify and fix the problem.
The easiest way is Device Manager
The advantage of this method is that to determine the installed sound card, you do not need to download and install additional programs, thereby cluttering the system.
Therefore, open the device manager. For example, this can be done by clicking on “Start” and entering the required phrase in the search bar. There are several more options suitable for Windows 7, 8 and Windows 10.
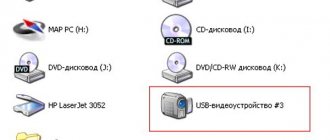
Next, open the item for sound, video and gaming devices. The name of the sound card will be displayed here. I call it “Realtek Definition Audio”.
Also here you can see detailed information about its driver. To do this, right-click on the model and go to “Properties”. Open the “Driver” tab, here you need the “Driver Version” item.
Typically, the driver version is checked in cases where you need to reinstall it.
Software method for determining the sound card model
You can find out the sound card model on a PC running Windows 7 and higher operating systems using standard means: using the Device Manager and the DirectX Diagnostic Tool. In the first case, to determine the sound card model, perform the following steps:
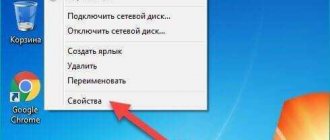
- Click “Start” and right-click on the “Computer” icon and select “Properties”.
- In the new window, click “Device Manager”.
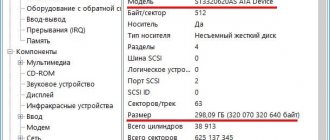
- In the manager we need the “Audio audio inputs and audio outputs” branch.
- However, it is worth noting that this section does not always display the data correctly.
The sound card detection through the DirectX Diagnostic Tool is as follows:
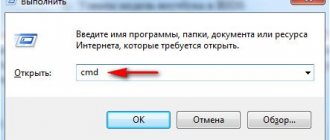
- Press “Win+R” and enter “dxdiag”.
- A new window will open. Go to the “Sound” tab. Using the specified code you can find the sound card model.
- However, again this method is not 100% accurate. Therefore, if you want to know exactly the model of your device, you will have to install additional programs. Among the software we recommend PC Wizard and Everest.
Determining the sound card model using the first program is as follows:
- Download and run the program on your PC.
- The program will open. Click on the “Speakers” icon. The “Device Audio” parameter is exactly the sound card model.
You can determine the sound card model using the Everest program in the following way:
- Download and install the software on your PC.
- Go to the “Multimedia” branch and select “Audio PCI/PnP”.
Physical way to determine the sound card model
This method is more suitable for stationary PCs, since disassembling a laptop and searching for small parts can cause difficulties and lead to damage to components. To physically find out the sound card model, perform the following steps:
- Remove the side cover of the system unit.
- We are looking for a small chip on the motherboard. It might look like this. Near it there will definitely be a power stabilizer for the sound chip.
- Also, the sound card can be built-in, then it will be located near the audio inputs and outputs and look like a small board.
- In any case, the chip will contain information that is necessary to find suitable drivers.
For other ways to determine the sound card model, watch the video:
We use AIDA64
Using the "AIDA64" program, you can find out not only the manufacturer of the sound card, but also determine the exact model. The same cannot be said about the previous method. The utility is free and compatible with all versions of Windows. You can find and download it here.
After installing the utility, do the following:
- Launch the program, select the “Multimedia” section in the left menu and click on the “PCI Audio” item.
- After this, in the main window you will see a list of sound cards with the exact model definition. For example, I have two of them: NVIDIA (controller related to the video card) and Realtek (integrated card). If you need more detailed information, you can look at it in the “HD Audio” and “Audio Windows” sections.
Viewing detailed information about each component is only half of what AIDA64 can do. I recommend using this utility.
Let's move on to checking the sound card
Method 1
The first step is to deal with the device drivers. To do this you need:
After this, the drivers will be updated and the problem will be resolved.
This procedure can also be carried out if you have the latest version of the software on removable media. In this situation, you need to install by specifying the path to a specific folder.
If the audio card is not in the device manager at all, then move on to the next option.
Method 2
In this case, a complete diagnosis is required to ensure correct technical connection. You must do the following in a specific order:
Please note that this option is only suitable for discrete components that are installed on a separate board.
Method 3
If, after a visual inspection and checking the speakers or headphones, they are in working order, and reinstalling the OS did not bring any results, we move on:
After the sound card test is completed, the system will inform you about its status and if it is inoperative, you will understand this based on the results.
Method 4
Another option on how to quickly and easily check a sound card on Windows OS:
In this way, we will run a diagnosis of audio problems on the computer.
The program will offer you several options for problems and also indicate the connected audio devices. If so, the diagnostic wizard will allow you to quickly identify this.
Method 5
The third option for checking whether the sound card is working is as follows:
In the “Driver” and “Information” tabs, you will receive additional data about the parameters of all devices installed on your PC, both integrated and discrete. This method also allows you to diagnose problems and quickly identify them through software testing.
Now you know how to quickly and easily check your sound card in several ways. Their main advantage is that for this you do not need online access to the Internet, and all procedures can be carried out independently, without contacting a specialized service.
Discussed in more detail in this video
Everyone has encountered sound problems on their computer at least once. Sometimes it simply disappears for some unknown reason, and then two questions arise: what happened and how to fix it? The answers are simple and usually identical in all cases - the problem is with the drivers that need to be reinstalled. But to do this, you need to find out the name of the sound card and start from it.
Visual inspection
If you have an external sound card in your system, then in order to find out its manufacturer and model, just open the side cover of the case, remove the board and carefully inspect it. The name can be written both on the board or chip itself, and on a special sticker.
In the case of a built-in audio card, just look at the motherboard. You need to find the controller responsible for the sound output. It is precisely the manufacturer’s marking that is most often present on it; even less often you can find a sticker with a number.
For laptop users, this option may cause difficulties. As an alternative, you can use utilities like AIDA64, HWINFO or Speccy.
Method three
If you use an external sound card, then you probably still have some packaging left over from it. Find the last one and see the device name on it.
If you bought a system unit in a store in a store, then you need to find the purchase documents - they will indicate the names of all components, including the sound card.
Traditionally, you can ask your questions using comments.
If you understand the inside of your computer, it will be easier for you to troubleshoot problems. Popular failures include sound card hardware that has fallen off, was installed incorrectly, or is missing after reinstallation. Knowing the part model, you can download the required driver online. It's not difficult to find out.
Options:
- Open the system unit and look at the board (for computers).
- Launch Device Manager in Windows of any generation.
- Install the EVEREST program.
- Install PC Wizard.
- Install the DirectX program.
The basic principles of each method are the same for Windows XP, 7, 8.1 and 10.
We use DirectX
A special diagnostic tool will also help you find out which sound card is not only installed on the computer, but is also currently in use.
You can run it as follows:
- Call up the Run window by pressing the “Win + R” combination.
- In the window that appears, enter – dxdiag. Then press “Enter”.
- Go to the “Sound 1” tab and look at the necessary information.
The advantage of this method is that by looking at the “Default” line we can understand which audio card is currently active.
Troubleshooting audio driver problems
Problems with an audio device driver may occur after updating Windows 10 or if it conflicts with a driver for another device. To troubleshoot a driver problem, you must perform the following steps.
Driver rollback
- Through the Start menu, go to Control Panel.
- Next, select and launch “Device Manager”.
- Find the sound device in the window that appears and right-click on it, in the menu that opens, click properties and in the “Driver” tab, click the roll back button.
Search for sound device driver by ID and reinstall
It happens that it is not possible to roll back a driver using this method. In this case, you need to reinstall the sound driver manually. It’s great if you have a driver disk that came with your laptop or computer. If there is no such disk or it is lost, then you will have to look for the driver yourself. There are several ways to do this. You can go to the website of the PC or laptop manufacturer and download the driver from there. If you do not have a branded computer, then you can search on the website of the company that produced the motherboard chipset or discrete audio adapter. Below we will consider the option of searching manually using the so-called equipment identifier (ID), which is unique for each device. This method is sometimes useful and applicable.
- In the “Device Manager”, select your sound device, right-click on it and go to properties;
- In the dialog box, select "Details";
- Now in the “Property” list you need to select the “Hardware ID” value;
There are 32 and 64-bit OS, you can find out the version by following these steps:
- From the Start menu, select “Settings”;
- Then you need to completely remove the old driver from the system for this in the same “Device Manager”, select the desired device and use the right mouse button to proceed to its removal.
Go to the “System” section, and then to the “About” tab of the installed version of Windows. In the window that appears, in the line “System type” the bit depth of Windows 10 will be indicated;
Speccy
The “Speccy” program is kindly provided to us by the developers of the famous “Ccleaner” utility. It is capable of showing all the information about the hardware installed in the computer. Absolutely free and available in Russian. In general, I recommend it.
After installing the program, you must:
- Launch it. By default it is installed in English, to change it to Russian, go to the “View” section, then to “Options” and change the language.
- Click on the “Audio Devices” section, after which detailed information about the installed audio components will be displayed in the right window.
Everything is extremely simple.
Information and diagnostic utilities
If audio card drivers are installed on your computer, you can find out its name and manufacturer using third-party programs. It is safest to download them from the official developer sites.
AIDA
The utility is provided free of charge for trial use for 30 days. But, before installation, you need to find out the bitness of the operating system installed on your device:
- “Start” - “Control Panel” - “All Control Panel Items” - “System”;
- by left-clicking on the “Computer” icon (“My Computer”). All data on bit depth will be located in the “System” section.
In order for the program to work, its bit depth must match the OS bit depth.
When the program starts, you can find the necessary information in the “Multimedia” section in the “PCI Audio” line.
HWInfo
This program has a fairly simple interface in English. You can find information about the audio device in the Audio line. Click on its name and in the next column you will see information about it and its driver.
It is especially convenient that this utility has a portable version.
Speccy
The program is in Russian, so understanding it will not be difficult. We are interested in the “Sound Devices” item on the left side of the window. By clicking on it, we will get all the data about the audio devices of the computer or laptop.
HWINFO
The HWINFO program will also help you find out the sound card manufacturer. In its functionality, “HWINFO” is somewhat reminiscent of “AIDA64”, but it is convenient in that it does not have to be installed on the system.
How to use it:
- First of all, download the current version from the official website. You can select "Portable".
- Launch the utility and click “Run”.
- In the left menu, open the “Audio” section and look at data about each component.
As you can see, there is nothing complicated.
What if the sound card is not displayed anywhere?
If no program sees the audio adapter, you need to check whether it exists at all. How to find out if there is an audio card?
Inspect the system unit: if there are audio outputs/inputs on the back side, it is there.
In a laptop, the sound card outputs are located on the side of the case, they are marked with corresponding images. Sometimes there is one connector for headphones with a microphone.
If you are sure that the card is there, the drivers are installed, but it is not displayed and does not work:
- Reinstall the drivers. Just be sure to delete the old ones first and restart your computer. Perhaps the installed ones do not work correctly or conflict with the OS.
- Check your BIOS settings. The video card may be disabled.
- enter the program (DEI, F1, F2, F9 or F10 depending on the laptop manufacturer);
- in the menu, find the line with the word Integrated;
- find the name of your audio card and check its status: it should be Auto or Enabled;
- save the settings and you will exit the BIOS.
- There may be a problem with the motherboard itself. You can check this by removing the device and installing it on another PC.
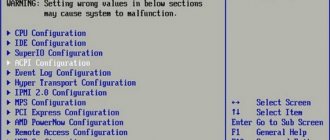
BIOS Settings
You can find the sound card in the BIOS. But unfortunately, it does not always display the manufacturer and model of the board. But looking at the controller version is not difficult.
It should be remembered that the appearance of the settings panel and the names of items may be different in each case. This all depends on the BIOS version you are using. Therefore, if your settings panel is different, look for similar symbols.
And this is how to look at it all:
- We go into the BIOS and move to the “Advanced” section.
- Using the arrows, select the “Front Panel Type” option and press “Enter”.
- A window with options opens, in which we see the name of the controller “AC97”.
- Next, boot the computer in normal mode and open the search.
- We enter “AC97” into the search and make sure that its direct manufacturer is.
Then the matter remains small. If you need drivers, then go to the official website and download the latest version suitable for your Windows system.
Method two
If you need to find out the exact name of the audio card, even if it is built-in, third-party software will help you. On the site I have already mentioned many times about programs for viewing the computer configuration. One of the most popular programs is, without a doubt, Everest. Yes, the program is paid, but you can use it for free for the first 30 days, and if you like it (and you definitely will), you can purchase it.
So, download Everest from the official website, install it on your computer, and then launch it. Having opened the program, we find the subsection “Multimedia” - “Audio PCI / PnP” and see the full name of the audio card on the right side of the screen.
Sound card in a computer
You can find out the exact model of your sound card using both third-party software and functions that are already included in Windows by default. In this article we will look at how to view the current sound card in your computer.
Option 1: "Device Manager"
"Device Manager"
is a system program that allows you to familiarize yourself with the components installed inside the computer, such as a sound card, video card, etc. The instructions in this case will look like this:
Option 2: AIDA64
AIDA64 is a powerful paid program designed to view detailed computer characteristics and conduct various tests. The software has a fairly simple but functional interface, translated into Russian. Instructions for using AIDA64 to view the sound card inside a computer are as follows:
Option 3: DirectX Diagnostic Tool
This is another system utility designed to view information about your computer. Instructions for its use look like this:
Using these methods, you can find out what sound card is on your computer. Additionally, using the described methods, you can find out the name of other computer components, for example, the motherboard.
On a computer or laptop. This problem may be due to either missing or damaged drivers or an inoperative sound card. In any case, even to reinstall sound drivers, you need to know the sound card model. There are several ways to determine the model of a component part.
Checking the sound card in Windows 7
Before you begin checking your sound card using the methods described below, it is advisable to perform several preliminary steps. First, visually and by touch check the serviceability of the connectors, cables and plugs used to connect audio devices and the computer. Secondly, try connecting the silent headphones or speakers to another device, for example, a smartphone. It is possible that it is they that are faulty, and not the audio card. And thirdly, with the computer turned off and de-energized, remove and reinsert the discrete sound card into the slot.
Nothing helped? Then let's move on.
Method 1: Checking the audio device configuration
First, let's try to check the functionality of the sound card using a special built-in operating system tool. Absolutely every computer user can perform these simple manipulations.
- We press the “Start” service button and in the menu that opens, go to the “Control Panel”, where we will definitely find the sound device settings we need.
In the Control Panel we find the “Hardware and Sound” section and move to it to perform further actions.
On the start tab of the “Sound” section in the list of equipment, select the current sound playback device, marked with a green checkmark, and click on the “Configure” button.
We install the desired configuration of audio channels and start the verification process. The sound should be heard in turn from all speakers involved.
How to test a sound card or Analyzer(R) measuring system
How to test a sound card...
So, you have decided to start digitizing from an external source (tape recorder, vinyl record player, etc.), but you are not entirely sure of the characteristics of your sound card. And how can you be sure of the parameters when even expensive sound cards (sold in Russia) are of dubious origin... Although, you can’t always blame China and other monsters that have developed (often glitchy) hardware. It's no secret that very often there are ordinary incompatibility of components... An ordinary listener will rarely notice that his card has the characteristics of a regular radio receiver, nothing more. The card seems to be working, there is sound, seemingly without obvious distortion... and okay... it’s good to listen to...
But you and I are digitizers!
And we are “From” and “To” monsters in any matter related to sound!
We are not satisfied with the parameters of ordinary listeners! We strive for high-quality sound reproduction on any card! Not a single musician with perfect pitch can reproach us for our quality! Isn't it true?...
Okay, jokes aside, but this is the moral framework of the digitizer. If a digitizer deviates from these “theses,” then he becomes an ordinary digitizer.
If you intend to seriously engage in high-quality digitization or restoration of audio archives, then I strongly recommend that before purchasing a sound card, you negotiate with the company (where you are going to make the purchase) about replacing it with a similar one if you are not satisfied with its technical characteristics.
By the way, as a consumer, you have every right to do this. Don't be fooled!
For example, me, my SB Live! I changed it at least six times until I settled on a copy that suited me!
In the description below you will learn how and how to test your existing device.
Just keep in mind that the card you selected with ideal parameters, for example, if you change the motherboard, will no longer correspond to the characteristics that you carefully tested. The dependence of chips and small circuits is such that the ideal option can only be selected once... Below I give a description “from the manufacturer”.
Measuring complex Analyzer(R)
Program description
The Analyzer(R) program is designed to check the characteristics of electronic devices using the capabilities of a sound card. Runs under Windows'95,'98, ME, NT4, Win2000 operating systems.
The program consists of three relatively independent blocks:
- signal synthesis and output,
- signal input and pre-processing,
- analyze the signal and display the results.
All these blocks are implemented as processes that begin their life when the program starts and flow in parallel to each other. In fact, the sound card, together with the computer, works both as a test signal generator and as a measuring device. Since the process of outputting and inputting audio signals occurs simultaneously, it is necessary that the sound card and its driver support full-duplex mode.
Analyzer(R) acts as a digital audio generator, oscilloscope and spectrum analyzer. Since the DAC of the sound card is synchronized from a quartz oscillator, the stability of the test signal is about 10-9. Using a computer as a measuring device can significantly simplify and speed up the process of testing a card. Similar equipment used for audio testing can cost tens of thousands of dollars.
The digital test signal generator allows you to generate a sine wave signal with a frequency ranging from 20 Hz to 20 kHz. The value of the generated frequency is set in the Frequency (Hz) window. This test signal, which has an amplitude corresponding to the maximum signal level of the sound card, is digitally multiplied by 1, 0.1 and 0 depending on the position of the Signal switch (0dB, -20dB, No). This makes it possible to carry out measurements at the nominal (maximum) signal level, at the standard (for test measurements) signal level, and in its absence (there is only noise in the recording-playback channel).
In the upper right corner of the program there is an oscilloscope window that allows you to visually track the waveform. The “horizontal frequency” of the oscilloscope is synchronized with the generator frequency set in the Frequency (Hz) window, which allows you to observe exactly one signal period on the screen. The slider under the oscilloscope window shifts the initial phase of the signal display.
Depending on the position of the Signal switch (0dB, -20dB, No), the signal in the oscilloscope window is scaled along the vertical axis so that it occupies the entire window. In other words, the signal graph is “multiplied” by 1, 10, 100. Note that the Signal - No case corresponds to the absence of a sinusoid at the generator output (there is only thermal noise and interference in the channel). Therefore, the scale factor, with this position of the Signal switch, was set empirically.
The program allows you to measure the power of the input signal in real time. Power is measured in decibels relative to the maximum amplitude sine wave power and is displayed in the Power (dB) window. The spectrum analyzer is located on the left side of the window. The frequency scale is presented on a logarithmic scale from 10 Hz to 22.5 KHz. The frequencies 100 Hz, 1000 Hz and 10 KHz are marked in pink. The vertical scale represents decibels, 0 corresponds to a sinusoidal signal of maximum amplitude. Levels at 0 and -20 dB are marked in pink. The signal spectrum is calculated from 8128 signal samples, which allows for a spectral resolution of 10.76 Hz. When calculating the spectrum, either a rectangular or quasi-Chebyshev window can be used. The first allows you to get the narrowest (sharp) peak of bandpass filters, the second - a lower level of side lobes. The choice between different types of windows is made through the context menu of the spectrum analyzer. When the program starts, by default, a quasi-Chebyshev window is used.
The Function/Memory button turns on the memory mode, i.e. The image of the signal and spectrum are superimposed on those obtained from previous measurement cycles.
The Function/-||- button turns on the filtering mode for the DC component of the input signal. The button simulates a similar function for measuring instruments. The only difference is that filtering is carried out in digital form, which means that simultaneously with filtering the constant component of the input signal, the zero shift of the sound card (the constant component of the ADC) is also eliminated.
The Function/AFC button turns on the Amplitude-Frequency Characteristic (AFC) measurement mode. In this mode, Analyzer(R) turns into a digital frequency response meter: the generator automatically changes the frequency of the sinusoidal signal, the signal passes through the analog circuits of the card, the spectrum analyzer calculates the resulting spectrum of the input signal, the amplitude of the spectral maximum is determined, then the resulting level (for a given frequency) is stored. When scanning the entire audio range, a frequency response graph (yellow) is constructed from the points obtained. The frequency response is measured either at a test signal level of 0 dB or at a level of -20 dB (standard level for such measurements).
One of the possible uses of the program is checking the characteristics of sound cards. During measurements, the linear output of the sound card is connected to its linear input. The connection diagram is shown below:
The “ideal” signal after digital synthesis undergoes digital-to-analog conversion, exits through the line output, passes through the connecting cable, enters the card through the line input, is converted into digital form by the card’s analog-to-digital converter and begins to be processed in the input and pre-processing unit. At the stage of analog representation of the signal, it is affected by interference and noise, it is subject to various distortions, and ceases to be “ideal”. Since the synthesis of the original and processing of the received signals are performed in digital form, it is possible to track almost all distortions.
The process of measuring the sound characteristics of a card is similar to the process of testing the characteristics of audio tape recorders and differs from it in the following: when testing a tape recorder, the measuring (“ideal”) signal from the generator is recorded on tape, and during playback and using measuring equipment, the resulting distortions can be assessed. This is how end-to-end (recording-playback) characteristics are measured. For a sound card, only the sequence of operations changes: first, the signal is generated (played back), and then, after passing through analog circuits, it is entered (recorded) into the computer and analyzed by the program. Thus, you can measure the end-to-end characteristics of the analog paths of the sound card.
Program User Guide
Program features:
Analyzer(R) allows you to check in a matter of minutes: end-to-end frequency response of the card; noise level, interference; signal penetration from the recording channel to the playback channel at various frequencies, evaluate harmonics. Since the spectrum analyzer, generator, and oscilloscope are digital, the measurements are quite accurate. For example, you can set the generation frequency of a sinusoidal signal in the range from 10 Hz to 22 KHz, while the frequency instability will be on the order of 10-9 (quartz instability).
General description:
The program consists of a digital signal generator, an oscilloscope and a spectrum analyzer. For its normal operation, you need a sound card with an installed driver that supports full-duplex mode. When testing, the linear output of the sound card must be connected to its linear input. In general, if you wish, you can also check the power amplifiers and/or microphone amplifier built into the card by connecting the outputs and inputs of the same name to each other through a voltage divider. When testing, the card simulates an “ideal” signal and feeds it to the card’s DAC. The signal is converted into analog form, in which it is affected by various noises and distortions, passes through the connecting cable to the ADC input, is converted into digital and analyzed by the program. After analysis, we can say how imperfectly this card works.
Bugs and pitfalls:
- When plotting the frequency response, the graph is not smooth (rough). The fact is that the testing does not take into account the shape of the bandpass filters of the spectrum analyzer. In Analyzer(R) Std. this is supposed to be fixed.
- On some sound cards (usually expensive cards), it is not possible to measure the level of noise and interference. This is due to the fact that at low signal levels, an electronic switch is triggered, short-circuiting the ADC input. In Analyzer(R) Std. another evaluation method is used: a normal signal is generated and against its background the noise power, interference and harmonic distortion are measured.
- Sometimes the image of the signal and its spectrum disappears. This is due to the methods of input-output and signal analysis. In this program, they are not synchronized with each other (they are executed as separate processes); therefore, any desynchronization of them (when running a “powerful” application) results in loss of information. In Analyzer(R) Std. they want to fix this.
- On some sound cards, the noise power estimate is incorrect due to the fact that in full-duplex mode the input signal is digitized in eight bits. Since the ratio/signal resulting from quantization of the signal in amplitude is approximately equal to: SNR = 7.2-6*n, where n is the number of quantization bits, then with eight-bit quantization of the input signal, the power estimate can be greater than -40.8 dB. On the other hand, if thermal noise and interference are small (less than this value), then their power will not be enough to change even the least significant digit of the ADC and its output will be “zero”, i.e. complete absence of noise, which is not true. You can check with what number of bits the input signal is quantized into your card using the signal oscillogram in -20dB mode: if there are noticeable steps on the sine wave (with a step of half a scale division in amplitude), then you are out of luck and will have to purchase Analyzer(R) Std.
a. Preparation for measurements:
- Connect the linear output of the card to the linear input using a short and shielded cable, if possible.
- Launch the Analyzer(R) program.
- Select (enable) line outputs and inputs in the Windows(r) volume panel. Use it to adjust the signal levels so that the signal power is 0 dB and the sine wave shape is not distorted. The signal strength and sine wave shape are assessed in the Analyzer(R) panel. The least distortion of a sinusoid is obtained if the power is slightly less than 0 dB, because in this case, the ADC and DAC do not enter the limiting mode. Remember the measured power X (you will also need it to evaluate the signal/noise).
b. Frequency response measurement:
Frequency response is usually measured at -20dB, so you need to turn on the “-20dB” button and then “AFC”.
c. Signal-to-noise ratio measurement:
Enable the "No" button. Measure the received power Y. The signal-to-noise ratio SNR will be determined by the formula SNR = YX. Note. In some cards, when the signal level is low (this is exactly the situation that will occur when measuring noise power), the linear input and output are closed with electronic keys. In this case, there will be a round zero at the input and it will not be possible to measure the noise level. What can be done is to gradually lower the signal level using the volume controls and track the threshold for turning off the input. Analyzer(R) Std is supposed to use an algorithm to determine the noise power against the background of the test signal.
d. Noise level measurement:
Enable the "No" button. Using the spectrogram, estimate the interference frequencies (they look like strong peaks against the background noise) and their amplitudes. In principle, the technique for measuring the signal-to-noise ratio actually gives the signal/(noise + interference) ratio, that is, it is integral.
e. Measuring parasitic penetration from the playback channel to the recording channel:
Disconnect the connecting cable from the linear input of the card (this is the only mode in which the linear input of the card is disconnected from the output). Measure the frequency response at a level of 0 dB. The maximum value of the constructed frequency response will be the level of parasitic interference. Accordingly, we can say at what frequency the greatest parasitic penetration occurs.
f. Harmonics measurement:
Set the signal frequency F = 44100/2n, n is any number from 2 to 4096. At this frequency, the side lobes of the spectra will be zero and it will be possible to accurately estimate the harmonic levels. Accordingly, the level of the second harmonic will be equal to the signal amplitude at a frequency of 2*F, the third at a frequency of 3*F, and so on. Typically, the integral harmonic distortion coefficient is measured for even and odd harmonics, which is the sum of the powers of the even and odd frequencies, respectively, divided by the power of the test signal. The standard version provides a mode for automatic calculation of integral harmonic coefficients.
Sound card test results
The sound card used was SKY ROCKET GOLD 16 PLUS 3D.
Amplitude frequency response:
| Frequency | Failure* |
| 20 Hz | -27 dB |
| 20 KHz | -24 dB |
*both at maximum signal and at -20 dB.
The result in the form of graphs: Clicking on the screenshot will give you the opportunity to view it in full size...
Harmonic analysis:
Harmonic amplitudes
| Signal level | ||
| Harmonics | 0 dB | -20 dB |
| Second | -45 dB | -50 dB |
| Third | -60 dB | -66 dB |
The result in the form of graphs (test signal frequency is 344.53125 Hz): Clicking on the screenshot will give you the opportunity to view it in full size...
Noise and interference relative to the maximum power of the sinusoidal signal:
| Thermal noise and interference | -67 dB |
| The level of interference itself | -69 dB. |
The result in the form of graphs: Clicking on the screenshot will give you the opportunity to view it in full size...
The result of testing the SKY ROCKET GOLD 16 PLUS 3D card for parasitic penetration of signals from the playback channel to the recording channel:
Parasitic penetration reaches 57 dB at frequencies up to 200 Hz: Clicking on the screenshot will give you the opportunity to view it in full size...
Conclusions:
Based on the tests, we can assume that this sound card works like an average quality tape recorder and is very far from the level of “digital” sound. Its advantage can be considered its low price and sixteen-bit conversion of both output and input signals when operating in full-duplex mode.
How to find out what sound card is on your computer?
The situation when the question arises “how to find out which audio card is on the computer?” is usually familiar to people who are unaware of the equipment of their devices. Meanwhile, installing the driver and its subsequent correct operation is simply unthinkable without this information. There are several ways to determine the settings of your machine:
- Everest program;
- SISandra program;
- dxdiag.exe utility;
- system help.
The Everest and SISandra programs are similar in principle and provide the most complete information on device characteristics. It is simply necessary to acquire these programs if you do not want to constantly experience any difficulties. They usually even give out the name of the manufacturer, the date of assembly of the device and many other sometimes unnecessary details.
The dxdiag.exe utility is the second most reliable method. It will not be difficult to understand, but you need to find a manual for use.
Each computer has its own operating system. The person who defined it (and this is elementary - its name is displayed upon startup) can easily obtain information in the system help.
In order to find out what sound card is on your Windows 7 computer, you can also use your menu. Then you can quickly determine whether there is any need to reinstall the drivers at all.