Select the beginning of the sector where the combination of letters JFI appears...
Page 74
- Image
- Text
Select the beginning of the sector where the letter combination JFIF
.
Shift
key and
by pressing the arrow keys (or Page Up
and
Page Down
), select the remaining
blocks to the end of the sector in which the combination of letters OLF
.
6. Select Write to file
in the
Edit
.
7. In the Write to File
, select
Browse
and specify the path and file name.
For example, C:\image_1.jpeg
.
8. Click OK
to save the file. 9. Open this file in any image viewer. If the image
is visible, it means everything was done correctly. If the image is not visible,
Make sure the image data is selected exactly according to step 5.
To recover another JPEG file, repeat steps 4–9.
74
Copyright © Acronis International GmbH, 2002-2014
Diskpart
To clean up the disk, use the Diskpart command. Before continuing, make sure that the desired USB drive, memory card, or other device you are about to clean is connected to the computer.
To run the diskpart tool, enter the appropriate command in the Command Prompt window and press Enter: Diskpart
Display a list of disks installed on your computer by entering the following command: list disk
Review the results of the command and determine the disk number that needs to be cleaned.
Be careful!
If the wrong disk number is selected, it will be erased and possibly important data will be lost.
In the screenshot below you can see that Disk 0 has a capacity of 111 GB, and Disk 1 has a capacity of 15 GB. We know that we need a 15 GB disk. This means Disk 1 is a USB drive, and Disk 0 is the computer’s internal hard drive.
Once the disk number has been determined, enter the following command, replacing the # sign with the disk number.
Attention:
Be very careful. If an incorrect drive number is specified, all data on the wrong drive will be deleted. select disk #
The diskpart command selected the specified disk. Now all actions will be performed with it. To completely clear the partition table, type the following command and press Enter.
Attention:
This command will delete everything on the specified disk! Make sure you have copies of all important data before proceeding. Clean
If everything is done correctly, you will see “disk cleanup completed successfully.” Close the command prompt.
Base Volume Data Block Drive Letter
Volume letter, Primary volume, Foreign dynamic disk group, Defragmentation, Dynamic disk
- Image
- Text
Base volume
Volume on the base disk (page 75).
The base volume can be primary (p. 82) or logical (p. 81).
Data block
See Sector (page 83).
Drive letter
See Volume Letter (page 76).
volume letter
A letter, such as "C", that Windows assigns to the volume to search for files hosted on it.
files and folders.
The volume letter is usually assigned when formatting it. It can be assigned
change or delete later, and these operations do not affect the data stored on the volume.
The volume letter is also called the "drive letter".
G
Main volume
One of two volumes being joined, onto which files and folders from the other volume are placed.
After two volumes are merged into one, it is assigned a letter and label for the primary volume.
Foreign dynamic disk group
A dynamic disk group that does not belong to the currently running operating system
system.
To use such disks, they must be imported into an existing disk drive.
group by car.
D
Defragmentation
The process of reconfiguring files on a volume to reduce fragmentation (p. 87), which
allows you to reduce file access time.
Dynamic disk
Hard drive managed by Logical Disk Manager (LDM)
which is available on Windows starting with Windows 2000.
Using LDM allows you to flexibly distribute volumes on a disk for fault tolerance purposes,
improve performance or volume size.
76
Copyright © Acronis International GmbH, 2002-2014
Recovering dead MBRs and partition tables
Intro.
The situation is as follows. There is a 160GB screw. It has 2 partitions - 40GB and 120GB. In order to install Ubuntu as a second system, a breakdown of 120GB -> 100+10+2+8 was made. Further, in order to roll back the changes, the disks were combined (10, 2 and back into one 20GB and formatted in NTFS. In addition to this, operations were carried out with the MBR, the result of which was its death.
Results
1. When the system boots, the message MBR helper not found is displayed;
2. fdisk shows one large 160GB disk. The fool understands that this is the beginning of a fun night. Further, under the cut, solutions to the issue.
Partition table recovery
1.1. Parted magic
This LiveCD\USB distribution kit, 100 MB in size, contains a huge bunch of software for working with disks. From breakdown to restoration. Of all of them, we will need gpart
,
testdisk
,
fdisk
and
ms-sys
.
1.2. Gpart
gpart is a utility that scans a disk sector by sector for partitions that are present on the media but not in the table.
In its work, it ignores the already existing table (if present). The program was developed by the German programmer Michail Brzitwa and is no longer supported by him. Slow development is carried out by the Fedora and Debian teams. The current version is 0.1h. The utility allows you to quickly and easily restore the partition table, but it has several disadvantages. Firstly, the development was abandoned a long time ago, and secondly, it sometimes does not quite correctly define sections.
gpart can work in 2 modes. This is a quick analysis and detailed scan. In some cases, the first mode is sufficient. We will look at the second one.
gpart -if /dev/sda -i - interactive mode. For each part found, a question will be asked whether to save it or skip it. -f - full disk scan.
After quite some time, a report will be created with possible sections. This is what you need to look through as carefully as possible before recording. Sample report (not mine):
Begin scan... Possible partition(DOS FAT), size(1907mb), offset(0mb) Possible partition(SGI XFS filesystem), size(5730mb), offset(1907mb) End scan. Checking partitions… Partition(DOS or Windows 95 with 32 bit FAT, LBA): primary Partition(Linux ext2 filesystem): primary Ok. Guessed primary partition table: Primary partition(1) type: 012(0x0C)(DOS or Windows 95 with 32 bit FAT, LBA) size: 1907mb #s(3906544) s(16-3906559) chs: (0/1/1 )-(1023/19/16)d (0/1/1)-(12207/19/16)r Primary partition(2) type: 131(0x83)(Linux ext2 filesystem) size: 5730mb #s(11736000) s(3906560-15642559) chs: (1023/19/16)-(1023/19/16)d (12208/0/1)-(48882/19/16)r Primary partition(3) type: 000(0x00 )(unused) size: 0mb #s(0) s(0-0) chs: (0/0/0)-(0/0/0)d (0/0/0)-(0/0/0 )r Primary partition(4) type: 000(0x00)(unused) size: 0mb #s(0) s(0-0) chs: (0/0/0)-(0/0/0)d (0 /0/0)-(0/0/0)r
If everything is OK, then we agree to write to the partition table, cross our fingers and reboot. In my case, the program identified the partitions that were there before the partition (40 and 120), which was not suitable and forced me to look for alternative recovery methods.
1.3. testdisk
Note: this utility is described in more detail in this post, I will not repeat it here.
This utility is similar to the previous one, but has a number of advantages: 1. more recent and actively supported; 2. subjective, it works much faster; 3. more functional; 4. there is a simple console interface based on ncurses.
Go! 1. in the first window, select Create a new log file; 2. select the desired disk (/dev/sda) -> Proceed; 3. mark the partition type as Intel; 4. select Analyze current partition structure and search for lost partitions; 5. if the found partitions are correct, click Backup and go to step 6, it is possible to quickly rescan the disk if there is an error somewhere (Quick search); 6. A green list with sections is already visible here. If ok, then write it down, otherwise run Deep search.;
In my case, the result was similar to the result of gpart, which is incorrect. Having launched Deep search, after waiting about 40 minutes, I received an answer that made my soul feel so much better. Several partitions were found that overlapped one another (these were the original (before manipulation) 120GB and the new one, 100GB). Having marked the unnecessary one as deleted, I wrote the table to disk and rebooted. Fortunately, everything worked out and the computer returned to its original state, and I could go to bed with a clear conscience.
MBR recovery
For this task, we have the ms-sys tool in our arsenal.
First, let's find out what's wrong with our MBR. ms-sys /dev/sda /dev/sda has an x86 boot sector it is unknown boot sector Now you can see that there is no boot sector on this disk. The utility can work with the MBR of various operating systems. The list can be obtained by running the program without arguments. In my case, it was needed from Windows 7. We write the MBR to disk:
ms-sys -7 /dev/sda Windows 7 master boot record successfully written to /dev/sda Check:
ms-sys /dev/sda it is Microsof 7 master boot record, like the one this program creates with the switch -7 on a hard disk device. That's all, the required MBR is installed and you can reboot.
Outro
This post is an example of how you can create a problem for yourself out of nowhere and spend half the night doing the wrong thing. But it gave invaluable experience, which I tried to present here. Perhaps it will be useful to someone. After all, it’s not very difficult to get into such a situation, but there isn’t really a detailed manual.
Disk Group, Track, Allocation Unit
HDD
- Image
- Text
Disk group
Number of dynamic disks storing common configuration data in their databases
Logical Disk Manager (LDM) and therefore subject to management
as a whole.
Typically, all dynamic disks created on the same machine are members of the same
same disk group.
As soon as the first disk is created using LDM or another disk management tool
dynamic disk, the disk group name appears in the registry key
HKEY_LOCAL_MACHINE\SYSTEM\CurrentControlSet\Services\dmio\Boot Info\Primary Disk
Group\Name.
The following created or imported disks are added to this disk group. She
exists as long as it has at least one disk element. When disconnected or
is converted to the basic last dynamic disk, the group ceases to exist,
although her name is stored in the specified registry key. If it is created again or
a dynamic disk is connected, a disk group with an incremental name is created.
When moving to another machine, the disk group is considered foreign (p. 76) and cannot
used until imported into an existing disk group. Import
updates configuration data on local and foreign disks so that they are
one whole. A group of foreign disks is imported “one to one” (preserves the original name),
if there is no disk group on the machine.
For more information about disk groups, see the following knowledge base article
Microsoft Corporation:
222189 Description of Disk Groups in Windows Disk Management
https://support.microsoft.com/kb/222189/ru-ru/
Track
Any concentric circle into which the hard drive is divided (page 78).
Information on one track can be accessed without moving the magnetic head.
E
Accommodation unit
See Cluster (page 80).
AND
HDD
Non-removable storage medium with built-in electronic components,
consisting of several magnetic plates rotating synchronously on one
spindle.
Information capacity and data read/write speed of hard drives relative to
great.
78
Copyright © Acronis International GmbH, 2002-2014
Boot, Bootable media, Boot sector
Boot volume
- Image
- Text
A hard drive is also called a hard disk drive (HDD).
Z
Loading
The process of starting a machine when it is turned on or rebooted.
When the machine boots, a program called the boot loader runs and starts
selected operating system.
A machine that cannot start normally, for example because the volume on it is missing
operating system is called "unbootable".
Some operations, such as resizing a system volume in Windows, require
reboot the machine.
Bootable media
Physical media: CD or DVD, USB flash drive, or other media,
supported by the machine's BIOS as a boot device. Such a medium contains
a bootable version of Acronis Disk Director or Windows Preinstallation Environment (WinPE) with
Acronis plug-in for WinPE.
The machine can also boot one of the above environments using network boot from
Acronis PXE server or Microsoft Remote Installation Service. These servers with
unloaded boot components can also be considered a kind of bootable
carriers.
Bootable media is most often used to create basic or dynamic volumes
in a clean car.
Boot sector
The first sector (page 83) of a disk (page 77) or volume (page 86) that contains the start code for
loading the operating system.
The boot sector must end with the hexadecimal signature 0xAA55.
Boot volume
A volume containing files necessary to boot and run a specific Windows operating system.
If the machine has only one Windows OS installed, the boot volume is usually
is systemic (p. 84).
If several Windows operating systems are installed on a machine, each of them, as a rule, has its own
boot volume, while the machine has only one system volume.
The type of boot volume can be a primary or logical volume on a basic disk, or
a simple volume on a dynamic disk.
See also System Volume (p. 84).
79
Copyright © Acronis International GmbH, 2002-2014
conclusions
I don't know why you needed to uninstall Linux. This is an excellent operating system, although there are still hardware that it does not support or does not fully support. Don't give up quickly: if Linux doesn't work on one device, maybe in the future you'll get another computer or the kernel will start supporting your laptop. Try and experiment. In any case, now you know how to remove Grub from your hard drive. If you have any questions, ask in the comments.
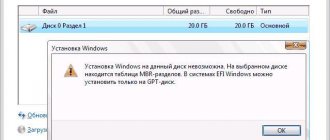
Consideration of the error “there is an MBR partition table on the selected disk”, identification of solutions, and also a description of the solution to the problem regarding disabling the Secure Boot property. The selected disk contains an MBR partition table, which means Windows is installed on this PC.
This problem occurs when, when updating the operating system from Windows 7, XP, Vista to a later version using a storage device, the hard drive remains in the old conversion - MBR.
And Windows 10 and 8 support GPT hard drive orientation because they are an EFI (Extensible Firmware Interface) system, or UEFI, which replaced BIOS as a more advanced base operating system.
Of course, this innovation is countered by arguments regarding the inability to work with devices that support BIOS configuration, older computer models that are still in use, etc.
However, it is not difficult to get out of the situation when the old MBR disk format stands in the way of installing the desired Windows number. That is, ways to solve the problem:
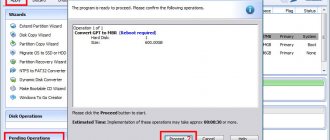
- converting the hard drive to GPT (then the MBR is completely formatted);
- changing the base operating system to BIOS (then EFI, or UEFI, ceases to operate, and related innovations).
Nevertheless, despite some resistance towards the new base OS (and, accordingly, the GPT disk format), it is the conversion of disks or even the sale of disks with the original GPT that is gaining momentum.
Mirror, Mirror Volume, Initialization
Cluster
- Image
- Text
Mirror
Each of the two pieces of disk space that make up a mirrored volume (p. 80).
Each mirror is located on a separate hard drive.
Both mirrors are identical in volume and content, which ensures fault tolerance when
failure of the hard drive with one of the mirrors.
The operation of converting a simple volume (p. 83) to a mirrored volume is called adding
mirrors
Mirror volume
A fault-tolerant volume whose data is duplicated across two physical disks (p. 87).
Each of the two parts of a mirrored volume is called a "mirror".
All data from one drive is copied to another to provide data redundancy.
If one hard drive fails, the data remains on the other hard drive.
Volume mirroring can also be applied to the system volume (p. 84) and boot volume
that (p. 79).
A mirrored volume is sometimes called a "RAID-1 volume."
AND
Initialization
The process of registering a disk in the operating system.
Initialization involves assigning a partition scheme (p. 84) to the disk (MBR or GPT) and
type (basic or dynamic).
Initialization is usually performed when the hard drive is connected to the machine.
TO
Cluster
A unit of disk space allocation used to store files in
file system.
Each non-empty file completely occupies one or more clusters.
The typical cluster size is 4 KB. When formatting a volume, you can select the size
cluster.
A smaller cluster size allows for more efficient storage of small files, so
how it reduces the amount of wasted disk space, but increases
fragmentation of larger files, which can increase access time.
A cluster is also called an "allocation unit".
Physically, a cluster consists of one or more (usually eight) sectors per
disk.
80
Copyright © Acronis International GmbH, 2002-2014
Comments
Select → I found instructions for my software here! #manualza
- Click →
An American company bought an airplane from the Soviet Union. This plane was neatly packed in boxes, all that remained was to assemble it. When the plane was assembled in the USA, it turned out to be a steamship. Everyone was very surprised, they dismantled the structure, reassembled it and again, instead of an airplane, a steamship. There was nothing to do, they called a representative from the Soviet Union. He came and assembled the plane for them. Americans ask: “How did you do it?” — Here in the instructions in Russian it is written: “After assembly, process with a file!”
Manualza!manualza.ru
Still not with us?
How to remove Grub from a flash drive
Flash drives typically use the MBR partition table. To remove the Grub bootloader from a flash drive, it is not enough to simply format it. The bootloader is written to the MBR table, so we will have to recreate it. I strongly do not recommend using this method to remove the Grub bootloader from your hard drive, because you will lose all your data.
We will work on a Linux system. First, look at the device name of your flash drive, for example, using the Gparted program or in the terminal with the command:
Then we will completely delete the existing partition table:
dd if=/dev/zero of=/dev/sdc count=512
Now, using the same Gparted, we create a new partition table:
Create a partition on the flash drive and format it to the FAT32 file system:
Now you know how to remove MBR from a flash drive, just don’t erase it from your hard drive, because it will be difficult to restore later.
