Of course, such a loss can greatly disturb the owner of a computer in which important information and valuable files are stored.
However, if you look at the problem judiciously and consistently, then the anxiety will quickly go away, and the PC will work again in normal mode, providing the user with free access to his files.
To resolve this issue, you must first clarify which disk has disappeared. A physical separate hard drive, designated by the letter “D”, or a logical partition “D” on a screw.
Further, detecting it and restoring normal display in Windows 7 Explorer will not be difficult, you just need to follow the instructions below.
Reasons for disappearance
To the question: “What should I do?” You can always get the correct answer if you identify the true cause of the failure. Depending on whether the physical disk is no longer readable by the system or whether local disk D has disappeared, there are several main problems with its display in Windows 7 Explorer:
- The user purchased and connected drive D to the computer, but did not format it or initialize it;
- Poor contact in the hard drive connectors;
- Virtual volume D is hidden;
- Exposure to malicious utilities;
- Dysfunction of the logical structure of hard drive volumes due to a failure.
Why do we need local disks?
Why do we need local disks, because you can use the entire hard drive, “scattering” all the information into folders? Of course, you can do this and in this case you will have one logical drive that occupies the entire volume of the hard drive. Let's return to the apartment analogy. Let's say you have a sufficient size of the total area, in which there is no division into rooms. The living room, bedroom(s), kitchen and bathroom are located in one room without partitions or doors. It is unlikely that you will be comfortable living in such an apartment. Likewise in a computer, dividing the hard drive into logical drives serves to conveniently store information and ensure the normal functioning of the operating system. For example, on one disk you have the operating system and the programs you need installed, on the other you store music files sorted into folders, on the third there are video files and (or) photos, also sorted into folders.
You can see what disks you have in your system and their capacity by left-clicking on the “Start” “Computer” menu item .
Actions required to resolve the problem
If the disk indicated by the letter D has disappeared in a Windows 7 computer, you must take the following steps:
- Turn off and disconnect the PC. Make sure that all wired connections of the hard drive are secure, as well as the connections of its cables to the connectors on the computer’s motherboard;
- After checking the density of physical contacts, boot the PC and click “Start”;
- Next, type “diskmgmt.msc;” in the search field;
- Then press “Enter”;
- If there is also no disk in the “Disk Management” menu that appears, it means that the hard drive itself is faulty or its cable, connector, etc. is damaged;
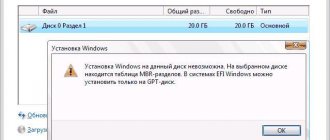
- If it is in the disk menu, but, for example, has the “RAW” status, then to solve the problem it is recommended to format it. To do this, you just need to call up the context menu from it and click on the “Format” line;
- In the case where such a “Raw” status is assigned to a logical volume “D”, you will need to assign an identifier in the form of a letter to it (instructions on how to implement this are given below);
- If it says “No data”, then you should call up the context menu on it and click “Initialize disk”. For this procedure, it is recommended to specify the format as "MBR";
- Call up the context panel from the unallocated area and click “Create simple volume”. Then specify a letter to designate it (the main thing is that it does not coincide with existing disks).
- Ready. Check the success of the operations performed by launching Explorer, where the missing disk is already visible and all files stored on it are available for the user to work with.
Using Disk Management to create a new partition
The built-in disk management utility will allow you to perform all the necessary actions, and this program is present in all the latest versions of Windows. To launch it you need to press Win+ R and enter diskmgmt.msc .
In the window that opens, you need to select drive C (or another partition that you want to divide), right-click on it and select the “ Shrink Volume ” option. In the next window you need to write the size of the new volume D; according to the standard, all free space is indicated there. But it’s worth leaving at least ten gigabytes of free space on the system disk for new programs and system files.
After this, the formation process . At the end of it, unallocated space will appear on which you need to right-click.
Here you just have to select the item marked in the picture. In the next window you need to select a letter for the new volume , in our case it is D.
Then you are asked to write the name of the volume, and also select the file system and cluster. Here everything can be left as default. After this, formatting will be performed and the new logical partition will become available for use.
Problem with logical partition
Often, as experts say, it can simply “fly off” from the virtual volume, so Explorer does not display it.
To eliminate this problem, just follow these steps:
- Open the context panel from “My Computer”;
- Then click “Manage”;
- Go to the “Disk Management” tab;
- In the window that appears, pay special attention to the unused area - here it is, i.e. the desired section;
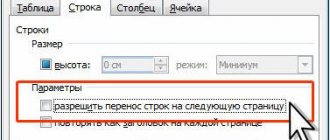
- Next, in the context panel, click “Change drive letter ...”;
- Click “Change”;
- Specify the letter;
- Click “ok”;
- Ready.
Location of the hard drive in the system unit
If you do not assemble a computer yourself, then the question may well arise: “Where is the hard drive located in the computer?” To find out, you'll need a pair of eyes and a screwdriver.
First you need to get rid of the side panel of the computer, which is removed after removing the bolts. You need to move it away carefully, pressing lightly and holding onto the recess on the panel itself. Almost all cases are made to the same standard, so the panel is moved towards the rear of the case.
After this, you can see all the “stuffing” of the computer, including where the hard drive is located. You can see that two cables come from it, one of which is responsible for powering the hard drive, and the other connects to the motherboard and the entire system as a whole. Where is the hard drive located in a computer? See photo above.
Using a third party application
If using the instructions described above it was not possible to resolve the problem, then a special utility will effectively help in solving the problem: “Acronis Disk Director 11”.
The order of action steps consists of the following steps:
- Download and install the above application on your PC;
- Launch it and in the main menu click “Acronis Recovery Expert”;
- Click “Next”;
- Put o;
- Click “Next”;
- Left-click once on the “Not occupied” area;
- Click “Next” again;
- Set o;
- “Next” again;
- Left-click the “rodent” button once on the problematic drive “D”;
- “Next” again;
- Wait until the procedure is completed;
- We can already say that everything has been completed successfully and the partition has been restored;
- In the last window, click “Continue”;
- Click “Exit”;
- Log in to Explorer to make sure all information is safe.
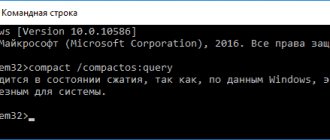
How to split a drive into C and D on the command line
Everything that was described above can be done not only using the Windows Disk Management GUI, but also on the command line using the following steps:
- Launch Command Prompt as Administrator and use the following commands in order.
- diskpart
- list volume (as a result of executing this command, note the volume number corresponding to your C drive that will be compressed. Next - N).
- select volume N
- shrink desired=SIZE (where size is the size of the created disk D in megabytes. 10240 MB = 10 GB)
- create partition primary
- format fs=ntfs quick
- assign letter=D (here D is the desired drive letter, it must be free)
- exit
At this point, you can close the command prompt, and the new drive D (or under another letter) will appear in Windows Explorer.