What is required to combine two or more computers
To connect two computers, 2 laptops, or a computer and a laptop together, we need:
- Network cable, crimped on both sides (patch cord). If you suddenly decide to crimp it yourself, then look at how to do it correctly in our article: the procedure for crimping twisted pair cables, all the diagrams.
- If you need to connect two desktop computers, then make sure there are two network cards, one on each PC. But it won’t be difficult to connect any two laptops to each other, because there are definitely network cards there.
See our recommendations for setting up Windows 10 after installation on your PC.
Checking the connection
You can check whether PCs are connected correctly to each other using the ping command, for example, using a PC that has an IP address of 192.168.0.2.
Step 1. Press “Win+R”, type “cmd” and click “OK”.
Type “cmd”, click “OK”
Step 2. Enter in the window: ping 192.168.0.1 and press “Enter” on the keyboard. Lines starting with “Reply from...” will appear. This means that the PC "sees" the other PC and the connection is established.
Enter “ping 192.168.0.1” in the window, press “Enter”
If the message “Request timed out...” is received, this means that there is no connection between the PCs. In such a situation, you need to double-check all the settings specified above.
Note! The network connection may also be blocked by the Windows firewall or antivirus installed on the PC. In addition, the Ethernet cable or PC network cards may be faulty.
Making a direct connection on Windows 10
To begin with, of course, you need to insert one end of the network cable into the network card port of one computer, and the other end similarly into another computer. Next we proceed to setting up the Windows 10 local network.
Action No 1
- Move the mouse over the “ My Computer ” shortcut and right-click. Select " Properties ".
- In the window that appears, click on the inscription “ Change parameters ”, another window will pop up, click “ Change... ”.
- In the “ Computer name ” column enter the name of the PC (the names for each PC must be different), be sure to write in Latin letters. The column “ Working group ” does not need to be changed; leave it as is.
Action No 2
Now you can proceed to setting up shared access on available computers that are present on the local network.
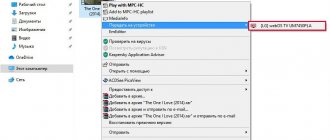
- Left-click on the “ Network ” icon, then “ Network Control Center…. ", " Change advanced settings.... ".
- Next, for a private network, enable all the items, as in the picture below.
- We enable it in the same way for the guest network . See the photo below.
- But for all networks you need to block public access. We install encryption.
- Save at the very bottom .
Action No 3
To connect your laptop to your computer, you need to enter the IP addresses on these devices.
- We configure the network on the first (main) computer that is connected to the Internet. Click LMB on the “ Network ” icon, “ Network parameters ”.
- Click on the line “ Configure adapter settings ”. You get to the window of all modules, we need an “ Ethernet ” adapter.
Right-click on “ Ethernet ”, then “ Property ”, double-click on the line “ IP version 4 (TCP/IPv4) ”.
Place a dot next to “ Use the following IP address…. " Now we write:
- IP address - 192.168.11.11.
- Subnet mask - 255.255.255.0.
The mask should be set automatically after clicking on the input field. Click " Ok ".
Let's move on to the second PC. On it we do everything exactly the same, only we enter other settings for the network card:
- Enter the IP address - 192.168.11.12.
- Enter the subnet mask - 255.255.255.0.
- Main gate - 192.168.11.11.
- We register the preferred DNS - 192.168.11.11.
Click " Ok ". After entering the settings, you should be able to connect your laptop to your computer via a local network on Windows 10.
Action No 4
The last stage to complete the setup. On the first (main) device, give permissions to use the Internet to all devices on your network.
- On the PC that is the gateway, open the network connections window, where all your adapters are located. We find the configured shortcut through which you connect to the Internet and right-click, “ Properties ”.
- A window will pop up, in which go to the “ Access ” tab and check two permission boxes. Click " Ok ".
After completing the fourth step, you will be able to use the World Wide Web on all PCs that you connect over the network and configure. Now you will know how to connect any computers via a local network on Windows 10.
A way to connect two computers using a Wi-Fi router, or a switch.
If you have a router or switch, connecting two computers is 2 times easier. Even if you have a Wi-Fi point, whether you connected your computer via a cord or a wireless Wi-Fi connection does not matter. This is the same thing, the main thing is that the subnet is the same (for example 192.168. 1.*)
First you need to check that the workgroup is the same, otherwise the second computer will not see the first. Go to the control panel and select system.
Next, let’s look at what kind of working group you have. If it’s different everywhere, we call it by the same name. To do this, click change parameters.
Next change.
And we change the name. The main thing is that this name is the same on all computers!
So, to connect computers, go to the control panel and select home group.
Next, choose to create a homegroup.
Next, select which shared folders you want to share.
Next, save the password they give you. You will need it to connect other computers.
Next, you need to connect to this group on other computers. We also go to the control panel - home group and see that the computer has seen the home group. Click join.
Some people think that connecting via wire and via Wi-Fi are different things. Therefore, to destroy the myth of how to connect two computers to each other via Wi-Fi, I decided to connect via Wi-Fi and do the same thing.
Let's go in order.
We provide access to the necessary files.
Next, enter the password that was given when opening the group above.
That's it, you have joined the group.
Next, if you want to share files, do the following - Go to the control panel and the network and sharing control center.
Click Change advanced sharing settings.
And select all the items like mine:
All. Now let's check. We create a folder, for example I created it on the desktop of a laptop (which is connected via wi-fi).
Next, right-click on it and select property. Access tab. First Sharing, then advanced settings.
We write everything, or a specific user, then we can set what is allowed to him and click general access.
In the advanced settings, check the box and press OK. If you need advanced rights, then the advanced button.
Now let's check. I press start on the computer and go online. And I see my laptop (I didn’t bother with the name of the computer).
We go in and see the folder that I created on the laptop.
Setting up a local network between PCs on Windows 7
After you connect both computers with a cable (twisted pair), you can begin setting up a Windows 7 local network.
Step one
We give all computers that will be on the network a unique name (in English letters). We leave the working groups unchanged.
- For example, the first device: Name – Home , group – work group .
- Second device: Name – Home 1 , group – work group .
- Enter “ Control Panel ”, “ System and Security ”, “ System ”.
- Now click on the “ Advanced system settings ” option.
- In the window that appears, you can change the name to whatever you want.
Step two
Set up shared access for the folders you select.
- Go to “ Start ”, “ Control Panel ”, “ Network and Internet ”, “ Network Sharing Center…. "
- On the left side is the very last line “ Change advanced settings…. "Click on it.
- A profile will appear: home , work and general . Everywhere we put dots opposite the line to include. The only thing is that you need to remove the password protection. We save and reboot. An example can be seen below.
Step three
We configure individual network settings on computers. The third step is performed in the same way as on Windows 10. Therefore, we will not re-describe how to do it. Action No. 3 above in the article .
Step four
If you need the first PC that is connected to the World Wide Web to also distribute the Internet, then take the following steps:
- To share access to the World Wide Web for a second PC, you need to go to “ Network Connections ”.
- Right-click on the icon of the configured connection, thanks to which you connect to the World Wide Web and click “ Properties ”.
- Go to the “ Access ” item and check the boxes everywhere. Click " Ok ".
Step five
We share folders so that the second PC has full access to these folders.
Right-click on the folder you want to open for public access, select “ Sharing ”, “ Homegroup (reading) ”. We wait 30 seconds and it’s done, the folder is now available for the second computer.
If you need to see all available PCs on the network, then click “ Network ” in Explorer.
That's all, we showed how to connect your computers to a local network on Windows 7.
How to connect a local network to a computer via a computer running Windows XP?
So, after you have connected the computers to the router or to each other directly, we go into their operating systems and begin to make the necessary settings. First of all, you need to set the same time and date on all devices. otherwise it will be impossible to synchronize them.
The second step will be to set up the local network connection itself. Go to “Start > Control Panel > Switch to Classic View > Network Connections”
Click on “Local connection” and go to “Properties > Internet Protocol (TCP/IP)” and manually set the parameters, as in the screenshot - ip 192.168.0.1, the mask is the one that pops up by default.
Click OK everywhere and save the local network settings. Also, in the second open window, activate the item “When connected, display the icon in the notification area” so that in the lower right corner of the Windows console we display the status of the local network connection in the form of two flickering monitors. After saving these settings, a pop-up window will appear informing you that the connection was successful.
Now we find the link “Install a home network or small office network” in the left column and begin working with the Network Setup Wizard.
Click “Next” twice, in the third window select “Other”.
In the fourth, there are options. If your computers are connected via a switch with Internet access, then select item 1. If the Internet is connected via a cable to a second network card or via a wifi adapter to this computer and you want to distribute it to others from this machine, then select the second one. I will choose the third one, since at the moment it is not important for us - in this lesson we are simply setting up a local network by connecting two computers together.
After this, we give the computer a unique name by which it can be easily recognized on the network, for example, by its user name.
And in the next one - the name of the working group. This parameter must be the same on all computers on the local network. I'll call it Homenetwork.
And in the next step, you need to check the first box, thereby allowing the built-in firewall to connect from the local computer network to shared folders and printers.
Click “Next” twice and wait until the settings are applied.
Next, the wizard will ask you to select an option to complete the work; we check the box for “Just complete the wizard.”
After this, the system will ask to reboot, which we will do. In the meantime, go to the second computer on the network and do the same thing on it, starting from the very first step. Only set the value “192.168.0.2” as the IP address of the computer on the local network. And also be sure to set a PC name different from the first one and register the same workgroup (I have Homenetwork).
We connect two computers using a Wi-Fi router
We will show you an example of settings on Windows 10; for other operating systems the principle is the same. There will be slight differences only in the names of the items. Let's start setting up a local network through a router. First, of course, you need to connect both computers to the Wi-Fi router.
- It can be connected using a twisted pair cable crimped with an RG-45 plug on both sides.
- Or, if there are Wi-Fi modules, we connect using Wi-Fi wireless technology.
Setting up a new local network
- We make sure that all PCs have the same written working group and different names in Latin. We have already written how to implement this in this article above for Windows 10, 7.
- Most often, the router is configured so that it automatically provides all settings to devices, be it a laptop, smartphone or tablet. Therefore, you just need to make sure that on the network card the dots are opposite the line “ Obtain an IP address automatically ”, “ Obtain a DNS server address automatically ”.
Allow sharing
Just like in the methods described above, here you need to activate sharing and, of course, network discovery. You already know how to implement this. If you forgot, see paragraphs “ Action No. 2 or step two .”
Sharing folders, disks
- Select the folder you want to share. Right-click on it, select “ Share ”, “ Individual people ”.
- A window will appear, open the list, click “ All ”, “ Add ”.
- We determine the operations that can be performed with the folder. We recommend setting it to “ Read ”, then other users will not be able to change anything in the folder, but only copy and view. Click " Share ". Access can be done from “ Explorer ”, and also from the “ Computer ” folder.
We hope we have clearly explained how you can create a local network between two computers or laptops using a WiFi router. If you forget your wireless network password, then read our article: how to find out the Wi-Fi password on a Windows 7 computer.
Connection via wireless module
If you don't have a router and you're out of Wi-Fi range, it's still possible to connect two laptops to a local network. In Windows Vista and higher, there is a special Connection Creation Wizard for this. The computers will communicate via a built-in wireless module, creating a Wi-Fi connection between themselves.
In this case, one laptop needs to be configured to transmit the signal, and the second will receive it. Pay attention to their location; concrete walls and other obstacles create obstacles to broadcasting. To avoid mistakes, place both computers next to each other, configure them, and then experimentally determine how far from each other they can be.
Turn on the Wi-Fi module on both machines and start setting up the first laptop:
- Go to Network and Sharing Control Center. This can be done by clicking on the wireless network icon from the tray in the lower right corner.
- Start setting up a new connection.
- In the connection type, select “Computer-Computer”. Next, the system will explain to you that this is a temporary network for data transfer, and if you are already connected to some network, then the connection may be broken. In addition, the OS will advise you to place computers within 10 meters. But as said earlier, for tuning it is better to place them closer.
- Next, similar to setting up Wi-Fi through a router, you will be asked to come up with an SSID, that is, the name of the network, select the encryption type and come up with a password. One of the most reliable protocols is WPA2, but you don’t have to use password protection at all. If there are no other users within range, you can connect your laptop without it. If you are in a public place, it is better to use encryption, otherwise strangers may gain access to your data.
- A window will open to complete the setup process. The network is now saved in the list of possible connections and works as long as all users are in it.
Before connecting a second laptop, you need to change the data access settings. By analogy with how you set up a local network through a router, you need to go to the settings of the folders or required drives and allow all users full access. If desired, of course, you can allow, for example, only viewing files without changing them. You also need to enable network discovery.
Now on the second laptop you need to search for Wi-Fi networks, select the one you need and click “Connect”. You will need to enter a password (the one we created earlier), after which you can enter any files and folders to which access is allowed.
In this way, you can connect as many laptops as you like, not necessarily just one. On the Wi-Fi distributing computer, there will be a message in the tray “Waiting for users to connect,” which indicates that the Computer-to-Computer network is ready to work.
Using the simple steps described, you can quickly transfer files from one device to another without the use of wires, flash drives, removable drives, even while somewhere outside the city without an Internet connection. If you have a router in the room, then it would be more logical to set up a permanent connection of all devices to each other. A full-fledged wireless local network will allow you to work on different computers, edit and move documents, view photos and videos, provide many other opportunities and eliminate the need for repeated rewriting to removable media.
Checking the connection between your computers over the configured network
After setting up the network cards, you can check the connection between the devices. Right now we will show you how to check it between computers.
- On any custom PC, go to “ Search ”, enter “ cmd ”, “ Enter ”.
- A command line will appear, write in it the IP address of the second computer. For example: ping –t 192.168.10.11 .
- If your computer and laptop are connected correctly, then you should see “ Answers ”.
- But if it says “ The specified node is unavailable or the timeout interval for the request has been exceeded ,” this means that either you entered the command line incorrectly, or there is no connection with the second device. In this situation, you will not be able to quickly connect a computer to a laptop; first you need to find the problem.
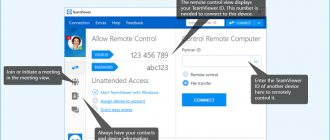
Connecting laptops using a router
Connecting your computer to the Internet via iPhone - setting up the connection
If two laptops are connected via Wi-Fi to the same router, they can exchange data over the local network in a similar way to what is available using Ethernet cables. This will allow file sharing and other network functions.
How to connect two laptops to a local network via a WiFi router? The setup is done like this:
- You should open the command line (by clicking “Start” and entering cmd in the search bar), select login as administrator on one of the laptops (if necessary, you will need to enter the specified password).
- Enter the netsh wlan show drivers command and press enter.
- Next, you need to find a line called “Supported Hosted Network.” You may have to scroll up the Command Prompt window to find it. If it displays "Yes", you can create a special connection. If “No” is specified, the laptop does not support this function. In this case, you should make the settings on the second device (one device that supports this module is enough).
- Next, you need to enter the command netsh wlan set hostednetwork mode = allow ssid =, and then the connection name, “key =” and its password and confirm everything by pressing Enter.
- The next command is netsh wlan start hostednetwork. It will open the network to other devices.
- How to connect two laptops via WiFi after the connection is established? On the second device, you need to click the network status icon on the taskbar, select the created connection from the list and enter the password to make the connection.
- Next, open the “Network” window on any of the laptops to find the shared folders of the other device (via the “Control Panel” or “Explorer”).