What is a driver and what is it for?
A driver is a special program that is necessary for each device to interact with a computer. Such devices include the chipset (control circuit) of the motherboard, sound card, network card, video card, disk controllers, etc.
Windows contains many drivers for various devices necessary for the initial installation and launch of the operating system. But usually they are simplified and outdated, and some modern devices are not detected and do not work at all. Therefore, after installing Windows, the first thing you need to do is install all the necessary drivers.
Before installing drivers, I recommend making a backup copy of the system to an external drive. If something goes wrong, you can quickly restore a clean system without having to completely reinstall it.
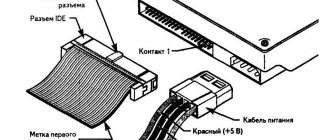
Hard drive Transcend StoreJet 25M3 1 TB
What is a driver?
Installing the driver from the disk takes just a couple of steps, but first of all, I want to provide a short technical reference. It would be very nice to understand how firewood works. Let's not go into details...
So, firewood is special programs created to work with specific equipment. Surely you are aware that computer hardware cannot work without software ; it simply will not be of any use. How is the benefit obtained? With the help of firewood and the operating system itself. Firewood is needed in order to create a kind of bridge between the operating system and the device on the motherboard. Through Windows you can control this device, although you yourself will not suspect it. But in the case of peripherals, for example, printers, the user controls them as he wants and when he wants. In short, if there is no driver, there will be no fully working computer with all its modules.
Installing drivers from disk
The easiest way to install drivers is from the motherboard disk that came with the computer when you purchased it. Place the disc in the drive and wait until the installation menu appears. In Windows 7 and higher, you may still need confirmation to run the installation program from the disk.
If the menu does not appear, then right-click on the disk in Explorer and select “Install or run a program from media”, “Open Autorun...” or something similar.
You can also open the disk in Explorer and independently run the file “Autorun.exe”, “Setup.exe”, “AsusSetup.exe” or similar.
But the previous method is better, since the system itself will launch the correct file.
The installation menu may look different. We are interested in drivers for the chipset, sound card and network card.
The first step is to install the drivers for the chipset and restart the computer. Then you can install the remaining drivers. If you are not in a big hurry, I recommend restarting your computer after installing each driver. If you are in a hurry, then reboot after installing the driver on the chipset, and then install everything without rebooting, in most cases everything will be fine.
There may be many more different programs and utilities on the disk, but usually they are not particularly necessary and they only slow down the computer. Therefore, I recommend installing only what you really need and know how to use it. It’s better to first look for information on the Internet about why this or that program is needed. Some of them are designed for overclocking and can harm your computer if used incorrectly.
Installation from disk.
So, installing firewood from original disks is the easiest option . Just put the disk in the wire, download the installation program, agree to all the terms of use, check the boxes next to the required applications and voila! Then the program will work automatically, in about half an hour, all the firewood will be ready for use. By the way, you can not install all drivers and auxiliary utilities; to do this, simply uncheck the boxes in some places. Thus, the hard drive will not be cluttered with unnecessary software, and installation time will be significantly reduced.
Downloading drivers from the motherboard website
If you don’t have an installation disk or you bought your computer a long time ago and the drivers on the disk might be outdated, then the best option is to download drivers from the motherboard manufacturer’s website.
If your computer is connected to the Internet by cable or via Wi-Fi, then you should already have a driver for your network card or Wi-Fi adapter. Download this driver in advance, because if Windows does not have a driver for the network card, you will not be able to access the Internet.
If you connect via a USB modem, then drivers are usually installed automatically when you connect the modem to the PC or from the included disk.
Please also note that drivers can be large (up to 1 GB), so you might want to download them all in advance, especially if you have a slow Internet connection.
So, we installed Windows and immediately go to the motherboard manufacturer’s website for drivers. On the site you need to find the “Service”, “Support” or something similar section. But so that you don’t have to search for a long time, I have compiled a list of addresses that will immediately take you to the desired section. You can download this list in the “Links” section.
After going to the site, enter the exact model of your motherboard in the search field.
The model is indicated on the box and on the motherboard itself. You can also find out the manufacturer and model of the motherboard using the “CPU-Z” program, which you can also download in the “Links” section.
After the model is found on the manufacturer’s website, you need to go to the “Downloads” or “Drivers” tab and select the version and bitness of Windows that you are installing.
You will see a list containing many different files.
Everything related to your motherboard will be here. This includes BIOS and user manuals and various utilities. But we are primarily interested in drivers for the chipset, sound and network card.
There may be several driver versions, check the date and download the latest version for each device, usually they are on the top lines. In this case, all drivers have only one version. Moreover, there is no separate driver for the network card, which means that it is included in the driver package for the chipset. There is a separate driver for the sound card and an AHCI disk controller driver. The AHCI driver needs to be installed only if, when installing Windows, the appropriate controller operating mode was selected in the BIOS.
AHCI drivers have a positive effect on the stability and speed of the drive, but if your computer is still not fast enough, install an SSD drive and your system will become much faster and more responsive!
Hard drive A-Data Ultimate SU650 120GB
Then you simply download the files and if they are in a ZIP archive, then unpack and run the executable file. If the driver was already in the form of an executable EXE file, then you can run it immediately. Drivers are installed in the usual sequence. First the chipset driver and reboot the computer, then everything else.
INSTALLING DRIVERS USING THE PROGRAM
All programs included in this category are called driver managers . Their main task is to detect devices connected to the computer whose drivers are missing from the system or are very outdated, and then install the software. One of these managers (and there are many of them today) is DriverHub. As an example, we chose this particular program for several reasons - it is completely free, easy to use, and does not have unnecessary functionality, like many other similar utilities.
The process of installing drivers using DriverHub is very simple, it comes down to a few mouse clicks:
- Download DriverHub .
- After installation and launch, click on the “Find Now” button. This will start the system scanning process, which usually takes no more than 30 seconds.
- DriverHub will display a list of those computer devices for which drivers can be installed (if missing) or updated (if there is a new version).
- Click on the “Install” button. This will start the process of downloading drivers from a remote server and then installing/updating them.
- It is not necessary to install drivers for all devices displayed by DriverHub. If you turn on Expert mode (by moving the switch to the appropriate position), you can select specific devices.
Using DriverHub instead of manual installation mode has many advantages:
- There is no need to independently determine the manufacturer and model of the device and then look for suitable drivers for it.
- There is no need to search for drivers suitable for a specific version of Windows OS.
- Ability to cancel driver installation/update, i.e. — removal of installed software.
- There is no risk of receiving malware instead of drivers and others.
In some rare cases (and this applies to all existing utilities of a similar purpose), DriverHub cannot determine the device for which driver installation/update is required. And in such situations you will have to resort to manual software installation.
Search for drivers on the chipset developer's website
You can try to find a driver for the chipset on the websites of their developers Intel, AMD, nVidia. What chipset you have can be found on the motherboard manufacturer’s website or using the “CPU-Z” program, which we have already discussed.
On the chipset developer's website, the driver is searched in the same way as on the motherboard website. Links to the necessary sections of chipset developer websites are in the “Links” section.
5.1. Finding drivers for the Intel chipset
Select everything in the search form as indicated below and click “Search”.
In the search results window, select "Drivers" and the version of Windows you are installing.
Download and install the latest version of "Intel Chipset Driver Update".
5.2. Finding drivers for AMD chipset
Select your chipset series and click “DISPLAY RESULTS”.
In the search results window, make sure that these are drivers for your chipset and click “DOWNLOAD”.
5.3. Finding drivers for the nForce chipset
The nVidia company produced chipsets under the nForce brand and there are still quite a lot of computers with such chipsets. If this is your case, then go to the nVidia website, fill out the form and click “SEARCH”.
Let me remind you that you can determine which chipset you have using the “CPU-Z” program (see point 5). If for some reason you find it difficult to do this, then to automatically detect your chipset, use the “MOTHERBOARD DRIVERS” button in the form shown in the screenshot above.
Make sure you have the correct drivers, download and install them.
We are looking for a driver on the manufacturer’s website
This is the best way to find the necessary drivers. Firstly , by downloading a driver from the manufacturer’s website, you can be sure of its compatibility with the equipment. Secondly , this way we can always download the latest version. Thirdly , there are now a huge number of scammers on the Internet who want to sell some kind of virus instead of the required driver. By downloading the driver from the official website, you can be sure that this is really what you were looking for.
Before looking for the necessary driver, you need to find out the manufacturer and model of the equipment on which you need to install the driver, for example, a motherboard or video card. To do this, you can simply look at the name on the motherboard itself, or, if access to the components of the system unit is difficult, you can use programs to collect information about the system. You can use the free program Aspia . (click on the picture to enlarge)
Suppose we know that our board is ASUS P5K/EPU. Accordingly, we must go to the manufacturer’s website https://ru.asus.com/ Select the menu item “ Service ” - “ Download Center ”.
In the window that appears, select our operating system and click “ general search ”.
Next, we see a hierarchical list of download files for all the equipment on this motherboard.
All that remains to be done is to download the necessary drivers and start the installation.
Of differ from the option I presented, but in general, all you need to do is go to the manufacturer’s website the download or support section the motherboard we need and download the files for our operating system .
But this method has one drawback. In order to download drivers for the motherboard, we need access to the Internet, and for this to work, the drivers must already be installed on the network card. The way out of the situation is simple - either always have a saved copy of the network card drivers , or download them from another computer/laptop.
Installing the video card driver
After installing the drivers for the chipset, I advise you to first download and install the driver on the video card. Thanks to this, a screen resolution that is convenient for further adjustment will be established and the system will start working faster. Links to sites where you can download drivers for video cards are in the “Links” section.
6.1. Finding a driver for a GeForce video card
If you have a GeForce video card, then go to the driver download section on the nVidia website, indicate the model of your video card, the version of Windows and click the “SEARCH” button.
Once the driver is found, click the "DOWNLOAD NOW" button.
Wait until the file is downloaded and run it. The installation is quite simple, you only need to click the “Next” button a few times.
6.2. Finding a driver for a Radeon video card
If you have a Radeon video card, then go to the driver download section on the AMD website, select the series to which your video card belongs, and download the driver for the desired version of Windows.
If you have an older video card and it is not in the list, then use the search on the AMD website. After downloading the file, run it. The installation is quite simple, you only need to click the “Next” button a few times.
Installing the driver as a regular program
Since the driver is the same program, the first installation method is no different from installing a regular program.
That is, if the driver installation file looks like Install.exe or setup.exe, no problems should arise, in this case the installation proceeds like a regular program, that is, we click the next button in each window, and the rest of the installation process is automated.
The only problem that may arise is that when you try to install the driver, a message may appear stating that the installation program did not find suitable hardware. This means that you are installing a driver that is not for your equipment (video card, sound card, etc.), or try installing an earlier version of the driver, since new drivers may not be suitable for older equipment.
Drivers of any version can usually be downloaded from the website of the manufacturer of the equipment for which you are installing the drivers.
Installing drivers using Windows Update
It happens that the motherboard manufacturer’s website does not have drivers for the sound and network card for the required version of Windows. But don’t rush, if the sound and Internet work fine, it means Windows has installed its own drivers for them, and in this case it’s better not to touch anything.
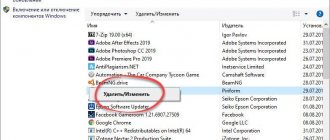
If something still doesn’t work, you can try installing the missing drivers using Windows Update. To do this, click on the START button and go to the “Control Panel\Hardware and Sound\Devices and Printers” section. Right-click on the icon with the name of your computer or laptop and select “Device installation options.”
Set the radio button to “Install drivers from Windows Update if they are not found on your computer” and click the “Save” button.
After this, the operating system will begin searching for missing drivers on the Internet and, if found, will automatically install them.
How to install drivers for the motherboard
As a rule, when purchasing a computer or laptop, the kit includes a disk with the necessary software and a driver package for the motherboard and other components of the computer. We find this disk and insert it into the drive.
Find the file Setup.exe or Autorun.exe (Run.exe or a file with the msi extension) and select it. Find and select the Drivers tab. As a rule, at the top we see the * InstAll button, when selected, the drivers noted in the list below will be automatically installed. Often there may be a trial version of the antivirus program, and it will automatically install along with the drivers.
Installing drivers using the DPS utility
If you were unable to find and install drivers for a device or your computer is too old, you can try to do this using the special “Driver Pack Solution Online” (DPS) utility. You can download it in the “Links” section.
This utility determines what devices you have, the version of the operating system, downloads the necessary drivers via the Internet and installs them. Launch the utility and click “Install manually.”
I think this option is better, since it will allow you to abandon drivers that have already been downloaded from manufacturers’ websites and installed on the system. You can also disable the installation of unnecessary additional programs.
Check the boxes only for those drivers that you were unable to install using other methods. For example, I selected a driver for a sound card.
Go to the "Software" section and you can select additional programs that you want to install. This is, in principle, convenient if you have just reinstalled the system and do not yet have the most necessary programs. I have ticked the programs that I consider useful and recommend for installation.
After that, click the “Install All” button and the utility will install all the drivers and programs you selected.
Where to look for drivers
Utilities necessary for the normal operation of embedded and peripheral devices are usually distributed free of charge. You can find the application to update or reinstall:
- On the manufacturer's website. Companies that produce video cards, sound cards, network adapters, and peripheral devices often post utility utilities on their pages. Such manufacturers include, for example, nVidia and AMD. Run a search by model and download the version you need.
- On the attached media. Your video adapter or printer may come with a driver disc, then you can install from it.
- In the Internet. Enter a query like “Driver for...” in the search bar, add the serial number or model of the device - and download the utility from one of the sites that appears.
- Using the installer program. One successful example is DriverPack Solution. Download the installer file, select for which devices the utilities should be installed, and start the installation.
Important! It is not always necessary to download a driver for a video card or other device from the Internet: the equipment can be automatically recognized and configured by the OS itself, without your participation.
Installing drivers using the DPS driver pack
A driver pack is a collection of drivers for a large number of devices. If you often encounter installing drivers on different computers or have a slow Internet, then you can download the full version of “Driver Pack Solution” on a computer with a fast Internet, and then use it to install drivers on any computer.
The disadvantage of this solution is the large size of the driver pack (about 10 GB). Thus, to use it on various PCs you will need an external hard drive or flash drive with a capacity of at least 16 GB. Sandisk Cruzer A link to the full driver pack will also be in the file, which can be downloaded in the “Links” section.
Why is it necessary to install system software?
The order in which drivers are installed on computers of various classes is determined, in most cases, by the user himself. Before making a choice in favor of a certain priority, I recommend that you familiarize yourself with the principle of operation of “firewood”, as well as their main purpose. Oddly enough, many novice users do not have even the slightest idea on this topic. And then, we wonder why office equipment doesn’t work on our computer, we can’t connect to the Internet via a new modem, and the peripherals don’t work. Today’s post will give a brief and quite sufficient answer to all these questions.
Before determining the order of installing drivers, you should understand what we will install and why. Let's start with a simple definition. A driver is special software, without which any computer is a “less useful” piece of hardware. “Firewood” opens a kind of bridge between the operating system and the hardware itself. This way, Windows will be able to control all connected devices. Accordingly, the user, communicating with the operating system interface, will be able to control all available equipment. To put it simply, if there is no firewood, there will be no working hardware.
How to check if all drivers are installed
In order to check whether all the necessary drivers are installed, you need to go to the “Device Manager”. This can be done in several ways.
1. Right-click the Computer icon on your desktop or START menu and select Manage.
Then go to the "Device Manager" section.
2. Click the START button and go to Control Panel\Hardware and Sound\Device Manager.
The first method is simpler and faster.
If there are icons with an exclamation point in the Other Devices section, it means that the driver for this device is not installed.
If icons with an exclamation point are in other sections, this means that the driver is installed, but it probably did not fit and the device does not work.
In such cases, you will need to find and install the driver for these devices manually, which we will discuss next.
Download and installation
To choose the right version of the utility utility, find out the model of the device being configured, the version and bitness of the operating system. Thus, the utility utility for Windows 7 x86 will not work if you are using Windows 10 x64. An incorrectly selected program will not cause harm, but you will not be able to configure the equipment.
If you are using a collection or installer:
- Select the utility utilities that need to be installed from the list.
- Uncheck unnecessary boxes, for example, those that allow the program to install advertising modules.
- Click on the “Install” button, Install or similar - this will start the installation process.
When the driver for the printer, sound card or video adapter is installed, close the installer window. Sometimes you may need to restart Windows.
Finding and installing drivers manually
Go to Device Manager, right-click on the problematic device and select Properties.
Go to the “Details” tab, select “Equipment ID” in the “Property” field, find in any line the device identifier in the format “VEN_xxxx&DEV_xxxx” or “VID_xxxx&PID_xxxx” (instead of “xxxx” there will be 4 characters).
Write down this data or right-click on any line and click “Copy”. Go to the “DevID.info” website and enter the device identifier in the search bar and click “Search”.
Select your version of Windows and click on the name of the found device driver or the floppy disk icon.
Two driver formats are often offered - a repackaged “devid.info” file and an “Original file”.
If you have fast Internet and are not in a hurry, then it is better to download the “Original file”, as there are fewer problems with its installation. If the Internet is slow or time is running out, then try downloading the repackaged “devid.info” file.
If you downloaded the driver in a ZIP archive, extract all files from it before installation. If the driver is downloaded as an executable EXE file, you can immediately run it for installation. The installation is quite simple, you just need to run the executable file (such as “Setup.exe”) and click the “Next” or similar button several times.
If the driver does not have an executable file, you will have to install it manually. To do this, in Device Manager, right-click on the device for which you downloaded the driver and select “Update drivers...”.
Then “Search for driver software on this computer.”
Click the "Browse" button, specify the folder where you unpacked the downloaded driver file and click "Next".
If a suitable driver is found in the specified folder, it will be installed and the device should disappear from the list of unidentified devices in the device manager.
Installing drivers manually
First of all, I want to note that if you purchased a computer that already had Windows installed, then all the necessary drivers are probably already there. In addition, if you reinstalled the operating system by resetting the laptop to factory settings, that is, from a hidden recovery partition, all the necessary drivers are also installed during this process. If one of these options is exactly for you, then I can only recommend updating the drivers for your video card; this can (sometimes significantly) improve the performance of your computer.
The next point is that there is no particular need to update drivers for all devices. It is really important to install the correct driver for the video card and for that equipment that is not working at all or as expected.
And lastly, thirdly: if you have a laptop, then installing drivers on them has its own specifics due to the differences between different equipment manufacturers. The best way to avoid problems is to go to the manufacturer’s official website and download everything you need there. For more information about this, see the article Installing drivers for a laptop (there you will also find links to the official websites of popular laptop manufacturers).
Otherwise, installing drivers involves searching for them, downloading them to your computer, and installing them. It is better not to use the disk or disks that came with your PC for this: yes, everything will work, but with outdated drivers.
As I already said, one of the most important is the video card driver; all information on installing and updating it (plus links where you can download drivers for NVidia GeForce, Radeon and Intel HD Graphics) can be found in the article How to update a video card driver. You may also find it useful: How to install NVIDIA drivers on Windows 10.
Drivers for other devices can be found on the official websites of their manufacturers. And if you don't know what hardware your computer uses, you should use Windows Device Manager.
How to View Hardware in Windows Device Manager
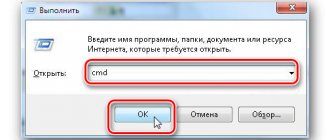
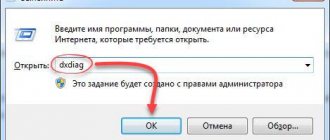
To see a list of your computer's hardware, press the Windows + R keys on your keyboard and enter the command devmgmt.msc
, then press Enter or the OK button.
The device manager will open, which will contain a list of all hardware (and other) components of the computer.
Suppose that after installing Windows the sound does not work, we guess that the problem is in the drivers, but we do not know which ones to download. In this case, the optimal procedure would be as follows:
- If you see a device with a yellow question mark icon and a name like “multimedia audio controller” or something else related to audio, right-click on it and select “Properties”, go to step 3.
- Open "Sound, Game and Video Devices". If there is a name in the list that suggests it is a sound card (For example, High Definition Audio), right-click on it and click “Properties”.
- Depending on which option suits you - the first or the second, you either do not have the driver installed at all, or you have it, but not the one you need. A quick way to determine the driver you need is to go to the Details tab and select Hardware ID in the Property field. Then right-click on the value below and select “Copy”, then proceed to the next step.
- Open the devid.info website in the browser and insert the driver ID into the search bar, but not completely, I highlighted the key parameters in bold, erase the rest when searching: HDAUDIO\FUNC_01& VEN_10EC&DEV_0280
&SUBSYS_1179FBA0. That is, the search is carried out using the VEN and DEV codes, which inform about the manufacturer and device code. - Click “Search” and go to its results - directly from here you can download the necessary drivers for your operating system. Or, even better, knowing the manufacturer and name of the device, go to its official website and download the necessary files there.
In the same way, you can install other drivers in the system. If you already know what devices your PC is equipped with, then the fastest way to download the latest drivers for free is to go to the manufacturer’s website (usually, everything you need is in the “support” section).
Rollback or removal of the driver
Sometimes it may happen that the driver you installed does not work or works worse. For example, background noise or clicking noises appeared after installing the driver on the sound card. In this case, you can roll back the driver to a previous version or remove the current driver from the system.
In order to roll back a driver to a previous version, go to Device Manager, right-click on the desired device and select Properties.
In the window that appears, go to the “Driver” tab and click the “Roll Back” button.
If the “Roll Back” button is not active or rolling back the driver did not help, then you can try to remove the malfunctioning driver. To do this, in the same window you need to click the “Delete” button and confirm the removal of the driver.
After this, restart your computer and the system will again try to find and install the most suitable driver for the device. If the device does not work, try finding and installing another driver using one of the methods we discussed.
How to install drivers on Windows with an active Internet connection
If the computer on which you want to install drivers is already connected to the Internet, then the procedure will be very simple.
Open the DriverPack Solution website and download the DriverPack Online utility. She will find the necessary drivers on the Internet, download them and install them on your computer.
Temporarily disable your antivirus so that it does not interfere, and run the downloaded file. In the running program, click on “Expert Mode” - the inscription at the bottom of the window.
Open the “Software” tab and uncheck the boxes next to unnecessary applications. If you do not do this, DriverPack Online will install Yandex Browser, Opera and other programs that you may not need along with the drivers.
Go to the "Drivers" tab and click on "Install All".
Wait for the installation to complete and restart your computer. After rebooting, all necessary drivers should be installed.
Do I need to update drivers?
Manufacturers periodically release updated versions of drivers that fix bugs and improve compatibility with other devices and software.
Some enthusiasts like to constantly update their drivers to the latest versions. But, if you are not a sufficiently experienced user and your computer is working fine, then I do not advise you to do this. Since some problems may appear with updating drivers, and you may not have enough experience to fix them yourself.
The only driver that is recommended to be kept up to date is the driver for the video card, as it adds support for new games and improves performance in old ones. However, also don't rush to update it if all your games are working well. Because games during development are always tested on older drivers, and their new versions can cause a drop in performance. Update the driver for your video card if you have problems with some games.