Sending electronic e-mail messages is one of the main operations that is constantly used in office work. Entering business correspondence, sending commercial proposals, or simply communicating with friends - all this became possible thanks to the use of email, and the knowledge of how to set up an outlook client to work with gmail mail .
Let's look at this from the technical side. To ensure the possibility of sending e-mail, we need a certain service that will take care of the technical support of the process, and a client program in which we can create new messages and view received ones.
From this point of view, the Microsoft Outlook email client and the Gmail email service from Google are the most popular at the moment. And now we will show you how to configure them properly to work together.
Technical information
First, let's take a look at the technologies that are used in the process of creating and sending email messages. And only then we’ll see how the Gmail email service will work in Outlook.
Mail client
A program that provides the user with a graphical interface through which one can create, edit, and send electronic messages. The mail client also stores received mail, providing the ability to view and read it.
Post service
A special software package that takes on the task of ensuring the forwarding of e-mail messages between users - both its own and users of third-party services.
SMTP protocol
Modern protocol used to transmit electronic messages
POP3 protocol
A modern protocol that allows email clients to receive email messages by downloading from a remote email service.
Changing the theme and size of the GMail mail interface
You can change the size of the mail interface to make it more convenient for you, and you can also install some kind of theme to make the mail look more beautiful and, probably, you would have a more pleasant time working in it.
To change the interface size (compactness), open the gear (see above). and choose one of 3 interface types: spacious, regular, compact.
This changes precisely the compactness of the display of GMail interface elements, i.e., for example, the distance between buttons and letters in folders.
Below are examples of the largest (spacious) and smallest (compact) interfaces.
To change the mail theme, also open the gear and select “Themes”. There you can choose the design theme you like (the background image of your interface in the mail will change).
By clicking “More images”, you can see other options, as well as upload your photo (picture), which will be used as a background. If you want to set your photo as the background, you need to go to the “Photo Upload” tab in the window that opens and drag the desired photo from your computer into this window.
Example of a modified subject on GMail:
All the settings discussed below are available in a separate “Settings” section of the mail. (select the gear and the “Settings” item in it).
Setting up the Outlook email client to work with the Gmail email service
Let's assume that we already have a registered account in the Gmail service and the Microsoft Outlook email client is installed.
So, launch Outlook - you should see the main program window in front of you:
Now you can proceed directly to setting up gmail for outlook.
Click the “Tools” button in the menu bar, and in the window that opens, the “Create” button:
A window will open in which we need to check the box “Manually configure parameters...”. Install it and click Next.
In the next window, select “Internet Email” and click “Next”:
A window for entering parameters will open. Here you need to fill in the following fields:
- Enter a name - enter from the keyboard the user name that you want to assign to this account
- Email address - enter your email address registered in the Gmail service. The address must be in the form [email protected]
- Account type - select POP3 protocol
- Incoming mail server - write pop.gmail.com
- Outgoing mail server - write smtp.gmail.com
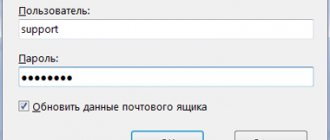
- User - indicate your account address, without @gmail.com. To make it clear, if in our example the username is in the “User” field, we must type example
- Password - enter your secret password that was assigned when registering in the Gmail service
- Check the box “Remember password”
The test data input is shown in the figure below:
Now we need to configure additional settings. Click the “Other settings” button. In the window that opens, we are interested in three tabs:
Outgoing mail server
Here we need to check the box next to “SMTP server requires authentication” and then select “Same as server for incoming mail”. Example in the picture below:
Connection
Here the “Via LAN” option should be selected, as shown in the figure below:
Additionally
The most important point. What options should be selected here:
- POP3 server port - dial 995
- Check the box next to “Requires SSL encrypted connection”
- SMTP server port - 465
- Encrypted connection type - select “SSL”
- Check the box next to “Leave copies of messages on the server.” This is necessary so that you have a backup copy of your messages in the mail service itself.
An example of settings is shown in the figure below:
When finished, click OK and return to the account settings window. Now all that remains is to check the correctness of the parameters - to do this, click the “Account Verification” button. If the test sending and receiving messages passed without errors, then we have correctly configured the Outlook client to work with Gmail mail. You can use it.
Author's note: We looked at the process of setting up Gmail in the Outlook 2007 client. For later versions, the process is similar (Microsoft Outlook 2010, 2013).
How to set up Google mail
Administrator October 01, 2014
Correctly setting up Google Mail will ensure not only ease of use, but also make it more secure, protecting confidential information. To configure, you must first go to your mailbox, enter your username and password. Why do you need to go to the “Settings” section of your mailbox?
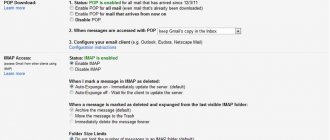
Setting up message forwarding
In order to configure the process of sending messages from your mailbox, you must first go to the POP/IMAP section, and then you must enable the IMAP protocol, which is disabled by default, unlike POP. After enabling IMAP, the mailbox user is presented with various additional settings that can be left alone and left as they are, saving the changes made.
Compared to others, setting up Google Mail is very simple, because it has the ability to automatically connect to IMAP; to do this, you need to uncheck the box next to “Configure server settings manually.” As a result of such actions, data is automatically synchronized on the server and mailbox, which will eliminate all differences without user intervention. For example, after disconnecting their Internet connection, users often delete or move their mail. If synchronization is correct, after the Internet is turned on again, all changes will be made on the mail server.
Setting up a username and login
When setting up mail, you need to indicate the login used during registration, and after it put @gmail.com, which many users who are faced with the need to set up mail forget to do.
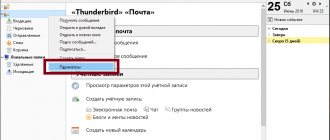
Setting up an email client
In order to use Gmail from Google, you can use not only the existing web version, but also various email clients. For a certain category of users, this is a more convenient option for managing mail. To do this, you need to use the incoming mail server address: pop.gmail.com. You will need to specify the port number in the client settings as 995 and select a secure connection.
Now you need to configure the outgoing mail server, which is done in almost the same way, except that you will need to enter other data. The server name will now be: smtp.gmail.com, and the port can be one of two: 465 and 587. You must select a secure connection TLS or SSL. The same login and password for outgoing and incoming mail servers must be entered, if necessary.
Basic Gmail settings
In order to customize the web version of Google Mail for yourself, you need to go to “Settings” in the upper right corner, after which a window will open in which each parameter will be listed in order.
At the very top you enter your preferred interface language; here you can select any language depending on your region and individual preferences.
The next setting is the country phone code; opposite the parameter you will need to select the country you are in from the list of options presented. The next parameter is to select the page size of the web version of Google Mail; it consists of setting two parameters: the number of chains and contacts located on one page. In the standard version, the values for chains are set to 50, and for contacts 250. The first parameter can be decreased or increased, and the second can only be decreased by 100 or 50.
Next comes setting up the images; you can always receive them or select the “ask permission to display the image” option. In the settings, the user can select the style of text used that is displayed on the page. You can change text parameters such as font, size, color. This makes it possible to choose the most convenient and eye-pleasing option. This setting is very useful for people who have vision problems. They can choose the most readable font and text size.
The Chains option, located in Mail Settings, can be turned on or off. It allows you to group emails received under the same topic. By default, this option is enabled, but you can disable it if desired.
The “Send emails via Google+” option allows you to specify the ability to correspond with people who send you emails. If the letter comes from a user in your circles, then you must confirm it to continue. Gmail allows you to send and archive emails. The button for sending and archiving is hidden in standard settings, but you can enable it by selecting the option to show the “Send and Archive” button for messages in the reply.
For chat messages, you can turn desktop notifications on or off. This feature is useful for users who chat using gmail; you can also enable or disable messages about the receipt of important and new emails. In the standard settings, the function is disabled and the mail user does not receive notifications about new letters.
The Large Keys option is very convenient for people with poor vision. By enabling the function, the keys used to work with mail will be larger, so you can use the mail service even without glasses. Button labels can be set as icons or text as you wish.
The Contacts AutoFill option allows the user to choose whether to fill in the Other Contacts group or leave it blank. To ensure that all sent letters are signed, you can enable subscription and write any text for it. By default it is disabled.
If you wish, you can set up an email with an autoresponder, indicating the first and last day of work, the subject and text for the response. One user sending letters receives a response every four days, no more often.
Gmail from Google has a large number of settings, thanks to which each user can tailor the service to their own needs and make it more convenient to use, as well as speed up work with email.
Add a comment
JComments
Our recommendations
If your clipboard is full of incoming messages, it's worth clearing it. More detailed information in the material - Windows 7 clipboard
If you encounter problems when trying to download a file from exchangers, look for recommendations in the material - Error when downloading files.
To connect your computer to your TV, use a hdmi tulip adapter.
Enabling the ability to unsend an email
Gmail has an interesting and unique feature (at least I haven't seen one in other email services) to unsend an email. For example, you sent a letter and remembered that you forgot to attach a file to it. To avoid sending a new letter with a note that you forgot to attach a file to the previous one or do something else, you can simply cancel sending the letter within a certain amount of time (for example, 20 seconds), make adjustments and send it again .
The thing is convenient and can come in handy from time to time.
To enable this feature, in Gmail settings, open the “General” tab and below there will be an “unsend” option. Check “enable...” there and select the waiting time before the letter is finally sent.
For example, if you selected 20 seconds, then within 20 seconds you can cancel the sending. And immediately after this time the letter will be sent and you will no longer be able to change anything in it.
To cancel sending, click “cancel” immediately after sending the letter, before the time period you specified has expired.
As a result, the sending will be canceled and you will return to editing the letter again.
Automatically forward emails to another person
If you constantly forward the same type of email to someone, try automating the work by combining automatic forwarding with a filter.
In the first line of the “Forwarding and POP/IMAP” tab, click on the “Add forwarding address” button. Enter the email address of the person you want to forward emails to. Once he confirms this step, you can choose to either forward all mail or set up filters - the corresponding link is located under the "Add Forwarding Address" button.
Let's say you want to automatically forward to a friend all emails sent from the address Enter "From" in the line and click "Create filter" at the bottom of the window. On the next page, select the Forward it to: checkbox and select the forwarding destination you created earlier. Once everything is ready, click on the blue “Create Filter” button and ensure that new messages from Bob will be instantly forwarded to your friend.
Gmail is broken
Users of Google's proprietary email service, Gmail, began to complain about glitches in its operation. People all over the world are experiencing problems with access to their mailbox or a number of its functions, but most often, according to the DownDetector resource, failures occur among users from Europe, India and Japan.
The first complaints about the service began to be received on August 20, 2020 at 8:00 Moscow time. At the time of publication of the material, Gmail had not been restored.
According to published comments, residents of Ukraine, Israel, southern Australia, and some American states experience certain difficulties when working with Gmail. Russia was practically unaffected by the failure.