How to completely clear a flash drive by formatting?
First, insert the flash drive into the USB port of your computer or laptop. Next, close the autorun window that appears and go to “My Computer” (This Computer).
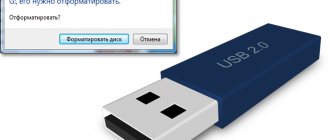
Here, among the local drives, we find the flash drive that needs to be completely cleared of its contents, and right-click on it. In the menu that opens, select “Format”.
Start formatting the flash drive
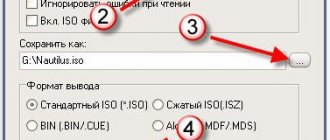
Next, a window will open in which you need to set formatting options.
Selecting formatting options and file system (NTFS or FAT32)
Only two parameters are important for us. The first is the file system. It is better to choose NTFS to eliminate problems with writing large files. The second is the formatting method. If you are not in a hurry and want to delete data permanently, then it is better to uncheck the “Quick format” checkbox. In this case, the cleaning process will take about an hour, depending on the size of the flash drive.
- The computer does not recognize the flash drive connected via USB
If you want to quickly clean the flash drive, then you need to check this box. Then the flash drive will be cleared in a few seconds.
Having set all the parameters, click the “start” button, after which the process of formatting the flash drive will start.
Formatting success message
It will be completed after the corresponding message is displayed.
After this procedure, your flash drive will be completely cleared of everything that was written on it.
“How to clean a flash drive?” is a question that many novice PC users ask. In fact, there is nothing complicated here, and the whole procedure will not take much time. In this article we will talk about several of the simplest methods that will help clear information from a flash drive and return it to its original state.
My computer is my castle
It is necessary to ensure the most “strong” protection for your computer. To do this, you need an antivirus and a program to remove viruses from flash drives.
Antivirus must be installed and working correctly
First of all, open your antivirus settings and make sure there are no warning messages. The databases must be updated, the license must work. If you do not have an antivirus installed, you will have to install it. Here I have given a brief overview of the most popular free antiviruses. If there is no Internet on the computer, the antivirus will not be able to update itself, which is quite logical. Read the help of your antivirus on how to update its databases manually . Almost all antiviruses can do this. You will, of course, need the Internet, but not necessarily on your computer
xUSB Defense - antivirus for flash drives
Actually, there are a lot of such programs - Anti-autorun, Keen Eye, Autorun Eater, USB Disk Security and a dozen or two similar ones. I chose xUSB Defense for one reason - it works the fastest and most discreetly (although there are problems), and it is also free. The official page of the program is here.
Unfortunately, you cannot download it without registration, so use this download link (replacement link) - there you can download the program immediately.
The program is small - one megabyte. Installation is simple. After starting the program, an icon will appear in the tray:
Left-clicking opens the settings window, right-clicking opens the menu. xUSB Defense has a lot of settings, but their purpose is clear. There is no point in describing it.
Let me highlight a few important points:
- The program can automatically remove or transfer viruses and other programs from flash drives to the quarantine folder. The problem is that the default quarantine folder is located in C:Program FilesxUSB DefenseQuarantine. This is incorrect because any program in Windows Vista, 7 and 8 does not have permission to write there. You will either have to always run the program as an administrator (which is inconvenient) or reassign the corresponding setting. Or you can simply delete or rename suspicious files - all this is customizable, it’s up to you. The same applies to the log recording option.
- The program has an option Enable “Work with Documents” mode . When this mode is checked, all files except documents are deleted from the flash drive . Be careful!
- xUSB Defense is not an antivirus, but only an addition to it. It is not able to distinguish viruses from ordinary programs! All it does is delete or neutralize files based on their name and location. If you store programs on a flash drive, do not configure xUSB Defense to be deleted.
- A nice feature is the automatic removal of the “Hidden” and “System” attributes from files and folders. That is, the program will “recover” folders and files hidden by the virus. Hidden folders and files can also be viewed using Windows tools - just open Control Panel - Folder Options - View and uncheck Hide protected system files , select Show hidden files, folders and drives - OK. If you use xUSB Defense , you will not have to configure Windows - the program will automatically restore hidden folders on flash drives.
I will provide screenshots of the most optimal settings, from my point of view. No files will be deleted, only renamed - this will make it difficult for viruses to launch and at the same time protect us from deleting something important. Folders and files hidden by the virus will be restored. The program will work on its own, starting automatically when you turn on the computer.
Here are my settings:
“General” tab - set to automatic operation mode
“USB Protection” tab - first move the slider up all the way, then check the boxes
Here and in the next two tabs we don’t touch anything - everything is configured most optimally
After clicking OK , the settings will close and xUSB Defense will go on “combat duty”. After inserting the flash drive into the USB, the program will scan the flash drive. You can use a flash drive during scanning, but it is better to wait at least 5 seconds - this time will be enough for scanning. Files identified as viruses are marked with the extension .#WARNING# in their name - if the program makes an error, you just need to rename the files back.
Please note that in the settings I unchecked the Scan in subdirectories (Slows down scanning) checkbox. Unfortunately, if you enable this option, the program first crawls deep into folders, looking for viruses there. This is incorrect behavior, because first of all we need to scan the root folder of the flash drive - the one we see when we open it - in order to neutralize viruses that are most likely to be launched. So keep in mind that if you need maximum protection, you will have to check the box, but you will wait a long time for the flash drive to be checked - up to five minutes.
Easy removal
The first and simplest, most banal way to clean a flash drive is to simply delete all files on the drive through a standard explorer. It's quite easy to do this. The flash drive is inserted into the USB port. Then you need to open File Explorer, go to the “This PC” section and open the connected USB device. All that remains to be done is to select all the files. You can select with the mouse if there are few files, or press the key combination Ctrl+A. Then press the Delete button on your keyboard, and then confirm the action by selecting “Yes”.
- In what format should I format the flash drive? Varieties of formats
Removing a virus from a drive
In connection with the situation that has arisen, the right option would be to calm down, concentrate, and direct all efforts to studying information on how to remove a virus from a flash drive. Moreover, there is nothing complicated in the subsequent steps, and even a beginner can remove a virus from a flash drive, and then successfully display hidden files.
Removal methods
To clean a USB drive from virus code, it is best to use a computer that has powerful protection installed. It’s good if this antivirus program is a paid version, because in this case you can be sure that the antivirus databases in it will be up to date, and therefore such an antivirus program can easily deal with any malicious file.
Having such an excellent antivirus program at your disposal, it will be absolutely simple to understand how to remove a virus from a flash drive, since the process will practically occur automatically, with only a little user participation.
The USB drive should be inserted into the USB connector, the antivirus program will immediately prompt you to check the drive, the user can only agree with this. The antivirus program will perform all other actions independently, displaying the result of its work on the screen.
The antivirus program itself will be able to remove hidden viruses. After such cleaning, flash drives will be “healthy” and operational again.
Experienced users can remove a malicious file from a flash drive manually. This tactic is especially welcome when there is no nearby computer with a powerful antivirus program with updated antivirus databases.
To manually eliminate a malicious file, the user must initially display hidden files, since the execution file is in this status.
To show hidden files, you should open the “Control Panel”, go to the “Folder Options” tab, then “View”, among the listed options you should find and check the box for “Show hidden files and folders”. Now the user will be able to see everything that the virus tried to hide. The USB drive will contain RECYCLED and RECYCLER, if there is a file inside them with the exe extension, it should be destroyed, since it is a malicious file.
Another option for removing malicious code is the formatting process, but it should be noted that after its completion, not only the virus and all its traces, but also all documents will disappear from the drive without a trace.
Document recovery
After you have successfully eliminated a malicious file, and only documents remain on the drive that are simply not visible because they are in the status of hidden files, it is important to perform a number of simple steps that will allow you to return the documents to their usual appearance.
The easiest way is to use a file manager, which includes Total Commander.
Having launched Total Commander, go to the “Configuration” tab, then “Panel Contents”, and then check the box next to “Show hidden/system files”.
Now the user will see all his documents. At this stage, you should select them, then go to the “Files” tab, then “Change Attribute”, and in the dialog box that appears, uncheck the “Hidden” and “System” boxes. This concludes the fight against the virus and the work of restoring documents.
So, when using a USB drive, you should be careful and not expose it to virus infection again. However, if such an infection does occur, it is important to remain calm and calmly eliminate the malicious object, not allowing it to “manage” the USB drive for a long period of time.
Formatting in Windows
The second way to clean a flash drive is to format it through the built-in Windows utility. First you need to connect the drive to your computer via a USB connector. Next, open “Explorer”, go to the “This PC” tab and find the connected drive. Now you need to right-click on it and select “Format” from the drop-down list. A small window will open where you need to set the type for the NTFS file system and click on the “Start” button.
How to delete all data from a flash drive without the possibility of recovery.
How to delete all data from a flash drive without the possibility of recovery.
It is well known that even from a formatted flash drive you can read files that were there before the formatting procedure. This is due to the peculiarity of flash technology, due to which a whole class of programs was born - data recovery from Flash disks and drives.
If you need to completely erase (destroy) the files and data on the flash drive, so as not to expose them to the risk of being “read” in the right hands, then you should use the solution described below.
A utility that will help us clean media (USB-Flash, MicroSD, etc.) is called Disk Wipe. This program is free and works without installation.
The principle of its operation (and similar ones) is quite simple: randomly generated information is written to the media, this procedure is performed several passes (depending on the selected mode).
After the “processing” of the drive is completed, no data recovery program will be able to restore the data previously available on the flash drive.
Launch the utility. In the window that opens, select your flash drive from the list, and then click on the Wipe Disk .
The Disk Cleanup Wizard will open. In the first step, select the file system type of your flash drive.
In the second step, you will need to select the type of erasure; the optimal option is One Pass Random (quick) .
Finally, in the last step, a warning will be displayed stating that all data from the drive being erased will be completely and irrevocably deleted.
And to confirm the start of the drive cleanup process, you need to enter the text “ ERASE ALL ” (without quotes) into the appropriate form, and then press the Finish .
After the cleansing process is complete, your drive will be completely empty. You can transfer it or give it away without fear that the data that was once on it can be restored.
Command line
You can clear the flash drive of records using the command line. First you need to install the drive into the USB port. Now open the command line. We do this as follows: press the Win+R button combination, in the window that opens, write cmd and press Enter. Now in the command line you need to enter the following text: convert: /fs:ntfs /nosecurity /x, where the letter of the flash drive in Explorer. Here's an example:
convert G: /fs:ntfs /nosecurity /x
After everything has been entered, all you have to do is press Enter and wait for completion.
USB Disk Storage Format Tool
So, the first one is USB Disk Storage Format Tool. You can download it from the official developer’s website; they distribute it absolutely free.
After installing the program, you will need to run it, but before that you need to remember to plug the drive into the USB port. Now let's talk about how to clear a flash drive of files using this software. In general, everything is simple here. At the very top, in the drop-down list, you need to select the connected flash drive to format. Next, select the file system (must be NTFS) and check the box next to Quick format.
- How to properly format a flash drive. Programs and formatting methods
Once everything is configured, you can start cleaning by clicking on Format disk.
HDD Format Tool
The second program for cleaning a flash drive is HDD Low Level Format Tool. You can download and install it, as in the previous case, from the developer’s website. There is even a version that works without installation.
The algorithm of actions is the same as last time: connect the drive to the PC and launch the program. In the window that appears, you need to select the connected drive from the list of available devices and click the Continue button. There is no need to set any additional settings, since all of them are already pre-written by the developer in the source code. Click on Format this device and wait for the procedure to complete.
Standard Formatting
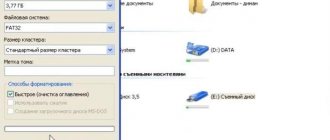
To format using standard system tools, you need to open the Computer and select the removable media that you want to clean from the list of devices.
Right-click on the flash drive icon, select “ Format ” from the menu - you will see the “ Format ” window, where you can select the file system and determine the cluster size.
The smaller the cluster size, the lower the speed of the drive, but the disk space will be used more efficiently.
To complete the process, you must click the “ Start ” button, after which a warning will appear that all data will be cleared, confirming by clicking the “ OK ” button that the device will be formatted.
By default, formatting is performed in the Fat32 file system, but it is known that NTFS is more fault-tolerant and reliable, so we recommend choosing this system.
quickly format the drive using the command line. To call it, use the combination Win + R by entering the command “cmd”.
In the console, enter the following command, making sure to specify the drive letter:
In this case, the flash drive will be formatted in NTFS format, and the console window will provide additional information about the device.
Secure media - unlocking via registry
- Call Registry Editor. Just press the Win + R keys, enter the command regedit and confirm your choice with the Enter button.
- Then go to ComputerHKEY_LOCAL_MACHINESYSTEMCurrentControlSetControlStorageDevicePolicies in the tree on the left.
- Double-click the WriteProtect option in the right pane of the window. Change the number 1 in the Value Data field to 0. Close Registry Editor and restart Windows.
- Re-insert the flash drive into the USB port. Now you can format it in the usual way, and therefore, by right-clicking on its icon in the Explorer window, select Format.
If there is no “StorageDevicePolicies” subkey within the Control section, create one by right-clicking and selecting New → Section. Make sure you enter the name correctly. Select the created section with the right mouse button, select New → DWORD value. Name the new value WriteProtect and assign it the number 0 in the Value Data field. Confirm with OK, close Registry Editor and reboot the system.
If the described method does not work, try the following tip.
If formatting doesn't help
If the device cannot be cleaned using standard means, you can try to restore it using the control panel.
Launch the Control Panel.
Next System and Security /Administration.
Then Computer Management .
In the Disk Management section, select your disk and right-click on it - “ Create simple volume ”
The volume creation wizard will start, in which we click on the “Next” button, and then “ Finish ”.
A new volume will be created. Before further use of the flash drive, it must be formatted using standard means, as shown earlier.
Quick Format option and complete it.
How to use Rufus
Data recovery
It would seem that it would be difficult to go into the properties and remove the “hidden” attribute. This case is a little non-standard and the problem cannot be solved in a simple way. After all, the Autorun virus assigns a system value to damaged elements so that the user cannot make changes.
But nothing is impossible for us, right?
The easiest way is to download a ready-made script, run it in the console window, and indicate the letter of your removable drive. Then press Enter and after a few seconds all unnecessary attributes will be removed automatically.
Download
In addition, this mini-utility is capable of removing RECYCLER on its own, I wrote about this in one of my articles.
But if you don’t trust me, then here’s a more complicated method.
- Launch the command line with admin rights. To do this, type “cmd” (without quotes) in the Windows search bar. When the result is displayed, right-click on it and select “Run as administrator.”
- Or open the Run window (Win + R) and execute the cmd command.
- When the black window opens, enter the following code:
cd /df:\
Instead of f:\ you should specify the corresponding letter of your flash drive. You can find it in the “Computer” folder.
- Now we execute the following “piece” of code:
attrib -s -h /d /s
- Hooray! Now all data has been restored. You can dance for joy!
To avoid finding yourself in such an unpleasant situation again, I recommend reading a couple more useful tips.
Using specialized software
If you can't clean it using Windows, there are many programs you can use to try to do it.
CCleaner app
This program can be downloaded for free from the official website.
After launch, go to Tools/Erase Disks, select the letter of your drive and click “ Erase ”.
All that remains is to wait for the cleaning process to complete .
Acronis Disk Director
An extremely powerful tool that allows you to perform any operations with disks.
To clean, you should find the “ Clean up disk ” item or create a new volume based on your removable disk by selecting “ Create volume ”.
After entering the information for the volume you are creating, click Apply Pending Operations .
Upon completion of the operation, you will receive a cleaned and healthy volume.
HDD Low Level Format Tool Application
This program allows you to perform low-level formatting - that is, complete and irreversible data clearing at a low level.