How to change the Wi-Fi name
The most convenient way to access the Internet at home is through a wireless network. By purchasing and installing a router, you can enjoy all the benefits of this type of connection. The positive qualities are that there is no need to clutter the room with unnecessary wires, and also that a large number of devices can gain access at the same time.
Wi-Fi is also actively used in public places, all kinds of private and government structures and organizations. This method greatly simplifies the connection; you only need a special module in the device. To configure, all you have to do is select the desired access point from the list and enter the password (if provided).
Not every user is satisfied with the standard name that is issued to the router or router by the manufacturer. For example, when connecting to one of the domestic providers (Rostelecom, MGTS, Yota, etc.), the name may correspond to the name of the company. In this regard, there is a need to replace it so that the network can be more easily recognized and identified.
In addition, the factory network name is often issued with the name of the router manufacturer. Knowing the model and brand of the device, you can easily gain unauthorized access to it, since a standard login and password are used to enter the settings. For example, admin-admin or others similar.
Note! The Wi-Fi connection identifier is SSID (Service Set Identifier). It represents the name of the wireless connection that is displayed on a PC, laptop or other device. That is, the SSID is used to distinguish one access point from another.
Often, the function of changing the connection name is available on all device models. To do this, you need to open the access point settings and carry out a certain sequence of actions.
How to enter the router settings?
In order to access the web interface for the settings of your existing router, you will need to start a personal computer on which you need to open any web browser. In the address bar we enter “192.168.1.1”; on some router models this value may differ.
In order to successfully carry out the procedure of changing the name of your router, you must first find out the manufacturer's brand and preferably the device model. This will allow you to select one of the required instructions.
Instructions for changing the name of a Netis Wi-Fi router
To manually change the name of the access point on the router from , you should:
- We connect the router to electricity, and also ensure that the Internet cable is connected to the router.
- We provide a connection between the router itself and the computer being used by connecting a special cable to the network card of the personal computer.
Reference! In the settings you can also set a password code to connect to your Internet. It is recommended to configure it in cases where there is a possibility that unknown people will use your wireless resources, thereby straining the performance of the router. This is also quite relevant for security purposes.
Manually changing the “SSID” on the router from
Routers from this well-known manufacturer are distinguished by high-quality assembly, excellent signal and a reasonable price. But for some users, setting up such devices is difficult.
Thanks to the algorithm below, even the most inexperienced user can easily change the Wi-Fi name, which is especially important for those who have just acquired a long-awaited router.
- We connect a personal computer or laptop to the Internet from our access point.
- Launch any available web browser and enter the value “192.168.1.1” in the address bar. This will allow you to open the web interface of the router settings, where in the future it is necessary to carry out various manipulations to achieve certain results.
Need for Internet access
All methods of free authorization for the WIFI network in the metro and possible problems
Before you start changing anything in the router settings, it is recommended to check the availability of a connection to the Global Network. The first thing you need to do is check the connection of the device to the power source. After that it should be turned on. Then start the device from which you will connect to the Internet and change settings. Also check its connection to the router.
Next, you can start checking the router’s connection to the Internet. If it is present, then connect the computer and the router via a cable. If the connection is via Wi-Fi, it will disappear after changing the name.
Having problems when changing your name
After changing the name, some problems may occur when connecting to this wireless Internet again:
- Firstly, it may be that when properly connected to a network that does not have a security password, it will display “Unable to connect”. To solve this problem, you can simply set a password and then save the changes;
- secondly, in order to get rid of all sorts of problems after changing the name of the router, you need to select this network and “forget” it.
To do this you will need:
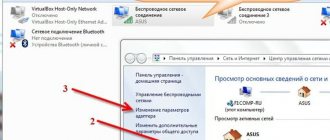
- Open "Control Panel".
In “Start” we find and open “Control Panel”
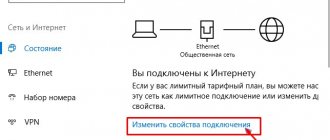
- Go to the “Network and Internet” tab.
In “View” mode, select “Category”, open “Network and Internet”
- Expand the “Network and Sharing Center..” option.
Expand the option “Network and Sharing Center..”
- Next, go to the “Manage wireless networks” item.
Go to “Manage Wireless Networks”
- Select the required network and right-click on it.
Select the required network, right-click on it
- In the menu that appears, select the “Delete network” column.
Click “Delete network”
After this procedure, you should re-search for access points and reconnect to the updated one.
If problems occur with the router itself
you should immediately contact specialists. The best solution is to call a technician from the provider company who will help you understand and solve the problem.
Access point settings
When the connection to the Global Network has been verified, you should begin to make the necessary settings. To do this, from the device that will adjust the parameters, you should go to the router settings. This can be done by opening any convenient browser and entering the network address of the device into its address bar, then pressing the “Enter” button.
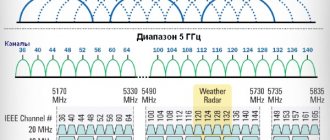
WiFi network SSID - what is it and how to find its name
Depending on the manufacturer of the device, its network address may differ. The easiest way to recognize it is to look at the sticker on the box or the router itself.
Important! The network address may also be indicated in the technical documentation for the device.
Manufacturers rarely change their default addresses, so you can try one of the following:
- manufacturers D Link, Netgear, Qwest, Trendnet, Senao use this set of numbers - 192.168.0.1;
- Tp-Link, Asus, Linksys, US Robotics, 3Com, Dell, Zyxel Keenetic brands use 192.168.1.1 by default;
- SMC, Belkin, Microsoft brands use the address 192.168.2.1;
- only production specifies 10.0.1.1.
There is another way to determine the original address - use the command line of the operating system. Often the address of the network connection gateway and the router are identical. Therefore, to perform the operation, you should perform the following steps:
- Press the “Win+R” keys simultaneously;
- type cmd command and confirm by pressing Enter;
- after opening the command prompt window that pops up, you should install ipconfig.
In the connection parameters that open, you need to find the gateway and copy the value.
Note! On devices from that work with support for the iMac operating system, you will need to open the main menu and system parameters. After that, find the item with network settings, which will have a special section for the access point - Router. The searched access point address will be displayed in the window that opens.
Using additional software
A certain number of routers come with special drivers, which have built-in specialized programs for managing parameters. However, to access them, you will need to enter your login and password information.
Entering login and password data
To enter any settings and menus for changing router parameters, you also need to enter this data. If the password and login have not been changed by the user during operation, then the values presented will be the original factory settings. You can see them on the box sticker, on the device itself, or in the instructions for the device. In addition, the data can be found on the Internet, where values are presented for all models and manufacturers.
Important! Most often, Admin values are used as the login and password.
Entering Wi-Fi connection settings and searching for SSID
When all the necessary privacy data has been entered, you will be entered into the router settings. It's worth going to the wireless network settings. Different brands have different menu item names, so it's a good idea to look for a name related to the wireless connection type.
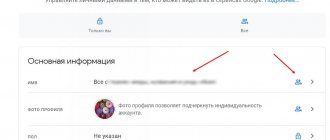
Just like the settings for wireless networks, in the case of SSID, various names of items and lines can be used. You should find something like “Connection name”, “Access point name”, etc. After this, the original name will be indicated opposite, for example, simply “Zyxel”, “Tp Link” or any other.
Entering and saving a new connection name
At this step, you should come up with a new name for the access point. You can be as sophisticated as you like and come up with something completely original to stand out in the list of available connections, which will be available to any user who has monitored the available connections within Wi-Fi range.
When the name is invented and entered into the required line, you must save all the changes made, only then the name can change.
Important! Without first saving, the connection name will remain the same.
To save the name being changed, there is a button with the corresponding name at the bottom of the menu. After all actions have been completed, you should check the steps completed. To do this, you will need to take any gadget and go to the search for available networks. The access point with the recently saved name should appear in the list.
Updating connection settings
It is noteworthy that after the connection name is changed, all connected devices will lose connection to this network. You will need to reconnect each one separately and enter the password.
Changing the name of the router's wireless network
You probably know that the implementation of the web interface depends on the company that produced the router. Sometimes this difference causes difficulties for certain users, since it is almost impossible to find universal instructions. Instead, we suggest that you familiarize yourself with the three different and most popular views of Internet centers from D-Link, TP-Link and ASUS, and then proceed to change the name of the wireless network, taking into account our recommendations.
D-Link
First up will be the web interface from D-Link. This is due to the fact that the manufacturer tried to adhere to general standards and made a minimum number of changes to the structure of the settings menu that is familiar to many. There are two options for changing the Wi-Fi name in this web center. The first is to launch the Configuration Wizard and looks like this:
- After authorization, we advise you to change the language to Russian to avoid further misunderstanding of the names of menu items.
- Then, through the “Get Started” section, click on the “Wireless Network Setup Wizard” line.
- Select the “Access Point” operating mode and proceed further.
- Now give the access point a name. This parameter is called SSID.
- All that remains is to select a security mode, specifying a password if necessary.
- Once setup is complete, make sure the SSID matches what you want, and then click “Apply” to save the changes.
When using the Wizard, you will have to go through the entire configuration process, which does not always suit the user. There is also a separate section in the Internet center where you can change only the name of the network, which is what we propose to do.
- Through the left panel, move to the “Wi-Fi” item.
- Here, in the first category, change the SSID to the required one and save the setting.
- If we are talking about a client access point, then exactly the same editing occurs in the “Client” menu.
If, after applying the changes, the network still has not changed its name, it is recommended to simply reboot the router to update the settings. This can also be done via the web interface or by pressing a button on the case.
TP-Link
TP-Link is one of the most popular network equipment manufacturers in the world. Their presentation of the router in the latest firmware versions is similar to D-Link, however some users may still have problems finding the setting to change. The first option for setting the Wi-Fi name is done through the configuration module.
- After entering the settings, in the left panel, click on “Quick setup”.
- Begin this procedure by clicking on “Next”.
- Oh and move on.
- Set the WAN settings according to the instructions provided by your ISP. Correct execution of this setting is mandatory, which is the peculiarity of this option.
- The next step is called "Wireless Mode". Here, set the network name and set related parameters according to your needs.
- When the settings are displayed, make sure they all have the correct values before saving your changes.
The disadvantage of this method is that it requires you to go through the entire configuration process, including WAN settings, which in many cases is simply not necessary. Then you should go to the advanced settings, where the Wi-Fi name is changed.
- Through the left menu, open the “Wireless Mode” section.
- There, change the “Wireless Network Name” value and save the changes.
- Exactly the same settings apply to the guest network.
ASUS
Today’s guide will conclude with a presentation of the ASUS router’s web interface. It is the most unusual of all, which is why it was included in this article. After logging into the Internet center, owners of routers from this manufacturer should perform the following actions:
- As usual, let's start with a quick setup. There is a special button in the menu for this.
- After launching the module, click on “Create a new network”.
- The connection type should be determined automatically.
- When setting up a wireless network, give it a new custom name and click “Apply”.
In the manual mode of changing parameters, this process will take much less time, and we will not touch all other settings.
- You can directly select an access point in the “Network Map” category and change its name. If this does not suit you, through “Advanced Settings” move to “Wireless Network”.
- Find the item responsible for the name and set it again.
- After applying the settings, check the current Wi-Fi name to ensure the configuration is correct.
Now all you have to do is set up to change the Wi-Fi name by choosing the most appropriate guide. There are no restrictions on this operation, so you can change the name as many times as you like.
We are glad that we were able to help you solve the problem. Add the Lumpics.ru website to your bookmarks and we will be useful to you. Thank the author and share the article on social networks.
Describe what didn't work for you. Our specialists will try to answer as quickly as possible.
Change in different models
How to determine the name of a computer by IP on a local network
In one case or another, the settings will be different.
TP-LINK
One of the most popular brands. Changing the name is done as follows: open Wireless, then enter a new value in the Wireless Network Name line. Save all changes.
Asus
In the settings, go to the “Wireless Network” tab, then change the value in the SSID line. Click "Apply".
D-Link
You should go to the “Wi-Fi Network” section and select “Basic Settings”. In the pop-up window, in the “Access points” item, click on the name of the current one. Enter a value in the SSID line and save.
ZyXEL
In the Wireless section, find the Wireless Network Name field and enter a new name. Save the parameters with the Save button.
Tenda
You should complete the following sequence: Advanced - Wireless - Wireless Basic Settings - SSID. Save the result.
How to change the Wi-Fi network name
To change the SSID name:
- Open the router control panel.
- Select “Wireless” or “Wireless Mode”.
- In the “Wireless Network Name” line that opens, replace the old name with the new one.
Access point setup diagram
New settings must be saved without leaving the program until the saving process is completed. To save, just click “Save”. The router must be rebooted, reconnecting all devices using the network to it.
Important! Before changing the name of the Wi-Fi network, be sure to write down or remember the new password. It must consist of English letters and numbers, as well as symbols.
If the router accepts a password written in Russian letters, there is a high probability that it will display the network name incorrectly, for example, using hieroglyphs.
Changing the access point
How to change the name of the Wi-Fi network (SSID) on the router?
Each Wi-Fi network has a name, the so-called SSID (Service Set Identifier) network identifier. This is what makes a wireless network different from another network. Sometimes this name is hidden to further protect the Wi-Fi network, or for some other reason. But as a rule, when setting up routers, people simply leave the standard name of the Wi-Fi network.
You can open a list of available networks on your computer or phone, and most likely you will see that most networks have names like “TP-LINK”, “ASUS”, etc. They may differ in numbers or some letters. In principle, it doesn’t matter what your network is called. This doesn't affect anything. But you can come up with an original name for your network and be different from your neighbors. For those who want to change the name of their Wi-Fi network, this article will definitely come in handy.
Now we will look at changing the wireless network name (SSID) on routers from different manufacturers. Everything is very simple there, the SSID is set on the wireless network settings page. Finding it in the router settings is not at all difficult. Let's take a closer look at the example of TP-LINK, Asus, D-Link, ZyXEL, Tenda and Netis.
After changing the SSID, you will need to reconnect all your devices that were previously connected to Wi-Fi. By specifying the password for your network.
Indicate the name of the network in English letters. You can use numbers and different symbols. The router will most likely allow you to set the name in Russian letters, but it will not be displayed correctly on devices. I checked on the Netis router, on the laptop the network name was displayed in some kind of “hieroglyphs”.
How to connect to the router
In order to connect a laptop, personal computer or other device to the Internet via Wi-Fi, you need to connect to a router. To do this on a laptop, you need:
- In the bottom panel of the work area, find the “Network and Internet” icon. Let's open it.
After completing these steps, the device you are using will successfully connect to Wi-Fi.
On a note! However, some users may experience various problems connecting to the existing network after changing their name, password, or setting any parameters.