The task of scanning a photo to a computer from a scanner (tablet or HP or Canon MFP) is not difficult. But for people who have not previously dealt with scanning photographs, and especially old ones in poor quality, it can cause difficulties. The main misunderstandings regarding: the required programs, the correct execution and order of steps, settings. The main option is the optimal extension with which you need to make a scan for high quality and acceptable size of the scanned document.
From this manual you will learn how to prepare the equipment, what programs and how to use it. Find an overview of the capabilities of the Windows 7, 8, 10 operating system for obtaining digital copies of images. As well as advice from professionals and video instructions.
List of preparatory work before scanning
An important point in working with any office equipment is proper preparation for the immediate process. Scanning photos is no exception. To ensure that the device is working properly, you should perform several simple steps to check and make preliminary equipment settings.
- If you have not previously used your printer to obtain scans of documents, then it is worth finding out for sure whether it can perform such tasks. A regular device doesn't do this. What you need is an MFP (multifunctional device) that is equipped with a flatbed scanner.
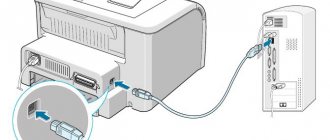
- Check the quality and availability of connection with your computer or laptop. Problems often arise if the connection is made via WiFi or local network. A more reliable connection between a PC and a scanner works via a USB cable. If you can choose the type of connection, use the latter method.
- Sometimes the user even simply forgets to turn on the equipment to the network. In addition to connecting to an electrical outlet, you need to “activate” the device by pressing the corresponding button or switch on the scanner body. Note that after “booting up” the device, the indicators should stop blinking, and only one remains lit. In 99% of cases it is a green LED.
- When you plan to use an MFP for scanning that previously only printed, you may also need to install software for the scanner. Alas, without this program it simply will not work. You can download drivers on the equipment manufacturer’s website, indicating the exact model name from the label on the case.
Rapid Scanner
Rapid Scanner is another very useful and easy-to-use Android app that allows you to scan images, documents, or anything written on paper with ease. The app takes a couple of seconds to detect the whole thing, and once it's done, you can do whatever you want with the image, from scanning to converting to PDF. Some of the useful and highlighted features of Rapid Scanner are:
- Optimized for fast scanning.
- Easily share, delete, rename scanned file.
- Sort by name and date.
- Barcode reader.
- There is no watermark in Pro version.
- Auto-detection of document boundaries.
- Print using cloud printing.
- Various filters, effects and modes when working with a scanned image.
The app comes with an automatic edge detection option, which means you don't have to select an edge every time you scan a document. Obviously, you'll be able to choose how much you want to scan, but if you want to capture the entire document or photo, you don't need to set the edges. This is a very convenient feature that greatly simplifies the process of using the program.
Speaking of price, you can download this app for free on Android starting from version 4.1. However, if you want to unlock all the features of Rapid Scanner, then you can purchase the PRO version, which costs $0.99. And that's quite a bit.
We use the capabilities of Windows OS to scan photos
The Microsoft Windows operating system has a built-in tool for obtaining digital copies of documents and photographs. If the connection of the equipment is successful, then follow these instructions:
- Go to the “Devices and Printers” section of the system. This can be done through the “Start” button or in another way known to you.
- From the list of equipment that you see, find your scanner. It may be located below the list of printers.
- Mark it with the left mouse button, and then right-click to open the context menu.
- From it, select the “Start scanning” line.
- Now a window should load where you can select and specify the desired photo digitization settings.
- Available options include: color and black and white formats, resolution, contrast, brightness. The most important thing is the file type.
- Use the Preview button to see what the scan result will look like.
- If there are no “claims”, then to receive a scan of the photo in the selected format, click on “Scan”.
Programs for scanning to a computer
ABBYY FineReader
One of the most popular and widespread programs for scanning and recognizing text in photographs. Supports work with more than one hundred and fifty different languages. The utility is easy to use thanks to its intuitive menu and toolbar design.
Paint
- Through a search in the “Start” section of your “computer” or laptop, find the “Paint” program. Launch it.
- In the main menu at the top of the utility window, expand the “File” item, and in it click on the line “From a scanner or camera.”
- A window with preliminary settings for scanning options will open. You can change it at your discretion and requirements. When scanning photos, the first option, “Color Image,” works best for us.
- You can also make a preview here.
- To directly receive a scan, click on “Scan”.
- At the end of the process, the result will be loaded directly into the Paint program.
- You can change everything you need in it. The standard Windows GPU has a small set of tools, but it has everything you need for simple tasks.
- After making the necessary changes (adding inscriptions, rotating the image), the result of your work must be correctly saved on the computer’s hard drive.
- To do this, open the “File” section, expand the “Save As” section, and in it select the PNG format for high-quality photos or JPEG for a smaller option.
VueScan
Supports work with a large number of different models of scanners and MFPs. Allows you to save scanned photos in different graphic formats, including: png, tiff, jpeg, pdf. The main advantage of the utility is its support for the OCR function. The available settings allow you to achieve a higher quality of the final result.
CuneiForm
A great free alternative for scanning and OCR. In addition to photos, it can detect different fonts and tables.
ScanPapyrus
ScanPapyrus is the main tool for scanning a large number of sheets or books. It is also often used to digitize photos, often very old ones. What the utility does very well. Correct settings of this software will easily speed up the process. The first thing to consider is that the photograph does not take up the entire area of the glass, but scanning takes place over the entire surface. To do this, in the “Scanner selection” menu, in the “Scanning area” subsection, select A6 format. It most closely matches the most popular photo size - 10 by 15.
- Now open the scanner lid and pay attention to the format markings. Find the marks of area A6. If there are none, then the angle to which the arrow on the edge of the glass points can be considered as the beginning of the scanner’s stroke. Most likely it will be in the upper left corner.
In the options, disable “Auto-crop” - we don’t need it anymore.
- To ensure that the color shades in the final result do not change when digitizing a photo, you should disable contrast “adjustment” in the program settings. Auto contrast is best used when scanning text, but is not recommended for images.
The entered options for the values of the required parameters can be saved so that you do not have to configure ScanPapyrus again when using ScanPapyrus in the future.
- Another important point is scanning resolution. In the panel, select the “Excellent” option, which is equivalent to a value of 600 dpi. Select the values in the “Color” field depending on the color of the original photos.
- After completing the setup, you can proceed directly to the process of obtaining digital copies of photos. If you need to scan more than one photo and save it to your computer, it is better to use the streaming mode. This will save you from having to click the Scan button for each photo. The user’s task is to have time to change photos in the scanner. Stream scanning settings are specified separately.
- After all the images have gone through the scanner, the process will automatically complete. The results of the work can be seen in the program window. They can be adjusted if necessary. The editing panel is located to the left of the images.
- To save in the desired format, use the keyboard shortcut “CTRL+S”. Here it is also possible to change the parameters of the “behavior” of the disk recording algorithm.
Printer software (HP, Epson)
Equipment from any well-known brand is equipped with its own proprietary utility for working with the scanner. You can install it immediately with the drivers on the device or, if necessary, download the program separately.
- Epson Scan - used with different models of scanners and MFPs from this company. The toolbar will allow you to customize digitization individually to the needs of each photo.
- HP Scan is a similar solution for devices of this American brand. The design of the utility differs from those discussed earlier. But the list of functions is the same.
CamScanner
CamScanner is another great Android app that is available for Android 2.0 and above. CamScanner is much smarter than most applications in the same category and hence you will get much more features when using this program. Whether you have an old photo, some document or anything else that you would like to digitize, you can certainly scan and save it in PDF format on your mobile phone.
Both a free version of the application and a paid one, which costs $1.99, are available for download. The program also supports cloud storage, which means that you can save the scanned file to Dropbox, OneDrive, etc. If we talk about the quality of the scan, there is no doubt about the quality, of course, if you have a good camera on your phone.
Another important feature of this app is that you can extract text from an image. If you only need to cut out some text from an image, then you can use CamScanner, which does an excellent job with this function. However, this feature is only available in the paid version.
Adviсe
- To scan old photos, it is better to use a flatbed scanner. We do not recommend using a top-loading device for such purposes to avoid damage to the original photographs.
- To obtain images of higher quality display and color reproduction, it is better to use 24-bit color. This will be optimal for matte and glossy photos.
- If after scanning you notice that the image is rotated incorrectly, then you should not adjust its position using software. It is better to scan the photo again in the desired orientation.
- It is better to adjust the saturation options before digitizing rather than after it. It’s worth “playing” with this parameter when the original photos are already of very poor quality (faded or burned out).
- If you need to obtain scans of a large number of photographs at once, you should group them according to common characteristics. Such actions will help save time on making adjustments for each photo.
- Correction, if necessary, is best done in professional programs. Such as Photoshop or Gimp.
- If you still have film with photographs, inquire about the availability of devices in your city that can scan from it. This way you can get higher quality pictures.
TapScanner
TapScanner is a simple Android app that you can use to scan documents, images, or anything else in just a few seconds. The application has features such as automatic edge detection, text recognition, and a document manager. There is no need to mention that you will be able to convert a scanned document to PDF using this tool. Also in TapScanner you can extract text from an image and use it in the future. However, not all features are available in the free version; for the full version, you must purchase a license for $4.99 per month or $19.99 per year.
These are some of the best photo scanning apps for Android. We hope they help you.
Also reading with this:
- 9 Best Android Games for Girls 2020 Android and iOS games are the best way to pass the time and also help reduce stress and keep you refreshed. In this article, we will look at the 9 best Android games for girls that you […]
- Types of Android Apps You Should Avoid Installing Google Play is a great place for budding mobile app creators. Here they can present their products to the world, but, unfortunately, not all developers have good intentions. […]
- Best Strategy Games for Android Strategy games are ideal for those who are leaders at heart. They can turn you into a battalion commander, a mayor, a restaurant magnate, an amusement park owner, or even […]
- Great Games to Play on Android TV Android TV is a platform that is slowly but surely breaking into the video game market. This is evidenced by the games that are becoming more and more available for this platform every […]
- Applications for travel lovers If you are an avid traveler or are just thinking about going to see other countries and cities, be sure to take a look at one or more applications from […]
Applications