Saving Microsoft Office Word is one of the main functions of the program. This is an action in which typed text is converted into a media file, which, in turn, can be stored and viewed on a computer, as well as moved to other media and transmitted over the network. Fixing data is necessary in order not to lose the changes made when editing the document. It is advisable to use this function as often as possible - this will reduce the risk of data loss when the program or computer is turned off.
There are two types of recording a media file in Word:
- “Save” - Using this function while editing, you will update the document so as not to lose your progress. This is necessary when working with one text.
- “Save as” - a new document will be created, which will be a copy of the current version of the original. The source, in turn, will remain untouched.
There are many ways to protect text from loss, which differ in complexity and functionality. They are united by general recommendations for use:
- Do this before exiting the program. When you close the editor, a window appears asking you to commit the changes. The answer options are “Yes”, “No” and “Cancel”. When you press the first button, the text will be written (the computer will prompt you to select a name and directory), but users often make mistakes and click “No”. In this case, the document will simply close and everything will be lost. Clicking “Cancel” will not close the program and you will be able to continue working with the file.
- Record changes as often as possible. This will prevent accidental loss of a large amount of entered data due to accidental closing or malfunctions with the program or computer.
- Record text in a format that is suitable for later use. For example, if you plan to view and edit in older versions of the program or on other devices.
- Before sending a document to a friend, use the “Document Inspector” - with this function you can remove confidential information and increase the security of use.
- Do not save two documents of the same format with the same name - only the last one will be recorded, and the first one will be deleted.
Word document name and format
The name consists of two parts - title and extension. When you first save text in Word, you can specify them in the form “Name.docx” (name before the dot, format after). This feature is available when using any method of committing changes. In addition, you can specify the data after re-editing by clicking “Save As”. The media file with the new name and extension will appear separately. Use a format that is suitable for all devices on which you plan to read and edit the text. The most universal for Word is .doc
First save (creation)
Every Word user should know how to create a document in it. This is quite easy to do - there are 3 ways:
- Click “Save” or “Save As” the first time you edit a new media file;
- Press Ctrl + “S” - this function duplicates the first one;
- Try to close the window - the program itself will offer to commit the changes.
Regardless of which option you use, a recording window will appear. You can select the directory and name. Configure these settings as required.
Saving as a template
To prevent changes to the original data record, but make another file based on it, make a template:
- Open the desired text;
- Go to "File";
- Click “Save As”;
- Select "This PC" and location;
- Enter the title of the text;
- Select the "Template" format;
- Save.
This way you can use a Word document as a source when creating a new one. To do this, open a text editor and click "New" - "Create from existing".
Saving a document in Word 2003
So, you typed the phrase “ A very necessary article
“, now, at the top of the Word window, click the File menu button, and in the menu that opens, select
Save as....
Rice. 6
In the Save Document
you see the name of the folder (My Documents) in which Word offers to save the new document. Under the folder name we see a list of documents already available in that folder. Instead of the suggested folder, you are on your computer. The main thing is don’t forget where you saved it!
The computer also suggests a file name, but you can immediately replace it with another one. File Type: Word Document should remain this way. In the future, to open a document it will be enough to click on the title of the article, and it will open immediately in the Word window. There will be no need to launch Word first! Now click the Save
and the document is saved!
How to burn to CD
In order to write text from Word onto optical media, you need to:
- Place the media in the drive for recording;
- Select one of the options - “Recordable CD” or “Rewritable” (the second allows you to repeatedly record and erase information);
- Click “Start” - “Computer” and click on the arrow next to this item;
- A list of available drives will expand;
- Transfer certain media files to the one you select;
- Click “Burn disc” and “As a USB flash drive” or “With a CD/DVD player” - depends on the desired requirements;
- Make a name for the disc;
- Next, do everything according to the instructions on the screen.
Tips for burning text to CD:
- Do not try to fit more data onto the media than is allowed. The capacity of the disk is indicated on the packaging (and sometimes on the disk itself). If the media files are large, it is better to save them to a DVD with the ability to record and rewrite. However, not all versions of Windows work with DVD copying. You will have to use special programs.
- Make sure there is enough space on the media to create temporary media files that are required for proper recording. A standard disk in Windows requires up to 700 MB, faster disks require up to 1 GB.
- After the copying procedure is complete, check the media to ensure that the data was transferred and saved.
How to save to USB drive
This recording option is needed when you need to transfer text to Word - especially if the other device does not have access to the Internet. To do this you need:
- Insert the USB device into the port;
- Click "File";
- Select "Save As";
- Select “Computer” or double-click on “USB drive” in “Devices with removable media”;
- Enter the title of the document;
- Click "Save".
How to record with remote access
Recording data online is a convenient way to store data because it can be accessed in different places. It is enough that the computers are connected to the network. To do this you need:
- Open file";
- Click “Save As”;
- Select a network folder;
- If it is synchronized with your computer, indicate it in the list in the “Computer” area;
- You can also start typing the folder name in "File Name" and press Enter;
- Enter the name of the file you want to record it with and click “Save.”
How to save to SharePoint
Algorithm:
- Open file";
- Click “Save”, send and select “Save to SharePoint”;
- Select a location for recording, click “Save As”;
- Confirm the entry in the dialog box.
How to write to OneDrive
Algorithm:
- Open file";
- Click “Save to website”;
- Click “Sign in”, log in using Windows Live ID, click “OK”;
- Select the OneDrive folder, click “Save As”;
- Enter a file name and make a recording.
The document will become available in OneDrive. You can grant other users viewing or editing rights. To do this, share the folder link with them.
How to save a document in Word?
Before directly recording the file you created, let's decide how it will be used in the future. So, for example, if you are using the most current version of the program today, and also do not have the need to open this file using older versions, then follow the following instructions:
- In the very top left corner of the toolbar, find the File menu item.
- Select "Save As" from the submenu, then click the "Browse" button - a save window will open in Windows Explorer.
- Find the required folder in the desired window or create one.
- Enter the desired file name.
- After that, just click “Save” without changing other parameters.
How to make it open in older versions of Word
The ".docx" format, which is the default format in modern versions of Microsoft Office, cannot be used in Word 2003 and earlier programs. It can only be opened if a special compatibility pack is installed. In order to avoid downloads, just write the text in “.doc”. However, in this case, formatting applied using Word 2010 and newer tools may become unavailable. In order to write to “.doc”, you need:
- Open file";
- Select “Save As”;
- Enter the file name, click “Save”;
- In the drop-down list, specify the extension “Word 97-2003 Document” and change to “.doc”;
- Enter the document name and confirm.
Autosave in Word
To set up autosave, which is a fairly useful function in general, you should...
In word 2003, go to the top menu of the program “service - parameters - save”. There a window will open in which you can configure autosave settings, whether to create a local version of the file, and in what extension to save.
In Word 2007, click the circle at the top of the window - then at the bottom of the window that opens on the right there will be an item “Word options” - click on it. The following window will open:
On the saving tab we will see the following item: saving documents. It will ask you to select the format in which to save documents, after how many minutes to auto-save (from 1 to 120 minutes), as well as the default file location and directory location for auto-recovery.
If you are too lazy to deal with autosaving, then you can always install a power supply. Now there are a huge number of them, assembled according to different principles and for different numbers of sockets. Although you only need one for the extension cord.
Once you spend money, you don’t have to worry about power outages. However, even an uninterruptible power supply will not protect against computer freezes - so do not forget to periodically press ctrl+s when working in any office programs.
And at the end of the article there is a small bonus, the answer to the question:
How to record in an alternative format
If you need to record data for users who may open and edit it on computers with other capabilities, you can choose an alternative extension. This also allows you to regulate the functionality of the file itself - for example, make it unavailable for modification. Most often used:
- PDF and XPS to restrict editing and allow viewing only;
- Web page extension for viewing text in a browser;
- TXT, RTF, ODT and DOC - for working on computers or in programs with limited functionality.
How to write to PDF or XPS
These formats are the most accessible and popular for limiting editing. The recipient of the document will only be able to view the content. To make this setting, you need:
- Open file";
- Select “Save As”;
- Enter the name of the text in the appropriate field;
- In the file type selection list, select PDF or XPS;
- If viewing will only be online, you can reduce the size - click “Minimum size”;
- If you need to partially record text, include recorded edits, file properties, or create hyperlinks, select the appropriate items in “Options”;
- Confirm the changes.
How to save as a web page
This option is suitable for reading in a browser. It doesn't transfer text layout. You can record it either as a regular HTML page or as a document that combines all media files (MHTML). For this:
- Click "File";
- Select "Save As";
- When publishing, find the server name and click on it once;
- Enter the file name;
- In the “Type” field, specify “Web page” or an alternative – “in one file”;
- Confirm the changes.
Save the document as "Web Page with Filter"
In most cases, the "Web Page with Filter"
is the best way to save a
Microsoft Word
as a web page.
It preserves the format and content of your document, but discards a lot of extra "HTML"
that you simply don't need, resulting in a smaller file size.
What you end up with is the cleanest code file that has the fastest loading time for your web page out of the options available. Microsoft Word-
specific formatting from the resulting document .
Therefore, you should only select this option to save a web page if you do not plan to convert the page back into a Microsoft Word
. To be fair, it should be noted that such a need occurs extremely rarely.
In the File Type
in the
“Save Document”
, select the
“Web page with filter (*.htm; *.html)”
.
Then click the "Edit"
, located immediately below the
“Heading”
.
In the “Text Entry”
Enter the name of your web page, which will appear in the title bar of your web browser, and press the
OK
or the
Enter
on your keyboard.
Then in the “Save Document”
click the
"Save"
.
A box will appear warning you if you are sure you want to convert the document to an "HTML file"
because saving will remove special tags and features specific to
"Microsoft Office"
.
Confirm your choice by clicking the "Yes"
.
You will now have the web page saved in the location of your choice. You can open it in your web browser to check that it displays correctly, or you can upload it to your website. Default "Microsoft Word"
saves
the “HTML file”
in the specified folder, and all the images contained in the document in a separate subfolder entitled the name of the web page. Therefore, you will need to upload this folder with images to your site along with the web page.
However, as we'll cover a little later, you can change the default document settings in the additional options window.
Saving in simple formats
This option is needed in order to write text in a simple extension that can be “read” by almost all editing programs. The simplest of them is “.txt”. You can also select ".rtf", ".odt" and ".wps". It is important to note that using them may result in formatting and layout being lost. Use extensions only when the text itself is important, not its properties. For this:
- Open "File";
- Select "Save As";
- Enter the name of the text;
- Select the media file type - one of the ones described above;
- Confirm the changes.
Saving errors
There are several ways to save text to your computer. Let's talk about how not to save. By the way, it would be more correct to say not saving the text, but saving the document .
Many people do not save the text (document) while working, but do it at the end. The fact is that when you try to close the Word program, having already typed something in it, a window pops up in which the computer “asks” whether to save the changes.
If you click on the “Yes” button, the computer will open a new window in which you need to select a location for the document, give it a name, and then click the “Save” button.
If you click on the “No” button, the computer will close the Word program along with the text, and you will no longer be able to open it. That is, the text will disappear forever. And if you click on the “Cancel” button, the computer will leave the Word program open along with the printed text. Thus, the program gives you the opportunity to correct something, change the text.
But it’s better to save it in another way. And not at the very end of working on the document, but from time to time. The fact is that there is a possibility of losing the document. For example, a power surge or a computer freeze. If this suddenly happens, your text may not be saved on the computer. This means you will lose it. By the way, this applies not only to Word, but also to any other computer program (Paint, Excel, Photoshop, etc.).
How to save progress if Word freezes
Often, especially on “weak” computers, problems with programs occur. Failure of Word may result in you losing the data you entered recently. There are three ways to try to recover text after a program or computer crashes:
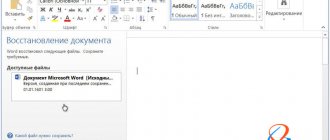
- Call the task manager (Ctrl + Alt + Delete) and “End task” Word. Most likely, the system will ask whether to record the changes. The document will open again in a few minutes and will include the latest data.
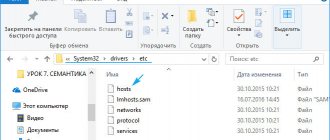
- If the work session was terminated incorrectly, you can find the data in the temporary folder C:\Documents and Settings\UserName\Local Settings\Temp. This includes copies of documents that were not recorded properly. So, even when you turn off the computer, there is a chance to return the text.
- Put your PC into Sleep Mode. After this, “wake up” him. The method helps against freezing.
Create a new document
Make sure that you have purchased a licensed version of the MS Office software package or MS Word separately. Now let's create a new document. Navigate to the folder where you would like to store your work files. In this folder, hover your mouse over an empty space in the Explorer box and right-click. A context menu will appear where you will need to select “Create MS Word Document”. The file will be created in this directory, after which you can open it by double-clicking the left mouse button or single-clicking and then pressing the Enter key. Thus, you can use this method even before you learn how to save a document in Word.
There is also another way to create a new Word document. To do this, open the Start menu on the Windows taskbar and launch MS Word. The program will start, automatically creating an empty document in a temporary folder for current tasks. In order to have access to this file after closing the program, you will need to write it to disk.
Autosave Word
This option works by default in the program - the document is recorded every 10 minutes. However, when working with an important document, it is better to make sure that there is no risk and check the box next to the autosave function. Additionally, you can change the interval. The function is needed for computers that are often turned off - this way you will not lose the text that was entered before the next time of recording. To enable and configure:
- Click “File” - “Options” - “Save”;
- Make sure that the checkbox next to “Auto-save” is checked;
- Set the desired progress recording interval;
- Click OK.
To remove autosave, follow the same path and uncheck the box in the menu.
How to properly save a Word 2007 document?
1 way
:
In the open document window, press the F12 key
or use
the keyboard shortcut Shift+F12
.
This works well the first time you save a document. The Save Document...
dialog box appears. The My Documents folder is suggested by default.
You can choose any other folder to save (see Fig. 1
)
Figure 1. Saving documents in Word 2007
Tip
1
: to change the default folder for saving files, follow the sequence of commands: “Office” button -> Word Options -> Saving -> Default file location. Select the folder you need.
Method 2
:
In the open document window, on the quick access panel, click on the “Save” button (if it is there) (see Fig. 2
)
Figure 2. Saving documents to the Quick Access Toolbar
3 way
:
1. In the upper left corner of the open document window, click on the “Office” button.
2. In the menu of typical commands, select the “Save” button.
Whatever method you choose, the “Saving Document” window will open, in which you need to:
1. In the “File name” column (at the bottom of the window), immediately type the desired name of the document to be saved - the window in this column is automatically highlighted, and the text of the name will be entered here (see Fig. 1
line Filename).
Note
.
Typically, the Word 2007 program itself offers the first line of the document as the title, or, if the page is still empty, the conditional name “Doc N” (where N is the serial number of the document since the next start of the program) (see Fig. 1
lines File name and Type file).
Tip 2
: Name your document in a meaningful way.
After all, it is by this name that the document will subsequently be searched for its opening. The document name can be up to 255 characters
and must not contain the following characters: * ? ” / ; : |
2. After creating a name, you need to select a location for placing the document on your computer. When you save for the first time, Word 2007 automatically suggests placing the file in the “My Documents” folder or in the folder that was specified in the program settings as the save folder (read Tip 1
).
3. If these saving addresses for a given document do not suit you, in the “Folder” line you need to enable the structural tree and select the one you want to save from the list of drives.
Note
. You can also use the left pane of the Save Document window and select Desktop, My Documents, or My Computer to save.
4. After selecting the drive in its window, open the folder where the document will be placed. If there is no folder on the disk suitable for saving, click on the “Create folder” button on the panel of the save window.
5. In the “Create Folder” window, enter the desired folder name and click on the “OK” button.
6. In the “File type” column, the default value is “Word Document”. If you are saving a document for future use in Word 2007, it is recommended that you keep this file format setting. All methods for selecting this format are described in the following instructions.
7. After typing the document name and selecting the save location, click on the “Save” button in the lower right part of the window or press the Enter key on the keyboard.
Note
.
the Shift+F12
keyboard shortcut or the “Save” button on the quick access panel, all subsequent changes made to this document will be automatically saved to the save address you specified for the first time.
It is necessary to save the document as often as possible - every 5-10 lines from the beginning of work, without particularly relying on autosaving, so as not to lose the work done if the computer malfunctions. Don’t put off saving until the very last moment of working with the document!
Subscribe to "site" channels in
T amTam or join in
Doc - this is an outdated text file format. Previously, it was actively used by all users of the popular text editor Microsoft Word(). However, the developers of this program changed this format to docx in 2007. Many users have updated their software to the new version, but there are still those who in their work prefer the old version, which does not recognize the new format. What to do if you write text in a new program, but they will view it in the old one?