Adobe Lightroom
Platforms: Windows, macOS.
Price: from 644 rubles per month.
A professional application used for both retouching and organizing photos. The ability to organize your photo archive in Lightroom is impressive.
There is a convenient system for importing and exporting files that will allow you to easily add pictures to your collection and sort them into folders. Lightroom also has smart virtual folders, as well as assigning tags and ratings to photos. You can search for images in the archive using keywords, metadata, and file attributes. Lightroom also supports facial recognition.
However, first of all, it is a tool for professional photographers and avid amateurs. For a simple organization of a home photo archive, its capabilities are clearly too much, and it is expensive.
Adobe Lightroom →
Cataloging of photographs
At work, I often have to deal with the task of structuring large amounts of information, including photographs.
This article describes the general principles of creating a photo catalog and examples of its implementation based on Lightroom.
Photo by dfulmer If we have a lot of something, we need a catalog to sort it all out. If you come to the library, then finding the book you need can be done either by searching through all the books or by searching the catalog. If he is. The same with photographs. You can often hear - I don’t need it. I'm not a professional, I'm an amateur. Indeed, if you need to view 300-500 previews, this is not a problem. But the archive of photographs somehow imperceptibly quickly grows to tens and hundreds of thousands of photographs. And the situation with the library is repeated. Even placing photos in separate folders by trip or date will only partially solve the problem. Try to find in such an archive, for example, all the photographs of horses that you took in different years. Do you think you remember all your photos by heart? This is most likely not the case. Metadata The basis of any photo catalog is metadata. This is what we call data about data. In relation to photographs, this will be data invisible in the picture that accompanies the photograph. This includes the date of shooting, the model of the camera with which the photo was taken, information about the owner of the camera, and keywords describing the image. The cameras don't yet know anything about the subject of the photo. At least they don’t enter keywords automatically. This is the photographer's job. The question immediately arises: how labor-intensive is this? Before answering this question, let's talk about the workflow. Workflow and catalogs The concept Workflow is often understood as photo processing. But this is a very narrow definition. The workflow is all the steps between getting the initial images (input) and getting the finished result (output). And the correct organization of the work process means saving time and money, and a better result. When it comes to cataloging, there are many programs that allow you to organize it. This is Aperture, and Extensis Portfolio, and iView, and Photo Mechanic... Perhaps one of the most common is Lightroom, and you can consider cataloging using its example. However, the basic principles can be implemented in any of these programs. Perhaps the main task is to quickly find the photos you need. Let's imagine that we have one disk (partition) with photos. All our photos are there. Then we have another disk (partition) on which lie - a directory (say, an SQL database) - preview files of our photos. With this structure, we can always say where, on what physical media our photographs are located, and where our catalog is. Possible directory organization scheme :
Each shoot is copied into our photo storage by importing images and immediately placed in the catalog.
We then add keywords and ratings to the photos. Often, basic image correction is performed along with the ratings. After which our photographs become a full-fledged part of our archive. They can be filtered by condition, collected in collections, etc. Naming Files Cameras name photo files with a letter prefix and a sequential number. This name contains almost no useful information. Moreover, these names may be repeated. It is advisable to change the file name during import to something more meaningful.
Rules for composing a name: - name length - no more than 31 characters, which includes 3 extension characters. - without spaces. Spaces are encoded differently on different operating systems, so their use in names is not recommended. When you upload files to a web server, you are most likely placing them on a Unix system. And it is very possible that if there are spaces in the name, the files will not be found. In addition to letters and numbers, you can use underscores, dashes, and periods to separate the name from the extension. - all letters are small. If you mix small and capital letters, you may not be able to find your files on some operating systems. Possible naming scheme: - year, month, day of shooting. - a name reminiscent of the subject being photographed. — 4 digits of the serial number. If we are working with black and white copies, we can add bw to the end of the file. If this is a file with layers, then you can add l. And so on. Developing such a personal scheme will allow you to very quickly find files by name. Even if the file is accidentally moved to another directory. Sequence of importing files: - copy files (do not move!) to disk using a pre-created naming template, information about the author, and processing settings. After copying and making a backup copy are completed, the original files from the flash cards can be deleted. At the import stage, it is better not to assign keywords due to problems with words - homonyms. This problem can be avoided later by assigning hierarchical keywords. Thus, the “faucet” as a construction mechanism and the “faucet” as an element of the plumbing system will be perceived by the hierarchical catalog as different concepts. It’s better not to start working in the Previous import mode, which we find ourselves in immediately after completing the import procedure, but to go either to the file structure or make a collection, since some functions (for example, User order) do not work in this mode. It is not advisable to move photo files using the operating system. If you do this, the cataloging program “loses” the photos. To avoid lost files, it is better to make all changes to the location of photos within the program. Photo captions (Caption) Allow you to remind what is shown in the photo. Very useful when filming while traveling. Used by search engines to index images, displaying them at the top of search results. Ratings The idea of setting ratings comes from the way film slides were sorted, when the slides were laid out on a light table, the selected ones were marked with a dot on the frame, from these selected ones a selection was made again and marked with a second dot, etc. The Pick and Rejected checkboxes allow you to perform an initial selection of photos. Ratings from 1 to 5 stars will help you evaluate the success of a photo. Color tags can be used as a way to mark files according to other criteria (panorama for assembly, in a portfolio, for an agency). Ratings 5 and 6 (red flag) are often used to mark the best photos. If we make a Smart Collection with selection based on 5 stars or a “red flag”, we will always have an up-to-date portfolio, which will automatically include the best photos. Keywords LR has done a lot to make adding keywords easy.
It's best to use hierarchical keywords whenever possible. For example, geographical location: Country > Nepal > Kathmandu > Pashaputinah In the case of using non-hierarchical keywords, we end up with a long list of unrelated words - this is better than no words at all, but worse than a properly constructed hierarchical system. In addition, hierarchical keywords are easier to “overlay” on photos. From the previous example: having determined the name of the place Pashaputinah, we simultaneously catalog that it is in Kathmandu in Nepal. Assigning keywords is possible in several ways: - transferring photos to a keyword - transferring a keyword to selected photos - synchronizing metadata - using an “aerosol can” to assign a keyword (words separated by commas), or an eraser to erase words, - highlighting photos and tagging their checkmark to the left of the keyword - start typing the keyword in the corresponding field, and LR will suggest existing options. — adding one hierarchical keyword from the lower level of the hierarchy automatically adds all higher-level words from this hierarchy
Keywords for public (for export) and personal use (public and private). Personal keywords are different in that they are not exported when exporting photos. Often private keywords are used for the names of people photographed, client names and other data that is not always desirable for import, but using these parameters it is desirable to be able to search for photographs in the catalog. Keywords at the highest level of the hierarchy are often not included in the export. For example, the word “country” does not carry any special meaning when exporting. If several types of names of the same entities are used (for example, English, Russian and Latin names of plants or animals), it is convenient to place them in the keyword database as synonyms. Example of top-level keywords: Action, Anatomy, Animals, Architecture, Art, Business, Cities, Clothing, Colors, Concepts, Continent, Countries, Directions, Disaster, Education, Energy, Environment, Ethnicity, Events, Expressions, Food, Gender, Government, Holyday, Landform, Light, Medical, Occupation, Oceans, Plants, Private, Religion, Seasons, Social, Sport, Transportation, Travel, Type, Weather, Wedding, World Location Second level example: Animals -> amphibian, birds, fish , invertebrate, mammals, reptiles. Example of hierarchy: Durbar -> Kathmandu -> Nepal -> Countries. Collections of photographs are selections from the archive, made either manually by the photographer or by condition (Smart Collection). It is possible to arrange photographs in any order within the collection. This is useful, for example, when showing a slide show to a customer. Stacks
For those who take panoramas or series of images (including for HDR), the ability to organize photos into stacks will be useful. A stack will allow you to avoid long “rows” of similar photographs, each of which individually is of no interest. The “Auto-Stack by capture time” mode allows you to automate the assembly of series of photos into stacks. As you can guess from the name, this mode combines photos into stacks that were taken at intervals of no more than a specified time. Can be useful when shooting panoramas and series. Conclusion The article examined part of the photographer’s workflow, namely cataloging using LR as an example. I hope that the sequence of steps described above will make it easier to find your old and current photos. The time spent organizing a managed catalog and assigning keywords will be returned a hundredfold when you subsequently work with the photo catalog.
When writing, materials from the books were used: Martin Evening. Adobe Photoshop Lightroom 2 book. Seth Resnick and Jamie Spritzer. The Photoshop Lightroom Workbook. As well as video courses from the site Luminous-Landscape.com
The article is part of the material from a seminar on digital asset management, which is given by the author at the photo school of the Photoproject company in Moscow.
Adobe Bridge
Platforms: Windows, macOS.
Price: free.
Adobe has another program that is designed to work with a media library - Adobe Bridge. She doesn’t know how to edit photos, but she has more than enough sorting capabilities. Tags, ratings, collections, dates, keywords - there are a lot of criteria.
This is a really high-quality tool that will be useful both for professionals and for those with large photo archives. Bridge was previously part of Creative Cloud and was distributed by subscription, but has recently become completely free.
Adobe Bridge →
How to use
Let's talk about how to install and use the image manipulation tool.
Download and Install
Download the free version of the program using the button at the bottom of the page, and then extract the contents of the archive to your hard drive. To complete the installation, follow these steps:
- Run the program installer and select Russian language.
- Accept the terms of the license agreement.
- Select the installation folder.
- Decide on additional parameters and wait until the software is installed on your computer.
Operating instructions
Once installed, you should launch an application called Microsoft Office Picture Manager. In the main window you will see all graphic materials located in the standard “Images” directory. Using the directory tree on the left, you can navigate through your hard drive and connected drives. The central part displays a grid with photo previews. On the right is a reference block that can be closed to expand the main work area.
Also watch: Activator for Office 2020
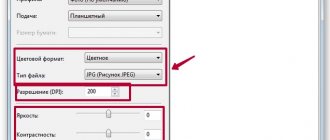
Go to settings and select the options that are comfortable for you. The quick access panel is located on the top line of the main window by default. Through the context menu you can go to the built-in picture editor. After this, a panel with settings will appear on the right. You can enable automatic adjustment or change the indicators manually:
- brightness and contrast;
- color;
- pruning;
- rotation and reflection;
- red-eye removal;
- resizing and compression.
After applying the tools, the result will appear in the “Unsaved Changes” branch. Go to it and select the save option. Specify the file name and format, and select a folder on your hard drive.
Corel AfterShot Pro
Platforms: Windows, macOS, Linux.
Price: 6,300 rubles.
A package for processing and sorting photos from a competitor of Adobe. The application will help you create a neat folder structure that will be easy to understand. Photos here are easily filtered by metadata - ratings, keywords, dates, tags are supported.
In addition, AfterShot can be used for photo retouching - optimizing lighting, contrast, color and other parameters. The application interface is somewhat overloaded with elements, but you can get used to it quickly.
AfterShot →
ACDSee Photo Studio
Platforms: Windows, macOS.
Price: from $59.99.
An extremely popular and time-tested photo cataloger. There are a lot of possibilities for organizing a collection of images: categories (both predefined and created manually), ratings, tags, keywords and geotags. If you are unaccustomed to all the features of ACDSee, you can even get confused.
Batch processing, sorting and renaming files will allow you to bring order to even the largest photo archive in a few minutes. There are also advanced editing tools: cropping, retouching, eliminating defects and noise, filters.
ACDSee Photo Studio →
Top photo processing programs
We have reviewed the TOP photo processors; you just have to decide which application to choose. PhotoMaster , Home Photo Studio and Movavi Photo Editor are some of the best photo editors, boasting the perfect combination of advanced functionality, as well as a simple, user-friendly interface. You will find all the necessary tools that allow you to process images, apply unique effects to them and save them in any popular format. It is worth noting the excellent photo cataloging tool Photo Manager from Movavi , with which you can quickly bring order to your photo gallery, get rid of duplicate pictures and distribute your favorite pictures into separate albums.
Photoshop Lightroom is one of the most famous editors today. Its obvious advantage is not only a huge range of filters and special effects, but also the accessibility of the interface. The built-in tools can be easily used not only by an experienced artist, but also by a beginner. However, working with photographs in LR requires certain knowledge and skills.
Krita , PaintShop Pro , Luminar , Capture One Pro , DxO PhotoLab and Pixlr are professional editors. Distributed on a paid basis, they can be tried with limited functionality for only 30 days. If you are a professional photographer, artist or designer and the tools present in the latest version of Photoshop are not enough for you, choose one of these solutions.
The GIMP , Paint.NET , PhotoScape and PixBuilder Studio are simpler than the above utilities, but they can please the user with all the necessary tools for cropping, applying photo effects, adjusting brightness, saturation, contrast, and so on. Plus, they are all completely free. This category also includes the ACDSee and Paint Tool SAI .
For smartphone and tablet owners, we recommend trying Photoshop Express , VSCO or Snapseed . All applications have a convenient menu, work with the main and front camera of the phone and can process photos saved in the gadget’s gallery.
In addition to the software we reviewed, it is worth noting several more programs that were not included in the review. These are desktop versions of the editors Zoner Photo Studio, Inkscape, CorelDraw, Adobe Illustrator, Photoshop Elements. Viewers FastStone Image Viewer, XnView, Picasa. Online services Canva and Photor. Applications for mobile devices Aviary, Prisma, PicsArt, Afterlight.
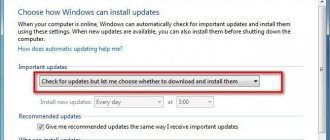
darktable
Platforms: Windows, macOS, Linux.
Price: free.
A kind of Lightroom from the Linux world - free and open source. The program is focused on automation and will be useful to those photographers who process a large number of images. It supports importing from most modern digital cameras, sorts photos by reading geotags and metadata, and allows you to assign tags and ratings to files.
In addition, darktable has support for graphics tablets, and the functionality of the application can be expanded using third-party modules if desired.
darktable →
Photos for macOS
Platforms: macOS.
Price: free.
This is a standard application included with macOS. And, like other software from Apple, it is convenient, beautiful and incredibly simple. “Photo” essentially does everything for you. It sorts your photos by year, collection, people and place, reading geotags and metadata from the files without bothering you with unnecessary questions.
Thanks to these same filters, advanced search allows you to almost instantly find photos in your library. And smart albums automatically collect all the pictures that match the conditions you set, eliminating tedious searches.
"Photos" for macOS →
Find.Same.Images.OK - find similar pictures and photos
I will tell and show you using the example of a portable version of the program (64-bit), since I do not search for similar photos on my computer very often and I consider it inappropriate to keep extra installed software in the operating system in standby mode for several years.
So, I unzipped the file received from the official link at the end of the article and clicked on the cheerful shortcut Find.Same.Images.OK...
...I agree with the license...
Pay attention to the number of supported languages for the program interface - if suddenly yours is incorrectly detected automatically, you can select the desired one manually by clicking on your checkbox.
The main and only working window is Find.Same.Images.OK…
The top panel will not hold your attention for long - there you can only assign a window when starting the program and its location on the desktop...
digiKam
Platforms: Windows, macOS, Linux.
Price: free.
Another free and open source application. It was originally created for Linux, but then received versions for Windows and macOS.
The application supports importing photos from digital cameras, scanners and portable storage devices, conveniently sorting them into albums with a hierarchical structure, filtering images by metadata and geolocation, and even facial recognition. DigiKam also includes the ability to assign tags to images and a viewing and editing function. This is one of the best free photo archive management programs.
digiKam →
XnView
Platforms: Windows, macOS, Linux.
Price: free.
Absolutely free, but at the same time a very advanced photo viewer and cataloguer. Naturally, in terms of photo editing, it is inferior to expensive professional packages, but for organizing a home photo archive, XnView is absolutely enough.
Batch photo processing, bulk import and sorting let you organize and organize thousands of your photos into folders without any effort. In addition to organizing files, XnView can also be used for minor retouching and converting images into different formats.
XnView →
How to find the same (or similar) pictures and photos on your computer and free up disk space
Good day.
I think that those users who have a lot of photographs, pictures, wallpapers have more than once encountered the fact that dozens of identical files are stored on the disk (and there are also hundreds of similar ones...). And they can take up quite a lot of space!
If you search for similar pictures on your own and delete them, you won’t have enough time and effort (especially if the collection is impressive). For this reason, I decided to test one utility on my small collection of wallpapers (about 80 GB, about 62,000 pictures and photos) and show the results (I think many users would be interested in this). So…
Find similar images in a folder
Note! This procedure is somewhat different from searching for identical files (duplicates). The program will take significantly more time to scan each image and compare it with others to find similar files. But I want to start this article with this method. Below in the article I’ll look at searching for full copies of pictures (this is done much faster).
In Fig. 1 shows the experimental folder. The most ordinary one, on the most ordinary hard drive, hundreds of pictures were downloaded and uploaded into it, both their own and from other sites. Naturally, over time, this folder grew greatly and it was necessary to “thin out”...
Rice. 1. Folder for optimization.
Image Comparer (scanning utility)
Official website: https://www.imagecomparer.com/rus/
A small utility for searching similar images on your computer. Helps save a lot of time for those users who work with pictures (photographers, designers, wallpaper collectors, etc.). Supports Russian language, works in all popular Windows OS: 7, 8, 10 (32/64 bits). The program is paid, but there is a whole month for testing to make sure of its abilities :).
After launching the utility, a comparison wizard will open in front of you, which will guide you step by step through all the settings that you need to set to start scanning your pictures.
1) In the first step, simply click next (see Fig. 2).
Rice. 2. Image search wizard.
2) On my computer, the pictures are saved in one folder on one disk (so there was no point in creating two galleries...) - so the logical choice is “Within one group of images (galleries)” (I think for many users things are about the same, so You can immediately stop your choice at the first point, see Fig. 3).
Rice. 3. Select a gallery.
3) In this step, you simply need to specify the folder (folders) with your pictures that you will scan and search for similar pictures among them.
Rice. 4. Select a folder on the disk.
4) In this step, you need to specify how the search will be performed: similar images or only exact copies. I recommend choosing the first option, so you will have more copies of pictures that you probably don’t need...
Rice. 5. Scan type selection.
5) The last step is to specify the folder where the search and analysis results will be saved. For example, I chose the desktop (see Fig. 6)…
Rice. 6. Selecting a place to save the results.
6) Next, the process of adding images to the gallery and analyzing them begins. The process takes a long time (depending on the number of your pictures in the folder). For example, in my case it took a little over an hour...
Rice. 7. Search process.
7) Actually, after scanning, you will see a window (as in Fig. 8), which will show pictures with exact duplicates and pictures that are very similar to each other (for example, the same photo with different resolutions or saved in different formats, Fig. 7).
Rice. 8. Results…
Pros of using the utility:
- Freeing up space on your hard drive (and sometimes significantly. For example, I deleted about 5-6 GB of extra photos!);
- An easy wizard that will walk you through all the settings step by step (this is a big plus);
- The program does not load the processor and disk, and therefore, when scanning, you can simply minimize it and go about your business.
Minuses:
- Relatively long time for scanning and creating a gallery;
- Similar pictures are not always similar (that is, the algorithm sometimes makes mistakes, and with a degree of comparison of 90%, for example, it often produces slightly similar pictures. In fact, manual “moderation” is indispensable).
Search for identical images on disk (search for complete duplicates)
This option for cleaning the disk is faster, but it is quite “rough”: deleting in this way will only result in exact duplicates of pictures, but if they are of different resolutions, the file size or format is slightly different, then this method is unlikely to help. In general, for regular, quick “weeding” of the disk, this method is better, and after it, logically, you can look for similar pictures, as described above.
Glary Utilities
Review article:
This is an excellent set of utilities for optimizing the operation of the Windows OS, cleaning the disk, and for fine-tuning some parameters. In general, the set is extremely useful and I recommend having it on every PC.
This complex has one small utility for finding duplicate files. This is what I want to use...
1) After launching Glary Utilites, open the “Modules” section and in the “Cleaning” subsection select “Search for duplicate files”, as in Fig. 9.
Rice. 9. Glary Utilities.
2) Next, a window should appear in front of you in which you need to select disks (or folders) to scan. Since the program scans the disk very quickly, you can select not just one, but all disks at once for search!
Rice. 10. Selecting a disk to scan.
3) Actually, a 500 GB disk is scanned by the utility in about 1-2 minutes. (or even faster!). After scanning, the utility will present you with results (as in Figure 11), in which you can easily and quickly delete copies of files that you do not need on the disk.
Rice. 11. Results.
I have everything on this topic today. Happy searching everyone