One of the simplest methods of hiding the real IP address of a device when surfing the Internet is a proxy server. It means a certain intermediary device through which all user requests pass. A properly installed proxy server makes it possible not only to hide the true IP address of the device, but also to visit previously blocked resources, speed up the loading of static web pages, and maintain anonymity on the Internet. But all this becomes possible only after properly setting up the computer and having working proxies.
How to tell if a proxy server is installed
There are several methods to check whether you are using a proxy server:
- Checking browser settings.
Ideal option for inexperienced users. In Mozilla, the necessary parameters can be found in the following path: “Settings” - “Advanced” - “Network”. This is where the proxy description is located. In a standard Windows browser, the data can be found in the “Internet Options” tab, which is located in the “Tools” menu item.
- Using the Control Panel.
This option is more suitable for advanced users. You need to launch the “Internet Options” icon in the Control Panel. Next, go to “Network Settings”. If the proxy server field is filled in with data and there is a checkmark next to “Use a proxy...”, then the connection has already been configured. If these fields are empty and the “tick” is only opposite “Automatic detection...”, then there is no dedicated intermediary server.
- System administrator help.
If you can’t determine on your own whether a proxy is worth it, you can always seek advice from the system administrator who maintains the local network. He has the necessary knowledge and competence to view proxies.
Sometimes you may need to find out not only the proxy server address, but also its port. This is another parameter used when working with a proxy. Typically looks like this: 80, 8080, etc. In certain cases the values may differ. You can find out the port in the same window as the server. The actions are the same. Its value is entered in the field to the right of the IP address. If you enter the address, but do not specify the corresponding port, then the Internet will not be visible.
You can also find out whether your computer uses a proxy server and whether it is configured correctly through special programs, but almost all of them are paid. Alternatively, you can also open a resource for determining the location of a computer by IP. If it returns a city or country that you are not even close to, then most likely you have a proxy. This option is absolutely free and easy to implement.
Clear cache and cookies before setting up a proxy in Internet Explorer
Before using a proxy server, it is important to clear all history of your previous browser sessions. Deleting cache and cookies in Internet Explorer will help completely protect your identity and protect your sensitive data.
The first way to clear cache and cookies in IE:
- Press the key combination "CTRL + SHIFT + DEL".
- Check the 3 options: Temporary Internet and Website Files, Cookies and Website Data, and Log.
- Click the "Delete" button.
The second way to clear data in IE:
- Go to Internet Explorer.
- Click on “Tools” (the gear in the upper right corner of the browser) or the key combination “ALT + X”.
- Go to the “Security” tab and click “Delete browsing history...”.
- Check the boxes next to Temporary Internet and Website Files, Cookies and Website Data, and History.
- Click the "Delete" button.
It's best to delete cookies after each work session.
How to remove proxy in Windows 10
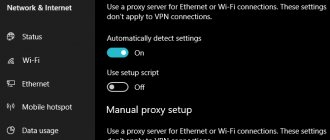
disable the proxy server settings in the “ten” in the same ways as in the “seven”; they will be described below. But there is a unique option that is not available on earlier versions of the OS - through parameters. To do this, press the key combination Win+X. Select the section we are interested in (in this case it is “Network and Internet”). Make adjustments in the “Proxy” tab. More precisely, like this: in the items “Use a proxy...” and “Use a script...” you need to disable the rest, do not change the rest. Check everything carefully and close it. The result can be viewed after restarting the PC.
Quote: If, after completing the steps, any problems arise related to access to the World Wide Web, then you should disable “Detect parameters automatically.”
Disabling the proxy server in the browser
One of the most popular browsers is Google Chrome. Disabling a proxy in this browser is done as follows: You need to go to the browser settings, enter “proxy” in the search, then select the proxy server settings in the results, then do all the operations described in the first method.
Disabling the proxy server in the Mozilla browser is much easier. In this browser, the proxy is not associated with Windows system settings; it can be disabled directly in the browser. Here we also go to Settings and enter “Proxy”. Click “Configure” and oh.
In other browsers, disabling the proxy server is similar.
How to remove proxy in Windows 7
Sometimes proxy server services cease to be useful to the user. This can happen for various reasons - from a banal server change to shutdown due to uselessness. But in any case, there is no need to rush to change anything, since disabling the use of a proxy server is not difficult, but connecting it is not so easy. First you need to weigh all the pros and cons and only then proceed to action. If the decision is made in favor of disabling rather than the assistant, then you must strictly follow the instructions below, otherwise problems may arise in the future.
disable the proxy server in the Chrome browser like this:
- In the upper right corner, click on the three dots.
- In the menu that opens, select “Settings”.
- On the left, find the “Advanced” subsection and click on it.
- Go to the “System” item.
- Go to “Proxy Settings...”.
- Click “Network Settings”.
- Remove o.
- Check the box next to "Automatic detection...".
- “OK” - “Apply” - “OK”.
- Restart your browser.
The proxy server can be disabled in other browsers in a similar way (the only thing is that the path to “Network Settings” may be slightly different).
Disabling in the control panel is done as follows:
- Open start.
- Enter the word “control panel” into the search.
- Run the found file.
- When displaying shortcuts as icons, you should launch “Internet Options”, in the form of categories – “Network and Internet”, and then “Browser Options”.
- Next comes point 5-10 from the browser settings.
Disable via the registry like this:
- Go to “Start” (in Windows 7 – round button in the lower left corner).
- Type “Run” into the search bar.
- Click on the found icon.
- In the input field, write regedit and press Enter.
- The Registry Editor will open. In it, go to the section: HKEY_CURRENT_USER\Software\Microsoft\Windows\CurrentVersion\Internet Settings
- Find the “Proxy Enable” item on the right side of the window and open it.
- Change value from 1 to 0.
- Click OK and close the registry.
- Restart your PC.
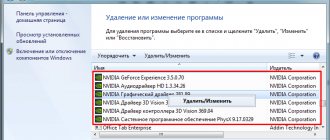
If everything is done correctly, the intermediary will be disabled, and you will be able to continue working from your real IP address. It's also worth noting that some browser add-ons (such as VPN for Chrome) also act as proxy servers and should either be disabled or removed.
Quote: It would not hurt any user to check whether a proxy is being used, since proxy settings can be changed by various viruses without your knowledge. If you find that there are settings in the browser properties that you did not make, then you should immediately scan your device with an antivirus.
Setting up IP address allocation
So, we completed this task and figured out how to disable the proxy server in Windows 7, but the Internet connection has not been restored? It's OK! Misconfigured TCP/IP stack settings can be easily fixed. How to do it?
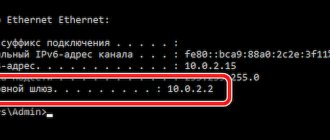
The options we need are hidden in the network connection parameters (protocol only TCP/IPv4, but not v6). They can be found in the “Changing adapter settings” section (to do this, open “Start”, then go to the “Control Panel”, in which you will need the “Network and Sharing Center” section).
Open the erroneous parameters of the active connection, select the desired protocol version (specifically TCP/IPv4, but not TCP/IPv6), and then in its properties, set the obtaining of an IP address and DNS server to automatic mode. All!
Ways to disable proxies on Android systems
Proxy is actively used not only on netbooks, laptops and desktop PCs, but also on mobile devices (for example, smartphones). Is it possible to disable the proxy server on Android ? Quite. There are several options for connecting a proxy: using third-party applications or directly.
In the first option, the connection to the server occurs through software products. Disabling everything is simple here - just turn off or delete the program, you don’t even need to restart the device.
In the second case, you will have to work a little with the settings, namely: correct certain data in the device’s system settings in the Wi-Fi section. To do this, you need to find the network that is used to access the World Wide Web and select additional settings. Several fields will be displayed on the screen, which will be filled with certain values, so they need to be deleted. You also need to find the “Proxy” item and change it from “manual” to “no”.
The article discusses cases of how to disable the proxy server. Instructions have been given.
Setting up a proxy computer and Internet connection settings
Configuring a proxy in Windows 10 is not the easiest task. People most often learn about proxy technology for the first time when the servers of their favorite online game do not allow them to log in from a blocked IP address, or when their computer suddenly falls off the network. Microsoft took care of its users and added proxy support in the operating system itself. This means that it is no longer necessary to download third-party applications to connect, although in some cases they are much more convenient.
How to enable a proxy server on Windows 10
How to set up a proxy server on Windows 7 - step-by-step instructions
You can configure a proxy and connect to the desired server in just a couple of minutes, even if you are not in a hurry. The procedure is as follows:
- Press the functional hotkey combination Win + I on your keyboard.
- Wait for the Settings application window to open. You can also get to it from the Start menu by clicking on the gear-shaped icon or by searching for the program name “Settings”.
- Select the “Network and Internet” tab and scroll down to the “Proxy” item.
- Stay in the “Manually setting up a proxy” section and activate the switch to enable the technology.
- Fill in the IP address and Port fields. This is the data that will be used to connect to the network.
- Make additional settings as desired.
- Click on the “Save” button.
Important! The Microsoft proxy server may not function in some browsers that have built-in proxies or VPN services. Any such extensions or settings in the browser must be disabled.
Setting up a firewall
Configuring a firewall is not necessary, since the proxy server, if specified correctly during setup, should start working immediately (provided that built-in and third-party VPN services and proxies are disabled in the web browser and other programs). As a last resort, you can simply go to it from the Start menu, select “Allow a program or component through Windows Firewall” and the “Allow another program” sub-item, specifying the path to your application or web browser.
Activation via "Settings"
An alternative setup method looks like this:
- Go to the “Run” window by pressing the Win + R button combination on your keyboard.
- Enter the inetcpl.cpl command and click OK.
- Find the “Connection” tab and click on the “Network Settings” button.
- Check the box next to “Use a proxy server...”.
- Click on the “Advanced” button.
- Select “One proxy for all protocols”.
- Specify all the necessary server data: address, FTP, Socks and a number of other parameters.
- Save and apply changes. After this, everything should work without restarting the computer.