Closing an application through the programs menu
Most applications and games for Android usually have a special menu called the main menu. If you carefully review all the items, you will see a button indicating that this application is closing.
This method is not only the simplest, but also almost 100% guarantees that the subsequent operation of the application will not be disrupted, and any stored information will not be lost. However, not every application has such an option.
Editing the Windows 7 boot menu
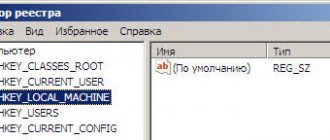
In Windows XP, boot information was stored in the boot.ini file, and to make changes to the boot menu, you simply edited this file in a text editor. Starting with Windows Vista, everything has changed, and now the operating system boot menu is located in the Boot Configuration Data (BCD). Some boot menu options can be changed in the usual way using the GUI, but full access to the BCD is only possible from the command line.
We'll look at several ways to make changes to the boot menu. So, method one.
System Properties control panel applet.
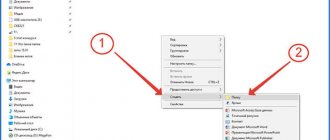
In order to get to the parameters responsible for loading the system, go to the Start menu - Control Panel - System. The system properties window will open, in which you need to select the “Advanced system settings” item.
Then, from the additional system properties, select the “Boot and Recovery” section and click the Settings button.
In the window that opens we can:
- view the list of installed operating systems and change the system that boots by default.
- set the waiting time before loading the selected system (timeout).
- remove the display of the OS list at boot.
And that’s it, you won’t be able to add a new entry, change or delete an existing one from here (in XP there was also an “Edit” button, when you clicked on it you could manually edit the boot menu in Notepad).
The settings are clearly not enough, let's try another method.
System Configuration snap-in.
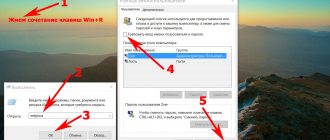
To open the System Configuration window, type the key combination Win + R, enter the msconfig command in the Run line and click OK.
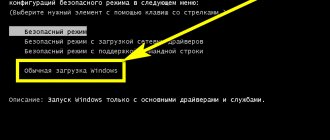
In the system configuration window that opens, go to the Download tab. Here we can do the following:
- view information about which system is currently loaded and which is loaded by default.
- change the system that boots by default.
- edit the timeout after which the default operating system will be loaded.
- remove entry from boot menu.
We still cannot add or change an entry.
But what should you do if you need to, for example, change the position of an entry in the boot menu or rename it? The third method will help us with this:
bcdedit command line utility
The bcdedit.exe utility is located in the Windows\System32 system folder. To work, it requires administrative access to the computer, so we launch the command line shell as an administrator (otherwise, when you try to start the program, an error will be displayed).
If you simply enter the bcdedit without parameters, the information stored in the BCD will be displayed. The information is presented in the form of two columns: on the left are the names of the parameters, on the right are their values.
Here are the main parameters responsible for loading:
- identifier - an identification number indicating an entry in the boot menu. It is a 32-digit alphanumeric code enclosed in curly braces. For standard identifiers, names are used, for example {current} - current system, {default} - default system;
- device - indicates the partition on which the operating system loader is located;
- osdevice - indicates the partition on which the operating system itself is located. Typically, the device and osdevice are identical ;
- path — the rest of the path to the operating system loader;
- description - description of the operating system, displayed in the menu upon boot;
- default - operating system loaded by default;
- timeout — default waiting time before loading the OS;
- displayorder - The order in which systems are displayed upon boot.
Now let's look at the options for using bcdedit:
bcdedit /default {ID} - set the system to boot by default.
bcdedit /displayorder - control the order of entries in the boot menu:
- bcdedit /displayorder {ID} /addlast - add the system to the end of the list;
- bcdedit /displayorder {ID} /addfirst - add the system to the beginning of the list;
- bcdedit /displayorder {ID2} {ID1} — specify the order in which systems are displayed in the list;
- bcdedit / displayorder {ID} / remove - remove the entry from the boot menu.
Please note that when you delete an entry from the boot menu, information about the parameters of the selected system is not deleted from the BCD and can be restored if necessary.
bcdedit /timeout XX - set the timeout in seconds .
bcdedit /set {ID} description ″System name″ — change the system name displayed in the boot menu.
bcdedit /create /d ″Windows Vista″ /application osloader - create a new boot entry.
bcdedit /create {ntldr} /d ″Windows XP″ - create a boot entry for previous OS versions (XP and older).
bcdedit /copy {ID} /d ″New system″ - copy the boot record. This way you can also add a new entry to the boot menu.
bcdedit /delete {ID} /cleanup - delete the boot entry. This removes all information about the installed operating system from the BCD and boot menu. This command has one feature - if a name is specified as the ID, for example {default}, then the command must be executed with the /f , but if the ID is written in alphanumeric code, the /f is not needed.
bcdedit /export ″C:\Backup\bcd″ — export the contents of the storage to the specified file.
bcdedit /import ″C:\Backup\bcd″ - restore the state of the system storage from a backup created using the /export .
Well, a few of the most “real life” examples
Adding a new boot entry for multiboot:
bcdedit /copy {current} /d ″New Windows 7″ - copy the current entry and name it new; bcdedit /set {ID} device partition=D: - specify the location of the system bootloader; bcdedit /set {ID} osdevice partition=D: - specify the location of the operating system; bcdedit /displayorder {ID} /addlast - add an entry about the system in the boot menu, to the end of the list.
Adding a boot entry to boot the system from a virtual disk (VHD):
bcdedit /copy {current} /d ″Loading from VHD″ — copy the current record; bcdedit /set {ID} device vhd=[X:]\DIR\filename.vhd — specify the location of the system bootloader; bcdedit /set {ID} osdevice vhd= [X:]\DIR\filename.vhd — specify the location of the operating system; bcdedit /set {ID} detecthal on - enable forced detection of the Hardware Abstraction Layer (HAL); bcdedit /displayorder {ID} /addlast - add an entry about the system in the boot menu, to the end of the list.
Note. [X:]\DIR\filename.vhd is the full path to the VHD file and the file name.
Adding a boot entry to boot Windows XP:
bcdedit /create {ntldr} /d ″Microsoft Windows XP″ - create a new boot entry; bcdedit /set {ntldr} device partition=\Device\HarddiskVolume1 - specify the location of the system boot files; bcdedit /set {ntldr} path \ntldr - specify the path to the system bootloader; bcdedit /displayorder {ntldr} /addlast - add an entry about the system to the boot menu.
Closing applications through the Task Manager menu
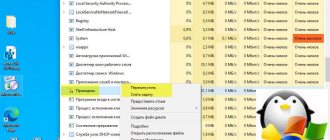
Almost every model of mobile phone or tablet based on Android software has a menu called “Task Manager” (or some other similar name). By selecting this item, you will be taken to a section where all running (active applications) will be listed, opposite each of which you can see a cross. By clicking on this icon (cross), you close the application.
When using this method, complete preservation of all data is not guaranteed, but it is one of the most effective methods for closing active applications, games and programs.
Where to find downloaded files on Android through Explorer
Through Explorer you can also find a list of downloads. To do this, click the “Tools” menu - the “Downloads” item or simply CTRL + J. Here they find the desired file, right-click on it, after which a menu opens where you need to select the “Open folder with file” item. If the required file is not in the list, you can try to restore it using any program provided for this purpose.
In this case, downloaded files can also be sorted, opened and deleted. For any actions, the download is first opened by clicking on it.
Rate this article
Author
Tatiana
I follow news on the mobile services market. Always up to date with the latest events
Force closing applications
In Android mobile devices, at least in software version 2.1, in the “Settings” menu you can find the “Applications” item, by selecting which you need to go to the “Application Management” section, where you can find a complete list of all applications installed on your device.
Having selected a specific application, we will be taken to the context menu, where in order to forcefully close it, we must click on the “Force Stop” button.
We have looked at all the ways to close applications on Android, and if you have alternative options, we will be glad to hear your comments. How to see all running applications on a smartphone or tablet (Android). How to close unnecessary applications in Android OS.
How to enable Android download manager
First of all, go to “Settings”:
Find the “Application Manager” item, click, scroll through the menu that opens, open “Downloads”:
After this, you will be offered a choice of actions: “Sort by size” and “Reset settings”, select the latter:
The system will ask if you are sure of the selected action. Please note that application data will not be deleted, but will be deleted:
- Disabled applications.
- Updates for disabled applications.
- Default applications for some actions.
- Background data restrictions.
Click “Reset application settings”:
Now you need to launch the “Download Manager”:
In the menu that opens, check the box “Show notifications”:
Now the “Download Manager” icon (or simply “Downloads”) will appear on your desktop, or you will first need to open the “Applications” icon (depending on the device model), and the function will be active:
For clarity, the entire process can be seen in the video:
Leave your comments if the material presented was useful to you, or if you have any questions. Good luck!
Advanced Task Manager (from INFOLIFE LLC)
The name and functionality of the application is similar to Advanced Task Killer. However, it is worth noting that the light interface is more pleasant and convenient.
Here, by default, all applications are selected, and you need to uncheck those that do not need to be “killed,” which is a little faster and more convenient. The top bar shows memory usage and remaining battery power, while the bottom bar shows the amount of memory that will be freed up when processes complete.