Our review will tell you about the problem with launching sessions in VirtualBox - Error code E_FAIL (0x80004005) in Virtualbox. You will find out what this failure is and why the problem occurs. We have selected all proven methods to fix this failure.
Error code E_FAIL (0x80004005) – this error occurs when trying to start a session in VirtualBox on Windows 7/8/10 and Linux. Its appearance is arbitrary: maybe yesterday everything worked fine, but today, on the first attempt to log in, it returns the response “Failed to open a session for the virtual machine . The solutions can be fairly simple, but if they don’t help, then you have to resort to extreme measures. Below we will describe the most effective correction methods.
Problem "Failed to open session for virtual machine"
The first and simplest solution
You should simply rename a few internal files in VirtualBox. This error occurs due to the absence of the original file of the saved session. That is, when the user above created erroneous saves from the program or they ended up being empty.
- First, let's visit our program folder. Let's go to drive C. Next, go to “Users” or “Users” depending on your choice. Find the name of your computer. Among other programs, look for VirtualBox VMs . This is where your image will be stored.
- In addition to the internal folder, there should be two files. We copy them to another location (for example, the desktop). Original files: “Win8.1.vbox” - deleted, and “Win8.1.vbox-prev” - renamed to the deleted file. Everything should work. In case of failure, we restore everything back, thanks to copies.
- If you have other files, like “Win8.1.xml-prev” , then we rename it to “Win8.1.xml” . A visual example of such a solution is a video.
Reasons for the error
Before moving directly to ways to resolve the E_FILA 0x80004005 error in VirtualBox, it is necessary to discuss the reasons for its occurrence in order to prevent this situation from reoccurring in the future.
Often this error appears spontaneously. The most interesting thing is that it will not be displayed if the virtual machine has just been installed; this only happens if you have already run some operating system on it. In some situations, this happens due to a failure to perform the initial startup of the operating system. This happens for several reasons:
- An error occurred while saving the session.
- Due to disabled virtualization option in BIOS.
- Unstable version of the virtual machine.
- Conflict between the hypervisor and the virtual machine (occurs only on 64-bit systems).
- Error in Windows update.
Now we have found out the main reasons for the error E_FAIL 0x80004005, so we can proceed directly to the solutions.
Rolling back updates
It often happens that after the next Windows update, everything starts to slow down or not work correctly. Therefore, most users have updates turned off. But if you are not one of them, then E_FAIL (0x80004005) may appear precisely because of it.
- Let's delete the latest changes. We go to “Start”.
- In the search bar, insert cmd.
- We run only as administrator.
- There is no need to remove anything here, just add: wusa /uninstall /kb:3004394 .
- Turn off your computer.
Uninstalling updates via the command line
Fixing error code E_FAIL 0x80004005 in VirtualBox
There are various reasons for the E_FAIL 0x80004005 error in VirtualBox, let's start with a few of the simplest ones that are very easy to fix:
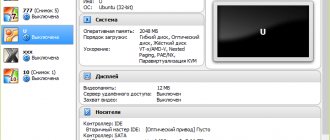
- Changing the path to the location of the virtual machine files due to changing the drive letter, renaming the folder containing the virtual machine files, changing the name of the user folder (if the virtual machine folders were located inside it, as is usually the case by default). In this case, when you start VirtualBox (assuming that the VB manager was not running before the rename), you will see an (Unavailable) next to the name of the virtual machine and, when it is highlighted, information about the error in question, as in the image below. Possible solutions: return the original location of the virtual machine (the path will be indicated at the top along with the File Not Found message), or delete this virtual machine in the manager and import it from a new location (via the Machine - Add menu).
- Deleting virtual disk files previously used in the virtual machine. The solution is to go into the virtual machine settings and remove the deleted virtual disk from the “Media” section.
- If you transferred a physical disk, flash drive or other drive to the VirtualBox virtual machine (for example, like this: How to connect a physical USB flash drive to a VirtualBox virtual machine), then if this physical disk is missing, and also if you run the VirtualBox manager not as an administrator, you can get the same error code 0x Solutions: connect the disk in place; delete the disk in the virtual machine settings in the “Media” section; run VirtualBox as administrator.
Above, easy-to-diagnose cases of occurrence of the error in question were given, but another option is also possible: you start the virtual machine as usual, but no changes have been made recently and, nevertheless, the error E_FAIL 0x80004005 appears. Typically, this is due to problems with the .vbox, .vbox-tmp, and .vbox-prev configuration files located in the folder with each VirtualBox virtual machine.
Let's say our virtual machine is called Win10. Then the essence will be as follows: when starting a virtual machine session, VirtualBox renames the Win10.vbox file to Win10.vbox-prev and, at the same time, creates the Win10.vbox-tmp file in the same folder. The last file will be used as the current configuration file for this session, and .vbox-prev is saved as a backup. After the session ends, Win10.vbox-tmp is renamed to Win10.vbox. The next time you start, everything repeats.
However, if for some reason the process is interrupted at one stage, the required .vbox file may not be created, resulting in an error the next time the virtual machine is started.
To fix the E_FAIL 0x80004005 error in this case, follow these steps:
- Completely close the VirtualBox manager, just in case, check for the presence of the VirtualBox.exe and VBoxSVC.exe in the task manager (close them if they are running).
- Go to the folder with your virtual machine. Standard path: C:\Users\Username\Virtualbox VMs\Virtual machine_name .
- If the specified folder does not contain the virtual_machine_name.vbox , but there are .vbox-tmp or .vbox-prev , save these files to some location on your computer, just in case.
- Change the file extension .vbox-prev to .vbox
- Launch the VirtualBox manager and check if the virtual machine now starts.
- If this doesn't help, you can also try -tmp file in the same way -prev .
- If the .vbox file was already present in the folder, you can try moving it to some other location and then try steps 4-6.
- Older versions of VirtualBox used .xml files instead of .vbox, but the solution remains the same for them.
As a last resort, if none of the specified files are in the location, you can set up a new VirtualBox virtual machine and connect an existing virtual disk to it.
The solution lies in the BIOS
Suitable for experienced users only. You should visit the BIOS and enable Intel Virtualization Technology . This item is not always activated by default, and without it there is no virtualization support. It is impossible to describe the exact path to this option, because there are a lot of BIOS modifications. But fortunately, the menus in all of them are very small, so after spending a couple of minutes searching, you can find the Intel Virtualization Technology settings. Just set to Enabled .
Issue 1: The virtual machine does not start on first boot
Although virtual machines with other OSes boot and work normally in VirtualBox. In this case, to solve this problem you will need to enable virtualization in the BIOS. To do this, follow the instructions below:
1.1. Restart your computer and enter the BIOS. To do this, when you start loading, press the Del or F2 or F10 button. If you are unable to enter the BIOS, then read the instructions on our website below:
1.2. Next in the BIOS we need to find the section with virtualization. This section is located in different paths on motherboards from different manufacturers:
1.2.1. Path for Award BIOS: Advanced BIOS Features -> Virtualization Technology (the name can be shortened to Virtualization);
1.2.2. Path for AMI BIOS: Advanced -> Intel(R) VT for Directed I/O (can simply be called Virtualization);
1.2.3. Path for ASUS UEFI: Advanced -> Intel Virtualization Technology.
In less popular BIOSes, the path may be like this: System Configuration -> Virtualization Technology; Configuration -> Intel Virtual Technology; Advanced -> Virtualization; Advanced -> CPU Configuration -> Secure Virtual Machine Mode.
If the above paths are not in your BIOS, then try to find the virtualization partition yourself. Most often, such a section will begin with the words: Virtualization, VT, Virtual.
1.3. In the section with virtualization, you need to activate it. To do this, move the Disabled option to the Enabled position.
1.4. After which you need to save the changes in the BIOS. Most often this is the F10 key, but there may be variations.
1.5. The computer will restart. Now you have to launch VirtualBox and go into the settings of your virtual machine.
1.6. Click on the “System” tab, then in the right window, the “Acceleration” tab and on the “Hardware Virtualization” title, check the “Enable VT-x/AMD-V” box.
1.7. Now you can start the virtual machine and begin installing the operating system.
Remove Microsoft 6to4
To resolve this issue, you must remove Microsoft 6to4 devices from Task Manager. Keep in mind that you may not see these devices because they are hidden by default. So, you will only see them after you enable the Show hidden devices option.
Here are the steps to remove these devices.
- Hold the Windows key and press R
- Type devmgmt.msc and press Enter
- Click View and select Show hidden devices.
- Double-click Network Adapters
- Right-click the Microsoft 6to4 and select Uninstall . Repeat this step for all Microsoft 6to4 devices you see listed
Once you're done, restart your computer. Your problem should be resolved after logging into Windows again.
Updating a virtual machine
We have already said that the cause of the error in VirtualBox E_FAIL 0x80004005 was an unstable version of the program. Most often this happens after updating it. If this is the case, then you have two options to choose from:
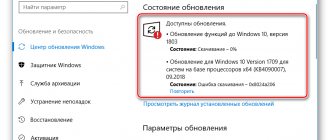
- Wait for the release of a new, more stable version of the application. Of course, this can take a lot of time, but developers often correct errors quite quickly. By the way, to check if a new version has been released, you need to click on the “File” button in the program and select “Check for updates.”
- Reinstall the program. This method is faster, but not everyone understands computers enough to roll back to the previous (stable) version of the program on their own. In any case, if you still have the program installer, just run it and install VirtualBox again. Otherwise, go to the developer's website and download the previous version of the application.
If the cause of the error E_FAIL 0x80004005 was an unstable version of the program, then after following the instructions presented everything should go fine, otherwise proceed to the next method.