Today I will show you how to find out and change the password on a TP-Link wifi router, which is the default, from a computer or phone. Most often, the standard router password looks like “admin”. Setting a new login and password to the TP Link router is a standard first step that must be taken immediately at the initial setup stage in the 192.168.0.1 or tplinkwifi.net panel. It also makes sense to change the connection password and the name of the TP-Link wifi network. This can be done either through a computer or from a phone. As you know, any router has two, or even three or more access keys. One of them is from the admin panel, the other is from the wireless network. Let's see how to change and install a new one on each of them. This manual is suitable for any Tp-Link model - TL-WR740N, TL-WR841N, TL-WR940N, TL-WA701ND, TL-WR743ND, TL-WR842ND, TL-MR3220, Arcehr C2, Archer C1200, etc.
How to find out and change the standard password for the TP-Link wifi network from a computer?
There are quite a few firmware versions for routers, and all of them are still in use. Therefore, I will show you how to set a password for the WiFi network and for the control panel on the old and new versions of the web interface.
First, let's talk about how to find out the default password for joining the wifi network of a TP-Link router. Since there are many modifications, many have different connection implementations. For example, in some models the wireless signal “out of the box” is not protected in any way. It has a name like “TP-LLINK_XXX” and is open for connection to everyone immediately after turning on the device. The authorization key itself is set when you first configure the router.
In others, wifi is immediately protected with a password by default. In this case, it is indicated on a sticker located on the bottom of the router.
After connecting, you need to change it to another one in the control panel.
How to find out the password for your Wi-Fi on your computer
To view the password for your connected Wi-Fi, the condition must be met that the password was saved on the computer at least once. If not, then you should look at the Wi-Fi password on the router.
Find out the password for your Wi-Fi network in Windows 7, 8, 10
In order to find out the password for your Wi-Fi network on a computer or laptop running Windows 7, 8, 10, do the following:
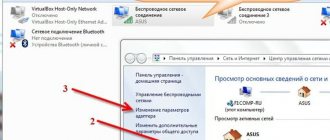
- Open Network and Sharing Center. The easiest way to do this is by clicking the “Start” menu and typing the name of the menu in the search. Also, you can right-click on the network connection icon in the lower right corner or find this menu in the Control Panel.
- The window that opens shows basic data about the active Wi-Fi network. Click on the active wireless connection as in the screenshot below.
- In the window that opens, open “Wireless Network Properties”.
- Go to the “Security” tab and check the “Display entered characters” checkbox. In the field next to you you will see the password for your Wi-Fi.
If for some reason, when you select the “display entered characters” checkbox, the password is not displayed, then try looking at the Wi-Fi password on the router. This is written about in this article just below.
Find out the password for your Wi-Fi network in Windows XP
On the Windows XP operating system, viewing the password of a saved Wi-Fi network is somewhat more difficult than on more modern operating systems, but it is nevertheless possible.
Open the Start in the lower left corner of your computer and go to Control Panel .
Go to the Wireless Network Wizard menu in Control Panel.
In the Wireless Network Wizard window that opens, click “Next”.
In the next window, select “Add new computers or network devices” and click “Next”.
Select a network installation method. To do this, click “Install a network manually” and click “Next”.
In the final window of the Windows XP Wireless Network Setup Wizard, click “Print network settings.”
As a result of this, you will open a text document with various Wi-Fi connection settings, including a password. The password line will be called “Network key (WEP/WPA key)”.
Programs for viewing saved Wi-Fi passwords
Let's look at two programs for viewing passwords of saved Wi-Fi networks on a computer.
WiFi Password Decryptor is a free program for recovering passwords of saved Wi-Fi networks. The program decrypts all types of Wi-Fi passwords for WEP, WPA, WPA2 networks, and also generates all the information into a convenient report in HTML/XML/TEXT/CSV format.
You can download the WiFi Password Decryptor program on the official website of its developer.
After downloading the .zip archive, unzip the contents and run the installation file Setup_WiFiPasswordDecryptor.exe. After that, just launch the program and click on the name of the Wi-Fi network you are interested in to view the password.
A video of WiFi Password Decryptor working is shown below:
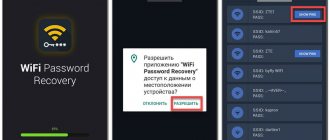
WirelessKeyView is a small free utility that displays a list of all Wi-Fi networks ever saved on your computer. The program has an English-language interface, but if necessary, a localization .ini file is published on the developer’s website.
You can download the program from the official website of the developer. After downloading the .zip archive, unzip it and run the WirelessKeyView.exe file.
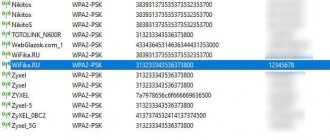
In the screenshot you can see the program in action. The Network column displays the Wi-Fi networks saved on the computer, and the password can be seen in the Key (Ascii) column.
Video of WiFi Password Decryptor working:
Find out the password for your Wi-Fi through the command line
In order to find out the password for your Wi-Fi network using the command line, click the “Start” menu - “Service” - “Command Prompt” or press the key combination Win + R , write the cmd and click OK.
In the command line that opens, enter the following command:
netsh wlan show profiles
The program will display on the screen a list of all Wi-Fi networks that are saved on this computer and, accordingly, from which we can view the saved password.
screenshot of the netsh wlan show profiles command result
In order to find out the password for the Wi-Fi network you are interested in, you need to enter the command
netsh wlan show profiles name=network-name key=clear
enter its name. For example, for my ALESKA the command looks like this:
netsh wlan show profiles name=ALESKA key=clear
As a result of executing this command on the command line, we obtain all the necessary information, including the password for the specified Wi-Fi network.
In the screenshot above you can see that the password for the ALESKA Wi-Fi network corresponds to the value 180700.
Video on how to find out the password of your Wi-Fi network via the command line:
How to set a wifi password on a TP-Link router and put your authorization key
Now let's see how the wireless network password is changed. You can set your key for connecting to WiFi, which is distributed by the TP-Link router, in the menu “Wireless mode - Wireless protection”
In the old “green” version of the admin panel, we find in the menu the item “Wireless mode - Wireless protection”. In the WPA/WPA2 column, check the box to activate the protection and enter your password in the “PSK Password” input field.
And on TP-Link TL-WR820N - just “Password” in the additional settings of the wireless mode.
If the router is inexpensive and can distribute only one network at a frequency of 2.4 GHz, then there will be only one value here. In my example, the router is dual-band, so I can replace it for two networks at once - 2.4 and 5 GHz.
To save the settings, press the corresponding button at the end.
Changing your Wi-Fi password
What are the differences between 3G and 4G networks: features, advantages and disadvantages
To change the wireless network access capabilities on the TP-link router, you need to go to the Wireless tab (English version) and “Wireless mode” (Russian version). After that, find the sub-item “Wireless network protection”, where, in fact, the password for “Wi-Fi” is changed.
First, the secure authentication type is set to wpa/wpa2 personal or wpa/wpa2 enterprise. TP-link recommends installing the first type. In the “Wireless Network Password” field, enter a secure set of characters known exclusively to the user and his relatives. There is no need to install too complex code; in addition, there is a maximum length limit: no more than 15 characters. All this will eliminate the possibility of unauthorized persons connecting to the network. It is almost impossible even for professionals to crack a code protected by this type of encryption, let alone ordinary neighbors.
How to set a password on a TP-Link router from your phone?
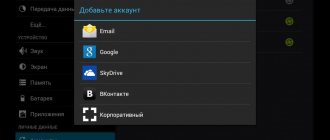
In new TP-Link models, you can also change your login and password from your mobile phone. To do this, you need to install the TP-Link Tether program.
Having entered it, we will see the current SSID of the wireless networks that this router distributes.
We select the one in which you need to change the password via phone. And we make the necessary changes.
Similarly, a new password is set when replacing a router or switching to a new provider, if you decide to change the settings in the old device.
How to change the administrator password “Admin” on a TP-Link router?
Now let's talk about changing the value of the access key to the administrator section. By default, all of them log into the router using the login and password admin-admin. However, for the security of your network, it is highly recommended to replace them with your own more reliable values.
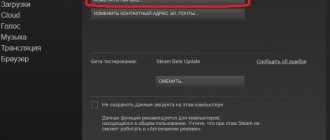
To do this, go to the administrative part at https://192.168.0.1 using the password ADMIN. If it does not work, you will have to use the TP-Link factory reset function. And after that, configure the router from scratch.
Here we open the “System Tools” menu and go to the “Administration” section. The very first block of the page is responsible for changing the standard TP-Link administrator password. You need to enter the old one first, and then the new one twice, and then click the “Save” button.
And this is how this section looks in another popular TP-Link model WR820N
On older TP-Link models, you need to open the “System Tools - Password” menu. And enter the old and new values - login and password for your personal account.
Change the password for the web interface (login to the router)
This also needs to be done when using the router for the first time. admin/admin login data and have access to change settings, which should not be allowed under any circumstances. The procedure for changing the input data for accessing the web interface is as follows:
- Open the router’s web menu by going to the IP address indicated on the sticker at the bottom of the device or using a browser. Log in by entering the standard login and password.
- On the left side of the menu, expand the last line “System Tools”.
- From the options that appear, select “Password”.
- A tab will open in which you can change your login and password for logging into the web interface. We enter the old admin/admin data in the old login and old password columns, respectively, and write the new data below (the new password will have to be entered 2 times to eliminate the possibility of errors). After entering, save the changes.
- After changes, you will have to log in again to continue working in the web interface. Enter new data in the appropriate lines.
- The main settings panel page will reappear. The procedure is completed.
Recovering a password from a TP-Link router
I immediately advise you to pay attention to the second block. If you activate the “Enable password recovery” checkbox, settings for entering data to connect to your mailbox will open. If you lose your current password, a letter will be sent from it to restore it. Just like if you forgot the password for some account on one of the sites. Be sure to use this feature so that in the future you don’t have to do a full reset and configure the entire network again.
You can read about other, more traditional ways to recover a forgotten password at wifika.ru.
How to reconnect your computer and phone to your TP-Link router after changing your WiFi password?
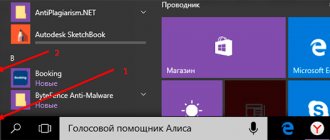
As I wrote above, after changing the password on the router, in order to connect to wifi, you will also need to make changes to the settings on the computer. To do this, click on the wireless connection icon in the lower right corner of the Windows panel and a list of networks will open. We point at the one to which we previously connected with the old password and click on it with the left mouse button - select “Forget” in the drop-down menu
Now you can connect to it again using a new authorization key.
You also need to forget the network on your phone in order to erase its configurations with the old password. Using Xiaomi Redmi as an example, you need to open “Settings” and go to the “Wi-Fi” section
Next, click on the “arrow” icon next to the name of the network to which the phone is unsuccessfully trying to connect and scroll down the page until it says “Delete this network”