Wi-Fi technology is very widely used in the life of a modern person, as it allows you to easily and quickly solve the problem of connecting to the Internet without using conventional wires. This is especially true when using laptops, which can be used to access the Internet in any convenient place thanks to the presence of a built-in Wi-Fi adapter.
That is why the situation when Wi-Fi does not work on a laptop leads to significant inconvenience and even some problems. There are many reasons why Wi-Fi may not work on a laptop computer. It is simply unrealistic to solve the most serious of them on your own without the help of specialists, but there are quite a lot of them that can be eliminated on your own. Let's look at them.
Is the problem with your laptop or router?
A fairly common problem that a laptop has stopped connecting to the WiFi network is not a problem with the laptop itself, but with the settings of the router that distributes the network. Thus, the laptop can be configured correctly, but Wi-Fi still does not turn on precisely because it has nothing to connect to.
To rule out the possibility that the problem is related to this, you should try to connect to the network from any other device that is equipped with a Wi-Fi adapter - from another laptop, smartphone, tablet, etc.
If Wi-Fi does not work from another gadget, then the problem lies in the Wi-Fi router distributing the Internet. If the connection is successful, the problem is in the laptop and before solving it, you first need to determine why Wi-Fi stopped working.
Connecting the laptop to Wi-Fi
Let's first look at the connection process without any settings or checks. Why complicate everything, perhaps you already have everything set up. If everything is fine, your laptop sees the wireless network and is ready to connect, then the Internet connection icon in the notification panel will look like this:
The connection status, which looks like a network level with an asterisk (as in the picture above), indicates that the laptop sees available networks and is ready to connect to them. Click on this icon, then select the Wi-Fi network to which we need to connect and click the Connect . In Windows 10, the process of connecting to Wi-Fi is slightly different. If necessary, detailed instructions are here.
If the network is password protected, a window will appear in which you need to enter a password and confirm the connection by clicking Ok .
That's all, your laptop should connect to the Wi-Fi network. The connection status will be like this:
You can use the Internet.
If you see the connection status “No connections available” , it looks like this: This means that most likely everything is configured on your laptop, but the laptop simply does not see the networks available for connection. Perhaps there is simply no coverage in this place. If you are connecting to your network, check that the router is turned on. If enabled, try rebooting it.
I wrote about the solution to this problem in a separate article: there are no available connections in Windows.
This is how the connection will proceed when you have the driver installed for the Wi-Fi adapter and the adapter itself is turned on. But very often the adapter on the laptop is turned off, or no one installed the driver for it at all. In such cases, many questions arise. Now we will examine in detail both cases, due to which you may have problems connecting your laptop to a wireless network.
Hardware enable adapter
Based on such diagnostics, you can accurately determine that this problem arose precisely because of the laptop. When Wi-Fi does not work on it, you can try using several methods.
The first one is to check if the wireless adapter on your laptop is enabled. Almost all modern models have light indicators for the operation of the WiFi module and there are special key combinations to enable it in hardware.
Typically, a lit indicator indicates that the module is turned on. If the indicator does not light up at all or lights up in red, then Wi-Fi is not working precisely because of the wireless network adapter. It must be turned on.
Most often, such indicators are located directly on the keyboard, side or front panel of the device case. Sometimes they are located on the monitor body or near the touchpad.
To enable the module of such a network, press the key combination Fn and one of the system keys F1-F12. The specific combination depends on the laptop manufacturer. Usually, the corresponding antenna icon is located on the desired key. If it is not there, then to turn on Wi-Fi you should try pressing the standard combination for a particular model: • Fn+F3 for Acer; • Fn+F2 for Asus, Dell or Gigabyte; • Fn+F5 on Fujitsu devices; • Fn+F12 on HP laptops.
After pressing the corresponding keys, we check whether the wireless connection module operation indicator lights up or whether it stops glowing red. After this, you should try to connect to the network again. If this does not help, move on to the next step.
How to connect a laptop to Wi-Fi
After the professionals have installed the cable into the house (apartment) and configured the router, you need to connect the laptop to Wi-Fi. In order to do this, follow a simple algorithm:
- Turn on Wi-Fi on your laptop. The easiest way is to use the Fn+F5 key combination (the second key can be anything, as a rule, it has an image in the form of signal transmission). Or some manufacturers place a separate button on the device panel;
- The Wai-Wai icon should appear in the tray. If it is there, click on it;
- A list of available connections will open in front of you;
- All you have to do is select your access point, click “Connect” and enter the password.
Ready. The shortcut will let you know that you succeeded in connecting the laptop to the wireless wifi network. Typically, it looks like this.
Possible difficulties
Unfortunately, many users still encounter a number of difficulties at this stage. The most common:
- I can't find the Wi-Fi power button. Carefully examine the device (including the ends). Moreover, manufacturers often began to install touchscreen options. If you still cannot find the treasured button, then take out the user manual.
- The Wi-Fi power button does not work. Let’s say you found it right away, but when you click, nothing happens, the network does not appear. What to do? Try using a keyboard shortcut (hold Fn, and then add a second key);
- Could not find the Wi-Fi icon in the tray. The simplest option is that the shortcut was simply not removed. So try clicking on the arrow, maybe the icon is hidden behind it. Another way to return the shortcut to the taskbar is to configure its display through the “Control Panel”;
- Instead of an icon, there is a monitor with a red cross. In this case, the system simply does not see the network, so just try turning on the WI-FI adapter on the laptop. To do this we go through the following path:
In the “Control Panel” section, opens the “Network and Internet” subsection.
Then go to Network and Sharing Center.
On the left you will see the “Change adapter settings” button.
Right-click on the “Wireless Network” shortcut, and then click on the word “Enable”.
After this, you should be able to connect to the WiFi network from your laptop without any problems. Try it! But what to do if you cannot find some items from the instructions above? Then you should pay attention to the OS of your laptop.
Software enablement
When Wi-Fi stops working and turning it on in hardware does not give positive results, you also need to turn it on in software, which is done directly from the operating system the laptop is running.
To programmatically enable WiFi that has stopped working on Windows 7, 8 or 10, you need to perform the following sequence of actions:
1. On the notification panel, which is located near the clock, select the network connection status icon;
2. From the list that opens, select “Network and Sharing Center” or “Network Settings” depending on the version of the operating system;
3. The next step is “Changing adapter parameters.”
Among the list of all existing connections, you need to pay attention to the color of the “Wireless Network Connection” icon. If your WiFi does not work and the wireless adapter is disabled, the connection icon will not be highlighted. In this case, right-click on its icon and select “Enable” from the context menu that opens. The color of the connection icon should change.
In this case, the wireless network adapter turns on, all you have to do is find the one you need in the list of available wireless networks and connect to it.
If, after such actions, Wi-Fi, which has stopped working, continues to be inactive, you need to move on to the next method of solving the problem.
Setting up wifi on a laptop running Windows XP
The Windows 7 operating system is quite well optimized for maximum ease of setting up communications. In Windows XP, the setup process and other tasks are performed almost the same.
- Turn on the wi-fi module in your laptop.
- When an icon appears in the tray, double-click on it with the left mouse button. A window will appear in which you should click Search for wireless networks.
- As a rule, then a list of available points appears that you could connect to.
- If you are unable to connect in this way, you should enable the wireless network connection via Start - Control Panel - Network Connections.
- The next step is to view the available wireless networks.
- How in seven you should select the line Change the order of network preference.
- In the newly appeared window, select Network by access point and install about.
- The next thing to do is go back to Wireless Networks and click Update List.
- Then indicate the required network, click Connect and enter the access key.
Driver installation and update
Quite often, the wireless Wi-Fi connection does not turn on due to the lack of a driver or when it is very outdated. To determine whether the driver is installed, you need to select “Properties” from the context menu of the “My Computer” icon, which is located on the desktop or in the “Start” menu. Next, in the window that opens, select the “Device Manager” command from the menu on the left.
In the new window that opens with a list of connected devices, you need to find the name of the laptop’s wireless network adapter. Usually its name is “Wireless Network Adapter” or “Wireless Network Adapter”, along with which the device manufacturer should be indicated: Realtek, Atheros, Qualcomm or something else.
Having found the desired item and right-clicking on it, select “Properties” from the context menu. In the window that opens, there should be an item “Device is working normally.” But even if there is a mark indicating the normal operation of the device, this is far from a guarantee that the correct driver version is installed and Wi-Fi is turned on correctly. To check it, in the window with the properties of the wireless device, go to the “Driver” tab and pay attention to the items “Date of development” and “Vendor”.
If the supplier is Microsoft or the program development date is several years behind the current one, go to the official website of the laptop manufacturer and download the latest official version of the driver.
The same should be done if there is no wireless adapter among the list of installed devices.
If the wireless communication module is present in the list of devices, but is marked with a yellow exclamation mark, this means that the device is disabled, as a result of which the network has stopped working. In this case, opening the device properties window, you need to click the “Engage” button.
Another reason why Wi-Fi stopped working on a laptop may be that the energy-saving mode is enabled, which prevents the wireless connection from working. To disable it, you need to do the following: 1. Open Control Panel; 2. Select the “Power Options” icon;
3. In the window that opens, select the “High” mode.
How to set up wireless Internet access
Those who use a computer a lot and often know how different Windows 7 is from 10, and even more so from XP. Therefore, let's figure out how you can connect and configure a wireless network on a laptop, depending on the OS that is installed on it. 7 remains one of the most popular operating systems. Let's start with it.
Windows 7
You can connect a wireless network on a Windows 7 laptop as follows:
- You should start by checking the Wi-Fi driver. This will allow you to understand whether it is installed and how correctly it works in order to avoid connection difficulties. To do this, go to the “Control Panel” and select the “Hardware and Sound” section;
- Find "Device Manager" and go to it.
- In the list, find the “Network adapters” subsection. There should be WI-FI, Ethernet and Wireless inscriptions here. The latter means the presence of drivers. If it is not there, then you need to install them by downloading from the Internet or from disk. If there is an inscription, but the exclamation mark is lit, then you should click “Enable”;
- If everything is in order with the drivers, then you can proceed to enable the built-in adapter. To do this, open the “Control Panel” and go to the “Network and Internet” section;
- Then go to Network Connections and right-click on Wireless Connection. All that remains is to select “Enable”;
- Connection setup. Before you start using the network, you will have to configure it. To do this, go to “Network and Sharing Center” (in the “Network and Internet” section). There, find the item “Change adapter settings”;
- Right-click on your wireless connection and select Properties.
- Find the item “IP version 4” and click on “Properties”.
- Then all that remains is to either select automatic completion or manually fill in the fields;
- And finally, the most important thing is connection. Find the Wi-Fi icon on the desktop and open it. You should go to your home access point and click “Connect”. Enter your password. A successful connection to the laptop's wireless network will be reflected in a modified shortcut.
With all other operating systems, the principle of how to connect a laptop to wifi (it doesn’t matter if you have Windows XP, 8 or 10) will be the same. Only the names of the items will be slightly different.
XP
We recommend starting setup the same way as on 7 by checking drivers and setting up adapters. You can always find detailed instructions above. If you have successfully completed these steps, you should try connecting via the tray icon. If connecting the laptop to the Internet via wifi failed, then go the following way:
- Open “Control Panel” through “Start” and find the “Network Connections” section.
- Find your wireless connection in the list and right-click to bring up the context menu. Click on "Property".
- In the “wireless networks” tab and click the button with the same name.
- Then click on “Update” and wait for the full list of networks to appear. After that, try to connect.
Windows 8
You can connect to the Internet via wifi on a laptop with Windows 8 if the device has a built-in Wi-Fi module and all the necessary drivers are installed. You can check this by right-clicking on “Start”, then “Task Manager”, “Network Adapters”.
If items in this list are not marked with a question mark or exclamation mark, then everything is in order. Otherwise, you need to update the drivers or download them.
Next you need to set up the Internet on the laptop via wifi, that is:
- move the cursor to the right side of the screen, in the upper corner, a menu with large icons will open;
- find “Settings” among them, then click the icon with the image of a Wi-Fi antenna;
- Click on it and a small “Networks” menu will open. Here you need to turn on the “Wireless Network” slider, select your access point, click “Connection”, enter the password.
Windows 10
To connect Wi-Fi on a Windows 10 laptop:
- Find the connection management window in the tray in the form of an icon with a computer and an antenna;
- The “Network Settings” menu will open;
- Click on the name of your access point and enter your password.
Possible difficulties:
- Can't set up the Internet on your laptop via WiFi? Check for driver updates and their functionality. To do this, go to the “Control Panel” in the “Devices” section;
- On the right side of the screen, select “Device Manager”;
- In the list of drivers, find the item “Network adapters” and expand it. The name of the wireless adapter must contain the word Wireless. If you right-click on it, you will see whether it is possible to update it. If there is no driver, you should download and install it.
- If there is no button to connect to Wi-Fi, you will have to dig into the settings. To do this, go to “Network and Sharing Center”;
- Then click on “Change adapter settings”;
- Right-click on the “Wireless Network Connection” shortcut and click “Enable”.
External obstacles to the signal
It's also worth noting that a broken wireless network can also be the result of more than just laptop problems. The wireless signal is affected by some external factors that may weaken it. Ceilings, walls, floors and similar obstacles significantly degrade the signal quality of the access point and laptop.
As you know, the signal quality on a personal computer is displayed in the form of several marks - the more of them, the higher the quality of the signal. If the wireless connection level is displayed as 1 or 2 marks, then you don’t have to try to use WiFi - in this case it will not work properly.
In this case, you need to move the router closer to your workplace, move the workplace closer to the Wi-Fi router, or buy a new, more powerful router.
Using the keyboard
The most common way to turn on Wi-Fi is using the keyboard. Some older models had separate buttons for this purpose, some even used switches.
Switches
Dedicated button
But on modern models, the button combination is usually used - Fn+F#. In place of the hash mark there should be the required number, which varies depending on the laptop manufacturer. Here is an example for ASUS:
The remaining known combinations for all current brands are summarized in the following table to make it easier to find:
| Acer | Fn+F3 |
| ASUS | Fn+F2 |
| Dell | Fn+PrtScr |
| HP | Fn+F12 |
| Lenovo | Fn+F5 |
| MSI | Fn+F9 |
| Toshiba | Fn+F12 |
| Samsung | Fn+F9 |
As a note, I would like to note that often the same key combination is also assigned to the function of turning on Bluetooth, and if everything does not turn on the first time, try pressing it a few more times until the result is positive. But if you have any problem here, we have comments, you can ask your question there. Or watch a video on the topic, maybe it will be clearer:
Other causes of Wi-Fi problems
The causes of problems with the functioning of the wireless network adapter described above are the most common and you can fix them on your own.
It is worth noting that all of these are software solutions to the problem, which can be solved by installing, reinstalling or updating the device driver, as well as performing some operations with the OS.
But often the problem with the operation of the wireless connection module lies in hardware errors. What are these errors? These are problems that are directly related to the board itself, most often due to its physical damage.
To fix such problems, you will need to disassemble the laptop. It is worth noting that such actions can only be performed if you have certain skills in this area. If such skills are missing, it is better to entrust the work to professionals.
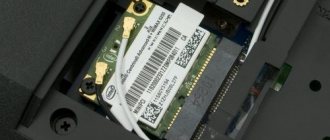
One of the most common physical damages is an unconnected antenna wire to the proximity module. This problem occurs with laptops that have been repaired or if their owner independently cleaned the cooling system from dust. In such cases, the antenna is sometimes simply forgotten, as a result of which the adapter will not be able to establish a connection even near the signal source. To fix this problem, you just need to connect its antenna to the Wi-Fi module.
Sometimes the reason that Wi-Fi stops working is the usual overheating of the network card. Most often this is the result of the laptop being placed on some kind of soft surface. The thing is that at the bottom of the device there are holes through which cold air enters, cooling all the computer boards. By blocking these holes, the system will overheat, which can lead to failure of certain components.
Another common cause of device overheating is dust, which can prevent cold air from entering the cooling system.
That is why, in order to avoid such problems, it is recommended to clean the laptop from dust at least once every year: in this case, it will be possible to avoid repairing the laptop as a result of overheating of its components.
In the most extreme cases, the wireless adapter may even burn out. In this case, only replacing it with a new one will help. You can determine this problem using the device manager, in which the module will simply no longer be displayed. When you try to install a driver for a wireless network, a message appears stating that the corresponding device is not installed on the system.
Is there wifi at all
The first thing we need to do is find out if your computer or laptop has Wi-Fi. Modern laptops, laptops, netbooks, phones and other devices have Wi-Fi. You can check whether your device has one on Google, but I can assure you right away that if you purchased it a long time ago, then the built-in receiver simply may not be there.
When you look for the technical characteristics of your device, look for the Wi-Fi inscription of the same name. For example, description of an Asus laptop:
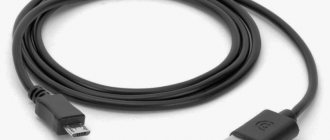
If it so happens that you are using, for example, an old laptop model and there is no such thing in it, then I can advise you two options: buy a new device, or install an external signal receiver (it looks like a regular flash drive). I wrote about this type of adapter in one of my articles, which can be read here: “How to connect Wi-Fi to a computer.”
If all else fails
If none of the tips above helped, you can use a simple, but often effective solution: restart both your computer and your wireless router. Please note that after a reboot, the router turns on for up to 5-10 minutes before it starts distributing the network. Be patient. Also, despite the opinion of many skeptics, sometimes the problem diagnostic function found in the Windows operating system helps solve problems with a wireless network.
Thus, most of the existing solutions to problems related to the fact that Wi-Fi has stopped working on a laptop have been listed above. Almost all such methods and recommendations can be used by anyone who is faced with a similar problem, since this does not require any special skills. If nothing helps, and the wireless network does not start working, there is only one option left - go for help to a quality service center, where they can solve any problems with the laptop.
If the article did not help solve your problem and Wi-Fi still does not work, write in the comments, I will try to help.
We activate Wi-Fi programmatically
Software launch is performed in several ways: through the device manager or through the network control center. Now we’ll take a closer look at how to enable Wi-Fi on a laptop using these methods. The methods are also suitable for netbooks.
How to start Wi-Fi using Network Sharing Center
- Press “ Win+R ” to quickly get to the “ Run ” window. Enter the command “ ncpa.cpl ” and click “ OK ”. The “ Network Connections ” window will pop up, where all the adapters on this PC will be highlighted.
- You need to pay close attention to the adapter named “ Wireless Network ”, if it is grayish in color, it means it is disabled. Right-click on it and select “ Enable ”. That's all, let's try to connect with the router. Suddenly, after turning on the module, the laptop does not find any Wi-Fi network at all, then read the article about why the laptop does not see the WiFi network.
Launch it in Device Manager
The Wi-Fi module in the device manager may turn off due to some kind of failure. With this option, in the “ Network Connections Wireless Network module shortcut will be absent altogether. Well, let's check it out.
- Run ” window again Win and R ” at the same time. Enter “ devmgmt.msc ” there and click “ OK ”. Device Manager we need will appear . You can also open it by right-clicking on “ My Computer ”, “ Properties ”, “ Device Manager ”.
- We look for the “ Network adapters ” section and expand it. A list will appear in which you need to activate the Wi-Fi module. To do this, hover over it (in our case it is called Realtek 8821AE Wireless LAN....), right-click and select “ Enable ”. After 20 seconds, you can try to connect to the network.
Checking the operation of the hardware Wi-Fi module on a laptop
To check the presence of a wireless module in a laptop, you must:
- Go to the control panel.
- In Device Manager, go to the “Network Adapters” section. If the list of devices contains the name Wireless, then the equipment has a built-in WiFi connection module.
To enable Wi-Fi on some laptop models, you need to find a slider or a special button on the device body.
This activation method is common mainly on older models. If there is no built-in switch, then you need to pay attention to the laptop keyboard. The function keys F1-F12 contain buttons for quick action. They allow you to adjust the sound volume, screen brightness, activate airplane mode, and turn the wireless module on or off.
To start the wireless connection, inspect the function buttons. One of them should show an antenna symbolizing Wi-Fi. On laptops from different manufacturers, the keys may differ. But in most cases, the Fn button will activate the function button when pressed simultaneously. It is located at the bottom of the keyboard.
Let's look at the most popular models as an example:
- Laptops from Samsung usually have a button for hardware activation at F9 or F12. One of them must be pressed simultaneously with the Fn key.
- The Fn and F2 key combination activates the network adapter on Asus devices.
- On Lenovo equipment you need to use the Fn and F5 key combination. But in some models there are separate hardware buttons for this function.
- HP laptops usually have a touch key with an image of an antenna. But it is also possible to activate the adapter by combining Fn and F12.
- Pressing Fn and F3 simultaneously enables the wireless communication module on Acer and Packard bell devices.
Also, the original key combination is often used in some device models. This is described in detail in the instructions for use that come with it.
We update outdated drivers on the Wi-Fi adapter
One day you will discover that Wi-Fi does not work on your laptop. There are many reasons why this happened, but first of all, we recommend that you check if everything is okay with the drivers on the wireless module. After all, they could fly off or simply become outdated. Now we will show you how to check whether the driver needs to be updated:
- Press " Win and R ". Paste this line - “ devmgmt.msc ”. Click " OK ". We get to the “ Device Manager ”.
- Find “ Network Adapter ” and expand it. From the list, select the module where it says “ Wireless LAN ”. Double-click on it.
- A window will pop up where you need to click on the “ Driver ” section in the top row. Here you will see the version of the driver that is currently installed on the computer.
Now find the official website of the manufacturer, compare your driver with the driver on the website. Or, to be sure in any case, download the drivers and install them again. Before installation, we recommend that you completely remove the old driver from your PC. After this procedure, we try to turn on the wireless module on the laptop.