In our article today we will talk about what to do when the “computer is not started correctly” error appears and how to fix it. All this will be shown using the example of the Windows 10 operating system, but it is also quite applicable on other operating systems, with some nuances.
Before you proceed directly to the study. For this step-by-step induction, we recommend that you familiarize yourself with the thematic video. In the video, the author explains in detail how to fix the error associated with the incorrect startup of a computer running Windows 10.
Why does Windows 10 keep loading forever?
Alas, it is impossible to immediately say exactly why the operating system goes into a cyclic reboot.
Of course, if messages about failures appear or faulty components are indicated in the description attached to the blue screen, you can partially guess what caused the constant restart. However, the most common reasons for the endless loading of Windows 10 starting over and over again are considered to be problems with the equipment (hardware failures), damage to system components of the bootloader, problems with installing the latest updates, etc. It is possible that the system could have caused this behavior Problems with the Update Center itself can also be affected. Also, sometimes a cyclic restart can be triggered by incorrectly installed user applications (most often in the form of pirated copies or unofficial assemblies) and even viral influence.
What causes the error
Why does such a glitch appear? What causes the system to generate an error? In fact, there can be a lot of reasons for this, and, as you understand, there are also quite a few specific, one hundred percent solution options.
The main reasons for the failure:
- unsuccessful operating system update;
- installation of problematic software;
- virus software activity;
- incorrect user actions: with system files;
- with the Windows 10 registry.
This is not a complete list of reasons, however, without delay, we move on to solving the problem.
What to do in case of hardware failures?
First, let's look at hardware failures associated with the incorrect functioning of the installed equipment, as a result of which a blue screen first appears, which usually contains a description of the faulty driver, after which the computer with Windows 10 starts endlessly loading. In this situation, the main culprits are the hard drive and RAM and video card. To troubleshoot problems, first of all, check the tight connection of all hard drive cables, as well as the correct installation of the graphics adapter or memory sticks on the motherboard. If a visual inspection does not yield anything, try removing the RAM sticks one at a time, turning on the computer again each time. If at one point the loading goes well, the faulty bar will have to be replaced. If you have bootable media with programs like TestDisk to check your hard drive, Memtest86+ to test your RAM, or similar utilities, run a full scan of the specified components using them. This will allow you to accurately identify the cause of the failure.
When the system boots, a blue screen appears with the inscription INACCESSIBLE_BOOT_DEVICE
Often the problem occurs when resetting or updating Windows, or when changing disk partitions. In more rare situations, failures may be caused by physical damage to the HDD.
First, you should disconnect all additional drives connected to your PC. Make sure that the required system disk is first in the boot queue in the BIOS/UEFI (for UEFI this may also be the Windows_Boot_Manager item). Restart your device and check if the Windows 10 situation has changed.
If the “ten” was reset/updated and the error does not disappear, do the following:
- On the blue screen “The computer is not starting correctly” (appears after the error message), select “Advanced settings”;
- Go to the “Troubleshooting” section, then “Boot Options” and click the “Restart” button;
- After the PC automatically restarts, by pressing the 4 or F4 key, select item number 4 - “Enable safe mode”;
- The computer turns on in the specified mode and we reboot it again (in the standard way through the Start menu);
- Now let’s check whether the failure has been resolved.
If you still have the same problem, you can similarly enter “Advanced options” and select the “Startup Recovery” section . Quite often, this helps resolve the problem.
Another situation where the INACCESSIBLE BOOT DEVICE message appears is an incorrect BIOS update, power failure, or a dead battery on the motherboard. Most often, this leads to an auto reset. Go to the BIOS, find the section with the settings for SATA devices and change the operating mode. For example, if IDE is installed there, switch to AHCI (or vice versa). Be sure to save the new configurations and restart the device.
If no method helps solve the problem, you will need to reset or reinstall the OS.
How to fix Windows 10 endless loading when you turn on your computer using the simplest method?
But as practice shows, the largest number of such situations are caused by damage to important system components. If Windows 10 keeps loading, force shut down your computer or laptop and then turn it back on to activate the automated recovery tool. It is possible that turning off and on will have to be done several times. When the rollback starts, the system (unless critical damage is detected in it) will be restored. However, quite often you cannot count on such actions, since when you try to restore, you still receive a message stating that the computer was loaded incorrectly.
In this situation, you should not immediately press the restart button. If there is an active advanced options button nearby, use it, and then try loading the Last Known Good Configuration or entering Safe Mode. After this, some problems can be resolved.
Troubleshoot Windows 10 in OS Settings
The Windows Troubleshooter will become available to the PC user after entering Settings after updating Windows 10 to Windows 10 version 1703 (Windows 10 Creators Update).
To enter Troubleshoot in Windows 10, follow these steps:
- Go to the Start menu.
- Click on the Settings icon (gear icon).
- Select the "Update and Security" section.
- Enter the "Troubleshooting" section.
Here are the tools that run Windows 10 troubleshooting, in the appropriate category. This is a kind of Windows Troubleshooting Center.
Problems can arise in the operation of any computer, and with the help of standard system tools, problems can be corrected automatically.
Specific methods for solving possible problems in the operation of the OS or hardware are grouped into two areas: “Start and work” and “Troubleshooting”.
The Start and Run section can help you resolve the following issues:
- Audio playback - Troubleshoot audio playback issues
- Internet Connections—Troubleshoot problems connecting to the Internet or websites
- Printer - Troubleshooting Printing Problems
- Windows Update - fix problems that are preventing Windows from updating (you can read about fixing this problem using the Windows service)
The “Troubleshooting for other problems” section is responsible for fixing problems:
- Bluetooth - Troubleshooting Bluetooth Devices
- Video playback—Troubleshoot problems playing movies, TV shows, and videos
- Incoming connections - Troubleshoot incoming connections and Windows Firewall issues
- Voice functions - microphone not ready
- Homegroup - Troubleshoot issues with viewing computers and shared files in a homegroup
- Recording Audio - Troubleshooting Audio Recording Problems
- Keyboard—Troubleshoot problems with your computer's keyboard settings
- Equipment and device - troubleshooting problems with equipment and devices
- Shared folders—find and fix problems accessing folders on other devices
- Power - Find and fix problems with your computer's power settings to save power and improve battery life
- Search and Indexing - Find and fix Windows Search problems
- Windows Store apps - Troubleshoot issues that may prevent Windows Store apps from working properly
- Network adapter - troubleshooting problems with wireless and other network adapters
- Blue Screen - Troubleshooting Errors That Cause Windows to Stop or Restart
- Troubleshooting compatibility issues - Find and fix problems running older programs on this version of Windows
As you can see, in Windows 10, a large number of tools are available to solve possible problems in the operation of the operating system, and to resolve issues related to the incorrect operation of computer hardware.
What should I do if the recovery environment does not boot?
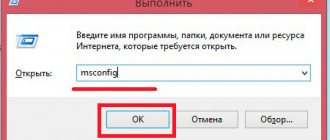
If you were able to start in Safe Mode, go to the configuration settings (msconfig) and set either diagnostic startup using the general tab, or on the boot tab set the safe mode parameters using either minimal configuration or Active Directory recovery.
You can launch the recovery environment from the command line by entering the command “reagent.exe /enable”, but if encryption of the system partition is enabled, it may not work, so you will first need to deactivate Bitlocker using the corresponding section in the Control Panel.
Automatic recovery failed to restore your computer
In this situation, we go to “Advanced options” and there is the following choice:
- Continue – continue trying to boot the Windows 10 operating system. But this method will most likely fail, otherwise our system would boot without problems.
- Turn off the computer, everything is clear here
- Troubleshooting, let's look at this point in more detail.
Reset your computer to its original state (you can keep or delete your personal data and then reinstall Windows). This is the most extreme solution to the problem, since all settings of the Windows 10 operating system will be reset to factory settings.
Extra options. And here let's look at the sequence of tools used in the order in which I personally would use them to try to restore the system to working order:
— Startup Repair (troubleshooting problems that prevent Windows from loading) You can try this option, as a rule it does not have much effect. Just after an unsuccessful attempt to troubleshoot problems that prevent Windows from loading, additional recovery options appear.
— Boot options (setting up Windows boot options) – here we are provided with additional boot options for the Windows 10 operating system. To use them, you need to restart the system. Let's reboot to see what this all looks like.
This is analogous to additional boot options when in XP or 7 we press F8 during boot. Only here the most important item “Last Known Good Configuration” is missing, as well as the function of loading additional system parameters via the F8 button. In 8 and 10, this feature was disabled to increase the loading speed of the operating system. In my opinion, it is simply stupid to sacrifice such vital functions in order to speed up the loading time of the OS.
This function can be restored manually, but you will have to dance with a tambourine. And I plan to make a separate video on this topic. And in this video we'll see what we have by default.
- Enable Debugging – Starts Windows in advanced troubleshooting mode
- Enable boot logging - this method creates a text file with a list of all installed drivers, this can help with advanced diagnostics.
- Enable low-resolution video mode - in case you have some problems with the image. Let's say you specified a very large screen resolution that the monitor does not support, and through this item you can cancel these changes.
- Safe mode - well, everything is clear here, loading only with the main drivers and services. The first thing you should do is start in this mode; most often this helps restore functionality. Or at least, you can copy all important files before reinstalling the operating system.
- Safe mode with loading network drivers - to provide the ability to work with a network, usually the Internet, to search for information on troubleshooting.
- Safe Mode with Command Line Support - Boots to a command line without a user interface.
- Disable mandatory driver signature verification – may be required when installing drivers that contain incorrect signatures. For example, I couldn’t install a driver for a fairly old printer on 10, it just didn’t want to be installed and that’s all. After booting in this mode, I was able to install the driver and everything worked! But, in fact, this item does not affect the loading of the operating system in any way.
- Disable early launch of anti-malware protection - drivers are scanned for threats during boot, and if the protection blocks the driver or it is infected, it will fail to boot. So you can try disabling early launch protection to start and remove it manually.
- Disable automatic restart after crash - This option should be selected if Windows has entered a cycle where a system crash causes a restart and you do not have time to see the error message that causes the restart.
- F 10 Launch recovery environment - this is also the menu we worked with at the very beginning.
- System Restore (Windows Restore using a restore point) - restore from a checkpoint, unless, of course, you are configured to create system restore checkpoints.
— Restoring a system image - personally, I always set up an archiving system on my home and work computers, but, as a rule, no one does this, so I think this is unlikely to help you. But, if you want to know how to set up an archiving system, then watch my video on this topic (link in description)
— Command line – if you have found the cause of the problem and it can be fixed using the command line. Let's say we change the disk from which the operating system should boot.
- Return to previous version - if you updated the version of Windows 10, you can try to roll back to the previous version. But, before that, it is advisable to save everything important on a flash drive or portable hard drive.
Troubleshooting system startup problems
When using the blue cone with the selection of additional parameters mentioned above, you can try to get rid of the system going into a cyclic restart using the startup repair item, which is available in the list after selecting diagnostics.
It is possible that problems will be identified and corrected automatically.
The system starts slowly, but works
The easiest problem to solve. All you need to do is revert back to the previous version of the OS you had before you decided to upgrade. You won't need to download anything. It is enough to patiently wait for the download, no matter how long it may be (more than 40 minutes is unacceptable, which means the OS will not load). Next, go to the system settings (open by right-clicking on “My Computer”) and select the item: system protection.
A new window will open where you will find the “Restore State from Checkpoint” option. Select it and click the “Next” button. You will see all available points with the date they were created. If the problem arose after starting the update through the official installation center, then today’s date will definitely be shown here. Before starting updates, Windows 10 always makes a point, just for such situations. Select any one, click “Next” and follow the instructions on the screen.
There is another way, but it is radical. If the OS works, you can always roll back to factory settings. To do this, in the control panel, find the “Update and Security” item, where go to the category: Restore the computer to its original state. Select this item and the OS will offer the following:
Please note that even the “Keep my files” option will cause you to lose some of your data. This especially applies to installed software. It will disappear and you will need to download Microsoft Office, Excel and other utilities again. Add our site to your bookmarks to quickly restore all the software you need.
Bootloader recovery and update management
If the bootloader is damaged, which is most often observed, none of the above results will give. Therefore, it is strongly recommended to boot from removable media with the distribution kit or using a LiveCD, call the command line, and then use the Bootrec.exe tool, adding the “/FixMbr” attribute, separated by a space, and then “/FixBoot” (without quotes).
If the problem is not resolved upon restart, you will have to completely rewrite the bootloader by adding the “/RebuildBCD” attribute to the main command separated by a space, and then reboot the system again in normal or safe mode.
Since it is very common to experience endless downloads after updating Windows 10, the smartest solution would be to remove them. To do this, if possible, it is better to use Safe Mode, go to the programs and components section in the Control Panel, and then remove the latest installed packages one by one from the installed updates section.
Note: You don't need to delete everything. It is enough to uninstall the packages one by one, checking the functionality of the system after a restart, and when a faulty update is found, when searching for updates manually again, it will need to be removed from the installation list. You can also use a utility from Microsoft called Show or hide updates for such purposes.
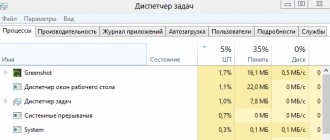
But it also happens that the system seems to be working, but updates are not installed. Endless downloads of Windows 10 updates are almost always associated with problems with the Update Center itself. First, look at the startup type of this service in the corresponding section (services.msc).
The Update Center, Delivery Optimization, Windows Modules Installer, and Windows Installer services must be active. If a component is not active, launch it in the parameters editing window, and in the start type set the value to automatic launch.
You can also use the command line running as an administrator to fix problems and restart the update service. First, the commands “net stop wuauserv” and “sc config wuauserv start= disabled” are executed, followed by a full reboot, and after that activation is performed with the commands “net start wuauserv” and “sc config wuauserv start= auto”. If this approach does not work, try looking for an automatic solution in the Troubleshooting Center by calling it from the Control Panel.
Causes
Since the release of Windows 10, this problem has begun to appear much more often than on versions 7 or 8 of the OS. There have been an order of magnitude more requests for support and messages on specialized forums. “A computer with Windows 10 does not start after updating” - messages with such headings often appear on Microsoft forums and specialized resources. With the release of new updates, there are more and more such messages.
The problem when the system does not start after installing the Windows 10 update occurs for several reasons:
- Impact of third party applications;
- Damage to the integrity of the registry and system files;
- Incompatibility of drivers and hardware;
- And finally, the problematic update.
I can say that the problem that occurs due to updates occurs quite rarely (except for the latest October Update '18).
Mostly, the problem is faced by old devices, “cluttered” systems, on which 2 antiviruses and 3-4 “optimizers” are installed. But even new devices encounter this not very pleasant error.
Crashes when starting installed programs
Sometimes the problem may not be in the system, but in the installed program. For example, it is very common for Windows 10 to load endlessly with NFS Underground 2. In other words, the crash is caused by the installed game itself. Apparently, this only happens because the installed version is not the official one, but a pirated one. To fix the problem, you need to download the official release or at least replace the game start executable file speed.exe with the original one. Also, some experts recommend launching the game in compatibility mode with versions of Windows lower than the tenth (if possible, even XP, and if this option is not available, then using a previous modification of the system).
Windows 10 Troubleshooting Example
The next window prompts you to select a device for diagnostics. Diagnostics and troubleshooting are carried out automatically.
Once the diagnostics are complete, the troubleshooter will offer an option to resolve the detected issues.
If the troubleshooter finds a problem, agree to the suggested solution. If necessary, run additional checks to look for problems. Perhaps the problem will be resolved after fixing this problem.
In my case, the system tool did not detect any problems (there were no problems).
Finally, close the Windows troubleshooter.
From the official website you can download an application that performs similar functions.
Using bootable media
This option is already for those whose OS does not start, or only reaches the password window. If you have not created it, you will need to create it on another work computer. We connect it to your problematic PC and launch the operating system in safe mode. This can be done in 9 cases out of 10. And then you are required to check the performance of the computer, as well as look at critical and vulnerable spots:
- Scan the system for viruses;
- Check the startup area;
- If possible, disable unnecessary software;
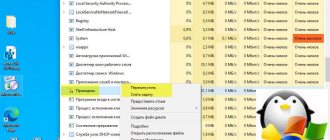
You can do the first using Kaspersky Anti-Virus or any other free solution. You can do the second using CCleaner or another utility. We also recommend disabling various utilities that you even need and removing them from the startup area. This is required in order to eliminate the possibility of a software conflict.
After all these steps, try restarting the system in normal mode, without using a bootable USB flash drive. If the OS starts, then congratulations, the problem is solved. If the situation has not changed, then you will have to move on.
What to do to restore Windows 10
If safe mode does not load or none of the methods help, it is recommended to use a third-party boot disk with a healing utility to transfer important data to another drive.
You should launch the program through the BIOS settings, setting a flash drive or disk as the priority media. Next you need:
- Install the healing utility with the file system on the media via another device.
- Insert the drive into a computer with a non-working operating system and start it through bootable media.
- Find and transfer important data to the drive.
- Check for malicious code.
- Remove the media and connect it to your work computer.
- Save the files in a safe place, format the drive.
- Create a boot image of Windows 10.
- Check functionality. Otherwise, perform a clean reinstall of the OS.
Download Win 10 Recovery Environment
As you may have already observed, the operating system makes its first recovery attempts on its own. If she succeeds, you don’t see any accompanying inscriptions - it just takes a little longer to load the next time. Unfortunately, usually built-in tools used in automatic mode do not bring tangible results - and you have to see on the screen either the message below, or a black window, or one of the options for a blue window.
In the first case, to initiate the recovery process, you only need to click on the “Advanced options” . If the drive with boot data is not yet connected, do it right now - otherwise the process will not be completed.
If you do not see the text presented above on the monitor, and the error due to which Windows 10 does not start after the update persists, take the following measures:
- By accessing the BIOS ( UEFI ) settings, make the connected media first in the boot list. You cannot skip this step, otherwise the PC will continue to start from bad sectors.
- As we described above, select in which language you would like to “communicate” with the recovery environment. This factor will not affect the subsequent state of the restored system.
- Proceed to recovery by clicking on the link located in the lower left corner. “Install” button - of course, unless you want to perform a clean reinstallation.