Many users believe that the keyboard keys on their personal computers are strictly fixed and may be surprised to learn that this is not the case at all.
Since the keyboard is one of the most used PC tools, remapping its keys can improve the user's productivity and enjoyment of using it.
How to reassign keys on the Windows 7 keyboard
Why remap your keyboard?
There are many reasons to remap keyboard keys:
- By remapping frequently used keys, you can get a productivity boost when working on the keyboard, if it suits a particular user.
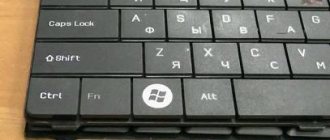
- Remove unused keys, for example, “Caps Lock”, a duplicate “Shift” key, or add the necessary ones, for example, on laptops without the “Win” key, reassigning it to the right “Ctrl” or “Alt”.
- Replace keys when switching from MAC OS, where some keys are in different places - for example, the Alt key.
- Remap special keys, media buttons (play, etc.), or "game" keys (eg, replacing the "Win" button) with different keyboard keys.
- Sometimes a key, for example, on a laptop, simply becomes non-working and needs to be reassigned to a working version.
Common reasons why you need to reassign keys
Why might you need to disable the keyboard?
- It just so happens that many users like to have a snack or a cup of coffee while working on a computer. One careless move and coffee ends up on the laptop keyboard. Such inaccuracy can lead to some keys sticking or complete failure.
- If after drying one of your keys is stuck, even if you connect an external keyboard, you will not be able to work on the computer until you disconnect the built-in one. The key will always be in a clamped position and will interfere with printing or viewing web pages.
Figure 2. Why might you need to disable the keyboard?
Temporarily disabling the built-in keyboard may be necessary in other cases:
- You have small children who are eager to press buttons on your work computer while you are away;
- Having a cat in the house that loves to run on the table and laptop;
- The keys on the built-in keyboard are very inconvenient to use. Owners of netbooks understand this especially well. There is a need to connect an external keyboard;
Whatever the reason for the desire to disable the laptop keyboard, you can do this in two ways:
- Use standard Windows
- Use third party programs.
It is best to use the first option, as it guarantees that you will not pick up any virus from the network on your computer.
Creating a restore point
Before reassigning keyboard keys, it is highly recommended to create a system restore point.
This will save your current keyboard settings in case you need to return to them without being able to do so through other means.
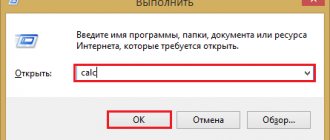
Step 1. Press the key combination “Win+R”.
Press the key combination “Win + R”
Step 2: Type “sysdm.cpl” into the menu and click “OK.”
Type “sysdm.cpl” into the menu and click “OK”
Step 3. Click on the “System Protection” tab, select the desired disk and click “Create”.
Click on the “System Protection” tab, select the desired disk and click “Create”
Step 4. Enter the name of the recovery point and click “Create”.
Write the name of the recovery point and click “Create”
Step 5. After creating a restore point, click “Close”.
Click “Close”
Reassigning keys using software methods
SharpKeys
SharpKeys includes many features and a simple interface. When using the program, all reassignments are saved in the OS, because the program adds values to the appropriate sections of its registry.
Reference! For changes in the program to take effect, a PC restart is required.
Step 1. Go to: https://www.randyrants.com/ and click on the “ZIP” link in the “Download SharpKeys” column.
Click the “ZIP” link in the “Download SharpKeys” column
Note! You can find the downloaded program archive in the “Settings” of the browser by going to the “Downloads” item.
Step 2. Open the archive with a mouse click and click on the “Extract...” icon.
Click on the "Extract..." icon
Step 3. In the right part of the window, specify the drive, type the folder name in “Path...” and click “OK”. The files will be moved to the specified folder.
In the right part of the window, indicate the drive, type the folder name in “Path...” and click “OK”
Step 4. Open the folder and run the .exe file.
Open the folder and run the .exe file
Step 5. After launching the program, click the “Add” button at the bottom of the window.
Click the “Add” button
Step 6: Click the Type Key button and press the keyboard key you want to replace until it appears in the window. Click "OK".
Click on the “Type Key” button, press the keyboard key that needs to be replaced, then “OK”
Step 7. Click on the “Type Key” button in the right window or select in the window with a mouse click the function that you want to add to the key from the previous step. Click "OK".
Select in the window by clicking the function that you want to add to the previously assigned key, click “OK”
Step 8. A description of the selected changes will appear in the “From” and “To:” windows. Click “Write to Registry”.
Click “Write to Registry”
Note! In the example given, the Caps Lock key will launch the calculator.
Step 9. At the warning about the need to exit Windows for the changes to take effect, click “OK”.
Click “OK”
Step 10. If no further action is required, click “Close” and answer “Yes” to the possible question about making changes to the registry.
Click “Close” and confirm the action by clicking “Yes”
Step 11. Log out or restart your PC.
Open “Start”, click on the arrow next to the “Shut down” button, select “Restart”
Step 12. To return to the previous key configuration, click on the desired line and click “Delete” or “Delete All” and click “Yes”.
Click on the desired line. Click “Delete” or “Delete All”, then “Yes”
Step 13: Click “Write to Registry” and click “Close”.
Click “Write to Registry” and click “Close”
After restarting the PC, all changes will be deleted.
Mapkeyboard
MapKeyboard is a miniature, handy utility that makes it easy to assign one key to another.
Step 1. Follow the link: https://www.snapfiles.com/downloads/mapkeyboard/dlmapkeyboard.html and click “Download MapKeyboard...”.
Go to the website and click “Download MapKeyboard...”
Step 2. Unpack the files into the desired folder.
Extract the files to the desired folder
Step 3. Launch the program and press the key to be reassigned. In the lower left corner, in the “Remap selected key to:” drop-down list, select a new assignment for the key. The key will turn green.
After starting the program, click on the key, in the “Remap selected key to” drop-down list, select a new assignment for it
Note! In the example above, the Win key will be disabled, for example, without interfering with playing games.
Step 4: Click “Save Layout” and click “Yes” to confirm that you will immediately exit Windows for the changes to take effect.
Click “Save Layout” and click “Yes”
Reference! MapKeyboard requires .NET v3 and runs on Windows XP to Windows 10.
MKey (MediaKey)
This program, in addition to the usual ones, allows you to use multimedia keyboards with customizable buttons.
Special features of the program:
- control of media players, as well as CD-ROM drive;
- emulation of mouse operation, recording combinations of keystrokes (macros);
- launching and managing folders (copying, etc.), programs and PC functions.
Step 1. Follow the link: https://www.seriosoft.org/download.php and click “Download from the official website”.
Go to the website and click “Download from the official website”
Step 2. Run the installation file and click “Run”.
Run the installation file and click “Run”
Step 3. Select a language and click OK.
Select the language and click “OK”
Step 4: Disable all keyboard programs and click OK.
Disable all “keyboard” programs and click “OK”
Step 5. Click “Next”.
Click “Next”
Step 6. Select “I accept...” and click “Next” four times.
Select “I accept...” and click “Next”
Step 7. Click “Install”.
Click “Install”
Step 8. Check the “Run program” box and click “Finish”.
Check the “Run program” box and click “Finish”
Adding a keyboard shortcut to one button
The program menu consists of three columns:
- key selection;
- choosing an action to take;
- setting up the details of the selected action.
For example, the user needs to program the keyboard shortcut “Ctrl+C” for one button.
Step 1. Click the “Add” button at the bottom left in the first column.
Click the “Add” button
Step 2. In the menu that opens, press the keyboard key to which the action is assigned. You can also assign a name to the selected key. Click "OK".
Press the keyboard key to which the action is assigned, then “OK”
Step 3: Click "Keyboard" and select "Keys" in the middle column.
Click "Keyboard" and select "Keys" in the middle column
Step 4. In the third column, select “Emulate pressing”, select a button in the drop-down list, select a system button (for example, Ctrl) and click the floppy disk image to save the settings.
Oh, select the button in the drop-down list, select the system button, click on the floppy disk icon
After restarting the PC, pressing the “Scroll Lock” button will trigger the “Ctrl+C” key combination.
Video - How to change the assignment of keys on the keyboard
How to temporarily disable a laptop's built-in keyboard using third-party programs?
The first method of disabling the built-in keyboard is more preferable if you need to turn off the keyboard for a long time. But if you need to disable it only for the period when you are not at the computer, then it would be best to use special utilities.
At the moment, there are many similar applications that allow you to disable devices on computers, but they all have approximately the same interface and control system. As an example, we will look at the most popular Toddler Keys , which you can download from this link . To disable the keyboard using it, follow these steps:
Step 1.
- Download and install the program on your laptop. Launch it from a shortcut on your desktop.
- In the tray (right corner of the taskbar) its icon ( TK ) will be displayed, on which you need to right-click to open the menu.
Figure 1. How to temporarily disable the built-in keyboard of a laptop using third-party programs?
Step 2.
- In the list that appears, to disable the keyboard you need to tick the line “ Lock Keyboard ”. As soon as you do this, the computer will stop responding to pressing any keys on the keyboard.
Figure 2. How to temporarily disable the laptop's built-in keyboard using third-party programs?
- Lock Keyboard line .
Direct key remapping
Direct reassignment of OS keys is done using the registry. An example of disabling the “Win” key through its editor.
Step 1. Click "Search" next to or in the "Start" menu, type "regedit", right-click on the program, selecting run with administrator rights.
In the Start menu, type “regedit”, right-click on the program, select run with administrator rights
Step 2. Follow the path, sequentially opening the folders with mouse clicks until: “HKEY_LOCAL_MACHINE”/”SYSTEM”/”CurrentControlSet”/”Control”/”Keyboard Layout”.
We follow the specified path, sequentially opening the folders with mouse clicks
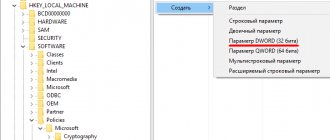
Step 3. Right-click in the folder contents window and select “Binary Parameter” with the left mouse button.
Right-click in the folder contents window and select “Binary parameter” with the left mouse button
Step 4. Name the file “Scancode Map” and press “Enter”.
Name the file “Scancode Map” and press “Enter”
Step 5. Open the created file with a mouse click and enter the data as shown in the example. Click "OK".
In the “Value” field, enter the data as in the screenshot, click “OK”
Step 6. Restart your PC for the changes to take effect.
Reboot the PC
Step 7. If the key needs to be enabled, open the Registry section (see “Step 2”), right-click on the “Scancode Map” file and select “Delete”, then restart the PC.
Right-click on the “Scancode Map” file and select “Delete”
When manually changing keys, you need to know the hexadecimal scan codes of each key and the order in which they are entered in the registry. You can view all scan codes of the keys on the Wikipedia website at https://ru.wikipedia.org/wiki/Scan code.
Video - How to disable the Windows key
How to disable Sticky Keys in Windows 7
Sticky Keys allows you to use key combinations by pressing keys one after another rather than all at once.
Sometimes this mode is turned on accidentally - for example, when pressed multiple times in computer games, accompanied by unpleasant sounds when the mode is turned on.
In this case, it is better to disable this mode.
Step 1. Press the combination “Win + U” to open the “Ease of Access Center”.
Press the combination “Win + U”
Step 2. Click on “Make the keyboard easier to use.”
Click on the item “Make the keyboard easier to use”
Step 3. Select “Sticky Settings...”.
Select “Sticky Settings...”
Step 4. Uncheck all sticky activation methods and click “OK”.
Uncheck all the ways to activate sticking and click “OK”
How to reassign keys on your keyboard
In the life of any computer keyboard, hard days come over time - the buttons no longer cope with bread crumbs, and the contacts can no longer overcome the substance of dust and sweet tea (or coffee).
Most users do not dare to disassemble the information input device and clean it - they simply buy a new one. What should owners of laptops or expensive keyboards do? It's very simple - you can reassign keys on the keyboard that have stopped working. There is a small, free and portable computer program for this called MapKeyboard .
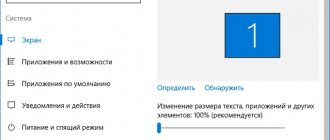
Changing language selection in Windows 10
Step 1. Press the combination “Win + I”.
Press the combination “Win + I”
Step 2. Click "Devices", select "Input", and click "Advanced options...".
Click "Devices", select "Input", and click "Advanced options..."
Step 3. Select “Options...”.
Select “Options...”
Step 4. Click the “Switch keyboard” tab and click “Change combination ...”.
Click the “Keyboard Switching” tab and click “Change Combination...”
Step 5. Specify the desired combination and click “OK”.
Mark the desired combination and click “OK”
Now you can use a more convenient way to switch language layouts in Windows.