Disable access to the Android camera
Camera Block - Anti spy-malware
Developer: BytePioneers sro
4.16
- After launching the application, we get to the main menu, where a lock with a yellow camera will be displayed. This means that the device is not protected and absolutely all applications can use the camera.
- To activate the blocking function, you need to click on the icon and then select “Activate”. The icon will change color to blue and you can feel more secure.
- In the settings, you can also view the list of applications that have access to the camera with the ability to immediately remove questionable ones.
- There is also the ability to create a widget for quick access to the program/game you need without restrictions on access to the camera.
When the camera or microphone is locked, you will not be able to delete applications using the standard method. You will see the message “Deletion failed” - this is a simple protection against unauthorized deletion. To uninstall, you will need to launch one of the programs, go to settings and select “Uninstall application” there. Using these programs significantly increases battery consumption. But if you don’t want to be wiretapped, much less someone knowing about your personal life, then we advise you to use one of these applications. It's easier to charge your device than to delete information from the Internet.
Mute the microphone on a laptop
In all modern laptop designs, microphones are mounted inside. But the design may include a budget and low-quality version of the device. Replacement may be necessary if it is necessary to supply more modern and high-quality equipment.
Disconnection methods
There are ways to disable:
- Try using the instructions that came with your laptop. Most often, the ability to disable it depends on both the version of the operating system and the type of computer.
- The standard method is to go to the “Control Panel”. There we look for the “Sounds and Audio Devices” section. Going to it, open the “Sounds” tab. There we turn off the device. If you need to connect it later, we do the same thing.
- If a RealTek device is connected to the laptop, there is a way to disconnect using the manufacturer's utility. First you need to install it. The microphone can be turned off through the “RealTek HD Manager”. This utility also allows you to adjust the volume.
- You can also use a combination of buttons on the keyboard to turn it off. Many device models have an additional key that allows you to turn the microphone on and off. Most often, there is a drawing on it. It works in combination with “Fn” (the key is located in the lower left corner between “Ctrl” and “Alt”).
- Another way to control the device is to use a program that transmits voice messages. For example, Skype. The program allows you to open access to control various audio devices that are connected to the computer.
- There are times when it needs to be disabled to prevent unauthorized access to it. There is no complete confidence that the previous methods will help with this. You can completely disconnect it from the laptop by disassembling the latter and removing it.
What difficulties may arise
Difficulties arise in rare cases. If one method doesn't work, you can try another. One of them will definitely work. A small problem may arise when disabling in different operating systems, since the algorithm of actions is slightly disabled, depending on the version of Windows. For example, for the Windows 7 version you need:
- Go to “Start:. Select “Control Panel”.
- In the panel we find the “System” section.
- A window will appear that describes the characteristics of the computer. There will be a small list on the left side. We are looking for the “Device Manager” section.
- Displays a window with a list of all devices that are currently connected to the laptop. We are looking for a microphone.
- Right-click and select disable.
For Windows XP the algorithm will be slightly different. We do the following:
- Go to the “Start” menu. Select “All programs”.
- Go to “Standard”.
- Now “Entertainment”.
- Click on “Volume”.
- Our window opens. We are looking for “Recording devices”.
- Click on “Options”. Now on to “Properties”.
- We are looking for the right microphone.
- Let's turn it off.
Voice search in Yandex.Browser
It's no secret that the most popular search engines, if we talk about the domestic segment of the Internet, are Yandex. Both provide voice search capabilities, and the Russian IT giant allows you to do this in three different options. But first things first.
Method 1: Yandex Alice
Alice is a voice assistant from Yandex, which was released recently. This assistant is based on artificial intelligence, which is constantly trained and developed not only by developers, but also by the users themselves. You can communicate with Alice both by text and voice. It is precisely the last opportunity that can be used for what interests us in the context of the topic under consideration - voice search in Yandex.Browser.
We have previously written about how to install this assistant in Yandex Browser and on a Windows computer, and also briefly talked about how to use it.
Read more: Installing Yandex Alice on a computer
Read more: Installing and using Yandex Strings
Method 3: Yandex Voice Search
If communicating with Alice, who is growing wiser before your eyes, does not interest you, and the functionality of the String is not enough, or if all you need is to search for information in Yandex.Browser by voice, it would be wise to take a simpler route. The domestic search engine also provides voice search capabilities, however, it must first be activated.
- Go to the Yandex home page and click on the microphone icon located at the end of the search bar.
In the pop-up window, if it appears, grant your browser permission to use the microphone by turning the corresponding switch to the active position.
Click on the same microphone icon, wait a second (a similar image of the device will appear in the top search bar),
and after the word “Speak” appears, begin voicing your request.
The search results will not be long in coming; they will be presented in the same form as if you had entered your request using text from the keyboard.
If you have more than one microphone connected to your computer, you can select the default device as follows:
Method 4: Google Voice Search
Naturally, the ability to voice search is also present in the arsenal of the leading search engine. You can use it as follows:
- Go to and click on the microphone icon at the end of the search bar.
In the pop-up window asking you to access your microphone, click Allow.
Click LMB again on the voice search icon and, when the phrase “Speak” and an active microphone icon appear on the screen, voice your request.
The search results will not be long in coming and will be displayed in the form familiar to this search engine.
Enable voice search in Google, as you may have noticed, is even a little easier than in Yandex. True, the disadvantage of using it is similar - the function will have to be activated manually each time by clicking on the microphone icon.
Voice control of Yandex Browser
Providing access to the smartphone microphone is intended to create comfortable conditions for moving in the network space. The basic functionality of the web navigator includes a voice assistant developed by Yandex-Alice. Alice's main skills include:
- searching for any information on the Internet;
- playback of audio-video files of a certain topic or mood;
- weather forecast for various periods;
- starting a timer on your phone;
- adding a location to favorites.
The full list of capabilities can be found if you click on the icon in the upper right corner in the chat with the assistant - “What Alice can do . Thanks to the presence of built-in voice commands in the mobile Yandex Browser, system management is greatly simplified - the user creates a request in a given format, so the assistant better recognizes the question.
A voice assistant can be not only a useful tool, but also a pleasant companion. Alice is able to maintain a dialogue on any topic and play charades.
Why can't assistant Alice hear you?
As you know, a bonus of the mobile version of Yandex.Browser is the voice assistant “Alice”, which saw the world in October 2020. A special feature of its functionality is the active use of the gadget’s microphone, thanks to which voice commands are issued to the assistant. Alice's speech recognition mechanism is constantly being improved, so it recognizes user commands better and better and reacts to them quite flexibly.
After installing Yandex Browser with an assistant on a smartphone or tablet, the user may find that he does not hear its commands. Some users may assume that Alice is not adapted specifically to his voice type, but this is not the case. Usually the cause of the error is the application's access to the microphone of your gadget is blocked at the software level.
Manipulations of reinstalling the web browser in this situation usually turn out to be ineffective. What to do, and how to unlock private access to the microphone in the Yandex.Browser application on your Android? Let's figure it out.
We figure out how to unlock the microphone we need
How to restrict microphone access
When Alice's speech recognition engine is no longer needed or is simply boring, you can restrict access to all permissions using the following instructions:
- In the main settings of your mobile gadget, find the applications section. Then click on the line with application permissions.
- In the list that appears, find the microphone; clicking on it will open a special menu. The user needs to select the required utility and block access to the microphone using the appropriate button.
- If your phone does not have a section with separate permissions, then you will need to select the block of all applications and find the one that you want to restrict access to.
- A menu with loaded utilities will appear on the screen. The next step is to look for app permissions, which can be used to restrict microphone access or disable a specific feature.
- Additionally, you can view the list of all permissions available for a specific program by clicking on the “List of Permissions” button.
- If desired, you can deactivate any permission for either one application or the entire list. To do this, use the icon with three dots, by clicking on which you will be able to reset all settings.
It is worth remembering that to fully use social networks, instant messengers and voice assistants, it is not recommended to turn off the microphone. In these circumstances, any of these services becomes ineffective.
Mute the microphone using third-party programs
In some cases, deactivating the microphone and restricting app access through Settings may not be reliable. The fact is that some programs are able to ignore the ban and use phone resources. To maximize the security of personal information, it is recommended to use third-party resources that can block unwanted software. You can use these services:
- Paranoia Lite. It is a completely free service that protects any mobile device from unexpected connection to a microphone, camera or personal data. The main feature is the constant monitoring of suspicious activities, that is, the program works in real time. In addition, the user can use a tool that provides a record of suspicious activity.
- KvdAntiSpy. This is an anti-spyware application aimed at carefully monitoring malware and other utilities that hack access to geolocation, camera and microphone. As in the previous case, the user can track all actions in real time, and also save statistics with blocked and approved utilities. Be it suspicious activity or benevolent transactions, KvdAntiSpy closely monitors what is happening.
- Anti-spy. The simplest and free option, thanks to which you can block access to the microphone, location on the map, camera and personal information at any time. A special feature of the program is the ability to configure a security system that will notify the phone owner when there is an unauthorized attempt to enter the smartphone system.
It is not recommended to use programs downloaded from unknown sources.
The microphone on the computer does not work:
The first step is to determine why the microphone is not working. Perhaps this was preceded by some event or action. By remembering the background of the problem, it will be possible to significantly narrow the range of likely sources of the malfunction.
Causes
Now we list the main reasons why the microphone does not work on a laptop or desktop PC, ranging from the simplest to the most complex problems:
- The microphone is turned off on the headphones or with a button on the case;
- The microphone connector is not connected to the correct port or the plug is slightly out of the socket. Poor contact is the most common and simple cause of the problem;
- The connector assignments are set incorrectly. The computer may incorrectly identify the microphone as a sound-producing device;
- There are no drivers for the sound card. In Windows 10, almost all drivers are installed independently, but in earlier versions of the operating system you had to do everything yourself. Even a smart system for searching and automatically installing drivers can fail, so we recommend checking that they are working correctly;
- The microphone is inserted into the front panel, which is not connected to the motherboard or is malfunctioning;
- Sound recording settings are "broken" in Windows;
- The port has failed or the plug has broken;
- The cable is damaged: chewed, frayed, broken, crushed, or something like that.
We won’t philosophize further and guess why the microphone stopped working; let’s just move on to practical methods for correcting the problem.
How to fix the problem?
All of the methods listed below are aimed at correcting the likely causes of microphone failure, although it is usually not necessary to try all methods. Even at the stage of reading the last chapter, guesses about the sources of the malfunction could already be formed. If this is the case, we immediately move on to the appropriate method, all of them are located in the same order as in the previous section.
What to do if the microphone does not work
- Turn on the microphone from the button. Most models have a button to turn on sound recording. In the case of headphones, it is located on the cable or one of the ear cups. On some microphones the button is found in different places, but it is not difficult to notice;
- Check that the microphone is connected correctly. If it worked properly before, but for no apparent reason has stopped recording sound, try pressing the plug to create a reliable connection to the port. After the contact is restored, the device should work. If the problem appears after switching ports, you should remove the cable from the connector and connect it to another socket. Usually microphone ports are highlighted in pink, if there is one, you should connect to it;
Redefining the meaning of connectors. It’s not surprising that the microphone on the computer does not work if it is set to speaker mode. To change the assignment, open the tray and double-click on “Realtek HD Manager”. In the column on the right there are several connectors, right-click on the one into which the microphone is connected and select “Change connector assignments...”. Among several operating options, select “Microphone input”;
- Install sound drivers. Software from Realtek can work with all common sound cards. However, when downloading it is worth considering the version of the operating system. After installation, you should go back to the point and check the purpose of the connectors;
- Switch the microphone plug from the front panel to the rear. It's always best to connect your playback and recording devices to the back panel, which is directly connected to the sound card. The front ports have additional cables connecting to the motherboard, which makes them less reliable and stable;
- Setting up sound recording settings in Windows. Go to the “Control Panel” element called “Sounds”. Select the “Recording” tab and double-click to open the microphone settings. Here we check that in the “Use of device” column the value “Use this device” is set. We also go to the “Levels” tab and set the maximum microphone volume. We can add amplification as needed, but it greatly spoils the sound quality;
We fix physical damage. Everything here is quite complicated, because you need skills in soldering and handling microelectronics. If you do not have the necessary skills, it is better to contact a service center (if there is a problem at the port). Connect the microphone to another computer. Problem still exists? This means there is something wrong with the device, we can resolder the cable or buy a new microphone. If the recorder works, the port is faulty.
How to turn on the microphone on your phone
The performance of the microphone may be impaired due to software or hardware problems.
Moisture got into the case, the smartphone was mechanically damaged, the holes were clogged, contact in the connection of elements was broken - you can go on and on about all sorts of reasons for the microphone to fail, but this is not the main thing, but how to restore the functionality of this element. So, clogged microphone holes can be cleaned using a pin or needle. This is the simplest problem. Below are solutions to more complex problems; some of them cannot be done without the help of a specialist. The solutions to problem situations described below are quite suitable for smartphones Lenovo, Huawei, Sony, LG, Xiaomi and other modifications with Android OS higher than version 6 installed.
The cause of the malfunction may be a software glitch, which the user can fix. The easiest way to do this is by resetting to factory settings. More “advanced” users will be able to “reflash” the device. Problems with the hardware (broken contacts) can only be solved by qualified specialists (you can, of course, try yourself, but then there is a risk of receiving a refusal of warranty service). Therefore, it is better to visit a service workshop with a damaged smartphone.
It is also impossible to solve failures caused by mechanical influences or moisture on your own. For those who are sorry for the money for qualified repairs, below is the sequence of restoring a device that has lost its functionality due to the reasons described above. So, the device needs to be disassembled. When performing this operation there is no way to do without:
- Phillips screwdriver;
- rosin and solder;
- flat screwdriver;
- soldering iron;
- stationery knife.
The operation is carried out as follows.
You need to remove the cover from the back and take out the battery, as well as all SIM cards and memory cards. Next, use a screwdriver to remove the screws and also remove all elements covering the board. As a result, the master gains access to a small round part called a microphone. Resembling a tablet in appearance, it is fixed by means of a barely noticeable cable and is located in a special groove in the body. The broken part must be removed. Next, by unsoldering and installing a new element, the burnt microphone is replaced. This is how troubleshooting is done. It should be recalled that the above manipulations can only be performed by those who are familiar with the basics of electrical engineering. For the rest, in order to avoid further deterioration of the situation, it is better to immediately contact a service workshop for inspection and repair work.
It should be said that you can solve problems related to blockages and software errors on your own. How to determine if the microphone is clogged? This may be indicated by problems with the audibility of the interlocutor or sound distortion. A similar problem can be solved by cleaning the microphone hole, which is a sound collector.
Cleaning is carried out by lightly penetrating the holes with a needle or pin. To avoid permanently breaking the microphone, it is not recommended to use force when cleaning it.
To resolve a software error:
- You need to back up all your valuable information, by turning on synchronization, you need to move all contacts to the memory card, then open the settings menu and perform a factory reset.
- When flashing a smartphone, you must use the software version only from the official source. Otherwise, conflicts between the OS and the hardware are likely.
If this did happen
It is possible that there is another reason why the microphone stopped working, which was already mentioned at the very beginning. If it's broken, that's also possible.
The likelihood increases if:
- the microphone did not stop working suddenly, there were prerequisites for this;
- the device has been dropped or otherwise subjected to physical impact;
- the microphone does not work in all cases in which it can be used, and not just in one service (such as Skype, RedCall or a regular voice recorder).
In this case, the microphone (if it comes separately from the PC) or the entire laptop will have to be taken to a service center, where they can provide professional assistance.
Microphone repair can be quick or lengthy (depending on the severity of the damage). The price also varies widely depending on which recording device needs to be repaired and why it broke.
How to set up a microphone on a computer
After connecting the microphone, you can begin setting it up. To do this, right-click on the speaker icon in the lower right corner of the screen and select “Recording devices” in the menu that appears.
You can also access your microphone settings through the Control Panel. To do this, go to the “Control Panel” and open the “Hardware and Sound – Sound” section.
As a result, the sound window should open in front of you on the “Recording” tab. This tab will display your microphone. To check how it works, just download something into it. If the microphone is working, green stripes will appear to the right of it, indicating the signal received from the microphone. If the microphone does not work, the stripes will remain gray.
You can also disable the microphone at the software level without physically disconnecting the microphone from the computer. To do this, right-click on the microphone and select “Disable” in the window that opens. The microphone is turned on in exactly the same way.
To start setting up a microphone, select it in the list and click on the “Properties” button. You can also right-click on it and select “Properties” from the menu that appears.
After going to the microphone properties, a new window should appear on the screen. This window has several tabs with microphone settings. We will look at all the settings available here in order. On the first tab, called “General,” you can rename the microphone, assign a different icon to it, open a window with the sound card driver settings, or disable the microphone.
The next tab is called “Listen”. Here you can configure the audio redirection from the microphone to the speakers. To do this, just enable the “Listen from this device” function. Here you can also configure the behavior of this function when running on battery power, which will only be useful if you have a laptop.
The next tab is “Levels”. Here are two of the most useful microphone settings. The first function is called "Microphone" - this is simply the volume of the microphone. In most cases, a value of 100 is suitable. The second function “Microphone Gain” here, in most cases, a value of +20 dB is suitable. But here everything is more individual. If your microphone records sound too quietly, then feel free to set it to +30 dB, but if, on the contrary, the microphone is too sensitive and the sound is too loud, then the microphone gain level can be reduced to 10 dB or even to zero.
The next tab is called “Enchancements” or “Improvements”. The settings available here depend on the sound card model and its driver. For example, on my computer there is only one option available here: “Disable all enhancements.”
But, usually, on the “Enhancements” tab, microphone settings are available, which are responsible for sound effects and noise reduction.
Well, on the last tab, which is called “Advanced”, you can adjust the bit depth and sampling frequency of the microphone. In addition, here you can configure the exclusive microphone mode
Also on the “Advanced” tab there is a “Default” button, which returns all settings on this tab to standard.
How to set up Alice on your phone
To customize artificial intelligence for yourself, you can use the application settings. To do this, click on the three horizontal lines at the top left, after which a menu appears on the tap.
In the menu, select the “Settings” section, here you can configure the order of the news feed on the screen, set your region of residence, and also enable or disable query history. You can enable or disable keyboard hints while you are asking a query.
In addition, in the settings you can set the browser with which it is preferable to work and set an information filter for adults. You can immediately activate or deactivate the voice assistant and even set the activation phases, which will allow you not to press the microphone button every time.
Additionally, you can configure the receipt of notifications from Alice and the search bar on the locked screen.
How to activate the microphone in Yandex browser
In this article, we will look at what methods of connecting a microphone exist in the Yandex browser on a computer and phone, and also learn how to activate the microphone for selected sites.
On the computer
There are two main ways to set up a microphone in the Yandex browser. The first method is to change the application's access to the microphone, and the second allows you to launch the microphone directly in the browser. Let's consider both cases in more detail.
Activating the microphone in Windows 10
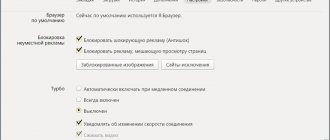
To launch the microphone in the browser, you will need to open the settings and allow access to the microphone. To do this, open the computer settings using the keyboard shortcut “Win + I” (the Win key is located in the lower right and left parts of the keyboard, which shows the Windows logo). Then click on the “Microphone” item on the left side of the settings and set it to “On.” under “Allow apps to access your microphone.”
Activation on request
Activation on request in the Yandex browser means that when you enter a site that supports the voice messaging function, you will receive a request that you need to connect a microphone. That is, you will need to allow access to your microphone. It looks like this:
As you can see in the figure, after you go to a search site and click search using your microphone, the browser automatically makes a request for access. After agreeing to access, you can use the microphone in the browser at any time.
Activate microphone for favorite sites
You can also unblock the microphone only for your favorite sites. Let's take a closer look at how to do this.
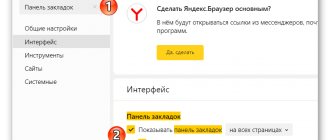
- Open the Yandex browser and go to settings. To do this, click on the three lines at the top and select the “Settings” line.
- Then click on the “Sites” tab located on the left and select “Advanced site settings”.
- Next, scroll down and find the “Microphone Access” block, in it click on “Site Settings”.
- Done, you are in the menu for selecting sites for which the microphone will be available. Here you can block the use of a microphone.
There is no microphone option in the Yandex browser settings, but don’t worry, it’s not needed here. Already when installing the application, the phone automatically responds that the microphone will work. Therefore, you can use voice search on your phone without any settings.
Benefits of Voice Dialing
- No need to use a keyboard.
- Significant time savings when typing the required request.
- Instant recognition of Russian speech.
Automatic correction of grammatical errors. Intelligent addition of your request with similar words or phrases.
That is, the system itself finishes entering the text for you. You can use a headset for voice input. But many Internet users very often encounter a problem: after the appropriate command, no typing by voice occurs. Let's try to understand this issue, determine the causes of the malfunction and offer solutions. So, how to unlock access to the microphone in Yandex?
Activating the microphone in the Yandex browser
Before you turn on the microphone in your web browser, you should make sure that it is properly connected to the computer, configured, and generally works normally in the operating system environment. The guides provided in the links below will help you do this, but we will begin to consider all possible options for solving the problem voiced in the topic of the article.
Read more: Checking the microphone in Windows 7 and Windows 10
Option 1: Activation on request
Most often, on sites that provide the ability to use a microphone for communication, you are automatically asked to provide permission to use it and, if necessary, turn it on. Directly in Yandex.Browser it looks like this:
That is, all that is required of you is to use the microphone call button (start a call, voice a request, etc.), and then click “Allow” in the pop-up window after that. This is only required if you decide to use the voice input device for the first time on a particular website. This way you will immediately activate it and be able to start a conversation.
Option 2: Program settings
If everything was always done as simply as in the case discussed above, this article, as well as such a high interest in the topic in general, would not exist. It is not always the case that this or that web service requests permission to use the microphone and/or begins to “hear” it after it is turned on. The operation of the voice input device can be prohibited or disabled in the web browser settings, both for all sites, and only for a specific one or some. Therefore, it needs to be activated. To do this, follow these steps:
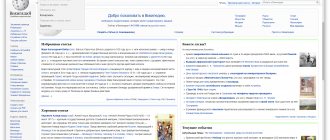
- Open the web browser menu by left-clicking (LMB) on the three horizontal stripes in its upper right corner and select “Settings”.
In the side menu, go to the “Sites” tab and in it click on the “Advanced site settings” link marked in the image below.
Scroll down the list of available options to the “Microphone Access” option block and make sure that the device you plan to use for voice communication is selected in the list of devices. If it is not, select it from the dropdown list. Having done this, set the checkbox next to the “Ask permission (Recommended)” item if it was previously set to “Prohibited”.
Now go to the site that required you to turn on your microphone and use the call function. In the pop-up window, click on the “Allow” button, after which the device will be activated and ready for use.
Additionally: in the “Advanced Site Settings” subsection of Yandex.Browser (specifically in the block dedicated to the microphone, which is shown in the images from the third paragraph), you can see a list of sites that are allowed or denied access to the microphone - corresponding tabs are provided for this. If any web service refuses to work with a voice input device, it is quite possible that you previously prohibited it from doing so, so if necessary, simply remove it from the “Forbidden” list by clicking on the link marked in the screenshot below.
Previously, in the Yandex browser settings you could turn the microphone on or off, but now you can only select an input device and determine permissions for its use for sites. This is a safer, but, unfortunately, not always convenient solution.
Option 3: Address or search bar
Most users of the Russian-language Internet, to search for this or that information, turn to either the Google web service or its analogue from the Yandex company. Each of these systems provides the ability to use a microphone to enter search queries using your voice. But, before using this function of the web browser, you must grant permission to use the device to a specific search engine and then activate its operation. We previously wrote about how this is done in a separate article, and we recommend that you read it.
Read more:Voice search in Yandex.BrowserActivation of the voice search function in Yandex.Browser