How to find out the address using Windows tools?
OS developers from Microsoft have equipped all Windows with a powerful tool called “CS” (Command Line).
Using "KS" allows you to quickly determine the network parameters used by telecom operators for accessing the user's computer to the global network. Experienced users are not always satisfied with the stability of communication even from such popular providers as Beeline or Byfly.
Knowing simple techniques for using third-party DNS and setting them in the settings as preferred and alternative, you can significantly increase the speed of your PC on the World Wide Web.
But before replacing the default address with an alternative option, you need to look at the current one.
In order to independently resolve the question of how to accurately find out your preferred DNS server, you will need to perform the following sequential steps:
- Click “Start”;
- Move the arrow to the line “All programs”;
- Next, a list of applications installed on the computer will expand, where you should enter the “Standard” section;
- In the contents of the section, find “KS” and click on it to launch the console;
- If calling “KS” with numerous mouse clicks caused difficulties, then you should press the “Win” key on the PC keyboard with your finger, and click on the button with the Latin letter “R” with the other finger. This deft move will bring up the Run menu;
- Then type "cmd";
- Click “Ok”;
- Next, in “KS” type “nslookup”;
- Click “Enter”;
- Ready. The searched address will be displayed in “KS”.
This is how simply any user can determine the DNS address and it does not matter which provider he has an agreement with, for example, for Kyivstar and Rostelecom subscribers the actions will be the same.
Best DNS Servers
Google Public DNS
The first DNS server on our list is a server from Google - Google Public DNS. It has been operating since December 2009 and its goal is to make the Internet experience faster, safer and more convenient for users. It is currently the largest government DNS entity in the world. To use Google Public DNS, you only need to use the DNS server IP address 8.8.8.8 or 8.8.4.4.
Switching to Google Public DNS improves security and optimizes speed because Google actually uses Anycast routing to find the nearest server. Additionally, it is resistant to DNS Cache attacks as well as DoS.
OpenDNS
If you're not just looking for a replacement for regular DNS, but an advanced version that gives you more control, try OpenDNS. According to the company, you will take another step towards security by implementing this service. There are two options for OpenDNS - home and corporate. The home version comes with parental controls, phishing protection, and improved speed. The enterprise version of OpenDNS has full functionality to protect the enterprise network. For home use, you can get OpenDNS for free. To configure Linux DNS servers, simply set the following DNS addresses: 208.67.222.222 and 208.67.220.220. OpenDNS also supports Anycast.
DNS.WATCH
DNS.WATCH is a minimalist DNS service that allows you to have fast, uncensored internet access. Because this service is built on freedom principles, you can be sure that your request will reach its target and no redirects will be used. The server is fast and stable. If you live in a censored country, this will be a great solution. DNS service servers: 82.200.69.80 and 84.200.70.40.
Norton ConnectSafe
Norton ConnectSafe is another DNS service designed to enhance your Internet security. It should be noted that Norton has been involved in the security aspects of many devices for a long time. So you can be confident in the quality of Norton ConnectSafe. The service offers three different protection options: protection against malware, phishing and scams, protection against pornography and other threats. Each type uses different IP addresses. To protect your entire home network, simply configure your router.
Level3 DNS
Level3 DNS is a great DNS service if you are looking for a reliable DNS server with excellent performance. While Level3 isn't as big as Google, it has an impressive infrastructure. You can be sure that the speed will be at the highest level. DNS server IP addresses: 209.244.0.3, 209.244.0.4, 4.2.2.1, 4.2.2.2, 4.2.2.3 and 4.2.2.4.
Comodo Secure DNS
Comodo Secure DNS is another service that combines speed, reliability and security. Comodo uses a huge network that includes a large number of DNS servers. Speed will be optimized by selecting a server based on your location. In addition, Comodo takes care of security by supplying a list of dangerous sites, and the DNS service will make sure that you do not visit any of them. Comodo Secure DNS IP addresses: 8.26.56.26 and 8.20.247.20.
OpenNIC DNS
Although OpenNIC DNS is last on the list, it is a great solution if you want free access to the Internet without government censorship. OpenNIC DNS has a very large network infrastructure and therefore will most likely find a DNS server that is close to your physical location. Just select the desired server from the list.
Using the fastest DNS
The use of high-speed DNS for specific connection conditions of the user’s PC is one of the best methods for increasing Internet speed.
You will need to complete the following steps:
- Download the “NameBench” application (the utility is freely distributed on the global network);
- Run the utility (no need to install it);
- There is no need to configure the utility. Immediately click “Start Benchmark”;
- Wait;
- A detailed report will be displayed;
- The report shows information with optimal connection parameters, which the user can only use by entering the preferred and alternative addresses in the properties of the protocol used;
If the user has difficulty entering network parameters, then the instructions described below will help even a beginner to quickly cope with the task.
Changing DNS Settings
It is not enough to be able to check the network settings you are using; you need to know how to change them. The procedure is simple and is carried out through the “NUS and OD” (Network and Sharing Control Center).
Steps:
- Open the “CUS and OD” menu. The most convenient way to do this is by clicking on the network icon in the tray;
- In the menu that appears, click “CUS and OD”;
- Next, in the “NCC and OD” window, click “Local Area Network Connection”;
- In the “General” tab, click “Properties”;
- Select the protocol used;
- Click “Properties”;
- Enter the parameters that were determined after the execution of the previous paragraph of this manual;
- Restart PC;
- Ready.
What is my DNS server? Learn 4 Methods to Verify IP Address
All computers connected to the Internet have an IP address so that they can be found over the Internet by other machines.
This IP address consists of several numbers for convenience in computing purposes.
192.0.2.1 is an example for an IP address.
But these IP addresses are not user-friendly to humans, meaning that it is difficult or impossible for people to remember the IP addresses of all the machines that are important to them.
Therefore, a new concept called Domain Names was introduced as a solution for this purpose.
"www.example.com" is an example of a domain name.
They are simple and easy to remember because they are words with alphabetic characters.
Each domain name is mapped to an IP address.
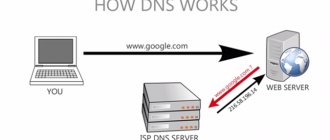
The DNS service resolves between these domain names and IP addresses.
A DNS server is a computer server that maintains a database of public IP addresses and their associated domain names.
When you enter a domain name into your web browser, if your router does not have enough information to resolve the domain name to an IP address, it takes the help of a DNS server to perform this conversion by connecting to one of the available DNS servers.
To find the DNS server IP address that is used by your router, you can use one of the methods below.
Method 1: Using the router GUI
The easiest way to find your router's DNS server IP address is to check it using the router's GUI.
1. First you need to find out the IP address of your router. (In most cases the default IP address is 192.168.1.1)
For Windows machines:
1.1. If you are using a Windows machine, open a command prompt by typing “cmd” in the Windows search bar.
1.2. Enter "ipconfig" to view network information.
There you will be able to see the default gateway address details under the Wireless LAN Details section.
In this case it is 192.168.1.1
For Linux machines:
1.3. If you are using a Linux machine, open a terminal.
for example on an Ubuntu machine.
Terminal can be opened by searching in the search bar.
There are 2 IP addresses here and the one with the lowest metric is chosen as the default IP address, which in this case is 10.8.0.1
2. Then enter this IP address into the address bar of your web browser and you will be prompted for a username and password to access your router's web interface
3. Then in the Status tab, you can view your router's DNS information
Method 2: Using Windows Commands
2.1. One way is to use the nslookup command.
This command provides you with DNS lookup information.
To view them, you can enter at the command line:
The first 2 lines of the output give you the DNS server details.
2.2. The second way is to use the "ipconfig /all" command in the command line:
As you can see, 192.168.8.1 is the DNS address as per the above output.
Method 3: Using Linux Commands
On Linux distributions, DNS information can be retrieved from the "host" or "dig" commands
host: The host command is a utility that performs a DNS lookup.
Therefore, the DNS server details can be viewed as shown below:
According to the above output, 10.0.10.11 is the DNS server IP address.
dig: dig is a tool that is used to query DNS name servers to obtain information about host addresses, mail exchanges, name servers and related information.
see also Domain name resolution with dig command in Linux
As shown above, this command gives you the IP address of the DNS server that is used by your router.
However, in some cases, you can determine the IP addresses of the DNS servers that your computer needs to use, and then these can also be passed to your router.
They can be defined in the file '/etc/resolv.conf', and its contents can be viewed:
Based on the above, priority is assigned to 10.0.80.11, and only if it cannot obtain the relevant information, the data is passed to 10.0.80.12 to perform a DNS query.
Method 4: Take a packet dump and view the DNS data.
To take a packet dump of current network traffic, you can use the tcpdump command.
Tcpdump is a network packet analysis tool that uses tcp/ip capture or filtering packets that are transmitted over the network.
It is widely used by Linux users to troubleshoot network problems.
To view network traffic, run the command below from root in a separate tab in the terminal
tcpdump -n -s 1500 -i eth0 udp port 53
Then in another tab, generate DNS traffic using host or dig command as shown below.
host www.google.com
Then you will be able to see similar output below in tcpdump output
In the above example, you can clearly see my machine (IP address 192.168.64.140) with DNS server (IP address 192.168.64.2) about the domain name www.google.com
Share this article: