Some users may need to delete a virtual disk (drive, floppy drive) that appears in Explorer of the Windows operating system. Sometimes, the computer uses several virtual drives, all of them are displayed in the file manager window.
Therefore, in such situations, users have questions about how to remove a virtual drive so that it is not visible in the Explorer window, especially in cases where several virtual drives were used on the PC.
Working in Windows, users create a virtual drive (disk drive) to open a disk image file, without using a physical CD/DVD drive or inserted media—an optical laser disc—on the computer. This is necessary in some situations.
Using system tools or third-party software, a virtual optical drive is created on the computer. The Windows operating system detects the virtual drive and works with it as with a regular physical drive.
Creating a virtual drive will be needed in the following situations:
- if there is no physical CD/DVD disk on the computer;
- to open a disk image directly on a virtual disk;
- to install a program, launch a game, etc.
Computer games, programs, operating systems are saved as a file with the extensions “.ISO”, “.NRG”, “.MDF”, “.IMG”, etc. Essentially, this is a complete copy of an optical CD/DVD disc in the form of one file.
To open a disk image on a PC, you first need to burn the disk image onto optical media (CD/DVD disk), and then insert the recorded disk into the computer's drive. A virtual disk eliminates the need to write a disk image to an optical disk. The image is mounted directly on the virtual disk.
Modern laptops often do not have physical CD/DVD drives, so the use of virtual drives is important there. A virtual drive will be needed to launch or install a game, program, or open a multimedia disc. One computer can have multiple virtual disk drives.
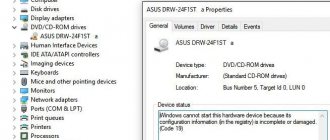
How to remove a virtual disk drive after use? There are several ways to remove a virtual drive from Explorer, depending on what exactly was used to create the virtual drive on a particular computer.
For example, if a user is interested in the question of how to remove a virtual disk drive in Windows 7, then he will have to use the installed programs with which it was created. Starting from Windows 8 and higher, the operating system has a built-in tool for working with disk images.
In this article, we look at deleting a virtual optical drive (ROD) rather than deleting a virtual hard disk. Both are often called virtual disks (a virtual drive or floppy drive is a disk on a PC), but serve different purposes.
First, let's see how to remove a virtual drive in Windows 10, Windows 8.1, Windows 8, and then we will remove the virtual drive created using the most popular programs: UltraISO, Daemon Tools Lite, Alcohol 120%, used for these purposes.
How to remove a virtual drive in Windows 10, Windows 8.1, Windows 8
In this instruction, we will look at how to remove a virtual drive in Windows if the virtual drive was connected using an operating system tool.
Connecting a virtual optical disk in Windows occurs as follows:
- Right-click on the disk image that you want to open on your computer.
- In the context menu, select “Connect”.
A virtual drive with a connected disk image will appear in Explorer.
To disable a virtual drive in Windows, follow these steps:
- In the Explorer window, right-click on the virtual drive. In this case, an image of the Windows operating system was connected there
- In the context menu that opens, click on the “Extract” item.
The virtual disk drive will disappear from Explorer.
If third-party software was used to create a virtual drive in the Windows 10, Windows 8.1, or Windows 8 operating systems, you will have to remove the unnecessary drive using the appropriate application. Disabling the virtual drive is done in the settings of the program that created the optical drive.
How to remove virtual disks created by the “Subst” command
If you have virtual disks enabled in your system using the “ Subst ” command, then removing them from the system is quite simple. When you run the " Subst " command, a mounted hard drive appears from a specific directory on the system, but after rebooting, this drive disappears.
Then a logical question arises: where do the virtual hard disks come from after rebooting Windows? The answer to this question is quite simple - a batch file is installed in Windows startup that executes the “ Subst ” commands when the system starts. Typically, these virtual disks appear when installing local web development servers such as Denver. To enter startup, for example, in Windows 10, just open the “ Run ” program and use the shell:startup command in it
This command will open the startup directory.
As you can see in the image above, this directory contains the batch file “ Virtual Hard Disk.cmd ”. If you look at the contents of this file, it will become clear from which directory the hard drive was created in the system.
To remove this hard drive, just delete this file from the startup directory and restart the computer .
- VirtualBox virtual machine for beginners
How to remove a virtual drive in UltraISO
Now we will try to delete the virtual disk in the UltraISO program. The application is often used to work with disk images, to create bootable flash drives, etc.
You may also be interested in:
- How to create a virtual drive in UltraISO
- DAEMON Tools Lite - virtual CD/DVD drive emulator
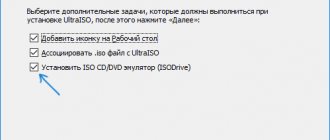
When you install the UltraISO program on your computer, a virtual CD drive is created. If necessary, the user can create several virtual drives in UltraISO.
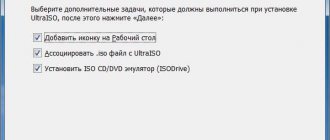
Follow these steps to remove a virtual drive created in UltraISO:
- Run the UltraISO program as an administrator (this is a mandatory requirement).
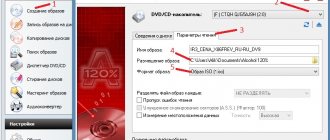
- In the main window of the UltraISO program, go to the “Options” menu, select “Settings...” in the context menu.
- In the “Settings” window, go to the “Virtual Drive” tab.
- In the Number of Devices option, select None, and then click OK.
The virtual drive will no longer appear in Windows Explorer.
Methods for deleting a virtual disk
Both to create a virtual disk in Windows 7 and to delete it, you can use two groups of methods:
- operating system tools;
- third-party programs for working with disk drives.
We'll talk about both of these options in more detail below.
Method 1: Using third-party software
First, let's explore the possibility of deleting a virtual disk using third-party applications. The algorithm of actions will be described using the example of the most popular program for processing disk drives - DAEMON Tools Ultra.
- Launch DAEMON Tools and click “Save” in the main window.
If the window that opens does not display the object that you want to delete, right-click in it and select “Add images...” from the list that opens, or simply use the Ctrl+I key combination.
The file open shell will start. In it, move to the directory where the virtual disk with the standard VHD extension is located, mark it and click “Open”.
The disk image will appear in the DAEMON Tools interface.
If you don’t even know which folder the virtual disk is located in, you can get out of this situation. Right-click on the central area of the window interface in the “Images” section and select “Scan…” or use the Ctrl+F combination.
In the “Image Types” block of the new window, click “Mark All”. All names of image types will be marked. Then click "Uncheck All". All check marks will be cleared. Now check the box next to “vhd” only (this is the virtual disk extension) and click “Scan”. The image search procedure will be launched, which can take quite a long time. The scanning progress is displayed using a graphical indicator. After the scanning is completed, a list of all virtual disks that are available on the PC will be displayed in the DAEMON Tools window. Right-click on the item from this list that you want to erase and select the “Delete” option or press the Del key. In the dialog box that appears, check the “Delete from the Image and PC Catalog” checkbox, and then click “OK” .After this, the virtual disk will be removed not only from the program interface, but also completely from the computer. Lesson: How to use DAEMON Tools
Method 2: Disk Management
Virtual media can also be deleted without using third-party software, using only the “native” Windows 7 snap-in called “Disk Management”.
- Click "Start" and go to "Control Panel".
- Go to System and Security.
- Click Administration.
- In the list, find the name of the “Computer Management” snap-in and click on it.
- On the left side of the window that opens, click “Disk Management.”
- A list of hard drive partitions will open. Find the name of the virtual media you want to delete. Objects of this type are highlighted in turquoise. Right-click on it and select “Delete Volume...”.
- A window will open, which will display information that if the procedure continues, the data located inside the object will be destroyed. To start the removal process, confirm your decision by clicking “Yes”.
- After this, the name of the virtual media will disappear from the top of the snap-in window. Then go down to the bottom area of the interface. Find the entry that belongs to the deleted volume. If you don't know which element you need, you can use the size as a guide. Also to the right of this object there will be a status: “Not distributed”. Right-click on the name of this media and select the “Disconnect...” option.
- In the window that appears, check the box next to “Delete...” and click “OK”.
- The virtual media will be completely and permanently deleted. Lesson: Disk Management in Windows 7
A previously created virtual drive in Windows 7 can be deleted through the interface of third-party programs for working with disk media or using the built-in Disk Management snap-in. The user can choose a more convenient deletion option. We are glad that we were able to help you solve the problem. Describe what didn't work for you. Our specialists will try to answer as quickly as possible.
How to remove virtual drives in Daemon Tools Lite
Many users use the DAEMON Tools Lite program on their computers. This is a free version of DAEMON Tools.
The program can create up to 4 virtual disks. Daemon Tools Lite creates virtual BR-ROM disks.
If necessary, you can delete a virtual disk in Daemon Tools as follows:
- Open the main window of Daemon Tools Lite.
In the main window of the DAEMON Tools Lite program, on the bottom panel there are virtual drives (in the form of images of the computer drive) created in the program.
- Move the mouse cursor to the desired virtual drive, click on the red cross to disable the virtual drive.
After applying the settings, there will be no virtual disk in Explorer.
How to delete a virtual disk in Alcohol 120%
Some users use the Alcohol 120% program (there is a free version - Alcohol 52%) to create virtual drives on their computer. The program creates virtual BD-ROM drives on your computer.
To disable the virtual drive, you will need to enter the settings of the Alcohol 120% program:
- In the main Alcohol 120% window, go to the “Settings” section (on the right side of the window), click on the “Virtual disk” option.
- In the settings window, in the “Number of virtual disks” parameter, select the value “0”.
- Click on the "OK" button to apply the settings.
Windows Explorer no longer has a virtual disk drive.
Creating a virtual disk on Windows 10
Many computer users have at least once encountered the concept of virtual machines. Sometimes there is a need to install not one operating system on a PC, but several. Installing a second operating system on a hard drive is not always a rational solution, because this can affect the performance of one of the OS.
You can use the LiveCD tool, but this method is only suitable for superficial work with the emulated environment. If you need access to full functionality, you should resort to using a virtual machine.
Main programs
There are a huge number of programs that represent a virtual machine on Windows 10; they can be easily found, downloaded and installed. The most common and practical to use are products such as Oracle VirtualBox (or Innotek VitrualBox), MS Virtual PC, VMware Workstation. The virtual machine for Windows 10 is installed in almost the same way in all cases; the process may differ only in some specific nuances.
The process of creating a virtual machine includes several main steps that are almost identical to each other. If you use third-party programs, the user will first have to install a virtual machine on Win 10. Windows 10 has a built-in module called Hyper-V, with which you can create a virtual disk on Windows 10. This is much easier to do than with other specific applications.
The main steps that will need to be completed include: installing the program or activating the module, naming the machine and creating a location, determining the parameters of RAM, virtual disk and other components, installing the guest operating system. What you need to do the necessary actions in the Hyper-V module. First, you will need to enter the Programs and Features section from the Control Panel, select the Windows menu, and check the box next to the name of the module. You will have to wait a few minutes until the service is activated.
After this, the system will reboot. The “Hyper-V Manager” component will appear in the administration section - this is the virtual machine that remains to be configured for operation.
When you log into the manager, you need to create a virtual switch. This is where Windows 10 virtual machines created using third-party programs differ from the Hyper-V module. The switch allows you to set up an Internet connection. First, you need to launch “Manager”, click on the name of the computer, select the same module for virtual switches. There are 3 types: external, internal and private.
It is recommended to select the first option (it will use a network card or Wi-Fi router). Next, click the create button, set the name of the switch, select the desired connection type, and click the “Apply” button.
Main stages of creating a virtual machine
First, we indicate the name of the virtual machine, its location on the hard drive or in a logical partition. Next, select a generation. The second one is recommended because it has additional features, for example, it works with UEFI, but at the same time, it does not support the installation of 32-bit systems. The first generation can handle both 32- and 64-bit systems, but does not support UEFI.
The RAM reservation can be left unchanged (automatic determination of the optimal parameter is enabled), however, if you have physical RAM at the level of 4 GB or higher, the bar can be raised. Using dynamic expandable memory is not recommended.
Select the created switch from the drop-down list and indicate the reserved space on the hard drive. Then specify the location of the pre-mounted image with the system to be installed, click “Finish”
To activate, select the created virtual machine in the Hyper-V Manager and use the appropriate command. Then press the green button on the panel, and then click any key.
After this, the guest OS will be activated and installed as usual.
How to create a virtual disk using VirtualBox
The Virtualbox application is not particularly demanding on PC hardware resources. You will need to make sure that the computer's processor is x86 and there is 200 MB of free space on the hard drive. You will need hardware rendering support, without which it will not install.
When planning the installation of a virtual machine, you need to consider the size of the virtual hard disks, which are usually at least several tens of GB. Don’t forget that Windows 10 itself requires 16 to 20 GB of disk space, and the guest system requires about the same amount. First, you will need to download the installation package from the official website. By double-clicking on the executable file, the program installation window will appear.
Click “Next” to continue installing Virtualbox for Windows 10; in the next window, select all the necessary components for installation. You can install USB support, Python network environment, network access support, and the ability to support a router.
Next, if desired, create shortcuts on the desktop and in the start menu, and also allow you to associate virtual machine files to work specifically in VirtualBox.
Then, in the “Warning Network Interface” warning window, click “Yes” to allow you to install additional network tools for virtual machines.
Go to the last installation window and click the “Install” button.
The installation of the program on your computer will begin. The process will take a couple of minutes.
After the installation is complete, a notification will appear that the program has been installed. There will be a checkmark in the window that says “Start Oracle VM VirtualBox”, this will allow you to start VirtualBox after clicking the “Finish” button.
After performing the above manipulations, a window will appear with the parameters of the virtual system, which will run on real Windows 10. Installing a virtual operating system is no different from installing the OS on a real computer.
secretwindows.ru