Author of the article
Anton Bogdanov
Communication Network Design Engineer
DHCP server - until recently, this term was used only among information systems professionals. But with the advent of Internet routers in almost every apartment, understanding how DHCP works will be useful for ordinary people not associated with telecommunications networks.
What is DHCP
Literally, this abbreviation (protocol DHCP) means Dynamic Host Configuration Protocol, which translated into Russian means “dynamic host configuration protocol.” Thanks to this technology, there is no need to configure network parameters on each client, such as:
- IP address;
- Subnet mask;
- Main gate;
- DNS server address.
For the purposes of this article, we will define the terms:
- Client – the device from which the Internet is accessed;
- Server is a device that provides Internet access to the client.
In simple words, DHCP does all the work of selecting network settings automatically, without the need to manually assign each device its own IP address. This greatly simplifies the work of the system administrator in case of network expansion.
How to give authorization rights to a DHCP server
As far as I know, in order for you to be able to authorize DHCP servers, you must be an Enterprise Administrator. It is clear that there should be a minimum number of people in this group. You can delegate these rights to any group or user. To do this, in the Active Directory - Sites and Services snap-in with the “Show services node” option enabled, you right-click on the NetServices and select Delegation of Control.
In the first step, you need to specify the user or group for which rights to manage DHCP authorization will be issued.
We choose to create a special task for delegation.
Leave the item “This folder, existing objects in it and creating new objects in this folder”
In the next step, we give full rights. After this, the desired group will be able to authorize DHCP servers in your Active Directory domain.
This is where I want to end this article, it has already turned out to be very long. If you have any questions, write them in the comments, I will try to answer them. With you was Ivan Semin, author and creator of the IT blog Pyatilistnik.org,
Operating principle
If it’s quite easy to understand why DHCP is needed, then you need to understand a little about the principle of its operation. IP assignment via DHCP is carried out in 4 steps:
- Discover. A client that needs to obtain a network address sends a message to all computers on the network requesting that it be assigned an IP. For its temporary identification, the client is assigned the address 0.0.0.0;
- Offer. The server receives a request from the client, analyzes it and, based on its settings, selects a configuration and sends it to the client;
- Request. Having received the proposed settings, the client sends a request to the server that responded to it to provide it with these settings;
- Acknowledge. The server receives a request for specific settings proposed earlier, creates a binding for the client and sends them to him.
The assigned settings are not issued forever, but for some time. When the lease time of an address comes to an end, the client sends a request to the server to renew the lease of the same address. The server receives the request, and if there are no reasons for refusal, it renews the lease.
All this exchange of packets occurs within the same subnet; if the client and server are on different subnets, then you need to use DHCP Relay for communication between them.
IP addressing
To operate on a network, any device requires an IP address. In the IPv4 protocol, this is a numeric identifier consisting of 4 digits, each of which is separated by a dot; without it, the device cannot be identified in the network infrastructure. Often the router has an IP address of 192.168.1.1, and the device connected to it, for example, has 192.168.1.2.
The client must be assigned a specific subnet mask, for example, 255.255.255.0. It allows you to determine which network a given client belongs to.
For communication between the Internet and the network, any network must have a default gateway IP address. A router acts as a gateway, providing network access to all devices on its network.
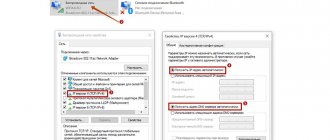
Setting up a network card
Next, you should set the LAN adapter to accept the IP address from the router. For this:
- Go to the control panel and select the “ Network and Internet ” option.
- In the network connections control panel, select “ Change adapter settings ”.
- A page with computer network adapters .
You can also call it using the “ ncpa.cpl ” command entered into the “ Run ” window.
- Right-click on the desired adapter, if there are several of them, and go to the “ Properties ” option.
- In the properties of. Click on the item 2 times with the left mouse button (LMB) or click 1 time on the “ Properties ” button.
- In the properties mark the items shown in the figure and confirm by clicking “OK”.
- To restart a computer.
Problems with the Internet and network
When using DHCP, some problems with Internet access may occur:
- IP duplication. When two or more devices within the same network have the same address registered, the “Address Already in Use” error will appear, which means that this address is already in use. In this case, you need to check the IP settings on all computers and change the matching ones. This may be due to the fact that the router is set to distribute addresses via DHCP or assigned static addresses to some devices, and due to the fact that the IP range distributed dynamically is incorrectly set, the DHCP server tries to assign an already used address. To solve this problem, you can look at the list of DHCP clients and move the range of dynamic addresses further;
- IP exhaustion. This means that the pool of addresses available for dynamic distribution has been exhausted and needs to be expanded so that new devices can receive addresses.
- Incorrect DHCP and client configuration. If you change the automatic settings assigned to it on the client itself, you will not have access to the network. You need to assign addresses to clients on the router, and then on the client.
Where is DHCP registered in the Active Directory configuration?
Now I want to show you where in the classes and with what attributes the records of authorized DHCP servers are written. Open the AD Attribute Editor and go to the configuration section. Go to the path: CN=Services,CN=Configuration,DC=root,DC=pyatilistnik,DC=org. In this container you will see records of your authorized DHCP services and a very important record CN=DhcpRoot; if it is not there, then this is bad.
When you try to authorize a server, the first thing to check is the presence of the CN=DhcpRoot entry, and if it is not found, then you will not be able to complete your operation
When you successfully authorize your service in Active Directory, it must create a dHCPClass class entry in the CN that must contain its name and distinguished name. If you go to the properties of any service record, you will find the dhcpServer attribute; the IP address and its DNS name should be entered here.
In the days of Windows 2000, the dhcpServer attribute had to be filled in with the CN=DhcpRoot entry in the corresponding attribute, but with Windows Server 2003, it was no longer recorded (https://blogs.technet.microsoft.com/askpfeplat/2015/06/22/windows-server -dhcp-server-migration-two-issues-from-the-field/). also view entries from the container CN=Services AD - Sites and Services (Active Directory Site and Service) from the snap-in. The only thing is you need to enable the "Show Services Node" option
As a result, you will have a “Services” container, then “NetServices”, in which you will see the entire list.
There are situations when an unprofessional administrator turned off and deleted the DHCP server, replacing it with another, and did not deactivate the old one; as a result, it will be listed as lost, and in order to remove it from the list, you need to delete its entry in this container
Due to incorrect deactivation of DHCP or restoration of the server from a backup copy of a decent amount ago, it may not start for you and when you try to pass authorization you may write “The parameter is set incorrectly”
In such cases, you need to check for the CN=Services,CN=Configuration,DC=root,DC=pyatilistnik,DC=org record of your server. If it doesn't exist, you'll have to create it from scratch. By right click we create a new AD object.
Select the dhcpServer object class.
Enter the Common-name of your server.
dhcp-Unique-key set to 0.
dhcp-type is set to 1.
In dhcp-identification we write the distinguished name of the server.
After creating the entry, try restarting DHCP on the desired server. If it doesn’t help, then delete this entry and try to authorize it again, sometimes it helps.
Enabling on Windows
If you connect your computer directly to a cable from your Internet provider, as a rule, you do not need to know how to work with DHCP. Since in most cases, individuals connect via the PPPoE protocol, in which the user only needs to create a connection to the network and enter their username and password there. In this case, the computer will be assigned a dynamic IP, which will change to another one over time. And at this moment the user does not realize that the DHCP service is already in full swing on his computer, and allows the provider to provide him with any IP.
To configure a DHCP server in the Windows operating system, you need to go to “Network and Sharing Center” and select “Change adapter settings”. In the window that opens, you need to find the network card and select “Properties” in the context menu, in the new window find the “IP version 4” item and click on the “Properties” button. In the window that opens, you can see that the settings for receiving an address automatically are active.
If your provider has provided you with a static IP, this means that in order to access the Internet, the device must have strictly the address that the provider issued; for this, in the same window you need to specify the parameters issued by the provider. After making the appropriate settings, you will disable DHCP on your computer and no one will be able to assign it an address different from the one that was set.
Interesting points
- The DHCP server checks its authorization in AD DS every hour. It uses the LDAP protocol [MS-ADTS] to communicate with Active Directory and check if it is authorized to serve IP addresses.
- When installed in a multi-forest environment, DHCP servers request authorization from within. Once authorized, DHCP servers in a multi-forest environment lease IP addresses to all available clients.
- If you install the DHCP role on a domain controller, the server is automatically authorized. If you are installing it on a member server, you will need to manually complete the authorization process using one of the following methods.
- If a DHCP server other than a Windows platform appears on the network, it will be able to distribute IP addresses and will not require authorization. To avoid this, technologies like DHCP snooping and traffic analysis systems are needed.
Setting up on routers
All this related to the external IP settings, but what to do if the user is tasked with providing Internet access to several devices? In this case, you need to use a router, to configure which you will need the ability to work with DHCP.
Depending on what type of connection is used, with a dedicated or dynamic IP, just as in the case of setting up a connection in the operating system, the router will receive either a dynamic (DHCP) or a static IP.
But that’s not all, because each device connected to the network requires its own address, unique only within this network, so that the router can “understand” how to communicate with this or that device. The external address, unique in the global network, will be exactly the same for all devices as the router, but the internal ones will need to be dealt with directly by the user.
The router itself has a static internal IP, usually 192.168.1.1 or 192.168.0.1. On all routers, the DHCP server is activated by default. This is done so that you can connect to the router from any device; the router itself will determine which address to assign to it and give access to the internal network. This method of connecting clients is very convenient, because in this case there is no need to pre-configure each device and assign each a unique internal address. All new devices will receive addresses and network access without any problems.
However, this can be inconvenient if you need to manage these devices, in which case it would be better to disable dynamic address distribution and assign each device a different IP. The principle of setting up a DHCP server on a router of different models is the same, but is achieved in different ways.
So, how do you enable DHCP on your router? In short, you must first activate the server, configure a pool (a range of addresses that are issued automatically by the router) by setting the start and end IP and its lease time.
Asus
The router from this company is configured as follows. In the left edge of the web panel there is a “Local network” item; by clicking on it, you need to select the DHCP server tab. On the page that opens, check “Yes” in the “Enable DHCP server” column.
Here you can configure the pool of automatically issued addresses and lease time.
D-Link
Setting up D-Link routers is a little more difficult, since they have very different interface options. But usually the DHCP configuration item is placed directly in the main menu on the main page.
The settings are the same here, they just look a little different.
TP-LINK
DHCP settings on TP-LINK devices are accessible almost from the main page of the interface.
On the left side there is a “DHCP” stack. Expanding it, you can see three more points where you can configure, view the list of clients and reserve addresses for certain clients. To configure, you need to select “DHCP Settings”. Next, you need to activate the server and configure it by setting the interval and rental time.
Zyxel keenetic
To configure Zyxel routers, you need to go to the Administrator panel, then to the home network settings.
There, select the “IP Settings” tab and check the “Enabled” checkbox in the “DHCP Server” item.
Netis
The settings for Netis routers are somewhat more sparse; here you can enable or disable DHCP on the router and set the range of issued IPs.
You can get to these settings from the “Network” stack, “LAN” item.
Configuring network adapters via PC or laptop
After the issue with access to DHCP on the router has been resolved, you need to configure the computer itself to work with the network protocol. To do this you need:
- press the following key combination on your keyboard: Win+R;
- in the window that appears, next to the start button, enter services.msc;
- find in the list of enabled DHCP services;
- Verify that the specified service is in an active state.
It should also be noted that the Startup Type section should be set to Auto.
Next, using the control panel, the user must open the list of all connections and find in it the connection used by the local network. Open the properties of this connection and set all positions to “Auto”. That's all, now your router and all available network adapters are optimally configured, and the DHCP service is ready for further use.