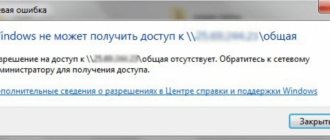
How to find out the adapter model
The first thing to do is check whether the card is connected to the computer and whether it is recognized by it. The adapter is included with all laptops and computers by default, so if you didn’t assemble your device piece by piece yourself, you shouldn’t think about its absence. But there are times when the wires going to it become disconnected or come off.
A network card (or network adapter) is a device that allows a computer to communicate with other devices. On modern PCs and laptops, the components of this device are integrated into the motherboard.
You will need to open the computer case and check this only if the network card is not displayed in the “Device Manager”:
- To expand the list of all devices connected to the computer, you need to open the computer properties by right-clicking on the “Computer” block in the “Start” menu.
Open computer properties - In the computer properties window, click on the “Device Manager” section located in the upper left block.
Click on the “Device Manager” section - Expand the sub-item “Network adapters”. It displays all network cards connected to the device. The name of the adapters corresponds to their model.
We look at the “Network adapters” branch
Enabling/disabling the network card in Ami Bios
After entering the BIOS settings, the main menu will appear in front of you. In it you need to select the “Advanced” tab.
AMI BIOS main window
Next, select the “OnBoard Devices Configuration” menu item.
"Advanced" tab in ami bios
In the next menu that opens, we are interested in the “Onboard Lan” parameter. This setting is responsible for turning the built-in network card on and off. Enabled - the card is enabled, Disabled - disabled.
Enabling and disabling the network card in Ami Bios
Don't forget to save the BIOS settings using the F10 button.
Enabling/disabling the network card in Award Bios
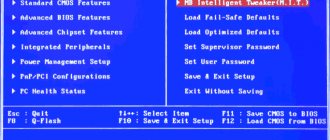
In Award BIOS, the network card is enabled differently. After entering the settings, we see the main Award Bios window. In it, select the menu item “Integrated Peripherals”.
Award BIOS settings main window
Next, go to “Onchip Device Function”.
Menu item “Integrated Peripherals” in award bios
“Onboard Lan Device” is a setting that is responsible for enabling and disabling the network card built into the motherboard. The value Auto means that it is enabled, Disabled means it is disabled.
How to enable a network card in Award bios?
Enable/disable network card in UEFI Bios
In modern graphical UFI BIOSes, to enable or disable the built-in network adapter, you need to go to the advanced settings (in our case F7) and go to the “Advanced” tab.
Asus Uefi Bios main menu
In the window that opens, select “OnBoard Devices Configuration” and look for a setting with the words Lan Controller or network adapter. It is she who is responsible for activating the built-in network card.
Enabling the network card in Asus Uefi Bios
Enabled - enabled, Disabled - disabled.
Source: https://helpadmins.ru/kak-v-biose-vklyuchit-setevuyu-kartu/
Card activation
If the network card is connected but not enabled, it must be enabled manually. There are several ways to do this. If the card is not damaged, turning it on will not cause errors.
Via "Device Manager"
The previous section described how to view the card model through the “Device Manager”. Find the adapter you need and right-click on it and select the “Enable” function. If the card is successfully turned on, the down arrow icon will disappear from its icon.
Click on the “Enable” button in the “Device Manager”
Using the Control Panel
- Using the Start menu or any other method, launch the Control Panel on your computer.
Open the “Control Panel” - Go to Network and Sharing Center.
Go to the “Network and Sharing Center” - Click on the sub-item “Change adapter settings”.
Click on the sub-item “Change adapter settings” - A list will open, which will most likely contain several cards. One serves as a connection to the wireless network, and the other serves as a connection to the wireless network. There may be additional adapters in the list. Select the one you need and right-click on it and select the “Enable” function. Wait until activation is complete: the red cross icon on the card icon should disappear.
Click on the “Enable” button to activate the adapter
Via BIOS
If the card cannot be activated using the previous two methods, then perhaps this can be done through the BIOS settings.
- Entering the BIOS is done using the Delete key, which must be pressed while turning on the computer. Perhaps the key that activates the BIOS will be different: this will be indicated in the hint that appears in one of the corners of the screen when the logo appears. If you find out the model of your motherboard, you can find on the Internet the button responsible for entering the BIOS.
Enter the BIOS by pressing the Delete key - The design and location of BIOS items and sections may differ depending on its version and motherboard model, but the following algorithm of actions is approximately the same for all versions. Go to the "Advanced" tab.
Open the “Advanced” tab - Go to the “Onboard Devices Configuration” subsection.
Open the subsection “Onboard Devices Configuration” - To enable the card, set the “Onboard Lan” line to “Enabled”. "Disabled" means the card is disabled.
Set the “Enabled” parameter for the “Onboard Lan” line
Video: how to enable a network card in Windows 7
How to enable a network card in the BIOS
The network card installed on the computer is usually connected and works normally. But in some cases it may be disabled in the BIOS settings or in the operating system settings. In this case, the network card must be enabled.
Instructions
1. If you know correctly that there is a network card on the computer, but the operating system does not see it, you should check the BIOS settings. Restart your computer and press Del or F2 when the system starts. Other keys can be used to enter the BIOS - Esc, F1, F11, F12, this depends on the computer model. 2. In the BIOS window that opens, find the section that contains the word Integrated. In it, look for the line Onboard LAN Controller or something similar in meaning - these lines may differ on different computers. 3. See what value is set opposite the detected string. If Disabled, then the card is truly disabled. Select the Enabled option and save the metamorphoses; traditionally, you need to press F10 for this or choose the Save and exit setup option. After rebooting the computer, the operating system should see the network card . 4. Let’s assume that the network card is disabled in the operating system settings. Open: “Start” – “Control Panel” – “System” – “Hardware” – “Device Manager”. Find the “Network Cards” item. If the card is disabled, it will be marked with a red cross. To enable it, double-click on it and select the “This equipment is in use (enabled)” option at the bottom of the window. Click OK, the network card will be enabled. Connect the connector to it and try to access the Internet, everything should work. 5. It may happen that the network card line will be marked with a yellow icon with an exclamation mark. Most likely, drivers are not installed for the network card. Try installing them from the installation disk, if you have one, or find them on the Internet. To reinstall, double-click the network card line again, select the “Driver” tab - “Update”. In the window that appears, select “Install from a specified location” and open the folder with the driver. Click OK, the drivers will be installed.
Connecting network drives allows you to place the document base in one place, allowing access only to a certain group of users. This makes it much easier for network managers to regularly archive data and control activities within the network.
Instructions
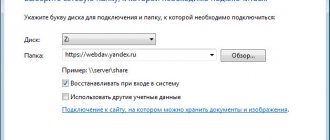
1. For any connection method, you need to know the name of the server and the name of the source you want to access. Ask your network manager for this information. 2. Open “Network Neighborhood” through the “Start” button. Next “Each Network” -> “Microsoft Windows Network”. You will see a list of domains that are online. Select the one you need by double-clicking on its icon, and a new list of computers will open. Click on the required computer and specify the drive or folder to which you want to assign a network drive name. 3. Select the “Map network drive” command from the context menu (by right-clicking the mouse). Come up with a letter for the new drive and check the “Restore connection every time you log in” checkbox so that the setting is not lost after the computer is turned off. Click the “Finish” button, after which the contents of the new network drive will open. 4. You can connect the drive through Explorer. Open it via Start. In the Explorer menu, open the “Tools” section, select the “Map network drive” command. Come up with a letter and enter it in the drop-down list. Usually these are the letters X, Y or Z, however, you can choose any of the ones that are currently available. 5. Enter the server name in the “Folder” field after a double backslash, and then the source name through a single slash as follows: \server_name, resource_name, or use the “Browse” button to select. 6. There is a 3rd method: connecting a network drive through the “Run” command, which is launched through the menu of the same “Start” button. In the window that opens, in the “Open” field, enter the command “cmd”, enter the line “net use x: \server_name, resource_name”, press Enter. In this entry, x is the letter assigned to the new drive. Its contents will appear on the screen. Video on the topic
Note! Keep in mind that only a public source is allowed to include a network drive, i.e. a folder or drive on another computer configured accordingly.
Network cards can be separate or built-in. The built-in network card is located naturally on the motherboard. A separate card is installed in the PCI slot. For the user, they work identically, therefore, when talking about how to enable a network card, we will not differentiate between them.
Instructions
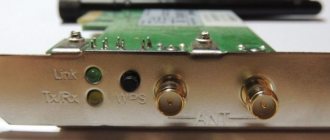
1. Network cards are a type of device that often does not require special drivers to operate. Typical Windows drivers ensure the operation of most boards. However, if your network card encounters problems when Windows detects it, go to the manufacturer's website. There you can download instructions and programs for installing all kinds of devices. 2. After installing the card in the slot and identifying it in Windows, it turns on mechanically. The core criterion for a positive connection is the blinking orange and green diodes. If the blinking of the diodes is not visible, pull out and insert the power cord - perhaps the contact has lost. If this does not help, check if the card is installed in the correct slot. 3. The usual operations performed should be enough to work with the card. However, it may be necessary to enable the network card from Windows itself. This can be done in 2 ways. Open the Start menu – Network connections. In the window that appears, we see an icon that says “Local Area Connection”. Right-click on it and select the “Enable” command. 4. If there is no corresponding icon in Network connections, do the opposite. From the Start menu, go to Control Panel and select Device Manager. In the window that opens, in the list of equipment, look for Network cards. Right-click on the displayed device (networking controller) and select the “Enable” command. For a few seconds, a small window should appear on the screen with the words “Enable...”. The network card is enabled. If, after this, access to the local network is unthinkable, refer to the connection settings.
After successful installation of the network card, it may happen that it suddenly stops working, there is no connection to the Internet, and there is no local network. Initially, you might think that the problem is with the modem or the provider - temporary Internet outages are not uncommon today. To check the functionality of your network card, use the tips described in this article.
You will need
- Checking the system settings of the network card.
Instructions
1. The most primitive method of checking the connection and network card is to pull it out of your system unit and insert it into another system unit on which the connection to the local network was fine. However, do not forget that you will need to install the latest drivers for the device to function properly. When installing the card in another system unit, make sure that the jumpers, which are not available on all models of network cards, are in the required location (select Plug&Play mode). 2. If the reason is abnormally installed drivers or system failures, “Device Manager” will display the problem as a question mark on the network controller. To launch Device Manager, right-click on the My Computer icon and select Properties. In the window that opens, go to the “Hardware” tab, click the “Device Manager” button. A window will appear in front of you with a list of all devices. The presence of a task with one of the devices is displayed with a yellow question mark, as described above. Please note that it is advisable not to occupy port IRQ 15 for the network controller - this port is not to everyone’s taste. 3. To check the network card for functionality, connect it to another slot (there are several of them on the motherboard). Most likely, after these manipulations, the network card will begin to work properly. If not, it makes sense to check all network cables.
All users, those who strive to know their computer, must work in the BIOS. With his help, he can make a lot of useful adjustments. But beginners often face the question of how to enter the BIOS system. In fact, everything is very easy.
Instructions
1. BIOS is a basic input-output system. Designed to prepare computer devices for booting under the operating system. With the help of BIOS, computer components take control of the computer and begin to perform their functions. Having a good understanding of the BIOS of your computer, the user can set the power supply values, device boot order, and more. 2. Restart your computer. At the moment when the screen saver passes, you need to press a certain key. Sometimes it is quite difficult to guess the moment of pressing, as a result, many users press a key or key combination several times in a row. This is done to prevent inexperienced users from accidentally calling up the BIOS. 3. Now about the keys. The "DELETE" key is mainly used. You can rarely call up the BIOS using the “F2” or “Esc” keys. On laptops, when calling the BIOS system, quite a variety of key combinations can be used. Therefore, before trying to do this, you need to read the laptop manual. It indicates each information about calling the BIOS. The main keyboard shortcuts that are used to open the BIOS of laptops are: “F1”, “F2”, “F10”, “insert”, “ctrl+alt+esc”, “ctrl+s”, “alt+enter”.
Any user who has wired access to the Internet is now familiar with such a device as a network card. This device has several names: network card, network adapter, and Ethernet adapter. It serves for direct reformation of the incoming signal and reverse reformation of the outgoing signal.
You will need
- Network card, computer, driver disk.
Instructions
1. Despite the fact that many network cards do not require additional software or special drivers (most often they are built into the operating system distribution), occasionally they are still used. An operating system developer physically cannot pack all the drivers into one assembly; on the contrary, the distribution kit can become much larger. 2. If you did not purchase a network card built into the motherboard , but a separate one, it must be mounted in one of the free PCI slots on the motherboard. Initially, you need to turn off the power to the system unit, then remove the side wall and install the device. Without closing the side wall, turn on the computer by connecting power to the system unit. There is no point in completely assembling the system unit right away; in case of incorrect connection, you will have to open the side wall again. 3. If the card is detected and a notification appears in the tray indicating that a new device has been found, then the card has been installed correctly. Wait a few seconds, if the drivers for your device are in the system distribution, a message about successful installation will appear on the screen; on the contrary, you will have to install the native drivers, which are often included with the device. If the disk was not included, you can download the required driver from the Internet using your friends’ Internet connection or via a 3G modem. 4. Once the drivers for the card are installed, connect the modem cable to the network card; flashing 2-color lamps in the Ethernet connector indicate a positive connection. Occasionally it happens that the lamps are blinking, but there is no connection to the Internet. Most likely, the connection to the local network is not strong. To enable it, click the “Start” menu, select “Network Connections”. In the window that opens, right-click on the “Local Area Connection” icon and select “Enable”.
When reconfiguring computers, you often have to use the CMOS Setup utility. It is written directly into the ROM of the machine's motherboard together with the BIOS, and therefore works even in the absence of boot devices. The method for calling it depends on the board model.
Instructions
1. The generally accepted method for calling the CMOS Setup utility is as follows. Turn on the computer, then quickly start pressing the “F2” or “Delete” key until the menu of this utility appears on the screen. Which of these 2 keys should be pressed depends on the motherboard model. The first key is traditionally chosen by laptop manufacturers, the second by desktop computer manufacturers, but there are exceptions. 2. If you do not know which key to press, watch the messages displayed on the monitor screen during the POST (Power-On Self-Test) test. Most likely you will see one of these lines at the bottom of the screen: “Press F2 to enter Setup” or “Press Delete to enter Setup”. 3. Some modern BIOS versions, instead of POST information before booting, display a splash screen, which sometimes does not say anything about which key enters CMOS Setup. But occasionally there is information on how to remove this screensaver. Press the appropriate key and you will see a regular POST. 4. If you cannot find out which key you need to press to enter CMOS Setup, try first using the “F2” key, and then, if the machine continues to boot, reboot it, this time using the “Delete” key to enter CMOS Setup " 5. It is absolutely acceptable that after entering the utility, instead of a menu, you will be greeted with a form for entering a password. In this case, turn off the computer's power, remove the tiny battery, use a screwdriver to close the contacts on its holder on the motherboard (but never the battery itself!), then reinstall it, turn on the computer and enter CMOS Setup. 6. When using the utility, remember that it allows you to perform actions that are unsafe for the computer, for example, overclocking the processor to such a frequency that it will fail. There is only one rule here: under no circumstances change settings whose purpose you do not know. And if you accidentally changed one of them, you can exit here without saving the settings, and then log back into the utility.
A child who has just begun to crawl and understand everything around him can ideally accidentally press the power or reboot button on the system unit. Of course, the computer from the floor to the table, but a simpler method would be to configure the mouse.
You will need
- Computer with PS/2 mouse.
Instructions
1. Since every second computer comes with at least one USB device (mouse or keyboard), it is recommended to look for a mouse with a PS/2 interface. The function of turning the power on and off using the mouse is configured through the BIOS Setup menu and still does not support USB components (some motherboards do not start with a keyboard with this type of interface). 2. To load the BIOS you need to restart the computer using the standard Start menu or using the Power button on the keyboard (if available). After the first lines appear on the screen, press the Delete, F2 or Tab key (depending on the hardware). The BIOS Setup menu looks like a blue screen with several function lines. 3. Navigation here is carried out using arrow keys and function keys. Find the Power Management Setup section in the menu and go to it: highlight it and press the Enter button. In the list that opens, you should find the line Power on Function or Power On by PS2. The choice of one or another item depends on the model of your motherboard. 4. After this, you need to prefer the power-on method that you choose. For example, to activate the power-on mode using the left mouse button, you need to prefer the Mouse Left option; accordingly, the correct value for the right mouse button will be Mouse Right. There is also the possibility of using the keyboard as a catalyst: for pressing any key, you should prefer Any Key and Hot Key for a certain combination. 5. All that remains is to exit the settings editing mode; to do this, press the F10 key and agree to the changes by entering Yes from the keyboard. Press Enter to restart your computer . Turn off your computer and try turning it on using your mouse.
Installation of the main drivers, as usual, occurs during the installation of the operating system. Unfortunately, for some devices you have to select the appropriate files yourself.
You will need
- – Sam Drivers;
- – Windows boot disk.
Instructions
1. The main problem that arises when installing network card drivers is the impossibility of accessing the Internet. In this case, you cannot visit the manufacturer's website to download the necessary files. Try mechanically updating the drivers through the device manager. 2. Certain failures during the installation of the operating system could lead to the fact that some equipment was simply not detected. Press the Win key to open the Start panel. 3. Right-click on the “Computer” icon. In the window that opens, select “Properties”. Now go to the “Device Manager” link displayed in the left column. 4. Expand the “Network adapters” submenu and open the properties of the equipment for which the necessary files are not installed. Go to the "Driver" tab. 5. Click the "Update" button and select the manual method of searching for files. Open the DVD drive tray and insert the Windows boot disc into it. Click the “Browse” button, having previously activated the “Search on removable media” option. 6. Select the root directory of the DVD and click the "Open" button. Wait while the system scans the disk and installs the necessary drivers . 7. If this method does not help you find the files you need, use another computer to access the Internet. Download the Sam Drivers program. With its help, you will be able to install drivers for most devices. 8. Run the application file from the root directory of the downloaded program. After a while, you will be presented with a list of devices drivers can be updated. Check the boxes for all items that contain the abbreviation LAN in their names. 9. Go to the “Install” menu and select “Install Selected”. Restart your computer after completing the driver installation. Check the activity of the network adapter. Video on the topic
Deactivating the card
You can disable an extra card using the same methods that allowed you to enable it: through the “Device Manager”, “Control Panel” and BIOS. Only in the last step of the method through the “Device Manager” you need to click the “Disable” or “Delete” button, in the “Control Panel” click the “Disable” button, and in the BIOS change the value from “Enabled” to “Disabled”.
Disable the card through the “Control Panel”
Adviсe
Before we start talking about how to enable the network adapter in the BIOS, it is worth mentioning some nuances that, to one degree or another, can help solve the problem that has arisen.
You need to understand that there are many versions of BIOS and each of them is somewhat different from the other. The article will talk about four commonly encountered ones, but this does not guarantee that your BIOS will be among them. In any case, read the instructions below and, based on them, understand the main principles of enabling the desired option.
If you are not sure that the problem lies directly in a disabled setting in the BIOS, then first try to correct the situation within the operating system itself. First of all, install or update the driver for the network adapter. Most often this helps in solving the problem.
Updating and installing drivers
Drivers are necessary to ensure that the card does not conflict with other components and fully performs all its functions. Usually they are installed automatically when you first connect the computer adapter, but sometimes the drivers fail or become outdated. In both cases, you need to reinstall them yourself. This is done through the “Device Manager”.
Automatic update
The positive side of this method is that you will not need to search for drivers manually, the negative side is that you will need an Internet connection, which may not be available if the network card does not work. But if you have the opportunity to connect to the network, you can update the drivers in the following way:
- Right-click on the desired card and select the “Update drivers” function.
Click on the “Update Drivers” button - Select "Automatically search for updated drivers." Wait until the computer automatically searches for new drivers and, if found, installs them. Be prepared that this method usually does not work, so it is better to use the second method - manual installation.
Select automatic system update
Manual update
The advantage of this method is that you can download the card drivers manually from another computer that has Internet access, and then transfer them to yours and install them. It is recommended to download card drivers strictly from the official website of the company that created it.
- To find the necessary drivers, you need to know the card ID or any other unique identifiers. You can find them out through the “Properties” of the adapter.
Open the “Properties” of the network card - In the “Properties” window, go to the “Details” tab and scroll down to the “Hardware ID” value. As a result, you will receive several unique adapter numbers, with the help of which you can find suitable drivers for it. Find and download them, and then use a flash drive to transfer them to the computer to which the card that requires driver updates is connected.
We look at “Equipment ID” - While in the “Device Manager”, right-click on the desired card and select the “Update Drivers” function.
Click on the “Update Drivers” function - Select the manual installation method, specify the path to the previously downloaded drivers and wait until they are installed. After the process is completed, restart your computer and try connecting to the network again.
Let's move on to the manual method of installing drivers
What to do if drivers are not installed
If at any stage errors occur that prevent you from installing drivers, you must remove the adapter from Device Manager and restart the computer.
Removing the card from the “Task Manager”
After the reboot, open the list of connected devices again, and in it there is the “Other devices” sub-item. It will contain the “Network Controller”, which is your card. Install drivers on it using one of the methods described above.
The network controller is located in the “Other devices” sub-item
Video: how to update the network driver
Enable or disable the network card on your computer. Set up internet via BIOS
HomeInternetConfigure Internet via BIOS
The network card is most often soldered into modern motherboards by default. This component is required so that your computer can connect to the Internet. Usually everything is enabled initially, but if there are failures or changes in the device configuration, the BIOS settings may be reset.
Tips before you start
Depending on the BIOS version, the process of enabling/disabling network cards may vary. The article provides instructions using the most common BIOS versions as an example.
It is also recommended to check that the drivers for the network card are up to date, and, if necessary, download and install the latest version. In most cases, updating drivers solves all network card display problems. If this does not help, then you will have to try to enable it from the BIOS.
Lesson: How to install drivers on a network card
Enabling the network card in AMI BIOS
Step-by-step instructions for a computer running on a BIOS from this manufacturer look like this:
- Restart your computer. Without waiting for the operating system logo to appear, enter the BIOS using the F2 to F12 or Delete keys.
- Next, you need to find the “Advanced” item, which is usually located in the top menu.
- There, go to “OnBoard Device Configuration”. To make the transition, select this item using the arrow keys and press Enter.
- Now you need to find the “OnBoard Lan Controller” item. If the value next to it is “Enable,” this means that the network card is enabled. If “Disable” is set there, then you need to select this option and press Enter. In the special menu, select “Enable”.
- We save the changes using the “Exit” item in the top menu. Once you select it and press Enter, the BIOS will ask if you want to save the changes. Confirm your actions with consent.
Enable the network card in Award BIOS
In this case, the step-by-step instructions will look like this:
- Enter BIOS. To enter, use the keys F2 to F12 or Delete. The most popular options for this developer are F2, F8, Delete.
- Here in the main window you need to select the “Integrated Peripherals” section. Go to it using Enter.
- Similarly, you need to go to “OnChip Device Function”.
- Now find and select “OnBoard Lan Device”. If the value next to it is “Disable”, then press the Enter key and set the “Auto” parameter, which will enable the network card.
- Exit the BIOS and save the settings. To do this, return to the main screen and select “Save & Exit Setup” there.
Enabling the network card in the UEFI interface
The instructions look like this:
- Login to UEFI. Login is similar to the BIOS, but the F8 key is most often used.
- In the top menu, find the item “Advanced” or “Advanced” (the latter is relevant for users with Russified UEFI). If there is no such item, then you need to enable “Advanced settings” using the F7 key.
- There, look for the “OnBoard Device Configuration” item. You can open it with a simple click of the mouse.
- Now you need to find “Lan Controller” and select “Enable” opposite it.
- Then exit UFFI and save the settings using the “Exit” button in the upper right corner.
Connecting a network card in the BIOS is not difficult even for an inexperienced user. However, if the card is already connected, but the computer still does not see it, then this means that the problem lies in something else.
We are glad that we were able to help you solve the problem. Ask your question in x, describing in detail the essence of the problem. Our specialists will try to answer as quickly as possible.
Did this article help you?
Not really
lumpics.ru
How to enable a network card in the BIOS?
If your computer has problems identifying a network adapter, or in other words, a network card, then the first place to start solving this problem is to check whether it is enabled in the BIOS settings. This article will also be useful for those who plan to install an external network card and disable the one built into the motherboard.
Next, we will look at options for turning on and off the network card in Ami, Award and Uefi bios.
How to enter the BIOS settings read here
Enabling/disabling the network card in Ami Bios
After entering the BIOS settings, the main menu will appear in front of you. In it you need to select the “Advanced” tab.
AMI BIOS main window
Next, select the “OnBoard Devices Configuration” menu item.
"Advanced" tab in ami bios
In the next menu that opens, we are interested in the “Onboard Lan” parameter. This setting is responsible for turning the built-in network card on and off. Enabled - the card is enabled, Disabled - disabled.
Enabling and disabling the network card in Ami Bios
Don't forget to save the BIOS settings using the F10 button.
Enabling/disabling the network card in Award Bios
In Award BIOS, the network card is enabled differently. After entering the settings, we see the main Award Bios window. In it, select the menu item “Integrated Peripherals”.
- Award BIOS settings main window
- Next, go to “Onchip Device Function”.
- Menu item “Integrated Peripherals” in award bios
“Onboard Lan Device” is a setting that is responsible for enabling and disabling the network card built into the motherboard. The value Auto means that it is enabled, Disabled means it is disabled.
How to enable a network card in Award bios?
Enable/disable network card in UEFI Bios
In modern graphical UFI BIOSes, to enable or disable the built-in network adapter, you need to go to the advanced settings (in our case F7) and go to the “Advanced” tab.
Asus Uefi Bios main menu
In the window that opens, select “OnBoard Devices Configuration” and look for a setting with the words Lan Controller or network adapter. It is she who is responsible for activating the built-in network card.
- Enabling the network card in Asus Uefi Bios
- Enabled - enabled, Disabled - disabled.
- helpadmins.ru
How to enable or disable a network card
A network card is a necessary element for an Internet connection.
Sometimes you need to turn it on if it does not appear in the list of devices, or turn it off if you no longer use it or want to change it.
View map options
If you want to find out the physical address, IPv4 parameters, gateway address and other possible information about the adapter, then follow these steps:
- While in the Network and Sharing Center, open the adapter settings.
Click the button “Change adapter settings” - This section provides a list of all physical and virtual wired and wireless adapters. Right-click on the desired one and select the “Status” value.
Open the “Status” section - In the window that opens, click on the “Details” button.
Click on the “Information” button in the adapter status window - A list will open in which you can view all the card data.
List of all network card data
Additional method
You can also find out the card parameters through the “Command Line” using the “ipconfig /all” command. “Command Prompt” can be found by going to “Start” - “Accessories” - “Command Prompt”. Running this command brings up information about all physical and virtual adapters recognized by the computer.
Run the command “ipconfig /all” to obtain information
How to disable a network card on Windows 7. Enabling the built-in network card in the BIOS
We reviewed the basic BIOS settings (basic input/output system) in the article. But there we only touched on the issue of boot devices. We're interested in all the settings, aren't we?
What is BIOS? “A piece of system software implemented in the form of firmware, which is intended to provide the operating system with API access to the computer hardware and devices connected to it,” Wikipedia tells us. Still not clear? And I think so. In simpler terms, this is the firmware for setting up computer devices, where most of the values are presented as toggle switches (On/Off). It allows you to change its configuration without physically interfering with the computer device (for example, disable the built-in sound or network card, overclock the processor or memory, change other parameters).
In order to enter the BIOS of your computer, you need to turn it on (or restart it) and press the desired key at the very beginning of boot. It may vary depending on the motherboard manufacturer and BIOS version. It is worth taking a closer look at the inscriptions like “Press Esc Button to Enter Setup”. The options are: Esc, Del, F2, F10, F12. There may be others, these are the ones I came across.
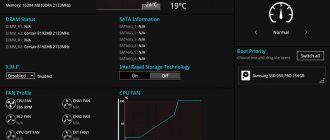
In order not to be unfounded, let’s take as an example the BIOS of the ASUS P8P67 Pro motherboard for second-generation Core i7 processors (here you need to press Del to enter). It is worth noting that the BIOS has changed a lot in terms of graphics, instead of blue-turquoise panels there are beautiful graphics (don’t be alarmed if you still have an old version, the basics are the same everywhere):
Let's start with the main menu:
As we can see, you can’t change much here. Only the language for displaying and setting the date and time. All other items are inactive and are for informational purposes only. But as we see, there is a submenu (or submenu) Security. Click on it if we want to configure security:
Here you can set a password to enter the BIOS (according to the description, this is Administrator Password) or a boot password (when the system boots, it will ask for it) - User Password. Passwords and settings will not be saved if you remove the battery from the motherboard.
As we can see, there are various groups of parameters available for change: CPU - processor settings. When you click on it, another menu appears:
CPU Ratio is responsible for basic overclocking (automatic), I recommend leaving it on Auto. Next comes the temperature sensor, Hyper-threading (multi-threading) - must be enabled. Next is the number of active processor cores (can be limited if required). If you use virtual machines, then you should turn the Intel Virtualization Technology switch to the Enabled position.
The next submenu of the Advanced section is System Agent Configuration:
This section is needed to select which graphics adapter to use as the primary device when booting. This option may not be available if you do not have an integrated graphics card (latest series of Intel processors have the graphics chip built into the processor). PEG - integrated graphics, PCI - graphics card on the PCI Express bus (discrete).
SATA Mode—interface operating mode. Options: AHCI, IDE, RAID and Disabled. Usually the AHCI mode is used; for systems without support for this mode, you can use the IDE compatibility mode, and if you have several identical hard drives, you can combine them into a RAID array and use the corresponding function. Disabled - will disable the built-in SATA controller (attention, if your devices are connected to it, they will stop working).
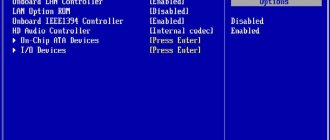
Connected devices are displayed at the top. Next comes support for loading USB devices before loading the operating system (I recommend enabling it so that the USB mouse and keyboard will work).
Where HD Audio Controller — turns on/off the built-in sound card (if there is no discrete one, then there will be no sound when you turn it off).
Front Panel Type - front panel type, for cases with audio connectors in the front.
SPDIF Out Type - digital audio output type.
Renesas Electronics USB 3.0 - Enable/disable USB 3.0.
VIA 1394 - enable/disable the Firewire port.
PCI Express X16 3 slot bandwich - throughput of the 3rd PCI-E port (it is better to leave Auto).
Display OptionROM in POST - display the boot device selection during POST boot (at the very beginning of boot).
Intel LAN—enable/disable the Intel network controller (built-in network card).
Restore AC Power Loss - behavior of the power supply after a power interruption (Power On - turn on, Power Off - turn off, Last State - last operating mode).
There are also switches for controlling the rotation of the processor and case cooler (with lower rotation speed thresholds).
Bootup Numlock Status - operating mode of the Numlock button during boot (on/off).
Full Screen Logo - if you want to see device test results instead of a welcome logo, then disable this option.
Boot Option - the order of boot devices (if you want to install Windows or another OS from a disk, you should set DVD-Rom as the first device). This version will have as many options as there are devices installed in the system.
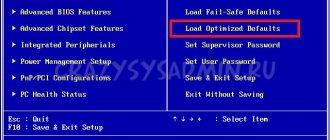
And the final menu is the exit menu:
Load Optimized Defaults - load optimized BIOS settings (default).
Discard Changes & Exit - discard changes and exit the BIOS.
The rest of the menus are specific (loading the OS built into the motherboard and the Asus EZ system utility).
Your BIOS may be very different from the one shown above, but don't be alarmed. The basics are the same everywhere. Well, if you still don’t understand anything, then write to me the type of your BIOS and I will help you figure it out.
1. Please note: The first thing to take note: if you are not confident in your actions, do not do anything!!! Invite a specialist who knows what he is doing. Since the computer BIOS is not the best platform for games and experiments. The most reliable way to resolve the issue is to read the documentation for the motherboard. As a rule, everything is described in detail. In case of lack of documentation / availability in another language / impossibility of finding the required item, etc. - read further:
2. A little theory: To begin with, there are two main versions of BIOS: AMI BIOS (American Megatrends, Inc.) and AwardBIOS (Phoenix Technologies), although this does not mean that there are others. The differences are in appearance, number of settings and location of settings. Depending on the motherboard used in your computer, the necessary steps will differ. Navigation through menu sections: Selecting a field - using the “Enter” key; Go to the next level using the “ESC” key; Move using arrow keys on the keyboard.
3. “How do I get there?” During boot, most PCs briefly display a message telling you how you can enter the BIOS setup. You will have a few seconds to press the required key; if you don’t have time, the operating system will begin to load. Hold or continuously press the desired key. On most PCs it is “DELETE”, also possible options are: “F1”, “F2”, “F10”, “Ctl-Alt-Esc”, “Esc”. If your PC does not enter the BIOS setup using these keys or does not display a message on how to do this, you will have to contact your PC manufacturer's documentation or support service.
4. So, the path to the desired setting: For AMI BIOS version 2.5x/2.6x/3.31: Main -> Integrated Peripherals; For AMI BIOS version 2.5x/2.6x on ASUS motherboards: Main -> Advanced -> Onboard Devices Configuration; For AWARD BIOS 4.51PG: Main -> Integrated Peripherals; For Phoenix Award BIOS 6.0: Main -> Peripherals -> Onboard Device; For Phoenix Award BIOS 6.0PG: Main -> Integrated Peripherals; For Award BIOS 6.0 on ASUS motherboards: Main -> Advanced; For Phoenix Award BIOS 6.0 on ASUS motherboards: Main -> Advanced -> Onboard Devices Configuration; If you do not find the item you need by decree
iuni.ru
How to change card settings
The previous paragraph described how to view information about the network adapter. But you can not only see it, but also change it by following these steps:
- While in the map status window, click on the “Properties” button.
Click on the “Properties” button in the map status window - Find the item you need, select it and click on the “Properties” button again.
Select which property needs to be changed and click on the “Properties” button - A window will open in which you can set your options or change their default values.
Enter the required information yourself
Video: how to configure a network card
How to enable the network adapter in BIOS AMI, Award, Phoenix and UEFI
The network adapter, or, as it is also called, the network card in modern computers is always built into the mother card. This component is used to provide access to the open Internet; this is where you insert the Ethernet cable. By default, it is always enabled, but sometimes there are failures that lead to deactivation of the work. This article will tell you how to enable the network adapter through the BIOS. We will consider three methods in total, since there are three BIOS interfaces that differ significantly from each other.
Adviсe
Before we start talking about how to enable the network adapter in the BIOS, it is worth mentioning some nuances that, to one degree or another, can help solve the problem that has arisen.
You need to understand that there are many versions of BIOS and each of them is somewhat different from the other. The article will talk about four commonly encountered ones, but this does not guarantee that your BIOS will be among them. In any case, read the instructions below and, based on them, understand the main principles of enabling the desired option.
Inclusion in Award/Phoenix
BIOS Award and Phoenix are put together for a reason. The fact is that Phoenix is essentially a slightly modernized Award, but their interface remains the same, so the instructions will be common. By the way, if you want to know how to enable the network adapter in the ASUS BIOS, then this instruction is for it.
- Enter directly into the BIOS itself. To do this, when you start your computer, press one of the following keys: F2, F5, or Delete.
- While in the main menu, you need to go to the “Integrated Peripherals” section. Select it and press Enter.
- In it, in a similar way, you need to go to another section - “OnChip Device Function”.
- In the menu that opens, you need to find the “OnBoard Lan Device” item and switch it to “Auto”. To do this, highlight the line, press Enter and in the window that appears, select the “Auto” item and press Enter again.
- Save your changes by going to the main menu by pressing the Esc key and selecting “Save & Exit Setup”.
Now you know how to enable the network adapter in Award and Phoenix BIOS. Well, now let's move on to the third type of Setup Utility.
Enable in UEFI
For most users, the problem becomes answering the question of how to enable a network adapter in a BIOS with a UEFI graphical shell, since its interface is completely different.
- Login to UEFI. Most often this happens by pressing the F8 key when starting the computer.
- Go to the "Advanced" tab. You can already use the mouse for this. Note that if there is no such item, then you need to press the F7 key for it to appear.
- Find “OnBoard Device Configuration” among the menu items and click on it.
- Find the line “Lan Controller” and select “Enable” in the drop-down list next to it.
- Go to the “Exit” tab and exit UEFI, saving all changes made.
This is how easy it is to enable a network card in UEFI. This is done, as you can see, an order of magnitude easier than in other methods, since there is a graphical interface.
autogear.ru
Resetting the adapter
You can reset the adapter settings, namely TCP/IP and DNS, using standard Windows tools or using a third-party program from Microsoft. Conditions under which a reset must be performed:
- Internet connection speed is low or unstable;
- files are downloaded broken, this happens due to the same instability of the Internet;
- When connected, the Internet works fully, but after a few minutes problems begin;
- Manually changing the adapter settings led to other problems with the Internet.
Standard method
Launch “Command Prompt” by going to “Start” - “Accessories” - “Command Prompt”, and enter the commands “netsh int ip reset c:\resetlog.txt”, “netsh int tcp reset” and “netsh winsock reset”, which will perform a factory reset. Done, the registry branches and system files will see changes, and you may need to restart the computer.
Execute the commands “netsh int ip reset c:\resetlog.txt”, “netsh int tcp reset” and “netsh winsock reset” in the “Command Line”
Through a third party program
You can download the NetShell program from Microsoft, which does not require installation, from their official website. Once you launch it, follow the instructions that appear on the screen to reset all changed settings.
Download the program to automatically reset the card settings
Setting up a network card
Most Internet providers practice fully automatic configuration of the client's network card, but in some cases additional configuration of network adapters may be required. This could be using two channels from different providers, distributing 3G Internet using a computer without using a router, setting up Wi-Fi repeaters and other work scenarios. This is especially true for configurations with multiple network cards.
How to find out the network card settings - IP address, MAC address and IP address of the provider's gateway and change them
In most cases, the network card receives settings for the IP address, gateway address and DNS server automatically from the router (router). And on the provider’s side, a DHCP server is probably running, which will provide your card with settings automatically. But in some cases, you may need to manually configure these important parameters. The easiest way to do this is through the “Network Connections” window.
- Open the network snap-in dialog by typing the ncpa.cpl command in the Run window.
The Network Connections snap-in can be launched via the Run command - Select the desired network adapter and open its context menu.
- From the menu, select the “Properties” command. This will open a list of services and protocols running on your network card.
To find out connection properties, right-click on the desired connection - In the list of protocols, select “Internet protocol version 4 (TCP/IP v4)” and open it.
Open TCP/IP properties to change the address, gateway and DNS server - In the window that opens, you can change the following parameters:
- IP address;
- subnet mask;
- gateway address;
- primary and secondary DNS server addresses.
Configure TCP/IP address, gateway and DNS server - Save your changes by clicking OK.
Carefully make changes to the network card settings. An error in even one digit will render the network inoperable. In the worst case, you can cause an address conflict with another computer and it will also lose access to the network.
You can view the settings of a network card, as well as its physical (MAC) address, using system utilities that are launched from the command line.
- Open a command prompt window.
- Run the ipconfig /all command.
- A detailed report will be displayed on all network cards on the computer.
The ipconfig command report will give you all the information about your network cards
Video: how to configure a network card on Windows 7
How to update a network card
Updating network card drivers is almost no different from installing them, except for the location of the network adapter in Device Manager. If an adapter without drivers was in the “Unknown devices” branch, then the working one, as it should, will be located in the “Network adapters” branch.
Normally functioning network cards are located in the “Network adapters” branch
Video: how to update the network driver
Is it possible to create two network cards
In the network life of each user, there may be a need for a second network adapter in the computer. It would seem that it could be simpler: add another card to the expansion slot and you’re done. But a tablet computer or netbook cannot be helped in this way; their expansion capabilities are extremely limited. In this case, a virtual network card can help. It will do an excellent job of distributing traffic between two network segments, filtering Internet streams, watching digital television and other tasks. Adding it is not difficult at all: this feature is preinstalled in the Windows operating system itself.
- Using the Win+R combination, open a command line window and enter the “Device Manager” launch command in it - mmc devmgmnt.mmc.
- From the top menu, select “Actions”, and from it - “Add a new device”.
"Device Manager" allows you to add a third network card manually - In the Add Hardware Wizard, select Manual installation type to access a list of network device drivers.
The manual type of adding a device will allow you to select a network card from the list of categories - From the list of categories, select “Network adapters”, and from there “Microsoft loopback adapter”.
Microsoft loopback adapter will take over the functions of the second network adapter - Click OK. The virtual network card will be added and appear in the Network Connections window.
How to reset all network driver settings
If your Internet suddenly disappears or most web pages do not open, one of the solutions to the problem is to completely reset the settings and TCP/IP protocol stack.
- Open a command prompt window.
- Type netsh int ip reset and click OK.
The netsh int ip reset command will help reset TCP/IP settings, and thus solve the problem with the Internet - Reboot your OS to apply the changes.
Video: Resetting TCP/IP protocol settings in Windows 7
How to disable the adapter
To disable a network card, it is best to use Device Manager, a standard operating system tool. Select a card from the “Network adapters” section, and select “Disable” from the top menu of the program. The network card will be turned off instantly; there is no need to restart the computer.
Disabling a network card is done using the “Device Manager”
Disabling the network card will result in a loss of the Internet connection and disconnection from the local network. If you have files open on network drives, be sure to save them before disconnecting the adapter, otherwise the data in them may be damaged or lost.
Solving adapter related errors
During setup or use of the adapter, the errors described below may occur, which will prevent you from using the Internet or local network. Most of them can be fixed without replacing the card.
The card does not have valid IP settings
You may encounter a similar error when setting IP parameters or scanning a network module using standard Windows tools designed to automatically resolve errors.
Manually obtaining settings
If you have not changed the settings of the adapter, that is, it obtains an IP address automatically, then manually requesting an IP address may fix the problem:
- Type “cmd” in the Start search bar. Expand Command Prompt using administrator rights.
Open Command Prompt as administrator - Run the commands “ipconfig /release” and “ipconfig /renew” sequentially. Done, all that remains is to check if the error has disappeared.
Execute the commands “ipconfig /release” and “ipconfig /renew”
Reset
Resetting settings to default values is the most reliable way. How to do this in several ways is described in the section “Resetting the adapter settings”.
Manual adapter configuration
If the previous methods did not help, you should try setting the settings yourself:
- While in the map status window (how to open it is described in the “Viewing map parameters” section), click on the “Properties” button. Find the IPv4 item, highlight it and click on the “Properties” button again.
Open “Properties” IPv4 - Disable automatic search and set the following parameters: for the main and backup DNS servers, the values are “8.8.8.8” and “8.8.4.4”, respectively, the IP address and the default gateway are the same parameter, which can be viewed on the router itself or in instructions for it usually looks like “192.168.1.1”. The remaining parameters will be entered automatically.
Setting parameters for IPv4 manually
Error "This device cannot start"
This error appears in the “Device Manager” not only with the adapter, but also with other connected devices, and has code 10. To fix it, you need to update the card drivers. How to do this is described in the “Updating and installing drivers” section.
The adapter does not work, does not install, or does not appear
If the adapter does not work, does not install or is not displayed, then the reasons may be the following:
- It is disabled in the BIOS, you need to start it manually. Or it is disabled in the system itself, since there is another physical or virtual adapter. You can check where it is enabled and where it is disabled using the “Card Activation” item.
- If the card is not displayed in the “Device Manager”, then click on an empty space in any area of the window and select the “Update configuration” function. Then look for the card in all the items on the list. It may not be recognized by the system and will be located under a different name or in the wrong section. Sometimes it is transferred to the “Other devices” block under the name “Network controller”.
While in the “Device Manager”, click the “Update system configuration” button - Update or reinstall the adapter drivers, first remove the already installed ones. It is important to install only official drivers that exactly match your card model. How to properly update and install drivers is described in the “Updating and installing drivers” section.
Changed map settings disappear
If, after you close the window with the changed settings or restart the computer, all the changes you made disappear as if you never made them, then there are two ways to solve this problem: set the settings by running commands and change the incorrect values in the registry.
Making changes via the Command Line
Launch “Command Prompt” with administrator rights and sequentially execute the following two commands: “route delete 10.0.0.0” and “route -p add 0.0.0.0 mask 0.0.0.0 X”, in the second command “X” is the IP of your router, which usually looks like "192.168.0.1", but in your case it may have a different meaning.
What to do if you have problems with your network card
Most often, problems arise with wired network adapters, because in multi-story buildings, cable routes are laid by providers in boxes not intended for this purpose, adjacent to high-voltage wires, telephone pairs and antenna television cables. High humidity and low temperatures have a detrimental effect on the wire insulation and sooner or later a breakdown occurs in the cable. The cause of the breakdown can also be caused by high voltage current during a thunderstorm or from higher voltage neighbors. It's rare that a network card can survive such an adventure. It either burns out completely, or begins to behave incorrectly, in cable industry jargon - “glitch”.
A high voltage discharge passing through the cable led to the destruction of the integrated network card chip
The network adapter does not have valid IP settings
A very common problem caused by incorrect communication between the router and the network adapter is when the adapter does not have valid settings. The result is predictable: the network connection becomes inoperable, and the Network Diagnostic Tool displays an error message.
There are several options to fix the error: turn the router on and off; Disconnect the power supply from the router (or turn it off with the button, if there is one), wait 5-10 seconds and turn the router on again. When you restart, the DHCP server is initialized, the problematic network adapter will receive a new IP address, and the problem will be resolved.
You can also update the IP address programmatically. To do this, enter a couple of lines in the command prompt window: ipconfig /release and ipconfig renew, then close the command prompt window and check whether your network connection is restored.
The last method is to reset and clean up the TCP/IP stack. It can be damaged by malware (viruses) or by inept use of Internet connection optimization utilities. Open the Command Prompt window again and enter the following commands (without the semicolon):
- netsh int ip reset;
- nets int tcp reset;
- netsh winsock reset.
After this, restart your computer. Now the network adapter will work correctly.
For lazy users who don't want to bother with the boring command line, Microsoft has released a utility that will make all the corrections automatically. Download the Netshell program from the Microsoft website, run and follow the instructions of the patch wizard.
The error “This device cannot start is displayed Code 10”
This problem almost never occurs on laptops; desktop computers that can be expanded with PCI cards are susceptible to it. The cause of the error is a conflict between the software resources of the integrated network adapter and one (several) expansion cards in the PCI slots.
Expansion cards may conflict with the network adapter and cause it to fail
Remove all cards from the expansion slots and start the computer in this configuration - the error should disappear.
The problem of starting the device can also be resolved by leaving all expansion cards in place, but reinstalling the system from scratch.
The network adapter does not work and will not install
The vulnerability of wired network cards to atmospheric and static electricity often causes adapter failure during thunderstorms, electrical work, or even power surges. Laying long sections of network cable outdoors “over the air” increases the risk of damage several times. If your provider practices laying cable routes along the outside of the building walls, you are at risk. The next rain with lightning or even the operation of a welding machine in the entrance can cause your network card to stop working, and an attempt to install drivers for it will lead to an error.
Only replacing the network adapter will solve the problem. For a desktop computer - the PCI standard, and for a laptop - USB or PCMCIA.
A PCMCIA network card will bring your laptop back to life
Try to connect the Internet cable from your provider to the router, and then connect computers to it. After all, the failure of an inexpensive router cannot be compared with the failure of an integrated laptop adapter, or even damage to the entire motherboard.
Windows 7 does not see the network adapter
If the network adapter is not displayed in the “Network Connections” window and is not visible in the “Device Manager”, as well as in the “Unknown Devices” section, then the probable cause of this is the failure of the hardware of the network card. Repairing the network adapter integrated into the card is not economically feasible. The best solution to the problem is to buy a new network card and install it in the computer.
An adapter with a PCIx interface can replace not one, but four network cards
A damaged integrated network adapter should be disabled using BIOS setup tools.
BIOS Onboard LAN Option
Onboard LAN option is responsible for using the network adapter built into the motherboard.
Disabled – disable the network adapter;
Enabled – use the network adapter.
The option may also have other names:
- 10/100 Mb LAN Device
- CSA Gigabit Ethernet
- Ethernet Device
- GIGA LAN
- Gigabit LAN Device
- Intel 82573E
- Intel GLAN Device
- LAN Controller
- MAC Lan
- MAC Lan Control
- MAC1 LAN
- Marvell GigaBit LAN
- Marvell LAN Controller
- On-Chip MAC Lan
- Onboard 2nd LAN Controller
- Onboard GbE LAN1
- OnBoard Giga LAN
- Onboard H/W LAN
- Onboard Intel LAN
- Onboard LAN Chip
- Onboard LAN Control
- OnBoard LAN Controller
- Onboard LAN Device
- Onboard LAN Function
- Onboard LAN (NVIDIA)
- Onboard MAC LAN Controller
- Onboard Marvell Gigabit LAN
- Onboard NV LAN
- Onboard PCI Express LAN
- Onboard PCI Gb LAN
- Onboard PCI LAN
- OnBoard PCIEX GbE LAN
- Onboard RTL8100C LAN DEVICE
- OnChip LAN Controller
- PCI-E Lan
- PCI Lan
- PCI-E Lan Controller
- Realtek Gigabit LAN
- Realtek RTL8100S
- RTL GLAN Device
- SiS 10/100M Ethernet
- VIA Onboard LAN
- VIA-3043 OnChip LAN
- Integrated NIC (Network Interface Card)
How to configure Wake on LAN (WOL) in Windows and BIOS using standard tools and programs
Hi all! Wake on LAN is a technology that allows you to turn on your computer remotely via a network. It was invented quite a long time ago, but has not gained mass popularity among ordinary users. Although, it is often used by system administrators in their tasks.
About technology
The Wake on LAN (WoL) function is a standard protocol for remotely waking up a PC using network technologies. To complete this task, three conditions must be met:
- The computer must be connected to a 220V network.
- The PC is physically paired with a working router via a LAN cable or paired via Wi-Fi.
- The "Wake on Lan" option is set to
Naturally, this technology must be supported by your network card, which in modern realities is also integrated into the motherboard. The latter must be connected to a power supply with the ATX form factor. All modern power supplies that are equipped with personal computers have this form factor.
Setting up Wake on LAN is usually done through the BIOS or by installing special software for the network card. It should be said that the technology is not new and is automatically supported by network cards that have been on the market for decades.
Principle of operation
Everything is built around the “Magic Packet” - when activating a PC, this option sends unique “magic packets” to its network card, including:
- Network broadcast address.
- Broadcast address.
- MAC address of the network card.
- Data package.
This “magic” is standardized and applicable to any platform (For example, Apple, Intel, AMD). WoL packets used always access "UDP 7/9" ports. With their help, the computer “listens to the air” and is ready to receive the necessary information.
This information is the “Magic Packet”, which provides the MAC address of the network card. The computer will process this data and start a chain reaction.
Safety
What Wake on LAN is has become clear, but is it safe to use this technology? Depending on where you will use wake on lan (WoL). If this is a public Wi-Fi network (without a password or security key) or the Internet, then such packets can easily be intercepted.
If the “wake up” occurs within a secure home network (with a password and WPA2 protection), then there is nothing to worry about.
How to turn it on? There are two options for activating the wake on lan option on Windows 10, on Windows 7, and in general on any operating system.
In BIOS on older motherboards the option was configured as follows:
- Use the “Del” key or one of the functional rows F1-F12 to call up the BIOS (UEFI).
- Open the "Power" or "Advanced Options" section.
- Set “Enable” opposite “Wake Up”.
On modern motherboards with UEFI, this function is located in the advanced settings or in the PCI-E power section.
Motherboard manufacturers call this option differently:
- ASUS - PME.
- ASRock – Aggressive Link.
- Gigabyte - ErP.
In windows
In the Windows operating system, you can configure power-on via local network after disconnection by changing one parameter:
- Right-click on Start and launch Device Manager.
- Select your LAN adapter and go to its properties.
- Go to the "Advanced" tab.
- Scroll the list and look carefully at the properties. Look for "Wake on Magic Packet". Set “Value” to “Enabled”.
- Click "Power Management" and make sure both boxes are checked. Set the third “optional”.
It doesn’t matter whether you are setting up a network card or a Wi-Fi adapter. The Wake on Wireless LAN option will work exactly the same as over a cable connection.
Launcher
There are various programs that allow you to wake up a computer on the same local network or via the Internet:
- Depicus is a single window simple software that performs the required option. There are programs for Windows, Android and Apple. It is enough to indicate the Mac of the network card, local IP address, port and subnet mask.
- WakeMeOnLan is a utility for Windows that only works to start your computer remotely.
- TeamViewer is a versatile utility that can wake up a “asleep” computer. Naturally, you need to set everything up first.
Source: https://WiFiGid.ru/raznye-sovety-dlya-windows/wol
How to turn on the adapter?
Sometimes a network card is connected, but the system does not see it because it has been deactivated. To run it through the BIOS, follow these steps: