Back in action
Let's start with the obvious - get the laptop working again. You may have to replace some components, clean it inside and out and, of course, reinstall the software.
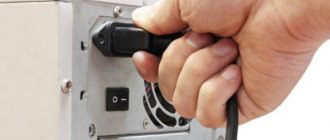
flickr.com
If after all these manipulations, the laptop still slows down and does not meet your requirements, try installing a lightweight operating system (for example, Lubuntu or Chromium OS) on it.
Listening to music CDs on an old laptop
If you still have old CDs with music and old DVDs with movies at home, you can listen to and watch them on an old laptop. Let's try, because most old laptops always included a device for reading and writing CD/DVD discs. They stopped installing such devices in modern laptops - there is no point, because now the technologies are different.
Take a CD. Open the CD drive on the laptop (there is a special button on the side for this). Insert the disk. We close the drive (just use your hand to gently push in the “shelf” with the inserted CD - I’m writing this for those who no longer remember such old devices). We wait for a while - you can’t demand instant performance from an old computer, it needs to “think” a little.
The inserted disk spun in the drive (noise is heard), the software was “loaded”. The CD player started automatically (it is built into Windows XP, there is no need to install it additionally). And music started playing in the connected external sound speakers - enjoy!
True, the noise of the player's drive can be heard. The noise can be quite loud, especially if the inserted CD is of poor quality and unbalanced. For some people the noise does not bother them, but for others they may want to get rid of the noise. How to do it?
To get rid of the noise, you need to get rid of the CD/DVD drive. But there is a disk there, and we need the information recorded on it. Okay, first let's transfer all the information from the disk to the hard drive inside the laptop. Let's create a folder on the laptop, say, with the name “Music”. In it we will create a folder with the name of the music disc, and into this folder we will copy all the files that are recorded on the CD.
We will receive a folder with files in .mp3 format. And then the CD will not be needed. Let's take it out of the drive, close the drive, and start the music directly from the laptop by double-clicking on the selected .mp3 files. Music will sound without annoying drive noise.
In general, we sorted out the music. Now how would you deal with videos on DVDs? Let's try to do this.
Additional Wi-Fi hotspot
flickr.com
If there are places in your home where Wi-Fi does not reach (for example, an attic or a terrace), expand the coverage area using an additional access point from an old laptop. This is done quite easily on both Windows and Mac. This method is good when the Internet in a far corner of the apartment is needed immediately and urgently.
Alternative configuration options through third-party software
On MacOS and Windows, the “Air Display” software tool is capable of turning laptops (and even tablets) into additional monitors that expand the workspace, which stands out from competitors due to its low response due to an intelligent algorithm for dynamic compression of transmitted content, and a Wi-Fi connection. Fi or Ethernet.
There will be no problems with setup - after downloading the distribution kits to your computer and laptop (or tablet), you will have to deal with registration, paying for a license (the demo mode is very limited) and installing drivers. The built-in instructions will tell you how to proceed next.
An alternative to the paid “Air Display” is “TeamViewer with a non-commercial license.” The idea is the same - first download the official distribution from a trusted source, then install the software on your computer and laptop. When the standard interface with the “Remote Control” setting appears on the screen, all that remains is to repeat the following procedure: copy the ID (consists of 9 digits) and password from the laptop and enter the values on the computer.
As a result of the actions taken, the image will appear where needed. Including on a computer, if you repeat the procedure in a different order and copy the ID and password from the laptop.
In addition to “TeamViewer”, it is easy to highlight “MaxiVista” (limited license of 14 days and 50 starts), and also “ZoneScreen”. Which tool to choose depends on the current version of the operating system and the desired result. Due to the difference in the methods of providing functionality (paid, temporary, with full access) and often encountered technical problems, you will have to experiment.
Sale
flickr.com
Let's finish with the obvious - sell your old laptop, even if it's broken. As you can see from the previous examples, the world is full of wizards for whom modding and remaking computers is not just a hobby, but something akin to a sport or a way of life. You never know what else they are up to and why they need your battered laptop. Just remember to format your hard drive before listing your laptop on eBay.
TV
Broadcasting television programs does not require high performance. Connection is possible through a provider that provides several points, Internet access or an external tuner.
If old equipment is not able to perform modern tasks, it can be used for old games that were once on consoles.
Models that have good screen resolution can be mounted on the wall as a photo frame. You need to find a beautiful picture, buy a frame and place your laptop screen in it.
This idea is only feasible for modern laptops. Outdated technology does not have enough capabilities for broadcasting and viewing. Additionally, to implement the idea you will have to spend money on auxiliary equipment.
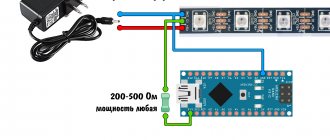
If there is a router in an apartment or house, and the Internet reception is poor at a distance or disappears altogether, its transmission can be improved by strengthening the signal. At the same time, you don’t have to buy additional equipment if you have an old laptop. It can be used as an access point. To do this, you will need to download the Switch Virtual Router application and install it.
To store information you will need to install the Pogoplug program.
If the battery discharges quickly, the problem is in its cells. Some of them fail. You can disassemble the laptop battery, take out the 18650 cells and make a portable charger.
What can be made from a laptop battery?
If your laptop battery lasts at least 5-10 minutes, then I do not recommend gutting it, since it will thus act as a power supply during a short-term power outage. In my case, the battery was dead and it basically wouldn’t charge. I decided to gut it and carefully opened the battery housing cover (photo not mine).
We need to remove these green things along with the controller (the board with the battery contacts). As a result, I was left with an empty battery case, which I returned back to the laptop case so that the laptop would not have a gaping hole in the case.
What to do with these things? We will use them, but in a different device. First, we need to carefully separate the current-carrying plates from the batteries; under no circumstances allow short circuits, since the batteries may be energized, and a short circuit can lead to their fire or swelling.
Now we go to Aliexpress and order something like this. Using this thing, we can not only charge the elements from the laptop battery, but also find out which of the elements is “dead”. We plug our elements into powebank.
We start charging and see if all the elements are charging, I was lucky, all 4 were normal, and I threw the rest until better times.
Now we can use this battery cell thing as a power bank.
So don't rush to throw away your old laptop.
Watching DVD movies on an old laptop
We will do the same with DVDs as with CDs. Simply, open the CD/DVD drive and insert the DVD into it. Let's wait until the drive spins up, makes noise, and picks up speed. Let's wait until the software “loads” - Windows XP “knows how” to play DVDs. There are built-in programs for this and the necessary drivers and codecs.
It's working! The video has loaded, you can watch your favorite movies on DVD. The image is clearly visible on an external monitor. Just like in a TV, a built-in monitor will have one quality, but an external monitor will have a completely different, more modern quality, different proportions, colors. The sound can be heard from external good speakers, so the sound is also okay.
It’s just that the noise of the drive interferes here. Interferes with the enjoyment of picture and sound. Some DVDs are especially noisy, apparently due to their not being the best quality. This is where a proven method comes to the rescue - burning the contents of a DVD to the laptop’s hard drive. We copy folders and files from the DVD into one of the folders on the laptop’s hard drive, for example, “Cinema” or “Video”, or even “My DVD Movies”.
Everything seems to work out quite well with movies recorded on the laptop’s hard drive. From there you can safely launch them in the same way as through a CD/DVD drive. And then they “scroll” without drive noise, without additional “rumble”.
But - a fly in the ointment. If .mp3 music files are quite acceptable in size for the small-capacity hard drive of an old laptop, then video files for the same drive are too large. Well, you’ll be able to record 1-2-3 movies on your laptop’s hard drive. Where should I put the rest of the “library”, “video library”, “music library”?
And here another solution comes to our aid - an external hard drive. This will be discussed further.
Preparation of materials and step-by-step assembly
After the matrix has already been dismantled, you can begin assembling the TV. To do this you will need the following materials:
- scaler;
- power unit;
- DC-DC converter;
- android tv box;
- LVDS cable.
All these items can be bought online, for example on AliExpress or Banggood. It is worth considering that different matrices require strictly defined parts, so it is better to consult with the seller before purchasing.
You should also think in advance about what the TV case will be made of. To do this, you can use the laptop itself or build a new box from any available material.
The entire process of making a TV can be divided into the following steps:
- We make housing for the scaler and TV box.
It is important not to forget to leave holes for the ports.
- We clean the laptop cover and drill holes for the LEDs and infrared sensors.
- If necessary, we repaint the entire structure in the desired color.
- We get rid of all unnecessary parts on the board: remove the bulky connector and remove the extra side connectors.
- To cool the structure, we attach a radiator to the TV box.
- We transfer the infrared port and LED from the board to the wires and fix them on the body next to the scaler buttons.
- We solder the input of the DC-DC converter to the power input of the scaler, and its output to the input of the TV box. In this case, we get rid of the power connector.
- We glue the USB ports to the back of the case.
You can use epoxy resin for this.
- For reliability, fill the soldered wires with hot glue and connect the scaler to the TV box with a short HDMI cable.
- We assemble the body.
Having completed all these steps, we get a full-fledged TV with support for Android OS. The finished device can be placed in the kitchen or taken with you on trips.
What can an old working laptop with Windows XP be useful for?
Let us briefly list the actions that I managed to do from an old laptop:
1) disconnect the old laptop from the Internet;
2) remove the antivirus on the old laptop. We remove it completely so that the work does not slow down;
3) connect the television board to the laptop. We configure software and drivers for it;
4) connect an external monitor via the VGA port and cable, preferably with the “correct” modern dimensions (larger in width than in height). We get a working TV with a good screen and high-quality image;
5) connect external sound speakers to the headphone jack of the old laptop. We get high-quality sound;
6) connect an external hard drive, say 1TB, to the USB port. We get a large storage for music and movies. Why is it needed? Because there is no connection to the limitless Internet. And you have to store everything on your laptop so that you can listen and watch at any time;
7) transfer videos, music, favorite CDs and DVDs to an external hard drive connected to an old laptop. You can record your favorite photos and other “home library of files” there. CDs can even fit on the internal hard drive of an old laptop, despite its small size. After all, the .mp3 format is quite compact;
 We prepare a flash drive for transferring files from the new laptop to the old one. We don’t use this flash drive anywhere else for fear of introducing viruses to it. After all, the old laptop now does not have an antivirus, and we do not plan to install it there, since the laptop works offline, it is disconnected from the Internet;
9) connect a color printer to the old laptop, which could not be connected to the new laptop. Install drivers and software for color printing;
10) files that need to be printed on a color printer are written to a flash drive on a new laptop. Then we transfer these files using a flash drive to the old laptop. We print the files on an old laptop using a color printer.
This is the happiness of re-owning an old laptop that seemed to have long ago exhausted its capabilities!