Shalom to everyone who wants to let photography and its processing into their lives! I continue to tell you about the tricks and secrets of Photoshop. And this article is no exception. Many people at the initial stage of work encounter certain difficulties and questions. One of them is how to insert a picture into Photoshop?
It would seem that what’s so difficult about this, you ask? Take it and insert it! But, it’s not that simple and there are several ways to do it. In fact, the difficulty lies only in reading this article carefully and remembering all the options well. I will tell you about them here in more detail, so that you remember once and for all and never return to this problem!
What are the ways
So where do we start? Well, of course, from the opening of the program. Just kidding! You know this perfectly well even without me. I am one thousand percent sure! Now let's move on to more serious things and leave the jokes aside.
I list all the ways you can do this:
- Drag an image from tab to tab
- Copy and paste via clipboard - Ctrl+C - Ctrl+V
- Place command
- Drag and drop from a computer folder
Not bad, right? It seems like such a simple action, but there are so many variations! We will look at each one. I won’t wait too long and get straight to the information you need. Get ready to absorb new information like new sponges.
LiveInternetLiveInternet
Today we will make a collage and at the same time learn how to overlay a picture on a picture in Photoshop. In the lesson How to make an interesting effect with overlaying layers, we have already superimposed a picture on a picture in Photoshop. In today's lesson we will look at a way to overlay a picture on a background that will be from a photograph.
Let's start studying the lesson.
To make such a collage, we need two photographs. Select photos so that they are the same in size and at least match the time of year.
Here is a photo that will be the background.
And here is the picture that we will overlay on the background.
Step 1.
Open both images in Photoshop and make the one that we will overlay active. Just click on it or open it a second time. Next, press the key combination Ctrl + A , with this we select the entire image. A selection line appears in the picture, go to the Editing tab - Copy
Then we activate (click with the mouse) the second picture, which will be the background and go Edit – Insert
We see that the picture has been copied and close the one that was selected. Don’t get confused about which picture to close as unnecessary. We close the one with one layer, and leave the one with two layers.
Step 2.
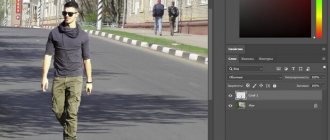
We remain on the top layer , where there is a man, and take the Eraser . We select the brush size (larger is possible) and erase the grass and everything around the man’s silhouette.
You can enlarge the view for more convenient stripping next to the male figure. It is convenient to enlarge the view by moving the slider on the Navigator . To completely erase everything, let’s temporarily turn off the peephole on the bottom layer.
The size of the brush with which we erase unnecessary things is constantly adjusted depending on the area in which the work is being done. We are not afraid to increase viewing .
To check the cleanliness of the stripping, let's create a new layer - click the second icon from the right in the layers panel, place this layer under the layer with the man and fill it with some calm color, using the command Editing - Fill . All streaks that remain after erasing will immediately appear and will be easy to clean up.
Now, having checked that all the excess grass around the man has been thoroughly erased, we remove the paint layer Right- click on the layer and select Delete Layer.
Step 3.
We turn on the peephole on the background layer, the layer becomes visible and we think about how to position the man on the grass. First, let's turn it to face the sun, guided by the shadow of the umbrella. To do this, make sure that we are standing on the layer with the man and go Editing – Transform – Flip Horizontal .
The silhouette of the man has been rotated and now made a little smaller. Go to Edit – Transform – Scaling and while holding down the Shift , so as not to disturb the proportions, move the markers.
Step 4.
Finally, we combine the layers into one. Right-click on the layer and select Merge Visible .
We admire the result.
In this fairly simple way, we superimposed a picture on a picture and made a simple collage.
You can also watch the lesson How to change the background using the distortion filter
Good luck!
The lesson was prepared for you by Marina Kolesova.
See you again at https://photoshop-help.ru
The easiest way is to drag and drop from the tab
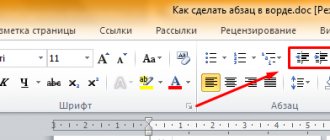
Let's say you have 2 tabs with photos open, and you need to make sure that both photos are in one window. You need to press the “V” key, so you will switch to the “Move” mode. Or click this icon on the panel:
Once you have done this and are in move mode, you need to grab one image with the mouse (i.e. click on the image and do not release the mouse) and drag it to the tab of another image.
This way, the picture from one tab will fit on top of the photo in the other tab. It must be said that this method copies an image from one tab to another. Those. your image remains in the first tab and appears in the second. Happened? Go ahead.
How to insert a picture into a picture in Photoshop?
First of all, it is worth considering the two simplest methods that require the least amount of effort. Their main drawback is that this is only applicable for the newest versions of Photoshop.
Method one: overlay.
- To begin with, you need to open the second picture in the same way as the first. They should be in different windows.
- There is no need to expand images to full screen. It is best to place the picture windows next to each other so that they are all visible.
- This can be achieved by dragging the image tab itself. Having found it at the top of the program, you need to hold down the left mouse button and drag the window down. As a result, it will lose its full-screen size, and you can place the picture where you want it. If desired, you can easily change the size so that both files fit fully on the screen.
- When all the images are visible, all that remains is to do a very simple manipulation, namely, moving one object to another. There is a special function for this, there is a hotkey, and you can also work with layers.
The easiest way is to use moving layers. In order to do this, you need to open the image that will be superimposed on the main one. Most often, layers are located on the right in the program. You need to left-click on the image layer and, holding it, drag it onto the main image.
Just release the button and the second picture will move to the first. You can then adjust the overlay image. Using Free Transform, you can easily change the size of an object, as well as its location.
All this can be done using the Move tool. It is enabled using the V hotkey. Further manipulations are the same as in the case of layers, but the entire image is transferred.
Copy
Now let's move on to the second method - copying through the buffer. It, just like the first one, is not particularly difficult. It’s somewhat reminiscent of working with text.
Open the tab with the required image. Select it by pressing the Ctrl+A key combination, using a lasso or other cutting tool, if only part of the picture is needed.
Use the Ctrl+C buttons to copy the selected area.
Go to the background tab by left-clicking on it and press Ctrl+V to paste. The copied photo appears on the working surface in the center of the image. It will be on a new layer.
Method number 2: copy-paste
A painfully familiar combination of actions also works in Photoshop. The essence is the same: copy one image to the clipboard, and then paste it in the right place.
Now in more detail how to do this
Open the picture you want to copy and press Ctrl+A (select all). “Marching ants” should appear around the image - this means that we have created a selected area. And this, in turn, is important for Photoshop, because it always needs to indicate what we want to copy. Thus, everything that is inside the selected area will be copied.
Let's copy the selected area - press Ctrl+C. Now the drawing is on the clipboard!
Return to the main image and press Ctrl+V. If everything is done correctly, Photoshop will place the contents of the buffer in the center of the open document:
Place command
Now we have already reached the third method - using the “Place” command. It is not always possible to insert a photo in the program due to its size. In this case, the “Place” command will help us out and create a smart object.
In other words, the layer in which the drawing will be after insertion. It makes it possible to change sizes without losing image quality. Helpful when working with inscriptions or photographs with low resolution.
You need to go to the background tab. Open the "File" menu in the upper left corner of the page. In the list that opens, find the item “Place built-in”.
A search window appears. In it we find a file with an image to insert. Select and click “Place” in the lower right.
A frame with a picture appeared in the center of the image. We change the sizes, stretching the corners by the black dots on the frame. After finishing the work, click on the button with a checkmark in the toolbar.
By the way, if you want your picture to stretch or shrink proportionally when you drag the edges of the frame, you need to drag and hold the Ctrl key. Then the proportions will be maintained.
Method number 3: menu command “Place”
This is a special method and it is qualitatively different from the previous two. A distinctive feature is the automatic creation of a smart object.
With the original image open, select File - Place.
A Windows Explorer window will open. In this window you need to find the image you need to insert and click the “Place” button.
As a result, this picture will appear on the main image. But:
- it will not match its original size;
- it will appear in an editable frame.
What happened?
By using the Place menu command, we automatically created smart objects. I have already written a detailed article about what smart objects are. In short: this is a container layer that can be resized as you like and as much as you like without the slightest loss in pixel quality (I wrote about the process of losing the quality of a photo when reducing its size in this article).
The picture did not appear at all in the size that we would like. It needs to be corrected. To do this, pull the ends of the black frame in the direction of decreasing or increasing. When you're done, click on the checkmark button located in the options bar.
Advice
To resize the picture proportionally, hold down the Shift .
To bring up the editable frame again, press Ctrl+T .
Drag from folder
And here is the finish line! The fourth method is to drag and drop a file from a computer folder. This is a simpler version of the previous method. The result will also be a smart object, but we don't need to go into the menu. To do this, we need to find our picture in the folder, then hold it with the mouse and drag it into the Photoshop window.
Moreover, if you have Photoshop minimized, then you can drag the picture onto the Photoshop icon in the lower area of your screen, and then, automatically, the photo will go into the program itself. Do you understand how to do this?
Or you can drag the picture directly into the program window if you have a photo folder open directly on top of Photoshop.
Method two: drag and drop from computer
In order to place one image on top of another, you don’t even have to open it in Photoshop. The picture can be taken directly from the desktop, some folder or any other place on the computer. All actions will be very similar to the previous method, but the result will be somewhat different.
So, first you need to find the image you want to overlay on your computer. If it is on the desktop, then it is best to minimize Photoshop. If the picture is located in a folder, then this folder can be placed on top of the program so that both it and the primary image are visible.
After this, you need to hold down the picture with the left mouse button and drag it to the second picture in the same way as described in the previous method. As a result, the image will become a smart object.
The peculiarity of smart objects is that they are so-called container layers that can be easily changed in size without losing quality. On the one hand, this is good, but, on the other hand, when overlaying such objects you have to spend time on formatting. As a rule, the applied image extends beyond the edges of the original one or, on the contrary, is superimposed in too small a size.
As a rule, in such a situation it is important to preserve the proportions of the second picture. To ensure that it doesn’t get skewed when working with the size, you need to hold down the Shift button on the keyboard. Changes are confirmed using a checkmark on the toolbar or the Ctrl+Enter combination.
How to overlay a photo on a photo on Android using built-in methods
Editing methods in devices are not as developed as applications specializing in photo editing. However, Android OS has a feature that is similar to overlaying photos - creating collages.
To create one file with several images you need:
- Go to Google Photos.
- Go to the “For You” menu. The icon is located in the bottom panel of the interface.
- Select the "Collage" option.
- Mark the photos you are interested in.
- Click on the “Create” button.
As a result, the newly created collage will be saved in the device’s camera roll.
It is important to use the Google Photos functionality, you must log in to your smartphone. Otherwise, the software will simply prohibit the user from any actions with the images.
Unfortunately, you cannot rearrange the photos selected for the collage in any way. Just like editing their size.
Instructions
So I will need 2 images. As a background image, inside which I will insert another picture, let's take this template. Let's call it image No. 1.
There is a white rectangular area inside the image. My task is to fit the second picture into this area so that it does not go beyond the boundaries of the white rectangle.
For the second image I'll take a photo of Jack with a ball.
Next, open image No. 1 in Photoshop and select the desired area, that is, draw a white rectangle along the contour. It’s more convenient to do this using the “Rectilinear Lasso” tool, which is called up from the toolbar on the left.
Select “Rectilinear lasso” and carefully outline the contour, that is, select the area we need. The same operation can be performed using the Magic Wand tool.
Now open image No. 2 in Photoshop and select it completely by pressing the key combination “Ctrl + A”. You will see a dotted selection of the image in the active window. Now just copy the image to the clipboard by pressing “Ctrl” and “C”.
Next, insert image No. 2 into background image No. 1. But the keyboard shortcut “Ctrl+V” will not work in this case. Photoshop has a “Paste Special” function for this, which is called from the “Edit” item in the top menu.
So, to embed picture No. 2 in the selected area of picture No. 1, go to the window with image No. 1 and click on the “Edit” menu item. Next, in the drop-down list, hover the cursor over the “Paste Special” line - another submenu will appear, where you click on the “Paste into” line. Or, instead of calling it from the menu, press the hotkey combination “Alt+Shift+Ctrl+V”.
Pay attention to the layers panel (mine is on the right). Above the background image layer (Layer 0) another layer (Layer 1) appeared with image No. 2 and a thumbnail of the layer mask. The white rectangle of the layer mask thumbnail is the selection area in image No. 1, which we previously created.
And the window with picture No. 1 now looks like the screenshot below.
By standing on Layer 1 and selecting the “Move” tool, we can move picture No. 2 as we please and it will not overlap the colored frame. All movement will occur inside the layer mask.
Using this simple method, you can also insert any image into some beautiful frame, create a collage of many pictures, and so on.
How to unfreeze a PNG image
And one more small addition. If you use images in jpeg format, then there should be no problems with moving the image into the image. But, for example, I used the png format. And in the “Layers” window, the layer with the image was pinned. This can be seen from the closed lock icon on the layer with the png image.
In this situation I could not do anything with the images. In order to remove this limitation, you need to do the following: convert the image to the RGB 8 bits/channel color mode.
How to do it? It’s very simple: click on the “Image” link in the horizontal menu, then “Mode” and check the RGB line. Now in the “Layers” window, double-click on the layer with the image and click “OK” in the window that appears. And then we work with the image.