Hello everyone, today I’ll tell you how to change the MAC address of a network card in Windows 7, Windows 8.1, Windows 10, Linux and MacOS. Previously I wrote about how to find out the MAC address of a computer, and today we will talk about changing it. Why might you need to change it?
A couple of times I came across arguments about the fact that the MAC address cannot be changed, because it is a hardware characteristic, and therefore I will explain: in fact, you really cannot change the MAC address “hardwired” into the network card (this is possible, but requires additional equipment - programmer), but this is not necessary: for most network equipment in the consumer segment, the MAC address specified at the software level by the driver takes priority over the hardware, which makes the manipulations described below possible and useful.
What are the reasons to change the MAC address on your system
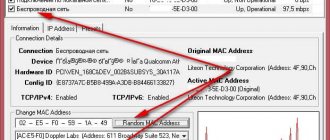
Each network adapter (Network Interface Card) has a unique MAC address ( Media Access Control ). This applies to all types of network cards, including Ethernet and WiFi cards. A MAC Address (Physical Address) is a six-byte number or 12-digit hexadecimal number that is used to uniquely identify a host on a network. As an example, I will show you my test server with Windows 10. The fastest way to find out is to run the command ipconfig /all . My physical address (MAC address) is " 00-0C-29-9A-EC-49 ".
Okay, you are our physical address, but you should have an idea of where it is used, as this will answer the question why a user might want to change the Mac address. At the lowest networking level, network interfaces connected to a network use MAC addresses to communicate with each other . For example, when the browser on your computer needs to retrieve a web page from a server on the Internet, the request goes through several layers of the TCP/IP protocol. The web address you enter is converted to the server's IP address. Your computer sends a request to the router, which then sends it to the Internet. At the hardware level, your network card only looks at other MAC addresses on the same network as it. It knows how to send a request to the MAC address of your router's network interface.
So why would you want to change your MAC address? Well, there are many reasons for this, mostly related to bypassing any MAC address filter installed on your modem, router or firewall. Changing the MAC address can help you bypass certain network restrictions by emulating an unrestricted MAC address or spoofing a MAC address that is already authorized. This is exactly what unscrupulous users take advantage of, organizing network attacks in this way, knowing that manufacturers are doing protection, for example, VMware has Forged transmits functionality.
For example, a WiFi network may allow only authorized computers to connect to the network and filter computers based on MAC address. If you can determine a valid MAC address, you can spoof your MAC address and gain access to the Wi-Fi network. Any DHCP server also has filtering.
Another example is if you have an Internet Service Provider that only allows a certain number of computers to connect to the Internet from your home. If you have more computers that need to be connected, you can spoof the MAC address of the authorized computer and connect from another computer. Changing the MAC address is useful when it is difficult or cumbersome to change the MAC address rules for your network.
How to change mac address through Windows Device Manager.
Note: the first two digits of the specified
MAC address do not need to start with 0, but should end with 2, 6, A or E. Otherwise, the change may not work on some network cards.
These methods will work equally on Windows 7, Windows operating systems 8.1, Windows 10
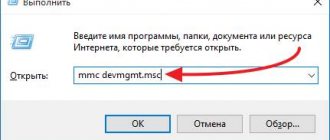
To begin, launch Windows Device Manager. A quick way to do this is to press the Win+R keys on your keyboard and type devmgmt.msc
, then press the Enter key.
It will open in Device Manager.
How to change the MAC address of a network card in Windows 7, Windows 8.1, Windows 10-02
Or you can right-click on the My Computer icon and select Properties
How to change the MAC address of a network card in Windows 7, Windows 8.1, Windows 10-001
A properties window will open in which you can select Device Manager at the top left.
In Device Manager, open the section Network adapters , right-click on the network card or Wi-Fi adapter whose MAC address you want to change and click Properties .
In the adapter properties window, select the “Advanced” tab and find the “ Network Address ” item and set its value. For the changes to take effect, you must either restart the computer or disable and enable the network adapter. The MAC address consists of 12 hexadecimal digits and must be specified without using colons or other punctuation marks.
On some network adapters, the item for changing the physical address value may be called “ Network Address ”.
Or you may see the name " Locally Administered Address ". Next, when changing the MAC address, delete all the dashes, my new value will be 000C299AAAAA .
Let's turn off/on the network interface or just reboot to check our changes. As a result, it is clear that everything worked quickly and reliably. Agree that in Windows it is very easy to change the mac address using this method.
Note: not all devices can do the above; for some of them, the “Network Address” item will not be on the “Advanced” tab.
In this case, you should use other methods. To check whether the changes have taken effect, you can use the ipconfig / all command (for more details, see the article about how to find out the MAC address).
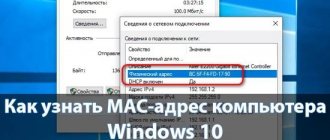
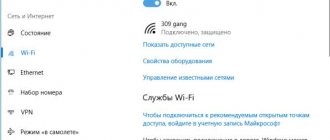
You can also view the list of network adapters through the Network Control Center; to open it, right-click on the WiFi or network connection icon in the bottom right
How to change the MAC address of a network card in Windows 7, Windows 8.1, Windows 10-003
Let's choose to change adapter parameters
How to change the MAC address of a network card in Windows 7, Windows 8.1, Windows 10-004
You will see the same list of network interfaces that also have an Advanced tab in their properties.
How to change the MAC address of a network card in Windows 7, Windows 8.1, Windows 10-005
You can also press Win+R again and enter ncpa.cpl you will also see a list of network interfaces.
Changing the MAC address for Windows Vista/7/8/10
Changing the MAC address for younger members of the Windows family is similar to the change in Windows XP:
, in the window that opens, select , then select the section and immediately select .
Next, just as we found out the MAC address, click on , select , right-click and .
You should choose
and in the window that opens, we must select the tab, find in the list the inscription: network address, which can also be called Physical Address or Network Address and fill in the column (Value) with the desired or any MAC address.
Another way to change the MAC address, which can be done through the snap-in.
To do this, right-click on the inscription (my computer) and click on . In the left part of the window that opens, you must select.
On the right in the drop-down menu you need to select and select the desired network card if there are several of them. By clicking on the selected network card, you should follow further actions similar to the instructions described above.
Now, in addition to changing the MAC address, there is a general knowledge of what a MAC address is and how you can find it out.
- Back
Add a comment
How to find out the number of cores and frequency of a computer's processor in Windows 10?
How to force quit a program in Windows 10?
How to run commands in Windows 10 Explorer?
How to open Task Manager in Windows 10?
How to open Control Panel in Windows 10?
How to add Hibernation Mode to the Shut down menu in Windows 10?
How to change the default browser in Windows 10 in three ways?
How to change mac address through the Windows registry.
If the previous option did not help you, then you can use the registry editor; the method should work in Windows 7, 8, 10 and XP. To launch Registry Editor, press Win+R and type regedit.
In the Registry Editor, open the key HKEY_LOCAL_MACHINE\SYSTEM\CurrentControlSet\Control\Class\{4D36E972-E325-11CE-BFC1-08002BE10318}
How to change the MAC address of a network card in Windows 7, Windows 8.1, Windows 10-04
This section will contain several “folders”, each of which corresponds to a separate network device. Find the one whose MAC address you need to change. To do this, pay attention to the DriverDesc on the right side of the Registry Editor.
After you have found the desired section, right-click on it (in my case, on 0000) and select - “Create” - “String parameter”. Call it NetworkAddress .
Double-click on the new registry entry and set the new MAC address using 12 hexadecimal digits without using colons. Close Registry Editor and restart your computer for the changes to take effect.
Edit using Registry Editor
This method is most relevant for those who use Windows XP, 7 and 8. It also will not take much time, and will give the desired result.
- As in the previous case, the user needs to get to the “Run” window by pressing the “Win” and “R” keys. In the open line you need to write “regedit”, after which the registry editor will open.
- To find the desired folder, you will first need to find the “HKEY_LOCAL_MACHINE” section, which consists of many folders. In this case, you will need the system folder “SYSTEM” and “ControlClass”. This section is also quite large and consists of seemingly identical folders. You need to find the one called {4d36e972-e325-11ce}. Having found it, you can find another list that is responsible for all existing network devices. The user will need to find the one whose MAC address needs to be changed. When viewing, you need to pay attention to “DriverDesk”.
In the “HKEY_LOCAL_MACHINE” section we look for “DriverDesk”
- As soon as the user has found the folder, he needs to right-click on it, after which the “Create” item will appear in the drop-down list. When creating, you must select the “String parameter” sub-item. The "Change Parameter" window opens. You will need to specify the desired value and specify a name. You can use "NetworkAddress".
We use "NetworkAddress"
- When entering, it is also important not to use any characters other than capital letters and numbers. To get the desired result, you need to restart your PC after clicking the “OK” button in the registry.
How to change MAC address via command line or PowerShell
Having learned how to change the MAC address using the Registry Editor, we can speed up this change using the reg in the Command Prompt or PowerShell. If you need to repeatedly switch between different MAC addresses on your Windows computer, the Command Prompt is the way to go and the commands can be saved in a script file and run to speed up the procedure. Open Command Prompt or PowerShell as an administrator, depending on which application you prefer to use.
In my example, I want to change the physical address value from 000C299AAAAA to 000C299BBBBB .
To execute the command you must know the folder number from the container {4D36E972-E325-11CE-BFC1-08002BE10318}, in my example it is 0001.
Enter the following command either in cmd or in PowerShell, do not forget to enter your MAC_address.
reg add HKEY_LOCAL_MACHINE\SYSTEM\CurrentControlSet\Control\Class\{4D36E972-E325-11CE-BFC1-08002BE10318}\0001 /v NetworkAddress /d 000C299BBBBB /f
As a result, the command worked perfectly, by turning off and on the network interface, I can already observe the new physical address and, best of all, it does everything in a matter of seconds, in my opinion, this is the most convenient method to change the MAC address in Windows.
This is how easy it is to change the MAC address of a network card in Windows 7, Windows 8.1, Windows 10.
Automatic change
If you don’t want to look for where the MAC address is changed on your own, you can entrust this task to specialized software. There are various programs that change network connection parameters in one click, the most popular of them is Technitium MAC Address Changer, which can be downloaded for free from the official website.
After launching the program, you can see your original MAC address under the Original MAC Address line and the current one under the Active MAC Address line. The combination is changed in the window under the line “Change MAC Address”, all other points must be left unchanged, after which the changes are saved by clicking on the “Change Now” button.
How to change mac address in MacOS
Changing MAC addresses in macOS Catalina and Mojave 2020 is definitely as easy as in Windows. First, you must use a terminal (similar to the command line in Windows) to actually change the MAC address. Secondly, you need to manually determine the technical name of the adapter before you can change the settings.
First, let's find out the current MAC address of your Mac. You can do this in one of two ways: through System Preferences or through the Terminal. Open System Preferences , click Network, then click Advanced . Make sure to select the appropriate interface first (WiFi, Ethernet, etc.).
Click on the Hardware and you will see the first line with the MAC address. We will need it for the command from the terminal.
Next, press the Command + Space keys simultaneously, type “ Terminal ,” and then press “Enter.”
Site material
Finding out the MAC address on macOS
Before changing the address, it would be useful to find out the current one, so that in case of unsuccessful manipulations it can be returned back. This is done using the following methods:
- You can use the "Terminal". To open it, use the Launchpad tool - click on the corresponding icon in the Dock panel.
Next, open the “Others” folder (otherwise it may be called “Utilities”).
Find the Terminal icon and click on it.
Next, enter the following command:
ifconfig en0 | grep ether
A line will appear that begins with the word ether - the sequence after it is the hardware identifier of the network adapter.
- You can also get information by opening “System Information” - to do this, click on the button with the Apple logo, hold down the Option key, and then click on the item with the specified name.
Next, the Mac Information section will open. In the menu on the left, select the “Network” item (exactly this, not the sub-items), after which detailed information about the network equipment will appear on the right side, including the value we are looking for.
- The third option is to open System Preferences (located in the Dock) and select Network.
In the adapters menu, select the one you need, then click “Advanced”.
Next, go to the “Hardware” tab, the first position on it shows the MAC address of the selected adapter.
It is better to write down the resulting value somewhere or copy it to a separate text file. Now you can proceed directly to changing the identifier.