Tip #1: Go to Windows Event Viewer to find out why your computer turned on
It may well turn out that your PC starts precisely because you yourself - or someone who was behind the screen - set such a rule. Finding out what exactly is causing it is not difficult: just use the system option that allows you to view the latest events:
- Open "Control Panel" , then, turning to the search bar, start typing "View logs" . In the list that opens, select the top option - most likely, it will be the only one.
- Wait until the next system window loads, and in it expand the “Windows Logs” - it is located in the left panel.
- Next, you will need to find out why, after finishing work, the computer turns on itself at night, go to the “System” . As soon as you click on the new link, switch your attention to the right panel: here you need to select the option “Filter current” .
- Call the drop-down menu located under the “Event Sources” heading. When a list of available options appears, select Power-Troubleshooter . To do this, you will need to scroll almost to the end of the list. Check the selected sub-item.
- Set filtering, wait a bit again, and then review the information presented in the summary table. As you can see in the image below, it lists all the episodes that meet the problem we are looking at. When you click on each heading, a description of the situation will be displayed in the bottom panel. Directly in the table you can see the exact time of “awakening” - with the date of each event.
Although there can be quite a few sources of problems, they can be roughly divided into the following categories:
- Pressing the power button. Produced by the user himself. If you have not done this, you can immediately proceed to diagnosing the electrical component.
- Wake up from sleep via a peripheral device. Most often this is a mouse that has been slightly moved to the side, or a keyboard that someone has pressed on any of the keys. The description of this situation will necessarily contain the abbreviation HID.
- Network card operation. The answer to the question why a laptop or computer turns on by itself in Windows 10 can be very simple: most likely, the incoming data packet “awakened” the adapter, which, in turn, woke up your PC.
- Using the system timer. It can be set either by the user or by the OS - in particular, for scheduled checking for updates.
- Lifting the laptop lid. As in the first case, in the normal state only the user can do this - therefore, such manipulations do not apply to the problem we are considering. Are you absolutely sure that neither you nor anyone else touched the device? Then it's time to check and probably replace the sensors.
spontaneous turning on of the computer - solving the problem in “power management”
1: Open “Power Management” - you can do this: the key combination Win + X (or Start/Control Panel/System and Security/POWER SUPPLY (these settings should be set to “Balanced (recommended)”)
/set up power plan/change advanced power settings...
And one more thing: change the settings for temporarily disabling USB to “disabled” (maybe “off” or some other...)
This is roughly the window in the settings of which you need to correct everything suggested above...
2: Disable Hybrid Sleep Mode.
...expand the “+ Sleep” tab, click a couple of times, expand “+ Allow hybrid sleep mode”, change to “Off”, click the “Apply” button, “OK”.
Disconnect all external USB equipment from the computer (webcam, printer, scanner, uninterruptible device, in general, everything except the keyboard and mouse) and check ... whether the system correctly enters Sleep mode.
If you have a laptop:
Press the Win+X key combination, select Power Management, on the left side of the window click “Actions when closing the lid”, then... in the “When closing the lid” section, select “on battery and mains Hibernation” - save the changes.
Attention here! Some equipment may not support Sleep or Hibernation modes, which may cause these modes to malfunction. Put your computer into Hibernation mode, does the system enter Hibernation mode correctly?
For the inquisitive:
Disable all external mouse gadgets, etc. ANYTHING that is possible (after putting the computer to sleep)
Listen carefully to rustling sounds inside the system...
In general, test it!
If this doesn't help, here's another option:
back to contents
Tip #2: Disable Windows Fast Startup
It is a very common situation in which you have to wonder why a laptop or computer turns on by itself in sleep mode. Most likely, the problem is in the option that allows you to perform quick startup - in fact, not even in the option itself, but in how it is configured on your machine. First, you will need to completely deactivate the feature and check if the problem persists. If everything works out, you can re-adjust the process - or leave everything as is.
To get started:
- As before, call "Control Panel" , and then go (you can use the search bar again) to the subsection "Power Options" .
- In the sidebar, click on the link that allows you to set actions for the corresponding buttons.
- Using the link shown in the image, proceed to change the currently inactive parameters. Please note: from this step you will need administrator rights. If you do not have access to them, log in under a different account or provide them to yourself from your “senior” profile.
- On the new page you will see many interesting options that directly or indirectly affect the parameters of “waking” the PC. You'll almost certainly only need to deactivate one of them - the one that enables Fast Startup. Uncheck the corresponding checkbox, and then save the changes made.
- Now you can close the window. After completing the described manipulations, we strongly recommend that you immediately restart and check whether the problem due to which the PC turns on itself after shutting down has disappeared. Is your computer working as it should? Congratulations - you don't have to read any further.
The computer turns on by itself after shutdown
See also:
- The computer does not turn on. What reasons?
- The computer turns on and then turns off immediately
- The computer won't turn on
- Why doesn't my computer monitor turn on?
- The computer turns on but there is no picture
Today we will talk about why the computer turns itself on after being turned off. Quite strange, isn't it? =) After reading what Yandex gave me for the query “The computer turns on itself after shutting down,” I realized that most often the problem lies in the BIOS and if you make certain settings or even reset it, the problem will be solved. Also, the reason may be that Windows contains viruses or some program makes the computer turn on itself after shutting down. However, my experience tells me that the problem may be not only in the software, but also in the hardware, and in particular in the power supply.
Let's take a closer look at all the reasons why the computer turns itself on after being turned off. People who are far from computer technology, if they suddenly have such a problem, simply pull out the power cord or flip the toggle switch on the power supply (PSU) at the moment when the computer turns on after turning off. But even a person who does not have special knowledge in this area can (in my opinion) solve this problem.
So, here are the reasons why the computer turns on by itself after shutting down:
- BIOS setup required.
- The power supply needs to be replaced.
- The power button needs to be replaced.
- Problem with the operating system.
Let's describe each reason in more detail.
1. BIOS setup required.
Many people have heard this terrible word BIOS, but they don’t even know approximately what it is and what they eat it with. Let me conduct a small educational program (liquidation of illiteracy). In simple terms, BIOS is a program for initially setting up a PC. It is there that you can programmatically disable many components (for example, the touchpad on a laptop ), configure their operation, choose from which device the computer will boot in the 1st, 2nd and 3rd places, manipulate the computer’s power supply (exactly what we need) and make a bunch of other settings . There is absolutely nothing for an ignorant user to do there =). You can set it up so that the PC stops booting altogether.
This is what the BIOS looks like:
or like this:
After you roughly understand what BIOS is, let's go into it and try to tweak a few things =)
You need to restart the PC, wait until it turns off, and as soon as it starts to turn on, press F2, Esc, or Del. Which button you need to press is most often written at the bottom of the screen, and if not, then just press them one by one and be sure to enter the BIOS. Next you need to reset the settings. Watch the following videos to see how to do this.
also, if you can’t reset it with software, try resetting it with hardware, like in this video:
After you have successfully completed this operation, you should check whether the computer turns on by itself after being turned off. If the situation has not changed, then you should read the article further =)
If resetting the BIOS did not help, then we will probably have to dig into it a little. This situation, when the computer turns on itself after being turned off, may arise after installing new equipment. (let's say a sound card) A little less often due to a problem with the power supply, which we will look at later.
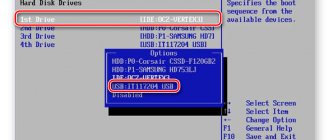
So, to check whether the BIOS is involved in the computer spontaneously turning on after shutdown, we need to enter it (how to do this is described above) and go to the Power Managment Setup . Next select Power Management Events , and then Wake-Up by PCI card.
Most likely, this item will have the value Enabled. We need to change it to Disabled. Also, in the Wake Up on LAN item, if it is Enabled, change it to Disabled. Then press F10 (saving all the settings made) and Enter to confirm that the settings need to be saved. Your next step is to exit the BIOS. To do this , press Esc and then Enter. The computer will restart. Try turning it off now. If the computer turns on by itself after shutting down, then the problem is most likely in the hardware. Read the article further.
2. The power supply needs to be replaced.
The power supply is one of the most important components of a PC. It distributes power to all computer components and also protects them from overvoltage. (in this case, the fuse on the power supply burns out, but all PC components remain unharmed)
The computer turns on by itself after being turned off; this problem may also indicate that the power supply is dying. In order to check this, you should get a 100% working power supply (from a friend or in a store) and connect it to the PC instead of the existing one. If after turning off the computer with a new power supply does not turn on itself, buy a new power supply.
You can find out more about how to replace the power supply yourself here.
3. The power button needs to be changed.
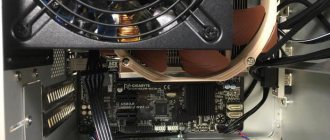
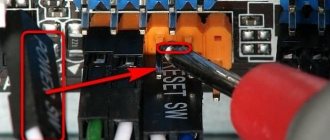
Of course, it is also possible that the computer’s power button itself is acting up, although this happens quite rarely. In order to check the power button and reset button, you need to find special jumpers on the motherboard. They are called Power SW or PWRSW for the power button and Reset SW or RSTSW, respectively, for the reset button.
You need to pull them out of their seats and use a screwdriver or something else to close the PWR SW contacts. The computer will turn on as usual, then try turning it off. If it also turns on by itself after being turned off, then insert the connectors back. The problem is not with them. If the problem has disappeared , then try putting the RST SW jumper in place of the PWR SW, that is, put the reset button in place of the power button, and leave the power button jumper unconnected.
The computer will now turn on with the restart button. If you are not satisfied with this, find the reason for the constant short circuit of the power button that you disabled. (perhaps the wires are broken somewhere)
4. Problem with the operating system.
If the previous checking methods did not help you, and the computer still turns on after shutdown, then there may be a problem with the Windows operating system. Try to remember when these spontaneous startups began, and also remember what programs or games you installed that day. It is possible that the reason lies precisely in them.
Also, some programs, such as antivirus programs, can themselves schedule the computer to turn on at a certain time in order to conduct a scan. To delete these “plannings”, you should go to drive C (or to the drive where the system you are currently booted from is located), find the “Windows” folder there, and in this folder find another “Tasks” folder. You should delete all these scheduled tasks in it, and quite possibly the problem will disappear.
If after this, the computer turns on by itself after shutting down, then I advise you to try reinstalling Windows. It is possible that this is the work of viruses and by reinstalling the system, you will find out whether it is so or not.
It seems that I have listed all the conceivable and inconceivable reasons why the computer turns on by itself after being turned off. Maybe I missed something? =) Write in the comments. I will be glad to add something new to this article. Thank you for your attention! Good luck!
Tip #3: Stop your computer from waking it up
Ideally, no peripheral device should cause a situation in which the computer turns on itself after turning off Windows 10 or another generation OS. But no one has canceled all sorts of failures - and, after eliminating the main possible cause, we recommend that you look at what else can disturb the peace of your computer.
The following instructions will help you:
- Open the command line. You can do this in any fairly convenient way. It would be optimal to immediately open the utility with administrator rights. If this is not possible, launch the terminal as usual.
- Use the powercfg -devicequery wake_armed . Use all of the attributes provided, remembering the difference between spaces and underscores. It is with this request that you can see which device needs to be reconfigured.
- After a few moments, a list of components that in one way or another affect the “awakening” of the machine will appear on the screen. Disable everything that is not critical. To do this, you will have to go to the “Properties” of each of the available items.
- Open the second tab in a new window, which allows you to configure power settings. There will be a checkbox marked here. Uncheck the box and be sure to apply the adjustments made. If there are two checkboxes, you will need the second one from the top - the one that allows the hardware to “wake up” the PC.
Disabling automatic wake-up
Computer devices, including timers and network cards, can interfere with Windows 10 turning on automatically. Separately, automatic system maintenance can turn on your computer or laptop.
We prohibit devices from waking up the computer
We get a list of devices that affect when Windows 10 wakes up:
- Launch the command line as administrator.
- Enter powercfg -devicequery wake_armed.
A list of devices appears as they appear in Device Manager.
To disable the ability to wake the system, you need to go to the device manager, find the desired device, right-click on it, select “Properties”.
In the “Power Options” section, disable “Allow this device to connect to the computer...” and apply the settings.
Now we repeat the same steps for the remaining devices.
Disable wake timers
To view active system wake timers, start a Command Prompt as an administrator and run the command powercfg -waketimers.
As a result, a task scheduler will appear with a list of tasks that can turn on the computer if necessary.
You can disable timers for specific jobs or completely for all jobs.
When performing a specific task, we disable the ability to exit sleep mode:
- Open the Windows 10 Task Scheduler.
- We find the specified task in the powercfg report.
- In the properties of this task, in the “Conditions” section, remove o. Save the changes.
The screenshot in the powercfg report in the second task named Reboot shows an automatically created task for Windows 10 after receiving the next batch of updates. Here, manually disabling sleep exit may not work.
Now we disable timers completely:
- Go to Control Panel, select the Power Options menu. Open the settings for the current power supply plan.
- Click “Change advanced power settings.”
- In the Sleep menu, you need to disable the wake timer and save the changes.
After completing the actions, the scheduler will not be able to wake the system from sleep.
Disabling wake up when Windows 10 starts automatically
Windows 10 defaults to daily system maintenance, which can turn on your computer. If a laptop or computer wakes up at night, then this is often the problem.
To prevent leaving sleep, follow the instructions:
- Open Control Panel, select “Security and Service Center”.
- Expand the “Maintenance” menu and click “Change maintenance settings.”
It might be smarter to change the task start time instead of disabling wake-up to perform automatic maintenance. This is done in the same window. The function itself is useful; it includes automatic defragmentation for HDDs (not for SSDs), updates, checking for malware and other tasks.
In some situations, disabling “quick startup” helps solve the problem.
Tip #4: Disable wake timers
In the next step, you will need to use the command line again to make sure that the device is not malfunctioning due to the system timer being turned on. Follow simple instructions:
- Call the terminal in exactly the same order as above. In it, enter a command with a prefix similar to the previous one: powercfg -waketimers . After a few seconds, you will see a list of all activated scripts that result in automatic "waking".
- If you know exactly which tasks your machine needs and which you can do without, turn it off individually. To do this, use the “Task Scheduler” : after launching the utility, look for the problematic timer in it using the built-in search.
- Having accessed the “Properties” of the task, switch to the “Conditions” .
- Here you will need to uncheck the option that allows you to start the machine to perform a particular task. Just uncheck the corresponding checkbox and click OK .
To understand how else you can deal with a problem that causes the computer to turn on spontaneously after being turned off, pay attention to the second timer shown in the first screenshot. As can be understood from the description, it causes a mandatory restart after the next updates are received and applied. To be sure to get rid of this option, you will need to call an advanced command line analogue - PowerShell . As before, we highly recommend doing this immediately with administrator rights. When you see a blue window on the screen instead of black, use the Get-ScheduledTask | where {$_.settings.waketorun} . Be sure to use curly braces instead of parentheses, otherwise the query will be useless.
In order not to eliminate each “wrong” timer individually, you can use the following instructions:
- As described in the previous paragraphs of the article, refer to the Power Options . Here click on the link responsible for the settings of the current scheme.
- Proceed to change additional parameters - the next link will help you.
BIOS settings as one of the reasons
One of the factors in the appearance of supply voltage is several software options that are located in the BIOS. Any modern computer is equipped with an ATX form factor power supply, the output voltage at the pins of which never disappears. And the boot conditions/parameters of Windows 10 are indicated precisely in that miniature diagram called BIOS.
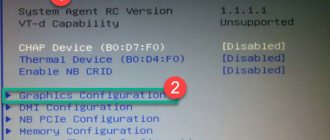
- We find a line that allows you to turn any computer into a real alarm clock. It will be called “RTC Alarm Resume”, “Wake Alarm” or some other combination with the word “alarm” and the corresponding meaning. The parameter is responsible for starting the PC according to the specified schedule.
- If the line value is specified as “Disabled”, skip the step; otherwise, change it from “Enabled”.
By doing this we deactivate the option that allows you to start the computer at a specified time.
The second reason that the laptop turns on spontaneously may be the active option Power On By Keyboard or Mouse. This allows you to turn on your Windows 10 PC by receiving control signals from one of the devices.
- We disable such options, as in previous cases.
- We go into the parameters of the built-in peripheral devices “Integrated Peripherals” and find an option with a name, something like Power ON After Fail and deactivate it.
If all else fails, try resetting the BIOS settings using the software method or by removing the power battery for ten seconds.
Afterwards, do not forget to insert the battery into place and configure the BIOS.
Tip #5: Disable Wake Up for Windows Automatic Maintenance
To keep the system in optimal condition, regular maintenance is necessary. Of course, you can do it manually - but where is the guarantee that you won’t forget about it in a day, week or month? It is for this reason that new generations of OS implement automatic self-service that does not require user participation. On the one hand, this is good and reliable; on the other hand, it can lead to spontaneous inclusions.
You can easily disable this option, which is usually not very necessary:
- Once again in the “Control Panel” , click on the “Security Center” . As usual, you can use the search bar.
- On the new page, go to the “Maintenance” , and then click on the “Change settings” ; it will be located approximately in the center of the window.
- Cancel the automatic permission given to the operating system to “wake up” the PC. Just uncheck the box and click OK . To achieve this goal, you will need to have administrator rights.
Please note : unless absolutely necessary, it is not recommended to completely deactivate the option. It would be much more reasonable to instead set, in the same target window, a more convenient start time for service - for example, during the day rather than in the evening or at night.
Otherwise, you will deprive the OS of the ability to check the health of hard drives, defragment them, run scans, and check for the latest updates. You will have to launch all these actions yourself - which, you see, is not always convenient.
Tip #7: Check Windows Sleep Settings
It is likely that this feature also affects the behavior of your computer. As the name suggests, it allows you to save on power supply by “putting the PC to sleep” during inactivity, and then, upon one signal or another, “awakening” it again. Although theoretically a situation in which the computer turns on spontaneously is impossible under such conditions, anything can happen - and in this section we will tell you how to get rid of the problem.
Once again the instructions will help:
- You can use the appropriate options to completely disable both “sleep” and hibernation.
- Instead, if you think that your computer needs the function, you can set any other time period for changing modes - from a minute to infinity.
- In the latest generation OS, the corresponding option is already available in “Settings” ; You won't notice any more significant changes.
- The situation is approximately the same in Windows 8 - in a word, you can easily find the necessary option, no matter what generation you are using.
As you can see, making changes is not at all difficult. After restarting, check if the problem goes away. If you notice that it has only gotten worse, reset the condition to its original state. You can do this in the same section using the appropriate link. Just confirm your intention to reset - and set new, more correct settings.
The computer wakes up from sleep mode
I think many people distinguish sleep mode from a switched off computer, but not always. In fact, in the BIOS you can choose which power saving mode to switch the system to:
- normal, familiar, sleep mode, in which nothing is visible externally except the extinguished monitor. The fans are spinning, the computer is turned on as usual, only in economy mode.
- but in this mode the computer seems to turn off completely, even the coolers do not spin. The only thing that can give it away is the light on the front panel. It can light up as usual or in a different color. The computer actually almost turns off, which achieves maximum energy savings. Only the RAM and some components of the motherboard remain under voltage. When exiting this mode, the RAM is completely restored to its pre-shutdown state, but it takes more time and it may seem like the computer is starting up.
You can choose which mode to use S1, S3 or both (depending on the operating system).
This is not a problem at all; instead of putting it into sleep mode, you can simply turn off the computer. If you turn it off not through Start, but with a button on the system unit, and you have Windows 7, then configure the “Power button action”
.
-click on the “Start”
, select properties, and then select
“Shutdown”
.
Tip #8: Check the tasks in the Windows Task Scheduler
At the very beginning of the article, we already mentioned that a problem due to which the computer turns itself on after being turned off may not be a problem, but a planned action. It can be created by the user himself (not necessarily you), the operating system, special “alarm clock” applications, or malicious code. We recommend checking the OS with an antivirus in any case - but for now we’ll tell you how to perform a full scan for hidden tasks.
Among other things, always pay attention to how exactly you turn off the machine: you need the “Shutdown” , and not one of the “alternatives” contained in the same list.
You will need:
- Press the Windows releasing it, add a second one - R. A window with the same name, “Run” , can also be found in the context list related to the “Start” .
- In the only available line, enter msc , and then click OK .
- Open the local task storage until a new window appears.
- the “Library” located here .
- Please read the list of executable scripts as carefully as possible. Let us warn you right away: not all of them are harmful, but for the most part they are even useful. Do not disable unnecessary ones - only those that cause serious suspicion.
- To find out in more detail what a particular item is responsible for, click on the title, and then read the description below.
- If necessary, you can delete almost any of the tasks placed in the general table. To do this, it is enough to use the function of the same name. Sometimes it makes sense to first see how a task is being carried out - using the “Run” .
- For the changes to take effect, be sure to confirm the changes you are making.
In the vast majority of cases, the measures described above help to completely and finally cope with the problem. Some tasks cannot be canceled - if you are sure that they pose a danger, use an antivirus.