How to find out which network card is on your computer
A network card is a computer component that is used to connect to a local network.
These devices rarely cause any problems, so in most cases, users do not even know which network card is on their computer. However, such information may be needed, for example, to find suitable drivers. In this material we will look at 3 ways to find out the name of the network card used on the computer.
Method number 1. Device Manager.
If you want to find out which network card is on your computer, the easiest way is to use Device Manager. There are different ways to open Device Manager. The easiest option is to press the Windows-R key combination and enter the command “mmc devmgmt.msc” in the window that appears.
You can also use the search in the Start menu. To do this, open the Start menu and type “Device Manager” into the search bar. After this, the system will find the desired program and offer to open it.
After opening Device Manager, expand the Network Adapters list. In this list you will see the name of the network card that is installed on your computer.
It should be noted that sometimes the “Network adapters” list may contain virtual network cards. Such cards may appear after installing some programs (for example, VirtualBox).
Method number 2. Command line.
You can also find out which network card is on your computer using the Windows Command Prompt. To do this, you first need to launch the command line. This can be done in different ways. For example, you can press the Windows key combination-R and execute the command “cmd” in the window that appears.
After opening the command line, you need to run the command “ipconfig /all”.
As a result, information about all network connections used on your computer will appear on the screen.
Here, among other information, the name of the network card will be indicated for each network connection. It will be indicated in the “Description” line.
Method number 3. Programs.
You can also find out the name of the network card that is installed on the computer using special programs for viewing the characteristics of the computer. For example, you can use the free program Piriform Speccy. Install this program on your computer and run it.
After starting the program, open the “Network” section. Here you will find all possible information about your network connections and network cards.
Quite often, after reinstalling Windows, users are faced with the fact that their local network and Internet do not work. Obviously, you need to install drivers, but for which network card it is not clear. In such cases, users ask a completely logical question: how to find out what network card I have.
We look at the name through the device manager
The easiest way for the vast majority of users is to look at the name using, where you can see all the information about the equipment installed on the computer.
Find the “Computer” icon on your desktop (if it is missing, click on the “Start” key and look at the right side of the window that appears), right-click and select “Properties”. A window like this will appear:
Click on the "Device Manager" link. A window with installed devices will open. Select "Network adapters" and look at the installed network card model. There may be several of them. Remember also that here you can see additional devices for connecting to the Internet, including Bluetooth adapters.
How to find out what network card I have on Windows 7, 8 or 10
If you are using the Windows 7, 8 or 10 operating system, then in order to find out what network card you have, you need to open the “Device Manager”. The easiest way to open Device Manager is to run the command “mmc devmgmt.msc”.
To do this, press the Windows + R key combination and in the window that opens, enter the command “mmc devmgmt.msc” (without quotes, of course).
After this, the “Device Manager” window will appear in front of you. Here you need to open the “Network adapters” section. This section will display the name of your network card.
Please note that some programs can create virtual network adapters, which then appear in the list of network adapters in Device Manager. It is quite easy to distinguish such virtual adapters. Because they have the same name as the program. For example, in the screenshot above there is a virtual adapter from the VirtualBox program.
How to find out what network card I have using the command line
You can also find out the name of the network card using the command line. To do this, open the Windows Command Prompt and enter the command “ipconfig /all”.
After this, information about all network connections on this computer will appear in the command line. Opposite the “Description” item, the name of the network card will be indicated for each of the network connections.
Other ways to view network card information
All of the methods described above for obtaining information about a network card use tools built into the operating system. But, you can resort to the help of third-party programs. For example, you can use the AIDA64 program. In this program you need to open the section “Devices – Windows Devices – Network Adapters”.
This section will indicate the name of the network card, as well as other information about it.
Go to the website and enter the first 4 digits of the code in the Search vendors field. For example, device instance code: PCI\VEN_1106&DEV_3106&SUBSYS_14051186&REV_8B\4&2966AB86&0&30A4
Enter the first four digits – 1106 – in the appropriate field. The search will return the name of the manufacturer
Tip 3: How to determine which computer is on the network in 2019
The network adapter is a printed circuit board that fits into a slot on the motherboard. It can also be integrated into the motherboard or connected to a computer via a USB connector. There are other options, but the ones listed are the most common. You can distinguish the adapter by its characteristic connector designed for connecting a network cable connector. Increasingly, there are adapters for network connections using either Wi-Fi or fiber optic technology, which can be expanded if desired - an optical coupling will serve this purpose. The purpose of any type of network adapter is the physical connection of the computer and the transmission medium, as well as the preparation and transmission of data from one device to another.
Before installing the network adapter, pay attention to its brand; it will be required during the setup process. Physical connection requires access to the motherboard. To do this, you need to disconnect the cover from the system unit.
Next, find the connector on the motherboard for installing the network card. Often, this requires removing the closing metal plates from the rear panel of the system unit in order to expose the external interface of the adapter. Install the module into the slot, make sure that the cable connector is accessible, and screw the board to secure it. Then install the cover back on the system unit. Connect the network cable.
Turn on your PC. After the system boots, a message will appear that a new device has been found. For correct operation, you will need to install a driver that matches the system and brand of network adapter. It is better to download it from the manufacturer’s official website. After this, reboot the system. The network connection icon should appear on the taskbar.
Right-click on the icon and select “Network and Sharing Center.” This is where all network connection settings are made. In particular, go to the “Change adapter settings” menu, after which all available network connections will open.
To change properties, right-click on the icon of any of them and select “Properties” in the context menu. In addition, the status of each connection is visible here: “Enabled” or “Disabled”. Connections that are enabled but not working for some reason are crossed out with a red cross. You can also enable or disable the connection (software control of the adapter) through the context menu.
A computer is a super smart thing. But without a special board called a network card, which is located on the motherboard, it will not be able to access the Internet.
Very often, when reinstalling the operating system or when problems arise with the network, determining the model of the network card comes to the fore. So how do you find out the network card model?
Then, in addition to the computer itself, you need a network card, the Everest utility and the ability to access the Internet. The user must know what a utility is. But clarification will not hurt - this is a program that solves auxiliary problems. Utilities can be classified as follows: computer service utilities; utilities for expanding functions; information utilities.
- by clicking on “Administrative Tools” in the “Control Panel”, open the “Computer Management” window;
- go to “Device Manager”;
- click on the plus sign next to the line “Network cards” and open the list of cards that are installed;
- by typing “Cmd” in the “Run” column, launch the command line;
- A window will open and enter the command “ipconfig /all” into it.
As soon as the command is executed, information about the network cards installed on the computer will appear on the monitor.
How to find out the model of a network card, examining a patient
It is possible that the system will not detect the network card. There are no drivers for it either. Then it makes sense to move on to a visual definition of the map model.
You will have to remove the network card from the slot, and enter the data on the manufacturer’s label into a search engine, any one on the Internet.
The network card model can be determined by “Vendor ID” and “Device ID”. Data is entered during BIOS boot. You can use the Everest utility. To do this, install the utility, open a program window and go to the “Device” tab. Next, in the upper right window, expand the “Unknown” tab, which appears with a question mark. You need to click on the sign next to the “Network Controller” line. Then in the lower window you can see the “Hardware ID” and the VEN and DEV values. VEN is a code that identifies the manufacturer. The DEV code is responsible for identifying the device. Using these codes, the program will identify the device and display the information on the monitor.
Determine the network card model by “Device ID” and “Vendor ID”. This data is displayed when loading the BIOS, or you can use the Everest utility. Install the utility, open the program window and go to the “Devices” tab. Expand the “Unknown” tab in the top right window, marked with a question mark. Click on this sign located next to the “Network Controller” line. A “Hardware ID” with VEN and DEV values will appear in the lower window. VEN is the code identifying the manufacturer, and DEV is the device. Using these codes, the program identifies the device and displays information on the monitor.
If there is an urgent need to find out about the model and manufacturer, then you need to use Vendor ID and Device ID to find the website www.Pcidatabase.com. Here you simply enter the received data into the appropriate fields.
It’s easy and simple to look at the receipt or warranty card if the network card is new and already installed in the computer. Provided that the original box from the device is prudently stored. By the way, when purchasing, the sales consultant will remind you not to throw away all your computer packaging for about a year. It's another matter to listen to such advice. As practice shows, it is worth listening. So, having a warranty card, you can always read the full name of both the device model and the manufacturer.
Download the driver using another computer
If the installation disk is lost, you can download the driver through another computer that has access to the Internet. But for this you need to know the exact model of the network adapter. Perhaps you still have the box from the network card, or a warranty card, which may indicate the model. If not, let's try to find out programmatically.
1 way
In the same device manager, right-click on the network card -> Properties -> Information and select “Hardware ID” in the “Property” drop-down menu. Copy the value and enter it into Google. The search engine will find many sites where you can download the appropriate driver for this device.
Method 2
Previously, we wrote about how to check system stability using the Aida64 program. This feature-rich program can show all the devices connected to the motherboard. Launch Aida64 and go to Network -> Windows Network. There you can find out the manufacturer and model of the network card. Download the driver from the Internet.
Installing the driver from the .exe file should not cause any difficulties.
What driver is needed for a network card (Ethernet controller)? Download and Install
On this page we will deal with the driver for the network card of a desktop computer or laptop. In the title I also wrote an Ethernet controller - this is a network adapter. It’s just that in the device manager, as a rule, the network card is displayed as an unknown device called “Ethernet controller”. This is when the driver is not installed on it. I will try to explain in detail how to determine the status of a network card (is it working, is it not, is it necessary to install a driver), then I will show you how to determine which driver is needed for the Ethernet controller specifically in your case, and where to download it.
I don’t often write articles specifically on solving problems with LAN adapters, for the reason that there are practically no problems with these adapters. They often burn, that's all. But as for drivers, Windows 10, Windows 8, and Windows 7 almost always automatically install drivers on the network card. The same cannot be said about the wireless Wi-Fi adapter. But today is not about him.
The Ethernet controller itself is almost always integrated into a laptop or desktop computer’s motherboard. Perhaps your system unit already has a discrete network card that is connected to a PCI slot. And there may also be a USB adapter, something like the TP-LINK UE300, but this is rare. For greater clarity, let's look at the picture:
It doesn't matter which Ethernet controller you have installed. In any case, for it to work, a driver must be installed on it. You can check this in Device Manager.
Immediately open the “Network adapters” . If everything is fine with the network card, then there should be an adapter in the name of which you will see the words “LAN”, “Ethernet adapter”, “PCI. “, “Family Controller”, etc. I have an ASUS laptop, and the “Realtek PCIe GBE Family Controller” adapter.
I think you will immediately understand whether there is a network card there. If it is there (there are no icons near it), and the Internet does not work, then perhaps the problem is not there. And in the cable, for example, or in the router (if you have one). You can see the article: The Internet does not work on the computer via a cable from a Wi-Fi router.
If you don’t see the network card there, then there must be an unknown device (with a yellow exclamation mark). Most likely, it will be called “Ethernet controller”. This is our network card, which does not work due to the lack of a driver. Windows without a driver simply does not know what kind of device it is and how to “communicate” with it.
We just need to install the driver on the network card. Or reinstall it if there is an adapter, but it works with errors or does not work at all.
Which driver should I download for the network card (Ethernet controller)?
We found out that we need to download and install the driver for the Ethernet controller. You probably immediately have a question about what driver is needed and where you can download it. Let's figure it out now.
The most correct way is to look for a driver for your laptop model, motherboard, or the network card itself.
If there is no disk, you will have to look for and download the driver from another computer, or even a mobile device. Then transfer it to the desired computer and install it.
If you have a laptop with a built-in network adapter
Everything is very simple here. First we need to find out the laptop model. It is exactly indicated on the sticker on the bottom of the laptop. Next, we type the laptop model into Google and go to the official website. Or, go to the official website of the manufacturer of your laptop, and through a search on the site we find the page for the model of your laptop. There we already look for the “Drivers”, “Support”, etc. tab, and download LAN Driver. Required for your Windows installation.
Depending on the manufacturer of your laptop, the process itself will differ. Therefore, I cannot give specific instructions. But the procedure will be the same. Since on the website of each manufacturer there is a page for a specific laptop model where you can download all the drivers.
I described this process in more detail in the article on how to install drivers for a Wi-Fi adapter in Windows 7. In this case, everything is exactly the same, only in the end we download the driver not for Wi-Fi, but for the network card. Although, you will most likely have to download and install the driver for the Wi-Fi adapter.
If you have a desktop computer with a network card built into the motherboard, then you need to look for the driver on the motherboard manufacturer’s website for your motherboard model. You probably have a question about how to find out the model of your motherboard. There are many programs, such as AIDA64, or CPU-Z. But this can also be done via the command line.
Open a command line and run the following commands one by one:
wmic baseboard get Manufacturer
wmic baseboard get product
Only the last one is possible. After completing it, you will see the motherboard model.
Next, we search the Internet by motherboard model, go to the developer’s website, in my case it’s MSI, and download the LAN driver. Just remember to select your operating system. There will definitely be such an opportunity.
In this case, first check if there was a driver disk included with the card itself.
If not, then you need to find out the model of the network adapter and download the driver from the official website. The model can usually be viewed on the device itself.
This is a backup case. There is one good site that has helped me out more than once. With its help you can find a driver for almost any unknown device.
First, go to the device manager, right-click on our Ethernet controller (or an unknown device that you think may be a network adapter), and select “Properties”.
Download the first driver from the list. Please note that next to the driver the system for which it is suitable will be indicated. You need a driver for your Windows operating system. There you can select the desired system and system capacity from above. For example, Windows 10.
And on another page:
Download the driver file to your computer. Now we will install it.
Downloading the driver using another PC
If you lose the installation disk, it is recommended to download the software through another device; to do this, you need to know the network adapter model information. This is an affordable solution for updating computer drivers without the Internet.
Error “Local Area Connection Adapter is disabled”: what is it and how to fix it
By downloading the network card driver from the device in the hardware identification section, as done above, you can install it on a computer with a non-working Internet. To do this, you need a flash drive, where you must first transfer it, and then transfer it to the problem PC.
Note! To find out the exact data, you can use the box from the device or a warranty coupon where the card is indicated. If this is not the case, then you need to use the software method.
It is recommended to try turning on the network card if the Internet does not work. To do this you need to follow these steps:
- Launch "Device Manager" as in the previous instructions.
- Find a list with the necessary network equipment.
- Click on the video adapter sign.
If the adapter is working, the word “disable” will appear. If not, then use it.
Installing a driver on a network card in Windows 10, 8, 7
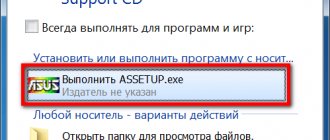
So, we already have the driver. As practice shows, to install you just need to open the downloaded archive, run the setup.exe file, and follow the installation instructions.
If any error appears during the driver installation process, restart your computer and try the installation again. If the driver still does not want to be installed, then try downloading another one. But there shouldn't be any problems.
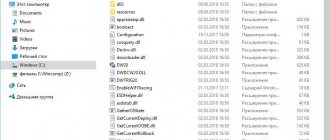
You can try another installation method. First, extract all files from the driver archive. You can go to your desktop.
Next, go to the device manager and right-click on the network card. More precisely, to an unknown device (or Ethernet controller), which in your opinion is a network adapter, and select “Update drivers”.
In the new window, select “Search for drivers on this computer.”
Next, click on the “Browse” button, specify the folder with the drivers and click the “Next” button.
The system itself must find and install the driver. If you specified the folder with the correct drivers.
3DP NET program
There is a wonderful program that can install drivers on a network card without the Internet . This is a utility that contains many drivers specifically for network adapters. And with a 95% probability, the driver for your adapter is also there.
Download the current version of 3DP NET from the Internet in advance. I specifically do not provide a link, because the program is constantly updated, drivers are added for new devices. Launch 3DP NET. The drivers will begin unpacking into the specified folder. Then the program will automatically detect your network adapter and in 1 click you can install the driver. I strongly recommend recording this program on a flash drive so that you can install the driver at any time.